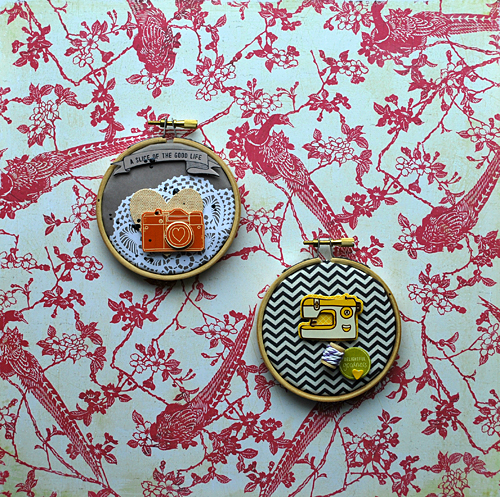
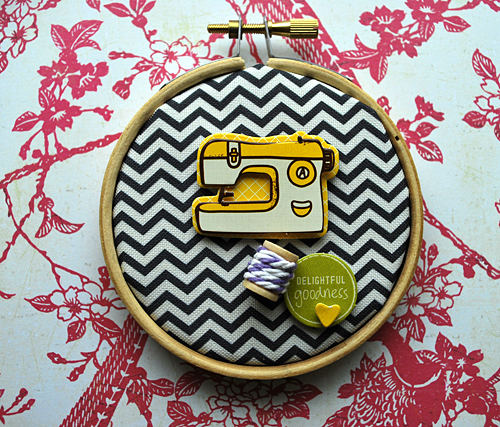
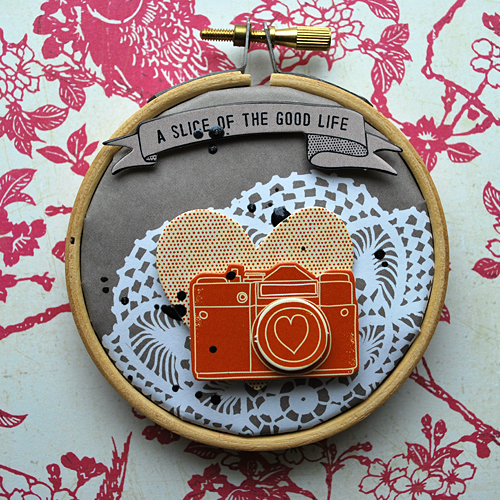
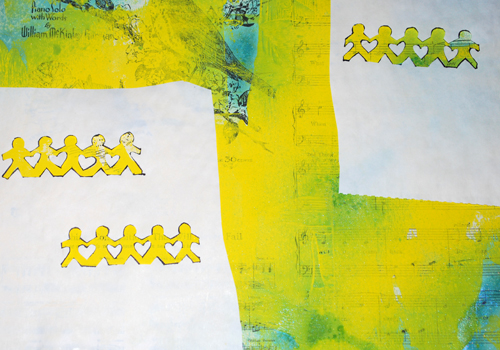
At Cocoa Daisy we had a crop with lot’s of challenges last weekend and one was to be inspired by hoops and do some wall art. Well – the Cocoa Daisy November Kit was perfect for using two hoops that I had laying around for quite some while and I love the simple and quick result :)
I think this might be a great gift for someone ;)
Maybe this inspires you for some fun wall art too :)
haaaa! that is amazing nat! I am soo into embroidery hoops, so far i’ve only been using them the other way round (for mobiles), but i have things on my list for using them as wall decor… and it never occurred to me to stick on scrapbooking embellishments. very cool!
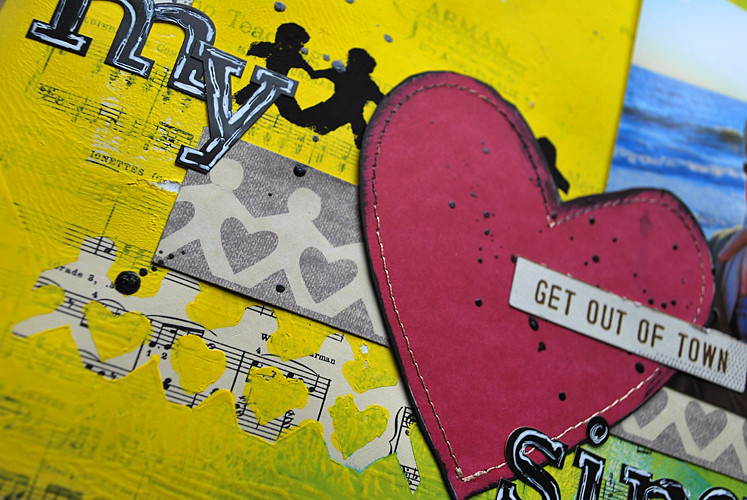
This weekend we had a crop at Cocoa Daisy and I showed three ways on how to do your own Silk Screens and I wanted to share those with you too :)
Silk Screening is such a wonderful craft – I love the look of it- the crafty selfmade look on fabric. When I see home decor or clothing created with silk screening I get instantly drawn to it. I have thought of a couple things on how to incoporate silk screening into my paper art and I thought I would share three techniques with you today, because you can do it too and you can make your own screens.
Let’s start with an easy technique – I call it
FAUX SCREEN PRINTING
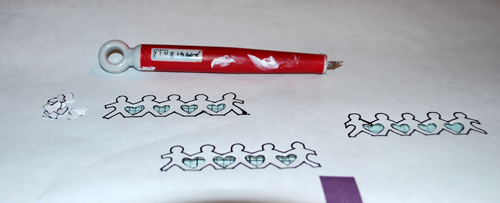
One of the things that are so intriguing with the silk screening is the texture of fabric and the imperfection and we…can fake it just with some shapes and our amazing Cocoa Daisy stamps
Supplies:
Shape – DieCut – Star, Circle etc.
Scrapbooking Paper from your Cocoa Daisy Kit
Non-Permanent double -sided Tape- for example MyStik Non Permanent by Scrapbook Adhesives by 3L
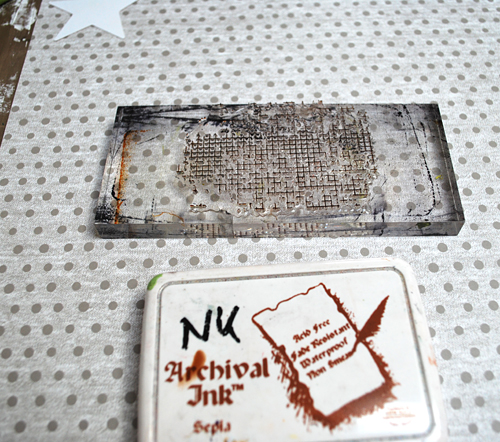
Cocoa Daisy Background Stamp – for example November Kit
Ink Pad- for example Distress Ink or Maya Road Ink pad from October Kit
Archival Ink
Step by Step:
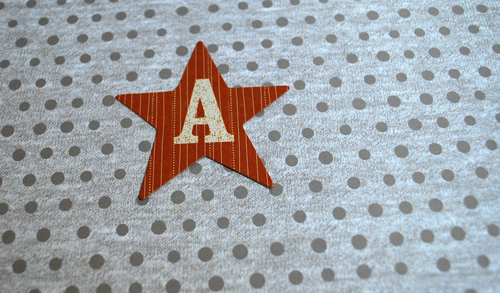
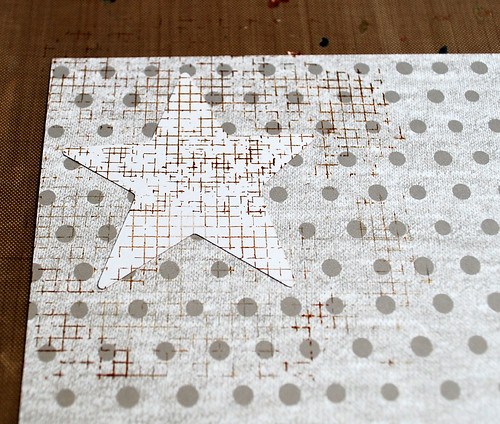
Take a piece of Scrapbooking Paper- here from the wonderful November Kit and a Die Cut Shape.
Take the Cocoa Daisy Stamp and Archival Ink (permanent)
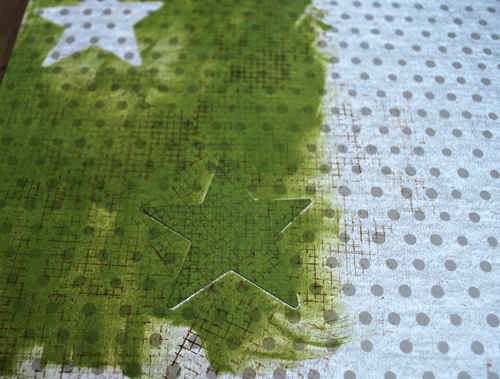
Apply some non permant tape onto the shape- here the star and put it down onto the paper. Stamp over with the stamp
Go over with an ink pad -for example the Maya Road Ink Pad that was included in the October Kit.
Take off the shape- if you have more then one then you can just use them all in one setting- but with one this is the way to go. Repeat all steps. It doesn’t matter if you stamp first or ink first.
You can even use the shape you used- either with the treated side or the side you inked and stamped on as an embellishment
next up is a technique that is often used on making you own T-Shirts
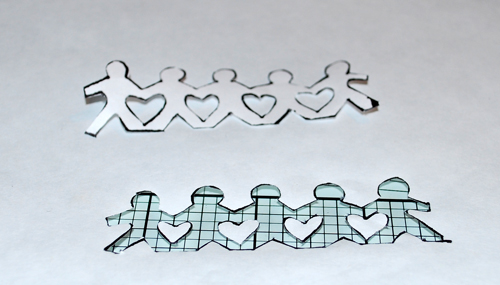
FREEZER PAPER SCREEN PRINTING
Supplies:
Freezer Paper
Scissor
Cutting Tool
Cutting Mat
Iron
Brayer and/or Brush
Acrylic Paint
Scrapbooking Paper- for example the wonderful Amy Tan American Crafts Paper in the November Kit
Step by Step:
Take a paper and put some Freezer paper on top – shiny side onto the paper and the paper side up – and trace the pattern – or just make your own pattern if you want.
Place the Freezer paper now on a cutting mat and start cutting out the patterns. Keep the insides- here the hearts- you can use them
you actually have two patters after you are done- that you can use
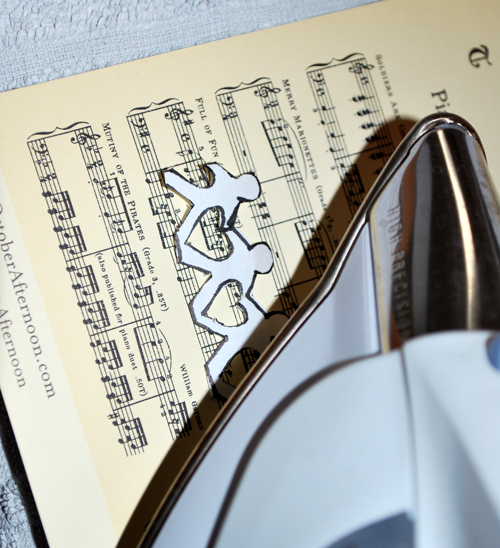
Now you can iron on the first cut out piece stencil onto the Scrapbooking Paper
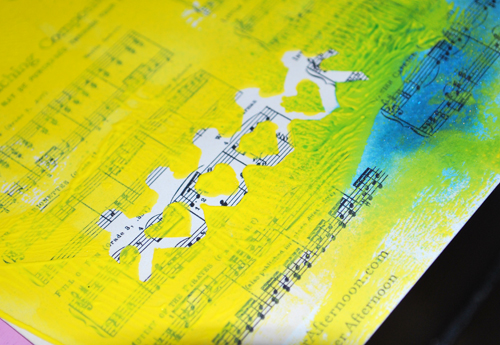
You can now either brayer some acrylic paint over the stencil or just dab some acrylic paint around. Let dry
Peel off the stencil and voila
Let’s take it up a notch and put the other mask on top and iron it – you will need also the little cut out middle pieces- in this case the hearts
dab over acrylic paint, let dry and lift the freezer paper – and voila you have the reverse print of the one before
It is so much fun to incorporate this technique with the actual paper you traced as you can see here- it ties the design together by repeating the pattern:
And last but not least I throw in a video about a technique that I have shown long time ago – so for those of you who want to get even a bit more adventureous – you can do this too
SCREEN PRINTING
Materials and tools you’ll need:
• A surface to work on–cardboard or canvas
• Paint brush
• An embroidery hoop (You can get this at most craft supply stores, but you might also
get a cheap one at one of the kid’s toy stores.)
• Acrylic paint
• A gel medium or fluid mask gel
• Sheer curtain material, such as a tulle or old silk pieces,
• An image, either a print-out or hand drawn
here is the video, which is a bit goofy and was for a competition in 2008 – so I changed a bit….not in the goofiness though- LOL:
I hope this gives you some ideas on how to incorporate some easy Silk Printing in your art work – I would love to see your projects if you try one of these techniques
Hi Nathalie! I’m so happy to be back to visit your site, after several months of easing into full-time work again; I haven’t had the time I used to, to check out the great sites belonging to my blogging buddies.:-(
At any rate, thanks so much for sharing these great techniques! I’ve started exoerimenting with masking lately (when I actually have the time to create art), and your freezer paper process is one I definitely need to add to my repertoire!
Wow!!!!!!!!!!!!Those are stunning yechniques I just love to learn news technique!!!!
I love the way you mix so different styles.
Thanks so muvh for sharing.You inspired a lot.
Kisses and huges from Brazil
Cynthia
Awesome ideas… although, for technique #2 freezer paper is required… I don’t know if it’s easy to find in Germany… in Spain (and I’m guessing in most european countries too) not so much! I’m a quilter (freezer paper is largely used in quilting), and have friends in the US, where those rolls are so inexpensive (here, when you can find the paper, in a quilting store, of course, it’s usually sold by the sheet or by the meter and is quite pricey), but I’ve learned from Spanish friends that you can substitute freezer paper for the paper that covers the printer/copy paper stacks: the inside would be the “tacky” side you iron face down. I’m not sure I’m being very clear here, but I just wanted to share this idea for those of us who don’t have access to freezer paper (if they have access to a computer, they probably also own a printer and the paper used in it, or even work in an office where those papers are just thrown away – and where paper stacks are used much faster that at home!)
Thanks for sharing those techniques with us… I think I’ll try them this week
Information about some workshops in Hamburg in German – if you speak english and want to come- contact me :)
Es gibt noch ein paar wenige Plätze für die Hamburg Workshops am 3.12.2011 bei mir :)
Workshopday bei Nathalie Kalbach The Raw Me – Tattered Angels – Pink Paislee Minialbum Workshop – 10- 13 Uhr
Es ist schon etwas besonderes an diesem derben, nicht perfekten aber doch schönen Drillichstoff. Ein passendes Material für dieses Minialbum “The Raw Me” (Ich – ganz ungeschminkt).
Genau wie Jeansstoff sind wir manchmal rauh, nicht ganz perfekt aber doch immer noch ganz schön – Zeit das einmal festzuhalten in diesem speziellen Buch.
In diesem Tattered Angels- Pink Paislee Workshop lernst Du ein wunderschönes und einzigartiges Cover mit handgemachten Embellishments und einer Menge Techniken zu kreieren. All die erlernten Techniken kannst Du auch in zukünftigen Projekten anwenden.
Komm und mach mit und kreiere ein aussagekräftiges, schönes Buch über das alltägliche ICH.
Kosten bei Buchung NUR dieses Workshops: 36 EUR
Bold About US- Prima Leinwand Workshop 14-17 Uhr
In diesem Prima Workshop mit Nathalie Kalbach wirst Du eine maskuline aber doch romantische Leinwand mit wunderschönen und besonderen Prima Materialien kreieren.
Du wirst mit verschiedenen Medien arbeiten, die gut mit Prima harmonieren. Du wirst Textur und Dimension erarbeiten, die Deine Leinwand zu einem besonderen Hingucker werden lassen. Verschiedene Techniken, das Arbeiten mit Sprühfarben und anderen Farben werden Inhalt des Workshops sein und auch für spätere Projekte sicherlich angewandt werden. Einige handgemachte Embellishments sind dann noch das Highlight und Du kannst Deine eigenen Farben auswählen.
Mach mit in Natahalie Kalbachs witzigem Workshop.
Kosten bei Buchung NUR dieses Workshops: 36 EUR
Bei Buchung beider Workshops insgesamt 62 EUR statt 72 EUR
Bei Interesse bitte unter nathalie.kalbach(bitte computer @ Zeichen einsetzen)gmail.com anmelden. Die Bankdaten werde ich Euch dann weiterleiten :)
Don’t laugh at me ….this layout was something I was smiling while doing it, tongue in cheak included and photoless.
I totally love the wonderful images on the Vintage Street Market Family Paper Pack especially for a while now I have a nack for 50s clothing and last CHA you could have seen me wearing a nice 50s Sailor dress (and I have a new style dress for the coming CHA ;) ) . I love 50s furniture too.
But there is one thing that I really don’t wish back….the way how a women’s path was determined back then. I think we are very fortunate today that the way how women are treated and the possibilties that women have nowadays have changed so much. Although….a bit of gentlemen attitude by men could definetly come back (DUDE you could help get my suitcase up in the baggage net in the train…and NO you do not have to let the door crash into my face and YES…even though I act as if I do not want you to treat me special because I’m a woman…I love it – keep going- hahahha) – LOL.
Good thing my hubs is a true gentleman – he laughs about my attempts in doing as if I don’t care- so if you read it ….here you go…truth out!
A little Memo- on – yes I like it clean – but no – I’m not a Hausfrau :)
I used my new yum yum Tonic Studios Border Punches with the Papers and also with my all time favorite metallic paper sheet from the Dimestore Vogue Kit.
Although I call myself a domestic goddess I really am not a hausfrau (at least I don’t think so). I do like the 1950’s postcard-type items that have the “traditional” woman on them with a modern day quote. One of my favorites is the woman in bed with a smile on her face and saying “I dreamed my whole house was clean”.
Hi Nat, ich verfolge schon seit einiger Zeit deinen Blog und jetzt musste ich doch “laut schmunzeln” und mich mal melden :-) Ich komme gerade ins philosophieren und ins grüben wer bei uns die typische Hausfrau ist… das wechselt eigentlich zwischen meinem Mann und mir. Ha ha. Ich mag Dein Layout, das ist so wunderbar nostalgisch!
Hi Nat, i love your LO! It´s so clean! ;-) I like the clothes from the 50s! I´m not a Hausfrau, too. Even if it is a part of my roles in my life.
Wish you a tidy day ;-)
Hugs
It is this time of the year again: We will have the Secret Santa Ornament Swap and it is the 5th Year Anniversary- WOOOWW- I can’t believe it.
If you would like to create one cute little ornament for someone please email me till next Tuesday November 15 at nathalie.kalbach(at)gmail.com. Grab the logo, link to my blog and tell that you play along and spread the word.
Due to organization everyone who wants to play along has to be willing to ship internationally. Email me your address. I will email you your happy recipent by the 19th of November. You have to commit to send out the ornament the latest by December 1st! If you think you can’t keep up with this deadline, please do not play along – I don’t want any sad faces here!!! One year one person did not receive her ornament – but it was sent out. It is always a risc here -but I can’t take responsibility. We can only trust each other and trust the mail system. Send me a picture of your ornament by December 1st. After December 15th I will show all the ornaments on my blog
Es ist wieder so weit! Auch dieses Jahr gibt es eine Auflage des Geheimen Weihnachtsbaumanhänger Wichtelns, die 5. Auflage.
Wenn Ihr also Lust habt einen Anhänger zu basteln und diesen an jemanden weiterzuschicken, dann meldet Euch bis Dienstag, den 15. November bei mir per Email bis Sonntag: nathalie.kalbach(at)gmail.com. Schnappt Euch das Logo für Euren Blog, linkt meinen Blog und verteilt die Kunde :)
Aus Organisationsgründen kann ich dieses Jahr nur Leute annehmen, die auch International versenden würden (die meisten wollten das sowieso und es ist schwierig alle gerecht zu verteilen, wenn es nur im eigenen Land versandt werden möchte) Schreibt mir Eure Adresse. Ich emaile Euch dann zum 19.November den Namen Eures Empfängers! Der Anhänger muss bis zum 01. Dezember versandt worden sein! Wenn Ihr diesen Termin nicht einhalten könnt, dann meldet Euch bitte bitte nicht an, ich möchte niemanden enttäuscht sehen! Vorletztes Jahr gab es eine Person, die ihren Anhänger nicht erhalten hat, aber rausgeschickt wurde er. Es gibt immer ein Risiko- aber die Verantwortung kann ich hierfür nicht übernehmen. Wir können uns nur gegenseitig vertrauen und das gilt auch für das Versandsystem. Schickt mir von Eurem Anhänger bis 01. Dezember ein Bild. Ab dem 15. Dezember zeige ich dann alle Anhänger
Last year we had 22 participants and you can see all the awesome and different ornaments here – it’s a lot of fun.
Letztes Jahr haben 22 Leute mitgemacht und Ihr könnt all die grandiosen und unterschiedlichen Anhänger hier sehen – es hat so viel Spaß gemacht!
Tanja- ich habe Dir mehrfach zurückgemailt wegen Deiner Adresse! Bitte emaile mir Deine Adresse sonst kann ich nichts machen. Ich brauche sie bis nunmehr morgen! nat
Cocoa Daisy crops always provides you with a ton of challenges, prizes, and most importantly laughter & camaraderie with people who “get this scrappy thing” you do. You do not have to use Cocoa Daisy kits or even be a subscriber to play along. We welcome everyone. You just have to be registered on the Message Boards, especially if you want to participate in the chats.
There is a HOW TO PLAY posted on the Message boards. Don’t forget to add your songs to the PLAYLIST. You can play music while you chat & have fun. The SCHEDULE is in Eastern (New York, Toronto) but you can easily convert time zones HERE. Got more questions? Post them to the MB post here and we will be happy to help.
Cannot wait to see you on the boards for this awesome inspiring event November 11-13!
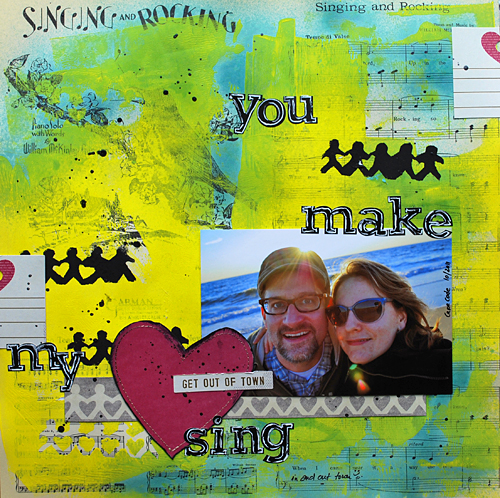
Traveling is something I really love – well you know that huh? One of my favorite trips was going to Yellowstone last year – Soooo beautiful there! And here we go a layout about the beauty of the nature using the Vintage Street Market Family Fun Kit.
Reisen ist ja etwas was ich liebe, das wisst Ihr aber ja schon, ne? Eine meiner Lieblingsreisen war Yellowstone letztes Jahr – soooo schön dort! Und daher nun ein Layout über die Schönheit der Natur mit dem Vintage Street Market Family Fun Kit.
Beauty
I used some Tattered Angels Glimmer Mist Colors to change the background color and then used a Crafter’s Workshop Template with Modeling Paste and sprayed again. I flicked some Glimmer Glaze on top.
Für den Hintergrund habe ich Tattered Angels Glimmer Mist verwendet und ein Crafter’s Workshop Template mit Modeling Paste und habe es erneut besprüht. Und natürlich dürfen ein paar Glimmer Glaze Tropfen nicht fehlen.
Supplies: Vintage STreet Market Family Fun Papers, Tattered Angels Glimmer Mist and Glimmer Glaze, Lascaux Modeling Paste, Canvas Corp Twine and Cork, PanPastels, Faber Castell Journeling Pen, Scrapbook Adhesives by 3L Crafty Power Tape and 3D Foam Pads
I love how versatile the papers are and that you can also use them in a more grungy than vintagey approach :)
Diese Papiere sind wirklich vielseitig und man muss sie nicht nur für Vintage-Layouts verwenden.
Are you scrapbooking photos about a landscape only also or do you always scrap photos that have people in it?
Scrappt Ihr eigentlich auch nur-Landschaftsphotos oder verwendet Ihr nur Photos wo auch Menschen zu sehen sind?
Have a wonderful day – Euch einen wunderschönen Tag
Amazing work!. Your style has evolved into a unique and totally Nat mix of wonderfulness! Congratulations on all that you have achieved, I am so proud of you!
The texture is unbelievable here!! LOVE! I do both landscape and people, although I haven’t done one in quite a while. Hubby and I love to hike, so we take a lot of landscape pics :)
Thank you to all of you who joined me from all over the world (Germany, Singapore, USA, France, Spain, Greece, The Netherlands etc.) yesterday in the Tattered TV Show – even some people joined me two times- since due to some confusion with the winter time :) Europe already changed the clocks last weekend while in America you do it next weekend, so we had all the times wrong in our newsletter. But hey…LOL…good thing I’m flexible ;)
If you missed the show- don’t worry- I recorded it – and you actually get the first version – clean hands and clean surface in the beginning included.
I showed how you can use Chalkboard as a stamping medium and also some different ways on how to use all four of the Tattered Angels Paint Glimmer Mist, Chalkboard, Glimmer Glaze and Glimmer Glam and did show how you can use the different specifics of those products and make it work for different techniques and how you can mix them too.
Nat..I just love to whatch your video tutorial, but I coud´t leave a comment in there, so I will tell you…I just love and Thanks for sharing with us !!!!
I love to see all the details.
Kisses and huges from Brazil
Cynthia
I only managed to watch parts of the show because of Tuva, but it was so fun seeing you work in a live show like that! I’m going to check that PDF out!
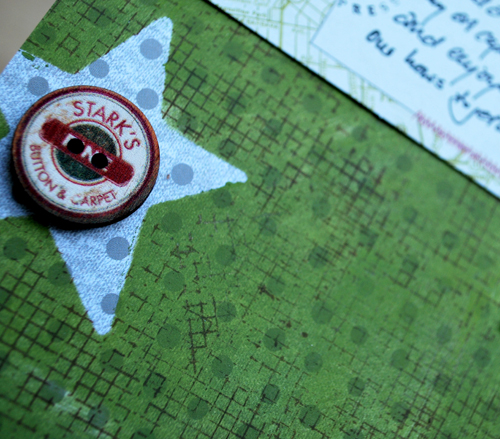
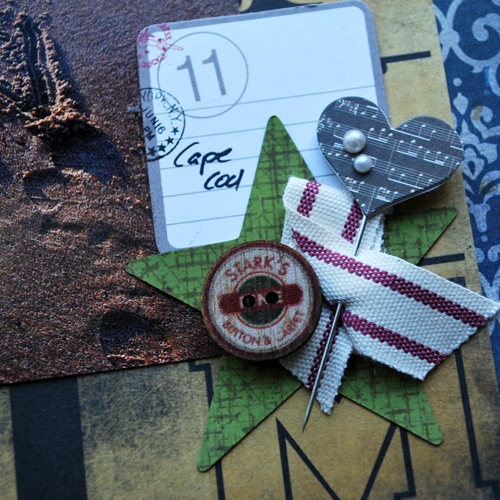
The new Cocoa Daisy November Kit: Bed & Breakfast is out and it is gorgeous!
Das neue Cocoa Daisy November Kit: Bed & Breakfast ist da und es ist wunderschön!
I love it and I can’t wait to fully reveal my layouts with the Fall Crop with lot’s of fun tutorials and challenges on November Friday 11-13.
Ich find es total schön und ich kann es kaum abwarten, bis ich beim Herbst Online Crop vom 11.-13.November mit vielen Anleitungen und Challenges meine Layouts zeigen kann.
Here are some sneaks of what I created with the kit so far:
Hier sind ein paar Sneaks von dem was ich bislang so kreiert habe:
Join Nathalie Kalbach as she creates a colorful unique fall layout! She will show you how to use all four Tattered Angels paint mediums in different but easy ways using them along with the perfectly fitting Mistables Line by Pink Paislee and some gorgeous products by Stampendous. You will learn different techiniques with the same products and the über-fun and German accent is guaranteed. Come and meet her on TatteredTV: Educator Style!
Just a quick Reminder that my FREE Tattered TV Class on U-Stream is tomorrow . You can see the materials I will use here. If you miss it you can still watch it recorded later :)
Nur eine kleine Erinnerung, dass morgen mein Kostenloser Tattered TV Workshop auf U-Stream morgen stattfindet (20.00 Uhr). Eine Materialliste gibt es hier . Falls Ihr es verpasst, könnt Ihr es später auch aufgezeichnet anschauen.
If you want to check out which time this airs live in your timezone- here is a little form:
Nat…I got my prize today in the mail :) LOVE…LOVE…LOVE! The Glimmer Glass will be put to work…along with the beautiful Santa Baby,Patina, Glimmer Mist, Cornflower5 and Banana Pudding Glimmer Chalk, Royal Velvet Glimmer Glam, Chianti Glimmer Glaze..AND…all the Scrapbook ADHESIVES STUFF!!! woo-hooooo and thank you!
Can’t wait to get my kit this month. This is the best kit club that I have ever belonged to and I just love to see what you will do with the supplies each month Nat.


Comments (3)
Kim S
| #
What a great idea – I want to do something like that now.
Fabulous stuff!
Reply
Sue Clarke
| #
Love those! I don’t use embroidery hoops but I love the idea of making a mobile (thanks Sylvia).
Reply
sylvia
| #
haaaa! that is amazing nat! I am soo into embroidery hoops, so far i’ve only been using them the other way round (for mobiles), but i have things on my list for using them as wall decor… and it never occurred to me to stick on scrapbooking embellishments. very cool!
Reply