Creative Squad

Rise & Shine – Nicole Watson

Hello from my Creative Squad! Today we have a colorful suite of cards and a video from Nicole Watson. Check out her process below using my new Mini Motifs and Triangle Love stamp sets and this month’s theme: Rise & Shine – Sometimes it is inspiring to think of each new day as an opportunity to do something good – to shine. Create something that will encourage others to do the same and let’s all bring a little more light into this world!


If you’re like me, you’ve probably spent some extra time during these stay at home days browsing Instagram and admiring all the creativity that is flowing from so many artists. Maybe, much like me, that creativity just isn’t flowing for you. It’s ok! You’re not alone!

Honestly, I struggled a bit with the theme this month. Sometimes it’s hard to shine and encourage others when you are feeling a bit blah yourself. Last month I shared that I’ve been focusing my time outside and in our garden planting flowers. This has brought me so much joy! The simplicity of planting flowers, caring for them, and watching them flourish has helped me cope with staying home (except for my trips to explore local nurseries and for groceries!).

I’ve noticed I’m not alone in the need to DO something creative and with one’s hands! While some are creating art, others are baking or gardening and yet others are returning to pen pals and sending snail mail. I wanted to send some mail to brighten some days this last week and realized my blank card stash was getting low… and that’s when this project came together!

Watch my video:

Here’s how:

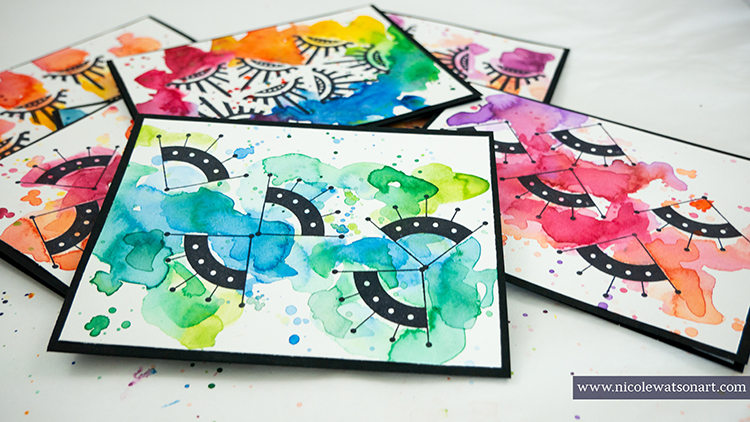
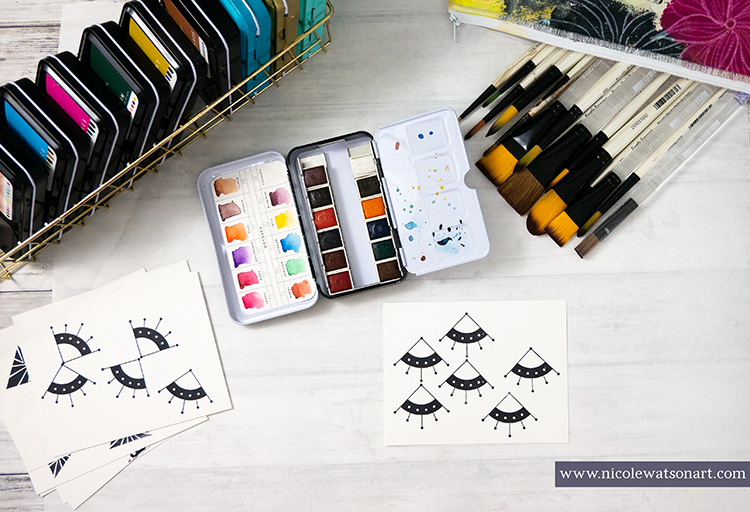
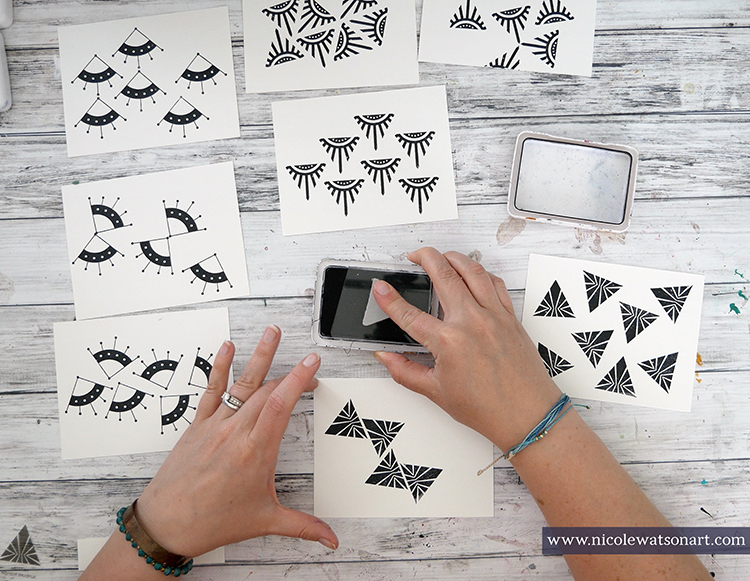
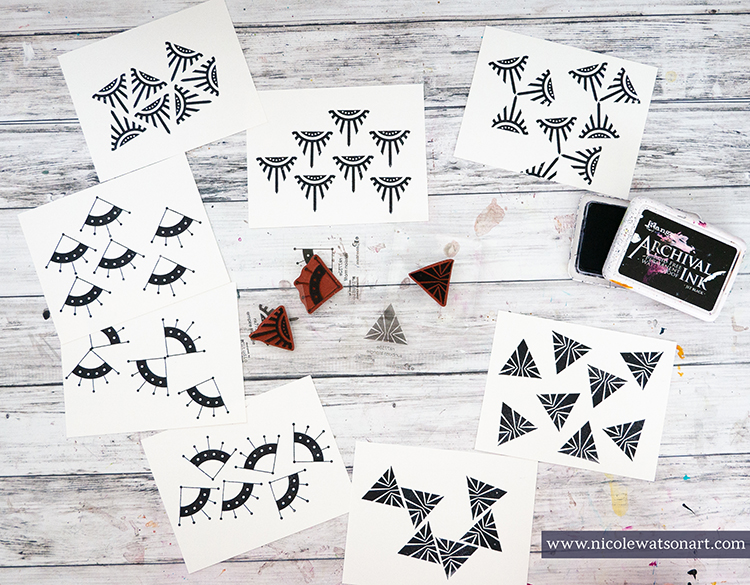
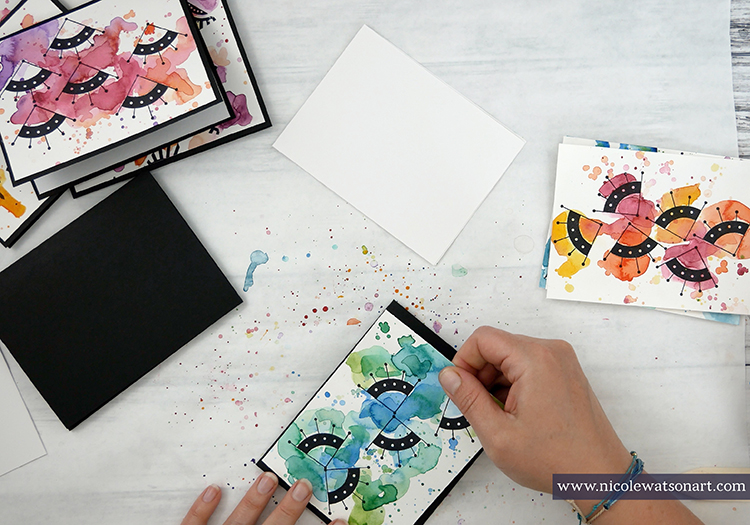
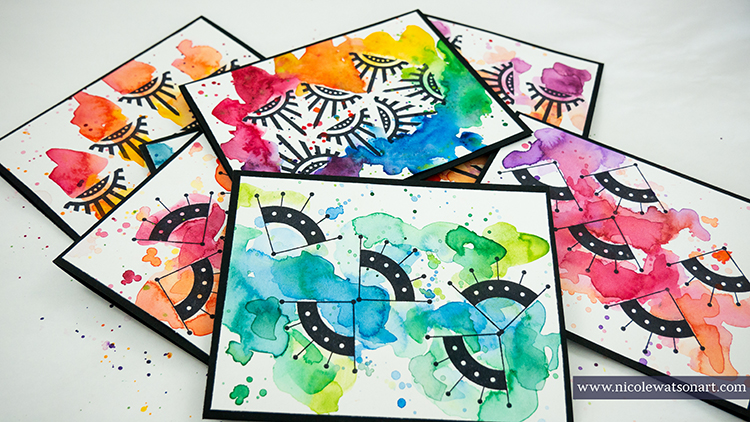
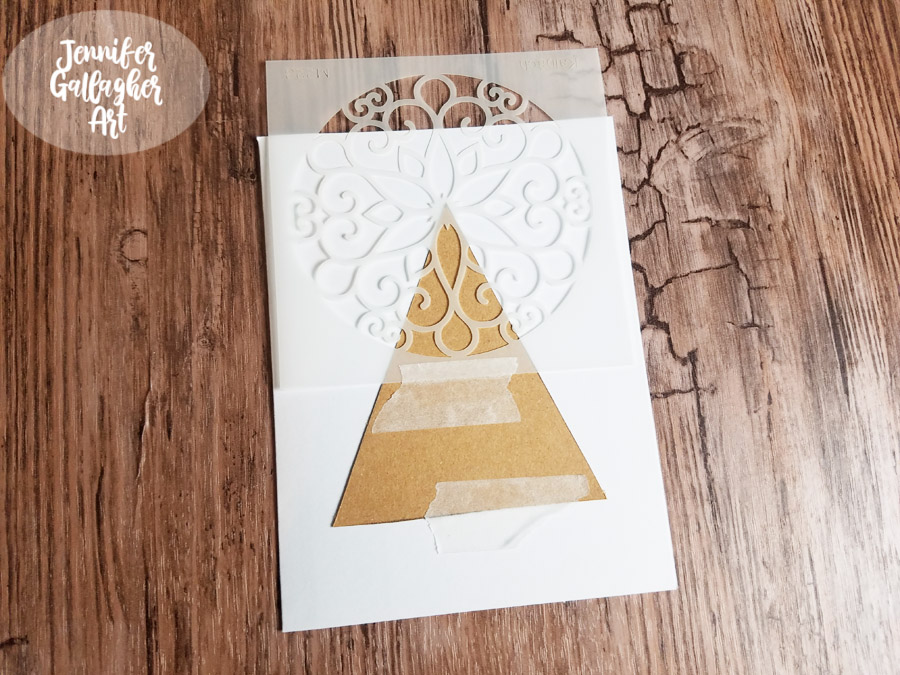
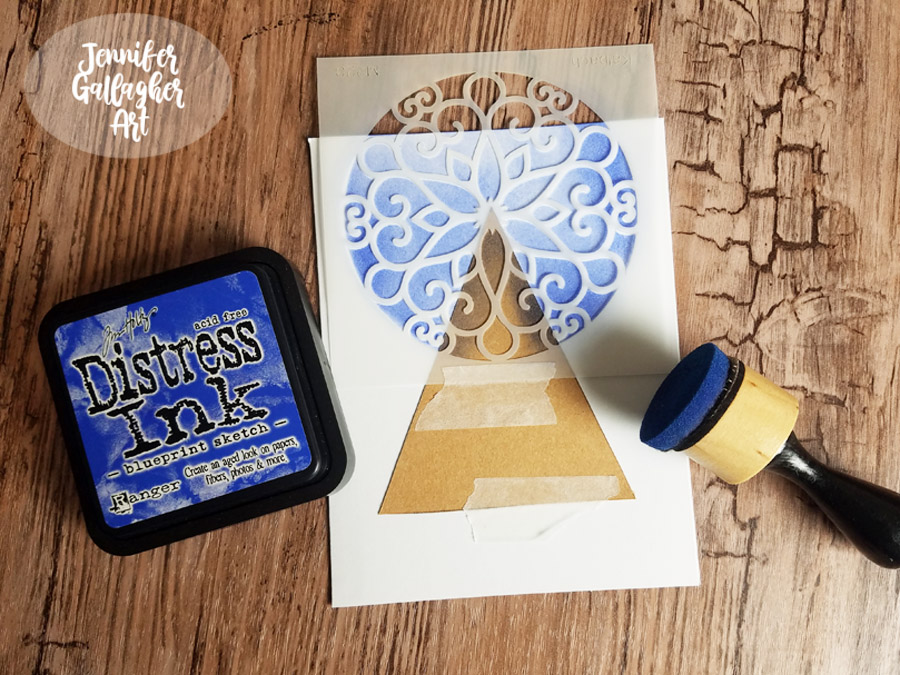
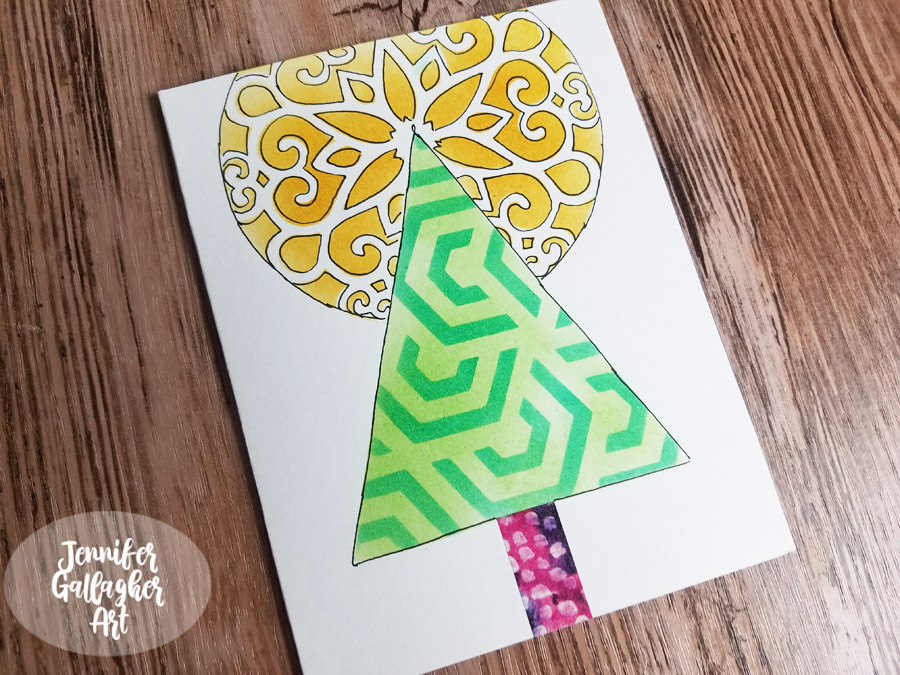
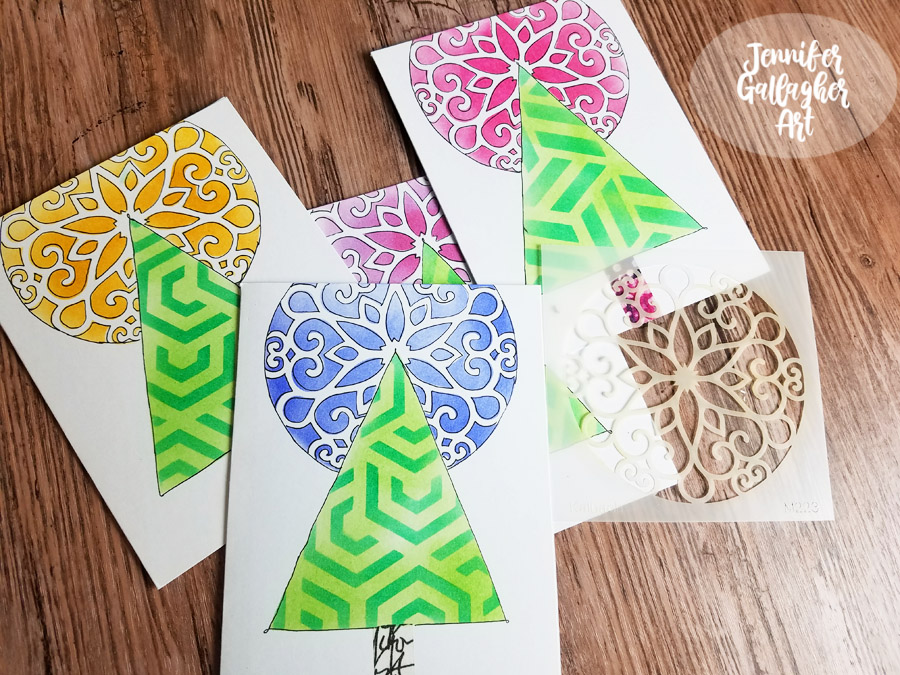
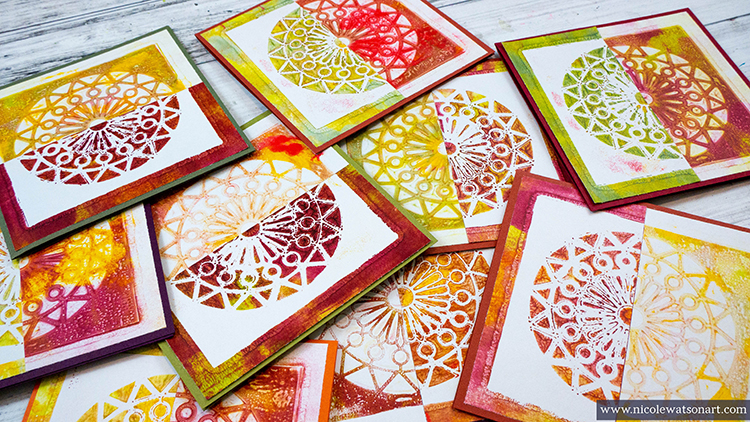
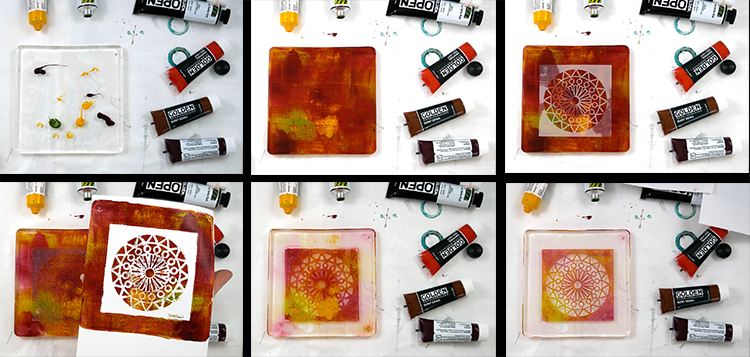
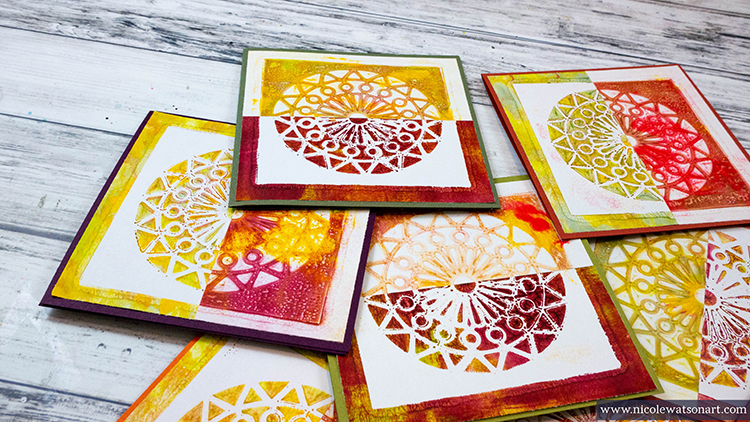
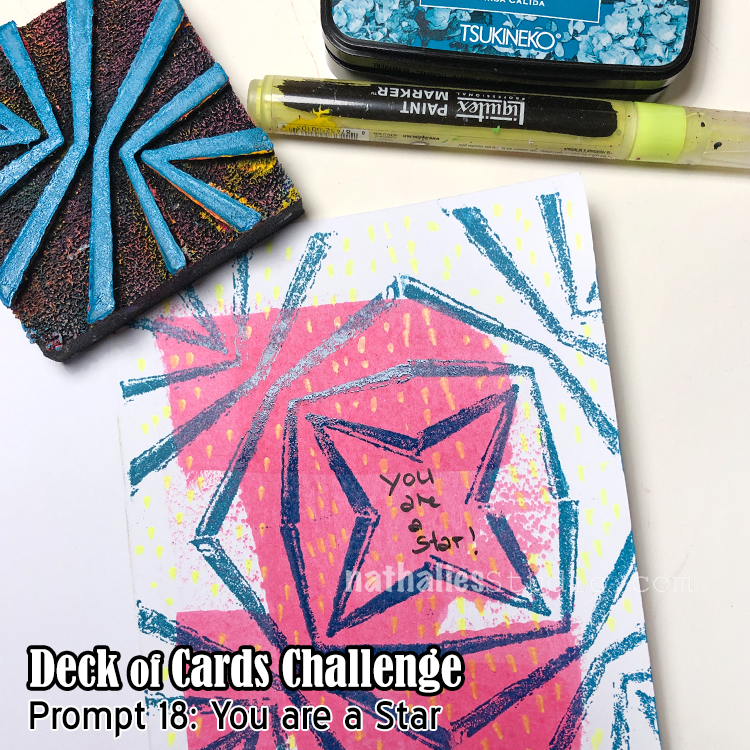
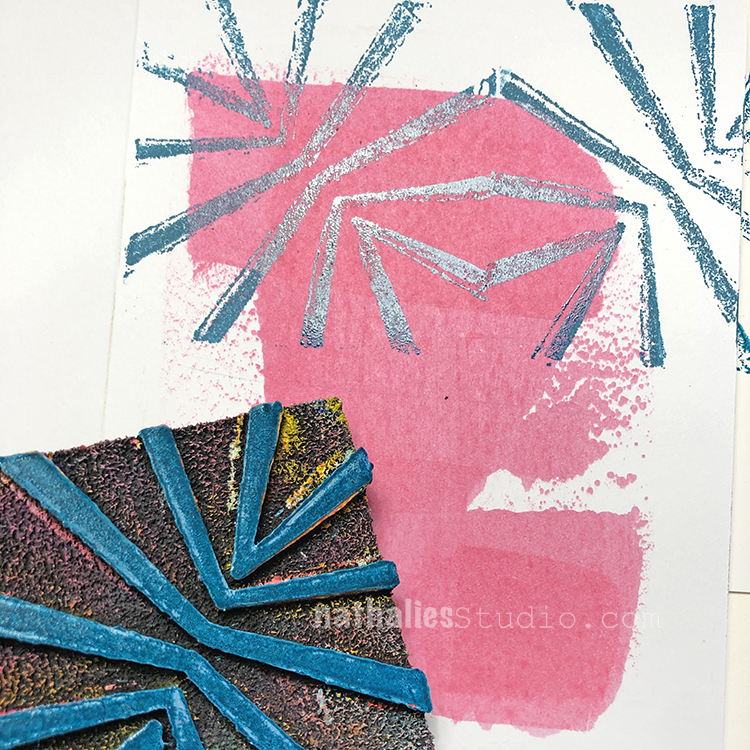
Grab some hot press watercolor paper and stamp on it with Nat’s Mini Motifs and Triangle Love stamps using black archival ink. Have fun! 

I enjoyed this process of creative stamping, all wonky, not perfect. Archival ink is important as it will not bleed or run with the watercolor in the next step. 

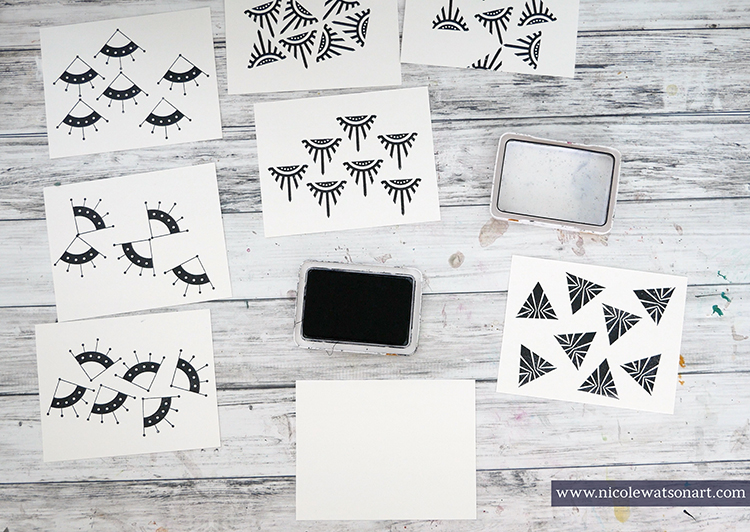
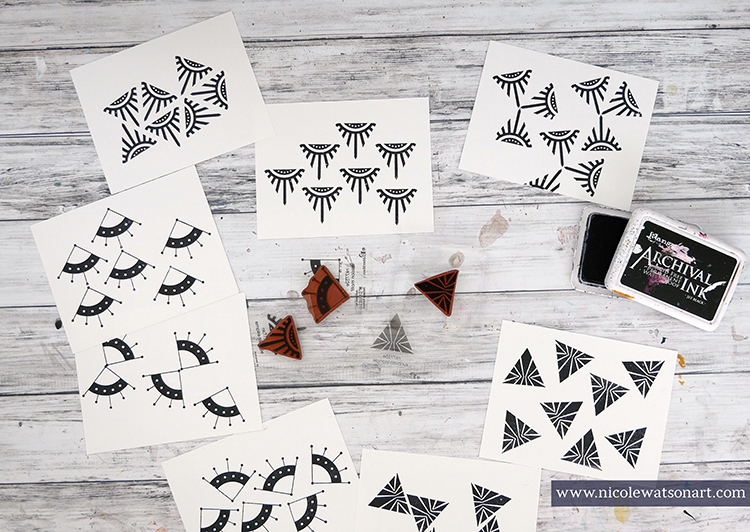
And, hot press paper is smoother for stamping. You can use cold press, but your stamped images will not turn out as clear (Note: I pre-cut my watercolor paper into card fronts (4.25×5.5) and will trim them down again to mount on the cards.)

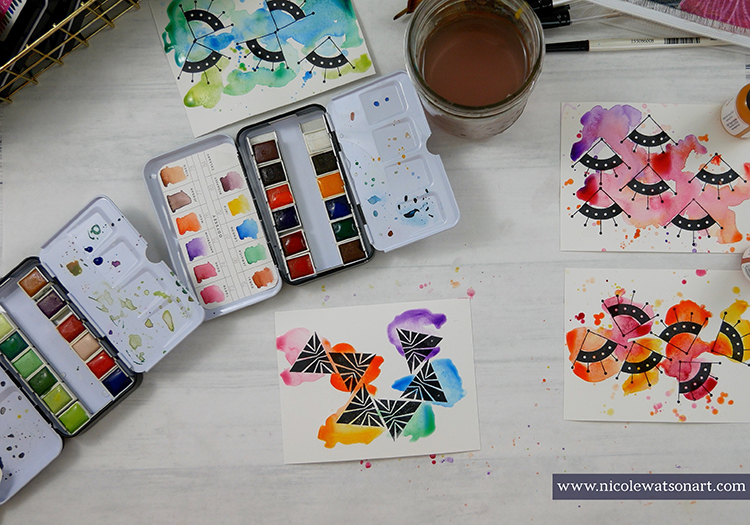
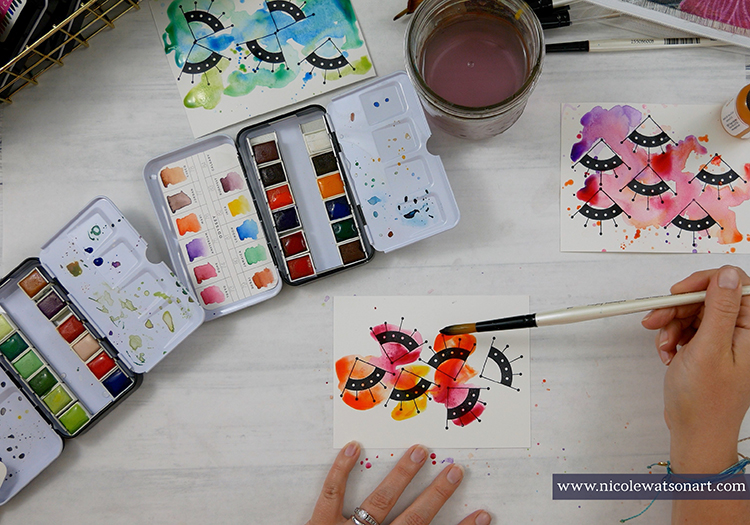
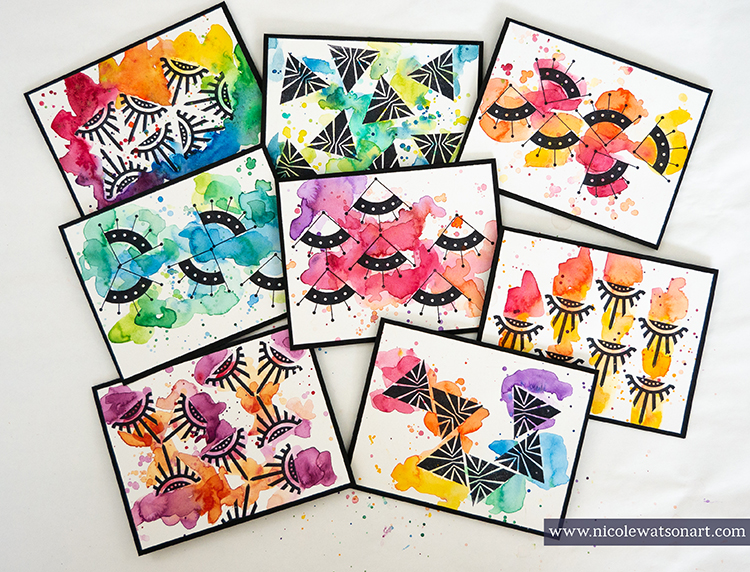
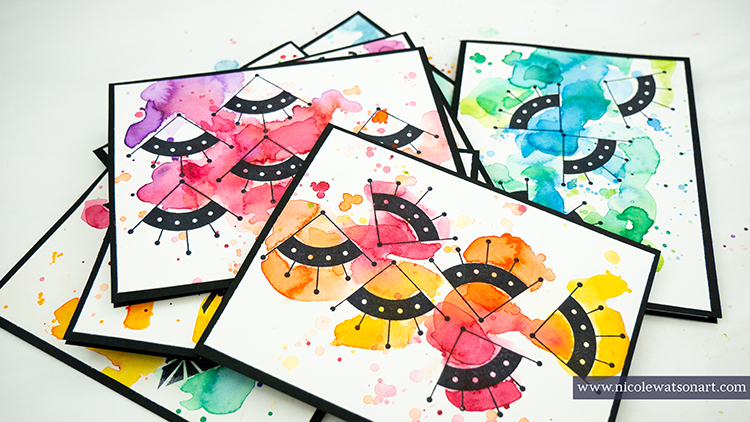
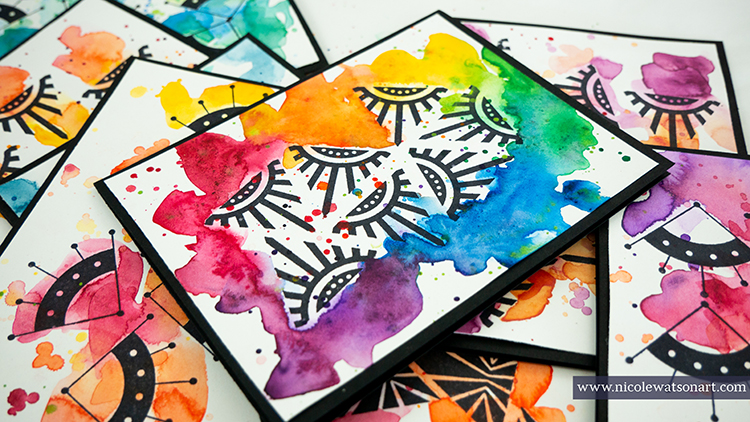
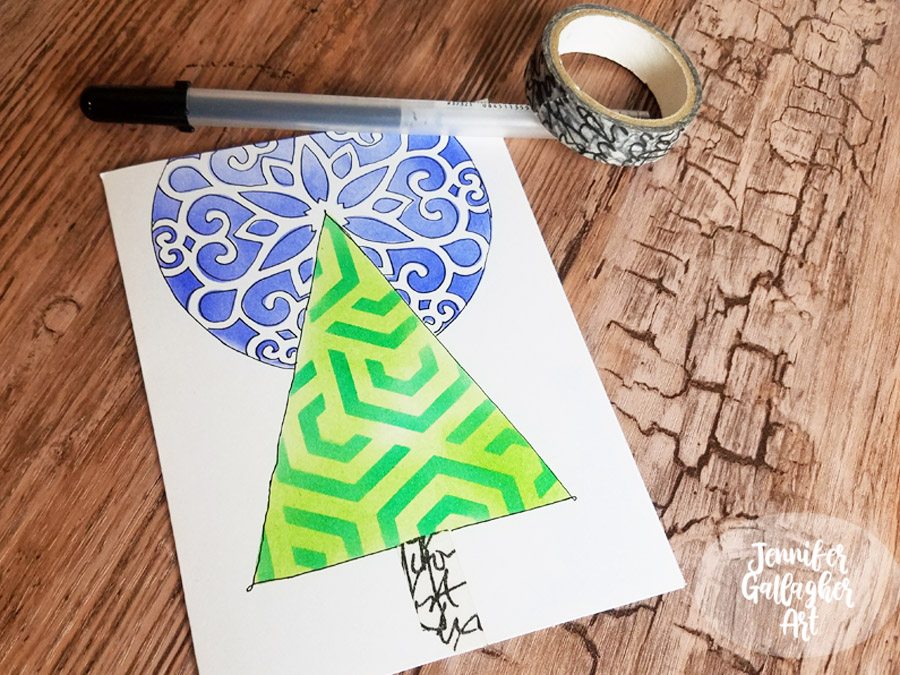
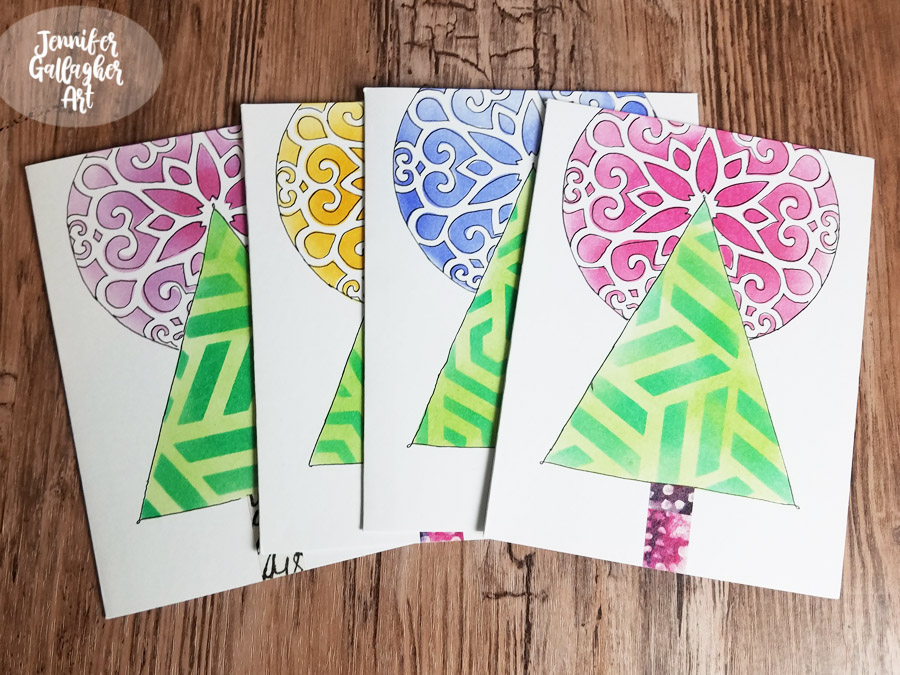
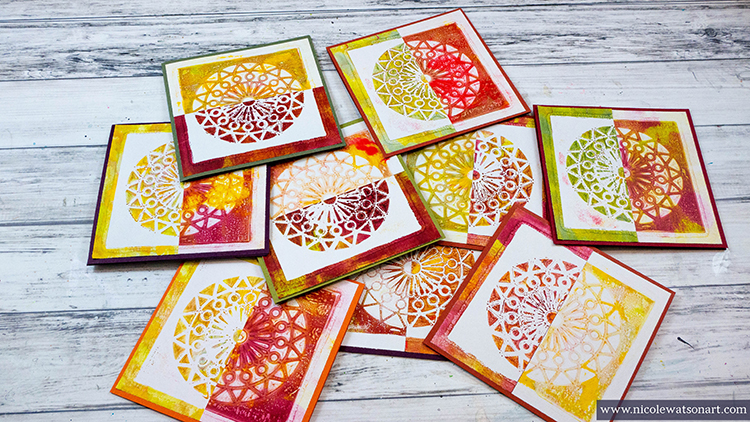
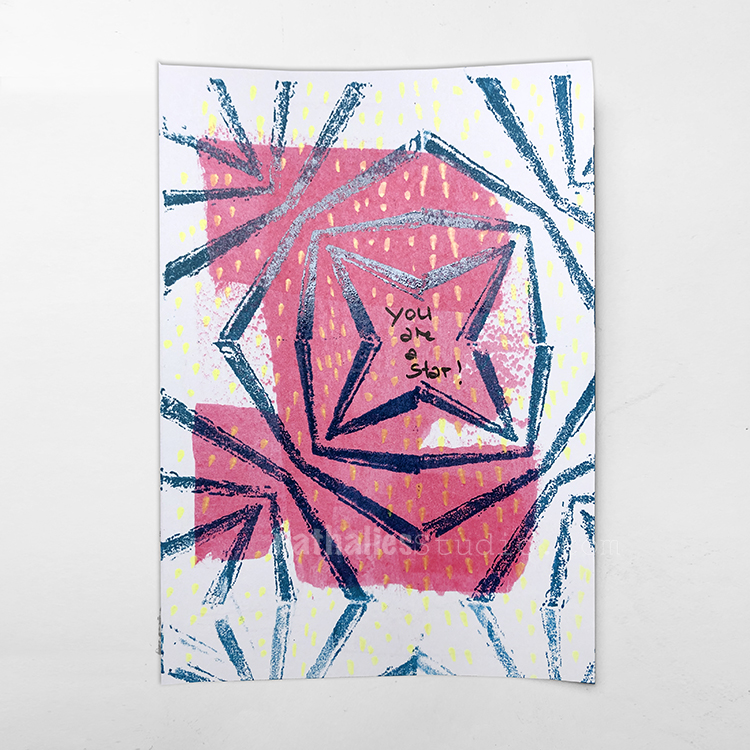
Let the ink thoroughly dry and then watercolor. Again, have fun! The only thing to keep in mind while you are water coloring is how colors blend. I stayed with palettes of warm colors or cool colors and then also a couple full rainbow palettes. Add some splatters and lots of puddles of color around the stamped images. 

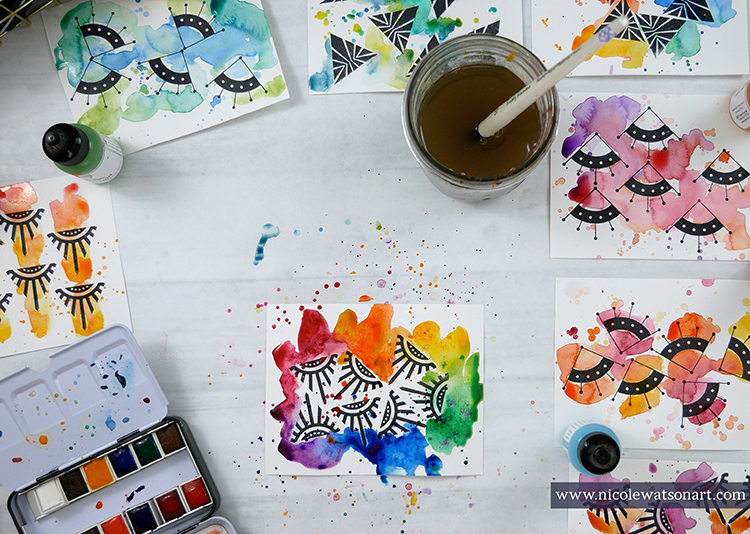
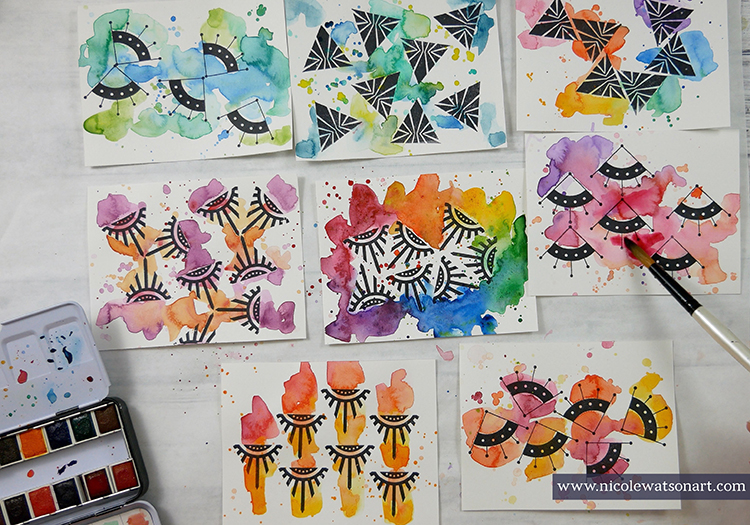
Let your fronts dry completely. Once they are dry, if there are areas that didn’t turn out dark enough or exactly how you’d like, go ahead and add some more color and splatters. And, of course, let dry.

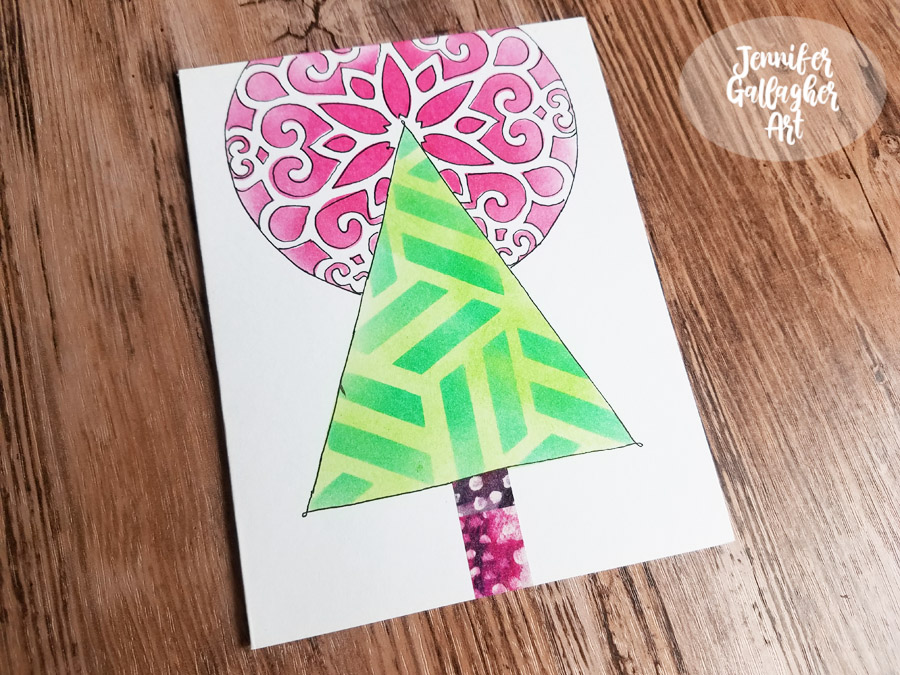
The next step is personal preference. I like to spray my watercolor cards with a clear matte varnish to protect them in case they become wet or damp in the mail. Be sure you follow the instructions on your spray.

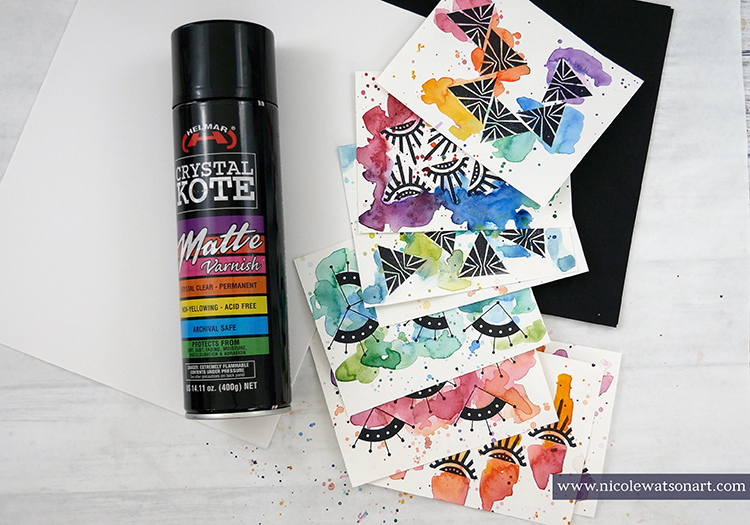
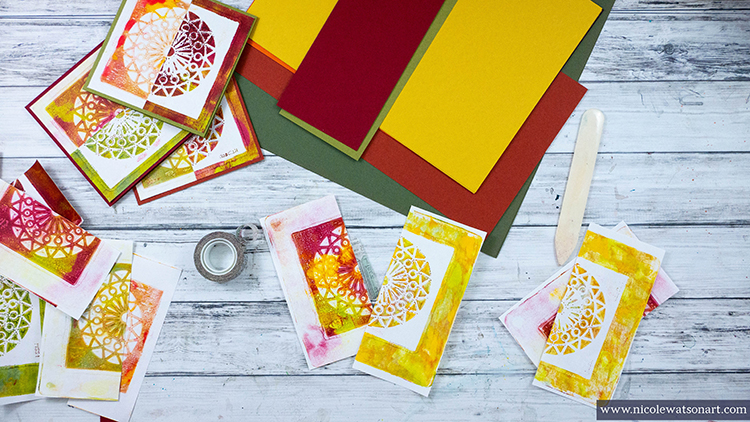
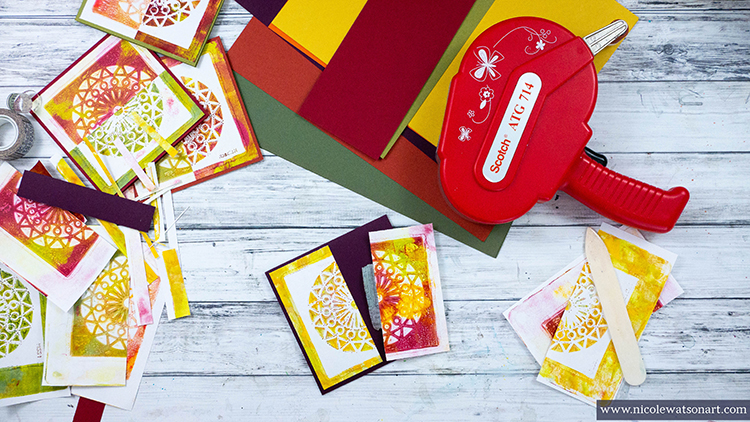
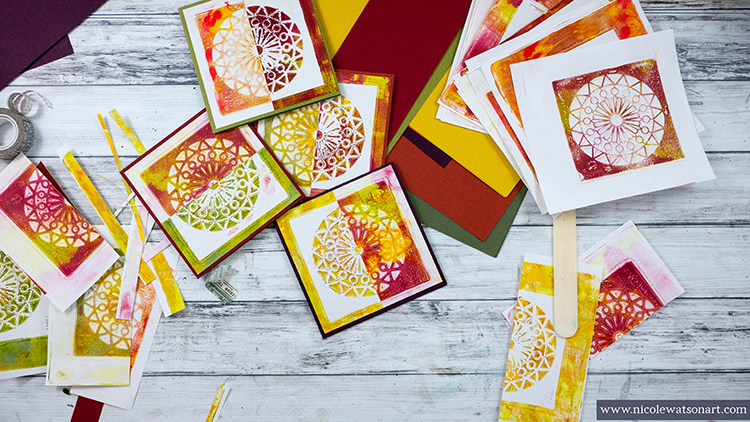
Once they are dry (again!), trim your cardstock bases and liners for your cards. Then, if you want a border around your artwork, trim your art a bit (to 4×5.25). Even though I knew I’d be trimming them when I started, I like to allow this option so I can trim off a funny area or help center the design if I didn’t stamp it quite right.  Then, fold your cards and stick the liners inside and your art on the front.

Final step? Mail them! These bright, cheery cards are perfect to shine, encourage someone, and do something good.

I did not want to stop painting these card fronts. Had I not run out of watercolor paper, I would have made many more. (Note to self, order more watercolor paper!) I cannot wait to send these in the mail, and I’d love to send out a couple to YOU as well. Find me on Instagram, and look for the post about this tutorial to see how to receive one in the mail. I can’t wait to see what you create with Nat’s stamps and watercolor.


Thank you Nicole! Love the brilliant colors here and super appealing color combinations. What a treat to see.

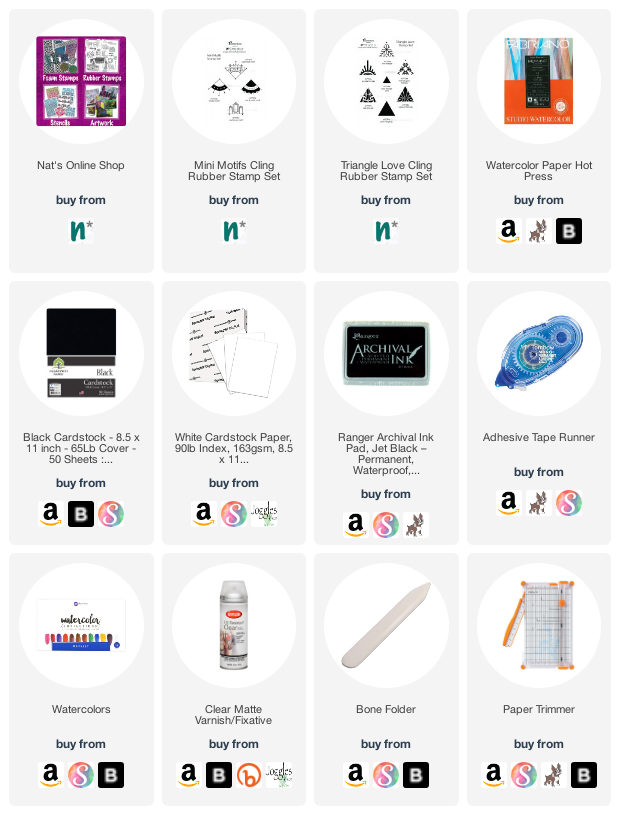
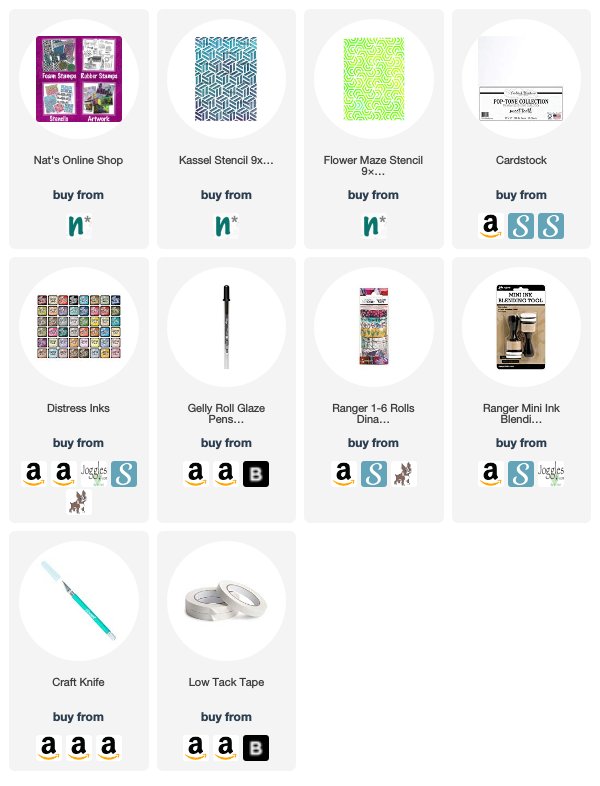
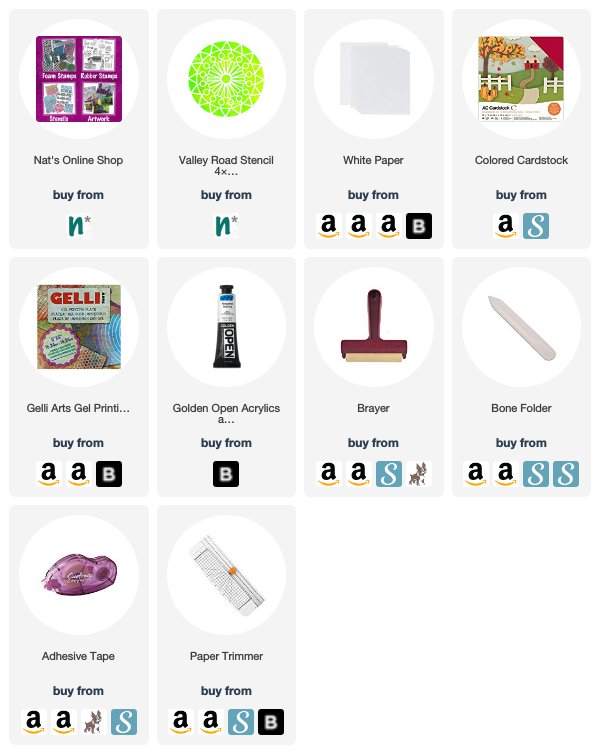
Give it a try: you can find all my Rubber Stamps in my Online Shop and here are some of the other supplies Nicole used:

Feel inspired? Working on something yourself that you’d like to share?  I love to see how you interpret our monthly themes. Email me how you used my stencils and stamps with the theme and email me an image – I would love to share your projects in my next  “n*Spiration From Around the Globe“.

Comments (1)

  • Sue Clarke

    |

    Nicole, those are gorgeous cards! I especially like the crisp, clear stamp image that you got on the paper, and the cheery colors you chose.

    Reply

Leave a comment

Happy Holidays – Jennifer Gallagher

Hello everyone and welcome to a Happy Holidays post from our Creative Squad. Today we have a group of super cool looking cards from Jennifer Gallagher that you can make with the whole family! Jennifer is using my Kassel, Park Blvd 4×4, and Flower Maze stencils and this month’s theme: Happy Holidays – It is a time of year where we are celebrating and coming together and enjoying some merriment. Create something holiday related (whatever holiday you may be celebrating) and enjoy the season!


This month we are celebrating the holiday season and what better way than to create some fun holiday cards. You’re going to love this tutorial because it’s fun, easy, and family friendly. So break out your favorite n*Studio stencils and let’s get started.

I began by drawing a simple tree shape onto craft card stock and cutting it out with a craft knife. I kept both pieces, one we will use as a stencil and the other as a mask.

Using the tree mask and Nat’s Park Blvd 4×4 stencil, I placed the designs down using a low tack washi tape. The mask allows me to protect the area where I don’t want to apply color.

Next, I applied distress ink in blueprint sketch to the Park Blvd. stencil. This creates a lovely halo around the tree.

I placed the tree stencil in the spot where the mask was and applied mowed lawn distress ink. Next, I laid Nat’s Kassel and Flower Maze stencils down and applied lucky clover distress ink over that.

Now is the time to pull out all of your favorite washi tapes. I chose one of my favorites and used a small piece to create the tree trunk. Then, using a Sakura Gelly Roll in black, I outlined my tree and halo.

Now it’s time for the remix! Change up your ink colors, stencil designs, and washi tapes to create different designs. I suggest trading out the Kassel stencil for Nat’s Flower Maze stencil in your trees. Some additional ink colors I used are picked raspberry, wild honey, and shaded lilac. Check out these variations:

I hope you have enjoyed this tutorial. This would be a great craft to make with your kids and grandkids. There is nothing better than receiving a handmade card around the holidays. If you try out any of this month’s tutorials, be sure to share with us. Happy Holidays!


Thank you Jennifer for this kick off to our December Creative Squad posts – love how doable the cards are and the very fun results – great design!

Give it a try: you can find all my Stencils in my Online Shop and here are some of the other supplies Jennifer used:

Feel inspired? Working on something yourself that you’d like to share?  I love to see how you interpret our monthly themes. Email me how you used my stencils and stamps with the theme and email me an image – I would love to share your projects in my next  “n*Spiration From Around the Globe“.

Leave a comment

Deck of Cards Challenge – Prompts 28, 29 & 30

Today I am recapping the final days of my Deck of Cards Challenge that has run all month long on Instagram. I hope you played along with us and created your own deck of greeting cards for all sorts of occasions. These are the last few prompts, one from the funny friendship cards/words genre and two that deal with boosting yourself. Enjoy this card making fun.

Here is a recap of Prompts 28, 29 and 30:

Day 28 – You Sparkle

Let someone in your life know how brilliantly they shine with this card.

I used my Millie stamp with embossing and then to really amp up the sparkle I added in my Star Fish stamp with gold embossing powder. Nice empowering card.

Day 29 – Note to Self – Get Over It

For these last two days of the challenge we are focusing on some personal pep talks.

I used my Chicago stencil and blending tool with Distress Inks, taping off one part of the pattern for one color and then moving on to another area and color.

Next I went in with a fine liner to emphasize the pattern and add my Note to Self!

Day 30 – Note to Self – Relax

With how busy life is, who doesn’t need a little reminder to relax? And I think a great way to do it is to create!

So today I grabbed my Far Out and Funky foam stamps and some archival ink. I stamped and rotated a couple times and ta-da!

An easy and fun card that now I guess I can put under my pillow or something. Ha!

Here are some of the supplies that I used in these cards:

I hope you enjoyed the challenge and tried some of the different card making ideas I shared :)


One last thing: Don’t forget about my Five Day Frenzy Sale that is happening through tomorrow – December 2. You can save 25% off ALL physical products (even sale items) by using the coupon code FRENZYFIVE when you check out. Enjoy the savings!!!

Leave a comment

Deck of Cards Challenge – Prompts 26 & 27

Only a few more days left in my Deck of Cards Challenge that has run all month long on Instagram. This week we are focusing on funny friendship cards and words. I hope you have been joining us for some card making fun.

Here is a recap of Prompts 26 and 27:

Day 26 – Stay Weird

I like to keep company with the weird ones because well, they are so much more interesting! So today for the Deck of Cards Challenge I made a card to hopefully encourage someone to stay unique and awesome and interesting.

I stamped a background with my Neato and Far Out foam stamps with Moonglo dye inks and wrote my sentiment.

Day 27 – Always

Here’s a card for that someone who you just can’t do without.

I started out with a black fine line pen and a lettering stencil for my sentiment.

Then I went in with my Adirondack Chairs stamp to really push the idea that 2 are better than 1:)

Here are some of the supplies I used:

Leave a comment

Deck of Cards Challenge – Prompts 24 & 25

Today I am recapping Days 24 and 25 of my Deck of Cards Challenge that is running all month long on Instagram. This week we are focusing on funny friendship cards and words. 

Here is a recap of Prompts 24 and 25:

Day 24 – You and I

How about a classic love sentiment for today’s Deck of Cards Challenge? Oh the memories of cinema history here with this one. Haha!

I started with my Jewett Fan foam stamp set and stamped them with Lindy’s Starburst Spray. I love the watercolor like effect it gives with foam stamps.

Then I added some color and You Complete Me with Graphik Line Painters. Don’t worry, this one is already in the mail to Jerry Maguire :)

Day 25 – I Love You

Three little words that can change your life JToday’s Deck of Cards Challenge is a card with a bit of collage to it and some pencil… and that’s it. Because when you say “I Love You” there is really not much more you need to do.

Oh and that cool collage paper is from my experiments with cyanotype printing and I used my Buenos Aires and Versailles stencils.

Here are some of the supplies I used:

Join us for thefinal days of the Deck of Cards Challenge on Instagram and share your work with #docchallenge. Here are the prompts:

Leave a comment

Card Making Workshop in Jersey City – Dec 12

I hope you can join me on Thursday, December 12th for a festive evening of holiday card making in Jersey City! I am teaching a workshop at a new space in my hood and am excited to be bringing some stamping and watercolor fun to help you make a batch of 12-15 cards for your holiday wishes.

It will be a relaxing good time with lots of creating and some refreshments also will be served. Spend an evening with old friends and new, enjoying a holiday activity that will help you spread some joy too :)

You can learn more and sign up HERE

Leave a comment

Mirror Mirror – Nicole Watson

Hello and welcome to a post from my Creative Squad! Today we have Nicole Watson sharing with us a nice and easy card project – just perfect to go along with my Deck of Cards Challenge this month on Instagram :) She is using my Valley Road stencil and this month’s theme: Mirror Mirror – A mirror can be a reflection of many things. We look into them every day and can see who we are outside and in. But they can also just be a fun visual tool to play with as we flip and reverse images and patterns. Play with reflection this month.


Since Nathalie is doing a card-making challenge this month, I decided to make cards for this tutorial! These mirrored cards are quick, easy, and require minimal supplies.

Here is a video of my process and below the video you can find the step by steps with photos


First, grab some fall colored paint. I used Golden’s Open Acrylic paint since it has a longer drying time, and I wanted to pull multiple prints before the paint dried. Begin by squirting several colors of paint on your gel plate and spreading it around with your brayer. I like to brayer off my excess paint in a book. Then, place your stencil in the middle of your plate. Now it’s time to pull some prints!

If you’ve never gel printed before, don’t worry. This is very simple printing and a good place to begin. Simply place your white paper on top your plate and stencil and smooth over it several times with your hand. I like to concentrate on the stencil (I’m using Nat’s Valley Road stencil here) with more pressure to make sure the paper contacts the paint inside the stencil holes. The more detailed your stencil is, the harder it is to ensure this happens. Gently pull your paper from the plate and admire your print! Repeat this process about two more times. You should be able to get three really nice pulls before the paint runs out.

Now it’s time to create the mirrored image. Carefully pull your stencil off the plate to not disturb the paint that was masked by the stencil. Place your stencil paint side up (We’ll use it in a minute!). Grab your white paper and you should be able to get two nice pulls. You will also be able to get one nice pull from the stencil itself. Place the stencil paint side up on your gel plate and use a white paper to pull the paint off the stencil. This will clean it for the next colors, and give you one more print.

Continue this process until you have a bunch of prints. Be creative and use different color combinations so when you put the mirrored images together, they are different.

Once your prints are dry, pair them together: one negative and one positive print that you think work well together. Then, cut these prints in half. This is where you can be a precise measurer or just eye-ball it like me. Use some washi tape to gently tape each half together to make a whole print and trim your squares down for card fronts. I made cards that are 5 inches by 5 inches, so I trimmed by stenciled fronts down to 4.75×4.75. Carefully remove the washi tape and adhere your prints to the front of your folded card base.

That’s it! Super simple but beautiful fall cards. You can take them further by stamping a sentiment or writing one on the front. These would make great cards to send as a thank you this month or even tie a bunch together with a ribbon to give away. They would also make super-cute place cards at your Thanksgiving table. And, your extra prints are perfect for using in your art journal or other projects.


Thank you Nicole and love that you were inspired by my card making challenge – what gorgeous results :)

Want to give Nicole’s project a try? You can find all my Stencils in my Online Shop and here are some of the other supplies she used:

Feel inspired? Working on something yourself that you’d like to share?  I love to see how you interpret our monthly themes. Email me or tag me #natkalbach how you used my stencils and stamps – I would love to share your projects in my next  “n*Spiration From Around the Globe“.

Leave a comment

Deck of Cards Challenge – Prompts 17 & 18

Today I am recapping Days 17 and 18 of my Deck of Cards Challenge that is running all month long on Instagram. This week we are focusing on just because cards and dots and lines. 

Here is an overview of Prompts 17 and 18:

Day 17 – See You Soon

For my Deck of Cards challenge today I am making a card for that special someone who maybe you are going to visit, or who is coming home soon.

I used water based spray paint and my Manhattan stencil because spray paint and stencils are an excellent duo! I love how the colors blend back and forth. 

And yum it makes a pattern look good! Super easy way to make some beautiful cards.

Day 18 – You are a Star

Today my Deck of Cards Challenge is a card for someone that has been rockin’ it in your life.

I started off with using an old hotel key card and laying out a bit of pink paint. Then I came in with my Beacon foam stamp and blue.

Finally I finished the background off with yellow marks all over and my sentiment: You are a Star!

Here are some of the supplies I used:

Leave a comment

Grungy Cards – DIY

I thought I would make a few cards using a monoprinting technique with my new Mixed Media Chips.

On a gelli plate I rolled out some acrylic paint with the Midtown 1 and Midtown 2 chips.

Then I printed directly onto blank cards. To attach the chip, I used Coccoina glue stick. I always loved this glue stick- smells a bit like almonds and I am so happy that I found it now also available in the states. It is great for paper and thin paper embellishments.

In addition to my nice and grungy monoprint I also stamped part of the My Home rubber stamp on this one.

This one I snuck in my Love Knots stamp for the xxxooo.

And this one got really yummy grungy and then I also added my Love Tag stamp. I’m really happy with how they turned out, especially with the addition of the painted Mixed Media Chips.

Here are some of the supplies I used:


Leave a comment