Creative Squad

Hydrant Card from my Creative Squad

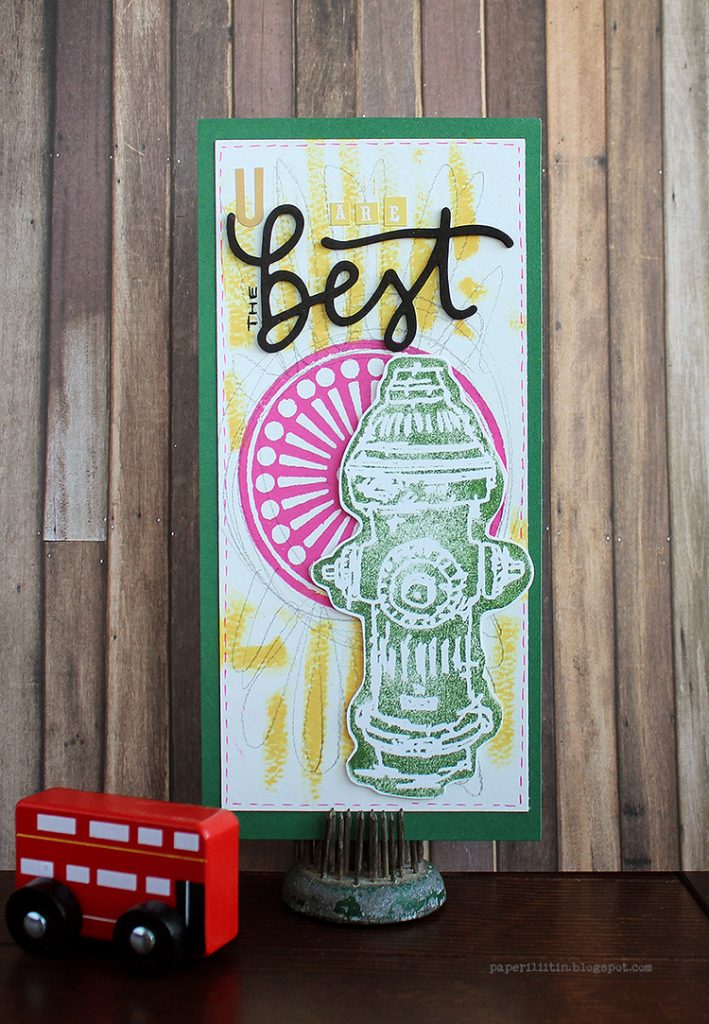
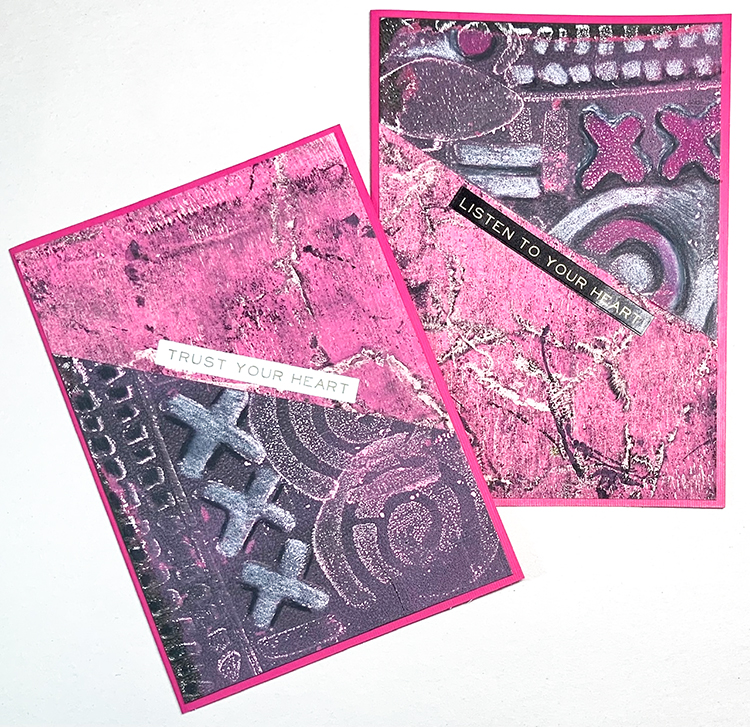
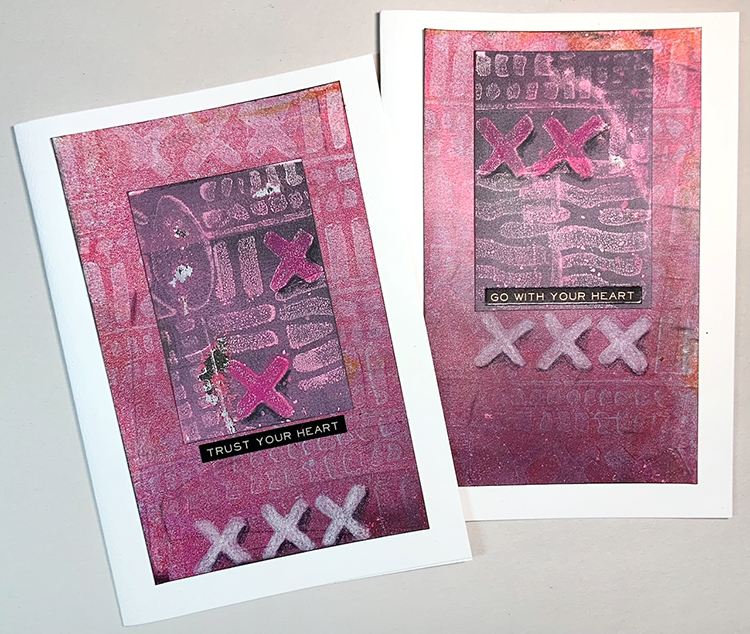
A bonus project from Riikka Kovasin from my Creative Squad for you today :) I think this card is super cute with the Hydrant foam stamp as the focal point on top of Grove St (for some extra oomph) and the message “You are the best”!

Here is from Riikka:

“I’m not totally sure how a person could be the best hydrant, but I still thought that the Hydrant would make a great focal point in a card! The shape is really captivating, don’t you think? Maybe it’s more like the hydrant looks like number one? Or that it doesn’t have anything to do with the sentence! “

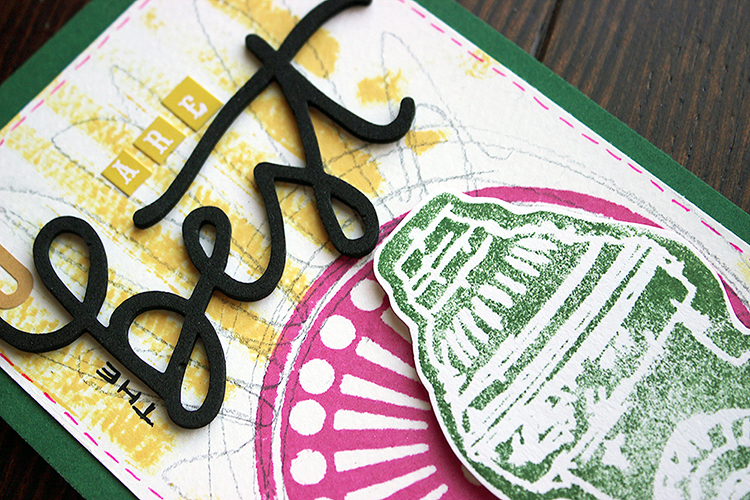
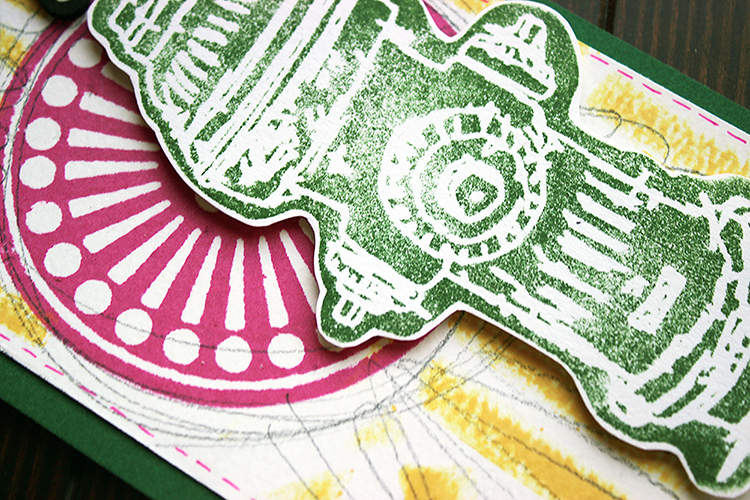
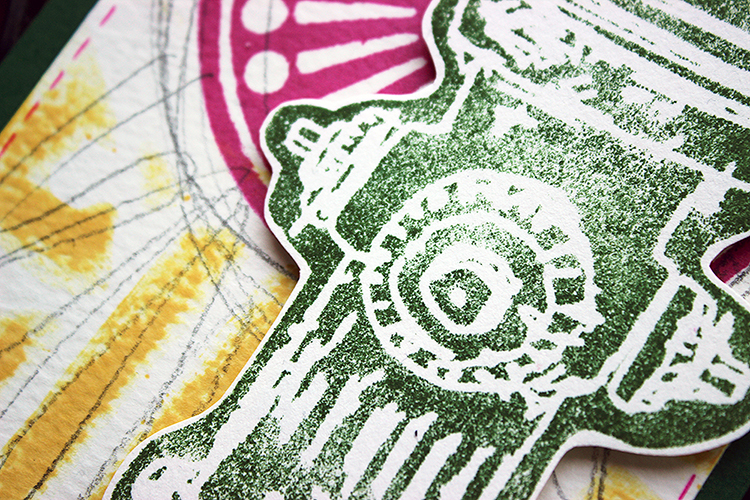
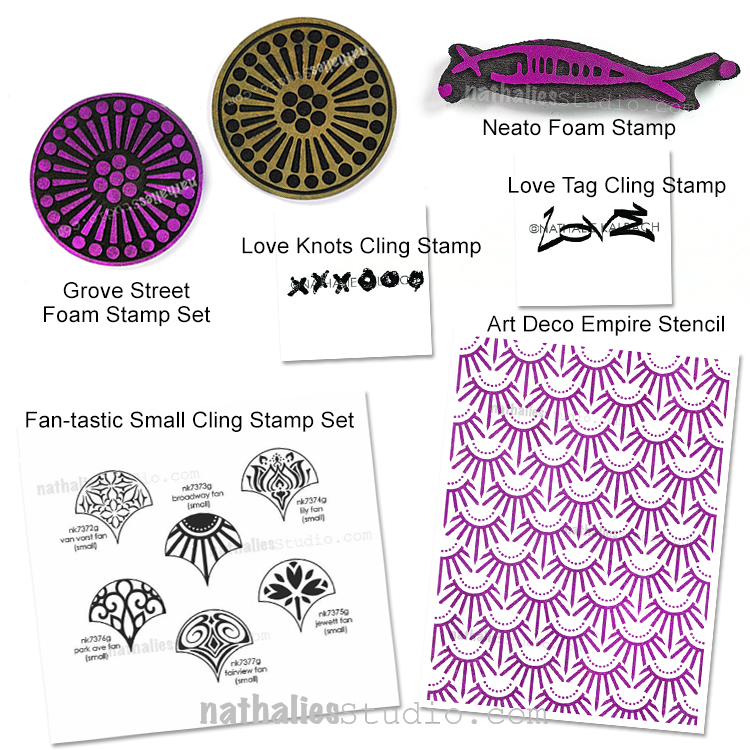
“Where the art journal page was layered with different mediums, this card is more straight forward. There’s only different inks used in this card. Oh, and some pencil scribbles. The background is done using Archival Inks. First I stamped the circle (another ArtFoamies, Grove Street) and then added some yellow patterns around using a stencil. The focal point, the “Hydrant”, is stamped using Distress Ink and it’s actually from a try out sheet I did after getting the stamps. You might have seen that on my Instagram Reels.”

Thank you Riikka – I think anyone would be honored to be called the best hydrant LOL

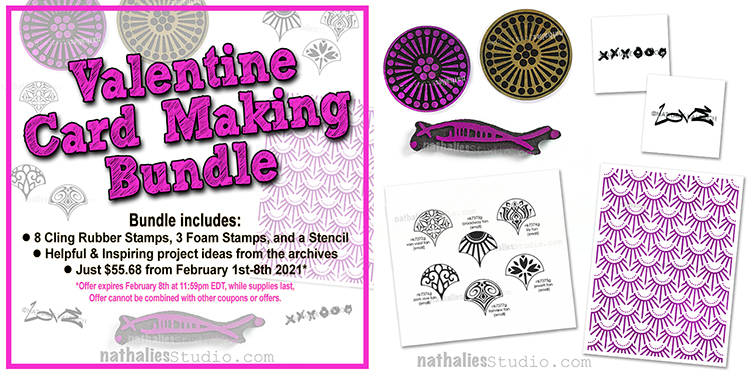
Give it a try: you can find all my Foam Stamps in my Online Shop and here are some of the supplies Riikka used:

Leave a comment

Print Collaboration from my Creative Squad

I’m sharing a nice collaboration that Judi Kauffman from my Creative Squad did with another artist.

Judi turned her friend Nancy McNiff’s cast-off gel prints done with Nathalie’s Batik Pattern 1, Pattern 2, and Pattern 3 foam stamps into some very striking cards. When the two friends have gel printing days Judi always rescues prints that Nancy would otherwise leave in the trash. Nancy’s much more ruthless, while Judi sees beauty in what Nancy thinks of as duds! Judi added her own touches with black, white and hot pink colored pencils and Tim Holtz’s stickers. 

What a great idea to do some printmaking and card making with another friend. Besides it being a fun activity, you never know what will come from it – collage material, print exchanges, and even a chance to allow ideas to flow back and forth. I just love how this session created some beautiful “trash to treasure” cards!

***A fun surprise: The rectangles on the two larger cards are removable ATCs, signed on the back and held in place with easily removable low-tack tape!***

Here are some of the supplies they used:

Leave a comment

Lady Liberty Cupcake Card – Creative Squad

Today I’m sharing a really fun little birthday card project idea from Creative Squad member Judi Kauffman. Her creative mind saw a cupcake in the torch of my new Lady Liberty foam stamp, and that is just sooooo cute :)

I love when my stamps or stencils inspire something unexpected and this just takes the cake ;)

Thanks for sharing Judi and so happy to see Lady Liberty holding that cupcake!

Leave a comment

Valentine Card Making Bundle – Special Product Kit

Are you ready for Valentine’s Day? I’ve put together this special product bundle to help you create tons of unique Valentine’s Day cards for all your sweethearts this year.

My Valentine Card Making Bundle includes a selection of foam stamps, rubber stamps, and a stencil, as well as some inspiring card making ideas from our archives to help you on your way.

The bundle is just $55.68, a big savings off the $69.60 regular price, and supplies are limited so hurry in to get your bundle before they run out for good. This offer expires February 8th at 11:59pm EDT, and cannot be combined with other coupons or offers.

Here are the stamps and stencils that are included in the set*:

  • Grove Street Positive Negative Foam Stamp Set
  • Neato Foam Stamp Set
  • Fan-tastic Cling Rubber Stamp Set
  • Love Tag Cling Rubber Stamp
  • Love Knots Cling Rubber Stamp
  • Art Deco Empire 9×12 Stencil

In total you will receive 3 foam stamps, 8 cling rubber stamps, and a 9×12 stencil. *No product substitutions are permitted.

Once you purchase, you will receive an email with links to project ideas from the archives to get you started on your Valentine card making.

Here are some examples:

This bundle offer is only available through February 8th at 11:50pm EDT, while supplies last, no product substitutions are available. 

Leave a comment

Sunny Home Card from Riikka Kovasin – Guest Post

Happy to have another Guest Post from Creative JumpStart 2021 teacher Riikka Kovasin! Today she shares a card celebrating a new home using my Queen Anne rubber stamp and my Grove Street foam stamp.

 We are so excited to share some projects with you from Riikka. Enjoy!


Hi there again! It’s Riikka here with another project! This time I made a card. The rays in the “Grove Street” stamp made me think about a sun, so I combined that with one of the beautiful, detailed house stamps Nathalie has. This one is “Queen Anne”.

When I started, I was thinking of going with yellow tones and instead of black embossed the stamped house first with pale yellow. When I then started adding colors to it, I realized that it won’t work. The pale yellow looked odd with the stronger colors coming on top. So, I ended up using black anyway.

I recorded a little video while working with the card so you can even see my two takes with the outline color:

After getting the elements done the card was easy to put together. 

I used white on white in the background where I added a strip of embossed white cardstock as kind of an anchor. On top I then added the warm sun and then the house.

Like I write in the video, the house just couldn’t float on the card front, so I stamped some grass, too. For that I used the “Queen Anne”, too, stamping the lines multiple times on top of a strip of white cardstock. The intersecting mishmash creates an illusion of a texture stamp!

Thank you for stopping by today! Wishing you a sunny day!

Xoxo Riikka


Thank you Riikka – love watching you work in the video to figure out the best solution!

Want to give it a try? You can find all my Foam Stamps and Rubber Stamps here in my Online Shop and here are some of the other supplies Riikka used:

Comments (4)

  • robinseiz

    |

    This is such a lovely card. Thanks for sharing!

    Reply

  • Sue Clarke

    |

    Cheery, bright colors and such a wonderful use of the stamp!

    Reply

Leave a comment

Sent With Love – Cards

I have been on a card making kick lately with my new #keepyouposted rubber stamps. I thought I’d share so you can see what I’m up to.

I used the LOVE stamp and the Blank Postage stamp from the set along with a rainbow of Moonlight Duo ink pads and just filled the front of the card – The LOVE stamp is designed to fit nicely inside the Blank Postage.

Here’s a card idea for your sweetheart – the LOVE and the Sent with Love stamps:

And then I mixed it up and paired it with a stamp from my Floral Tile Small set – also works really well together:

It’s never a bad time to send someone a note and these days it makes everyone feel good. Hope you try these patterns and send a couple cards to someone you love :)

Here are some of the supplies I used:

Leave a comment

Keeping You Posted – Cards

I was playing around with my new #keepyouposted rubber stamp set and found myself making cards. For the one shown above I used a masking technique to create a layered look.

I wanted to have my mail truck stamp over some of the word stamps, without collaging. It’s easy – here’s how:

First I stamped my cute truck (I just adore these distinctive US mail trucks – so unique looking!) where I wanted it on my card. Next I stamped the truck onto some scrap paper and fussy cut it out. Then I put some repositionable adhesive on the back – I like E-Z Dots. This is my mask.

With the mask stuck onto my card on top of the truck image I stamped my background and overlapping the masked area with with my “You are my No.1 Priority” stamp.

Then I removed my mask  – clean and easy peasy. I also added some color using a very nice new set of EMOTT Mitsubishi pens in the links below – love how they work for fine detail and intense color.

Here are a couple others I made, all with stamps from the #keepyouposted set: 

Are you sending cards through the mail these days too? I definitely had a ton of fun with those. 

Here are some of the supplies I used:

Leave a comment

Triangle Love Holiday Cards

handmade card with triangle shaped trees with toppers, besides the card some triangle shaped and patterned rubberstamps that were used to create the card.

It seems so early to start making holiday cards but I am determined to not get caught in my usual December panic “waahhhhh I didn’t even start yet” LOL. Because quite frankly – I looooovee to get holiday cards, but of course …you gotta spread the love yourself, no? So, I wanted to share with you some holiday cards I put together using my Triangle Love and Fan-fare rubber stamp sets. These are just a few ideas that I was playing around with. Both of these sets are super versatile so I can even imagine a bunch more ideas will come once you start creating.

Let’s get started!

Using my Tulip Triangle, I started lining up the pattern to build a larger triangle shape on my card.

Triangle shaped Rubber stamp used on a blank card to create a big triangle shape

I stamped my Solid Triangle off to either side, in the same manner, building larger triangles. 

three hand stamped triangle shapes in a row with a triangle rubber stamp

Then I added another pattern on top in a darker green ink. I chose my Empire Triangle and Stained Glass Triangle. I think you can see where this is going ;) I also used the Small Solid Triangle to create the tree trunk because, you guessed it, these are nice little Christmas trees.

And then I used one of the small stamps from my Fan-fare stamp set as a tree topper.

Next just add your message and there you go – easy card idea #1 for you.

How about a card that features an ornament for the holiday season? I began by stamping the Sunburst Triangle from the Triangle Love set onto a card, flipping the stamp around to double it up.

I added another pair to the left and right, and then below to create a larger diamond shape.

This reminds me of a vintage glass ornament. I then added one of the Fan-fare stamps here and there to give the scene a little sparkle.

Then you can add your hangers and tinsel and a nice message to finish it off. There you have it – card idea #2!

Finally another ornament idea, this time layering the Star Triangle over the Solid Triangle.

One of the stamps from Fan-fare makes a very nice ornament topper.

Then tie it all together with some sketchy lines and your sentiment. Voilà! Card idea #3 and hopefully you are on your way to a stress free holiday season (lol) now that you are ahead of the game with cards. I am not sure that holds true for me in regards of making holiday cards, but now that the first ones are done – my ideas keep on flowing :)

Comments (2)

  • Sue Clarke

    |

    Very cute cards and I really like the shade of green and purple which you used.
    December will be here before we know it, so it’s not too early to make cards!

    Reply

    • nathalie-kalbach

      |

      Thank you so much Sue! So true about making cards maybe this year I will be getting there :)

      Reply

Leave a comment

Holiday Card Making Bundle – Special Product Kit

Are you ready to get your Holiday Card Making Game on??? I’ve put together this special product bundle to help you create tons of unique holiday cards for everyone on your list this year.

My Holiday Card Making Bundle includes a selection of foam stamps, rubber stamps, and a stencil, as well as some inspiring card making ideas from our archives to help you on your way.

The bundle is just $45, a big savings off the $71.60 regular price, and supplies are limited so hurry in to get your bundle before they run out for good. This offer expires October 20th at 11:59pm EDT.

Special 20% Off Deal: Also, during this offer, if you purchase the Holiday Card Making Bundle you may receive an additional 20% off any other physical products (foam stamps, rubber stamps, stencils, ink pads) that you order at the same time. Just use the coupon code holidaycard20 when you check out. Artwork is not included in this offer.

Here are the stamps and stencils that are included in the set:

  • Valley Road Positive Negative Foam Stamp Set
  • Broadway Positive Negative Foam Stamp Set
  • Triangle Love Cling Rubber Stamp Set
  • Fan-Fare Cling Rubber Stamp Set
  • Toledo 9×12 Stencil

In total you will receive 4 foam stamps, 11 cling rubber stamps, and a 9×12 stencil. 

Once you purchase, you will receive an email with links to project ideas from the archives to get you started on your holiday card making.

Here are some of the tutorials from our archives that will come with the Holiday Card Making Bundle once purchased:

This bundle offer is only available through October 20th at 11:50pm EDT.  And don’t forget to use the coupon code holidaycard20 to receive 20% off any additional physical items in your order.

Happy Card Making!

Leave a comment