Totally stoked to join again into the Stencil Hop for Julie Fei-Fan Balzer‘s Crafter’s Workshop Templates. I guess if you follow my blog…I do not really have to tell you, how much I love them. If you don’t follow my blog…you should (just kidding ;) )
The designs are amazing and Crafter’s Workshop creates them in a high quality way that gives you a huge versatility in usage!
When Julie came out with those amazing Templates that can be layered I was almost fainting…LOL – sooo cool!!! You can use them with different acrylic paints or with spray paints or with Derwent Inktense blocks and Artbars – oh brother…endless possibilities
Today’s blog hop is focused on the Lotus Blossom Template – it is BEAUTIFUL (insert picture of me in cheerleader outfit exclaiming each of the letters while jumping up and down…oh wait…that might be a terrible picture….better proceed reading ;) )
And there it comes another fun way on how I love to use them :) – I created a Luminaria with the n*Lighten Technique
So much fun to use the n*Lighten Technique with the Stencils- they are perfect for this. So let me show you how it works.
You need for the first steps:
- the 6×6 Lotus Blossom Crafter’s Workshop Template which was perfect for creating a Luminaria in the end.
- 4 different colored Embossing Powders – I used the amazing WOW Embossing Powders by Suzy West – I’m just so amazed by the vibrancy of the colors- they seriously rock!
- Pastel Paper – but I’m sure it will work also with thinner water color paper
- Embossing Ink Pad – clear
- Heating Gun
How To:
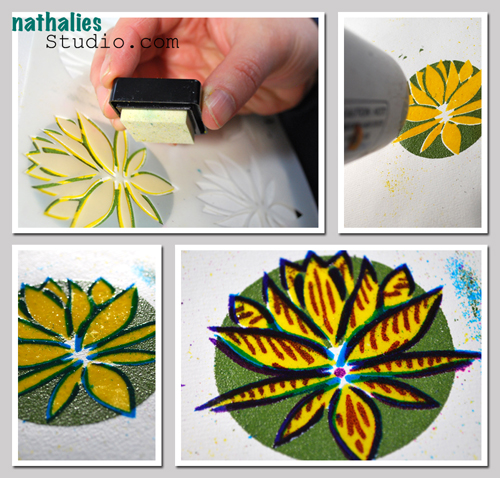
- Lay down the template and use the first image (you can also use all four and alternate later – I did this too)
- Dab the Embossing Ink Pad on top of the Template
- Make sure that you got the whole image
- Lift the Template
- Use one color of Embossing Powder and heat emboss
- Let cool
- Layer on the second image of the Template and again dab the embossing pad on top and sprinkle the second color on top
- Now with the second layer you have to be a bit more careful – you do not want to remelt the first layer in a way that it get’s lumpy or starts getting to melt into the second color – just watch closely the reaction
- and now repeat with image 3 and 4 and the other two colors of embossing powder
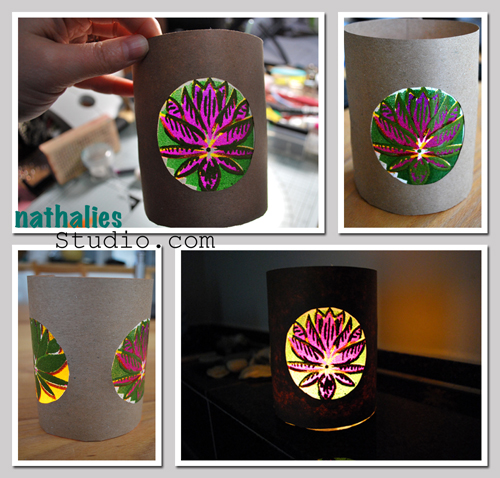
I draw a circle around the image that would give enough space to hold adhesive. Then I cut a letter size kraft paper sheet length wise in half. I cut circles with a craft knife out of the kraft paper that would just show the image. I adhered the Lotus Image to the back and bend the paper and glued the ends together forming a role.
And there you go – a summer luminaria- perfect in the garden or on your dinner table.
Warning: Never leave a burning candle unattended. Keep out of reach of children, playful husbands & pets. Be careful to not have the kraft paper too narrow to the candle!
Don’t miss out the others on this blog hop:
Julie Fei-Fan Balzer
http://balzerdesigns.typepad.com/balzer_designs/2012/04/stencil-hop-lotus-blossom.html
Nathalie Kalbach
http://wp.me/p1ILec-1hq you are here :)
May Flaum
http://mayflaum.com/?p=8237
Jenny Barnett Rohrs
http://www.crafttestdummies.com/?p=12271
Nat
———
My new Über*Media Online Workshop is here – Learn the whole Shebang about Acrylic Paints
———-
Supplies I used for n*Lighten Technique:


Comments (43)
Dawn F.
| #
That is gorgeous!! I love the idea. Thank you for the tutorial.
Reply
Tammy Shapiro (Demichelis)
| #
Wow! That is lovely. I would never have thought of creating something like this. Love your wonderful and clear directions and supplies. Great!
Reply
texasbarb
| #
love what you’ve done with Julie’s cool stencil!!
Reply
Winnie Dolderer
| #
Wow!! The image just shines through so nicely. I love Julie’s stencils..must get this one on my list. (loved your New Year inspiration class!)
Reply
Carol Mc
| #
Love the bright colors. And I am now one your blog followers.
Reply
teddi
| #
nathalie, gorgeous illumination. creative one! :)
Reply
Flo
| #
Very pretty, thanks for the great idea.
Reply
suzannebouchard
| #
I am crazy in love with Blazer’s stencils and I can’t get enough of them. Now what fun we will have with those layered ones!
Reply
Susan Tidwell
| #
What a great technique. Thanks for the tutorial.
Reply
Stacy Caddy
| #
This is gorgeous Nat…. Thanks for sharing & the tutorial….
Reply
Lisa Flaherty
| #
I have been n*Lighten’ed! Great technique, Nat! I have never used embossing powder (um, hello 2nd floor challenge!) and never would have thought to use the embossing ink through a stencil! Thank you! I see my patio area getting spruced up with some luminaries this summer for sure!
Reply
muriel
| #
Great idea! Can imagine these lamps on the garden table when summer comes!
Reply
Maggie M
| #
Very cool use of the lotus blossom stencil! I can see many uses for this fabulous stencil. Thanks for sharing your luminary idea:)
Reply
milkcan
| #
Whoa! Totally awesome idea! I love it!
Reply
LindaK
| #
so lovely-great different use of this beautiful stencil-thank you Nathalie!
Reply
hartofhearts1016
| #
beautiful use of the stencil….. i love this stencil…..
Reply
Paula McLane Jennings
| #
absolutely LOVE your luminarias. The image is so elegant and perfect for that. Awesome idea!
Reply
jane w.
| #
just gorgeous!
Reply
misty
| #
How beautiful! I can just imagine how gorgeous several of these would look surrounding a patio area at night!
Reply
Jaime (Tarrytown)
| #
Great tutorial Nat!!! Loved it. -Jaime
Reply
Sue Clarke
| #
Love how your sense of humor comes through in your posts.
Beautiful way to use the stencil as well.
Reply
The Scrap Yard
| #
Awesome. This project looks so easy. I will have to try this. Love the lotus stencil!
Reply
Martha Richardson
| #
Amazing…I he{art} Julie’s stencils & you really rocked it with this technique!
Reply
susan
| #
Woh great idea! I love luminaria on warm summer evenings ( we dont have much of those evenings so you have too really chelebrate the one you have :) )
I use an electric candle. Way saver, for the cat too.
Reply
pAULA fLÁVIA
| #
what a lovely luminaria…i need to try it and probabli will use a led lamp…lol.
kisses
Reply
Caryn S
| #
That looks so great lit from behind!
Reply