Mal wieder Zeit für Daphne und mich, eine neue Technik auszuprobieren – wir empfehlen Euch das Buch “Collage Unleashed” – grandiose Techniken, wunderbare Layouts! Diesmal haben wir uns an eine Technik gewagt, mit der man mit Crayons einen Hintergrund…bügeln kann :-)
It is time for Daphne and me again to try a new technique – we do recommend the book “Collage Unleashed” – awesome techniques and wonderful layouts! This time we were up to a technique where you iron on crayons for a new background :-)
Was man braucht -what you need
- Muffinform – muffin tin
- Crayons in verschiedenen Farben – different colored crayons
- oven
- optional mica
- ein ganz altes und schon abgelegtes Bügeleisen – an old iron (which you more likley wouldn’t use anymore)
- Cardstock
Erster Teil/1st part
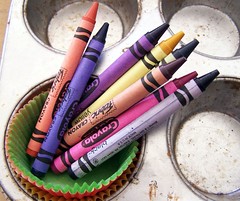
Zunächst habe ich die Papierbanderolle von den Crayons entfernt, und einige Stücke von verschiedenen Farben in eine Wegwerf-Muffinform hineingebrochen. Gut ist eine gesunde Mischung von Farben – mehr helle als dunkle – ich hatte leider nur eher dunkle Farben.
First of all I removed the paper around the crayons and broke different color pieces into a disposable muffin tin. It would be better to have a healty mixture of colors- more light colors when dark colors – but unfortunatley I had more dark colors.
Ich habe hierauf noch ein wenig Mica Flocken gestreut.
I added some Mica Flakes to the tin.
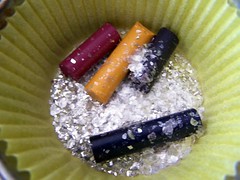
Hiernach habe ich die Muffinform in den Ofen geschoben und das ganze bei 120 ° Celsius ca. 10 Minuten schmelzen lassen. Den Ofen habe ich nach 10 Minuten einfach ausgemacht und die Form im Ofen abkühlen lassen.
Then I set the muffin tin in the oven and melted the crayons – heat the oven to 250 ° Fahrenheit (120 ° Celsius Degree). I turned the oven off after 10 minutes and let the mixture cool down inside.
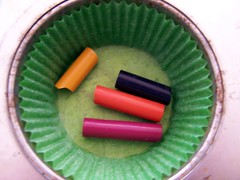
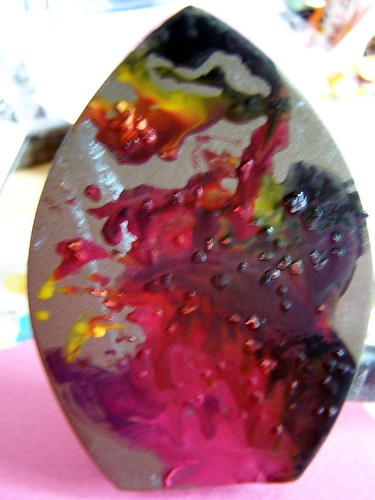
Und das ist das Ergebnis des ersten Teil – and this is the result of part One:

Zweiter Teil/Second Part
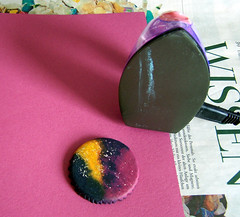
Nun das olle Bügeleisen raus (ich habe hier ein Ribbon-Bügeleisen benutzt – wenn Ihr mich fragt, meine unsinnigste Anschaffung während meiner Scrapperlaufbahn ;-) ), ein wenig Cardstock und die zusammengebackenen Crayons. Auf das erhitzte Bügeleisen habe ich die Crayons-Formen verteilt – Vorsicht, nicht die Finger verbrennen!!
Now take the old unloved iron (I used a ribbon iron – if you ask me that this was one of my most unuseful tools I bought . but mmmh – now it comes in handy ;-) ), a sheet cardstock and the baked crayons. I smeared the crayon forms onto the heated iron – be careful to not burn your fingers!!
Man kann auf dem unscharfen Bild ganz gut die Mica Flocken erkennen :-) :-)
You can spot the mica flakes pretty good on this really blurry photo :-) :)
Und nun – einfach das ganz auf Cardstock verteilen, immer wieder das Bügeleisen draufpressen, nicht zu sehr rumrühren (sonst vermischt man das ganze nur zu einer dunklen Farbmasse), das Bügeleisen wieder hochheben und ab und zu wieder mehr Crayons auf das Bügeleisen auftragen.
And now – just apply everything to Cardstock, just press down the iron, do not smear to much (you will only mix the all the colors to a dark colormix), lift the iron and once in a while add more crayons onto the iron.
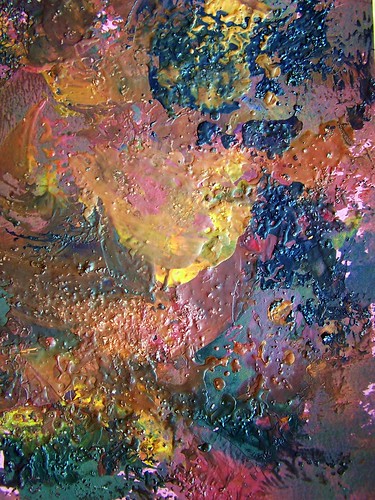
Wenn man mag kann man hinterher noch mit Stickles und Metallic-Spray rumspielen :-)
If you want you can play around with Stickles and metallic spray :-)

Ich mag das Ergebnis total – aber leider muss ich sagen, dass meine etwas empfindlichen Atemwege den doch sehr intensiven Geruch der schmelzenden Crayons als unangenehm empfanden – also seid ein wenig vorsichtig wenn Ihr das macht oder macht es am weit geöffneten Fenster!
I really love the result – but I gotta say, that my sensitive airways didn’t quite like the smell of the melting crayons – please be careful if you try this or do it with a white open window!
Vergesst nicht nachzuschauen, was Daphne gezaubert hat – don’t forget to see what Daphne did with this technique!
Cuchy
| #
I thought I had read and study your whole tutorials, but I missed this one. It’s fabulous I love all the textures and colours. I need an iron, right now! Hughs, Cuchy
Reply
SallyB.
| #
auf was für Iden Du kommst, schön, dass wir gerade am WE die Wahchsmalstifte weggeworfen haben ;-)
Reply
MarilynH
| #
Don’t you just love her book? I even like the name “cupcake muffins” LOL YOur finished piece came out looking so colorful and fun!
Reply
debbie
| #
I had a great time in Kauai. You are so right, it’s beautiful! Now we are on the Big Island and I have internet for a few days….What a treat to look at all your old and new layouts! And thanks for the lesson in melted crayons & mica! I’ll need to try that out when I get home…
Reply
Mirjam
| #
That sure looks good, would be a shame to cut it up, I would hang it on the wall as it is!
Reply
Aline
| #
I love the result, it looks powerful! Great idea. :)
Reply
Andrea
| #
WOW – wie genial – das ist eine tolle Technik – genau mein Geschmack – schön kunterbunt :) Kommt ebenfalls in mein “gotta try” Büchlein :)
Reply
Fauve
| #
SO cool girl,results are fab!
Reply
Simone
| #
Als erstes:Das Endergebnis sieht echt “Nat” aus ;)
Zweitens: Ich habe da mal ne ganz üble Schrumpffolien-Erfahrung gemacht,der Ofen hat es Gott sei Dank überlebt,deshalb laß ich da mal lieber die Finger von;))
So,und jetzt bin ich auf das LO mit dem Papier gespannt!
Reply
Liz
| #
Super cool.
Reply
Maren Thunert
| #
Wo nehmt Ihr nur diese abgedrehten Ideen her?!?!? Ich finds cool!
Reply
Marion
| #
HAMMER!!! Danke für die – wie immer – ausführliche und anschauliche Anleitung.
Reply
Amber girl
| #
would a toaster oven work the same? Love the technique!
Reply
Nadine
| #
very splashy :-D
Reply
nathalie
| #
Naja- aber das vorbacken ist ja gerade der Spaß an der Sache :-) Das riecht auch nicht so penetrant wie die Geschichte auf dem Bügeleisen – LOL
Reply
Sonja
| #
Klasse, aber ich würde in dem Fall vielleicht gleich die fertige Encaustic-Wachse empfehlen. Die riechen nicht so stark, man muss sie nicht “vorbacken” und es gibt sie in vielen tollen Farben.
Lg
Sonja
Reply
christiane
| #
wehehe!! it looks sooo graet and sooo *stinky* :))
Reply
Charlotte
| #
Wow, that looks awesome Nat… those mica parts look great!
Reply
Nicole Penders
| #
wow Nat, great technique, with a beautiful result…
gr Nicole
Reply
Je@net
| #
Wow, that looks very great!!!
Reply
Svenja
| #
Hmm, wieder sowas Schickes! Und ich muss sagen, mir gefallen die Farbmuffins vorm Aufbügeln auch schon ausgesprochen gut. ;-) Ich bin auf das Layout gespannt.
Reply
Daphne
| #
Love the colours you choose and the structured look it got of the mica….
I need mica too! LOL!
Beautiful results schatz :)
It was a pleasure again working with you LOL
Reply