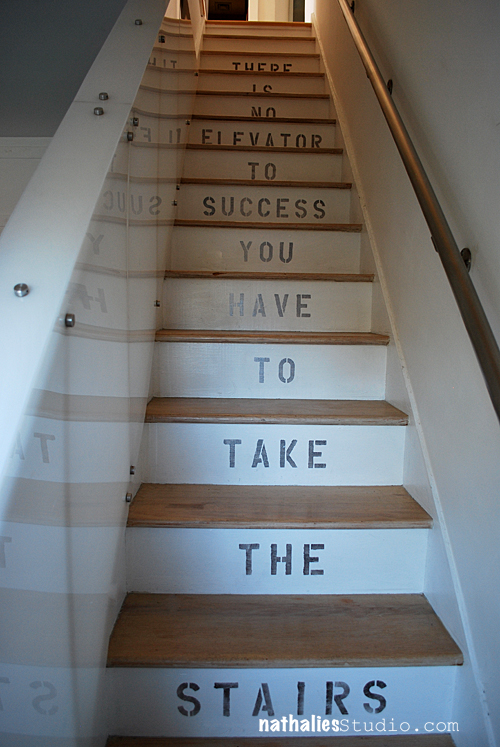
Our new apartment is spread out on two floors and my studio is actually located on the second floor. The stairs itself are not that bad – given the fact we used to live on the 6th floor in Hamburg with no elevator but those stairs are pretty step and remind me a bit of Amsterdam.

I do love this saying ” There is no elevator to success. You have to take the stairs” and I think it is also a very fitting one to be on our stairs climbing up to my studio. And it makes the very clean and a bit boring stairs more ours. Here are some tips in case you want to try this yourself on your stairs:
1. don’t be scared – keep in mind the worst thing that can happen is that you have to paint white over it again. We will have to paint this when we move out- so what…in the meantime we have something we like as a decor.
2. Use a cosmetic sponge to apply the paint. Less is more – dab on…dab off…so that not too much goes underneath your stencil. I used acrylic paint.
3. It is ok if it doesn’t look perfect – it is hand stenciled!
4. here is how you can do the spacing easily:

Prepare each word you want to apply – I used the spacing that the stencils provided. I applied a piece of masking tape throughout the whole length of the word on the bottom and on the top.
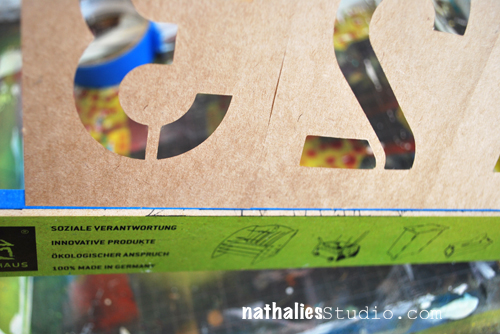
Prepare and measure how much spacing you want from the bottom of the stair to the letters – and prepare a cardboard piece or sturdy panel that has that height. I was lucky and the green ruler in the picture was exactly what I needed. Flip the stencil word over and apply the spacer to the bottom masking tape making sure it lines up right to the edge of the letters.
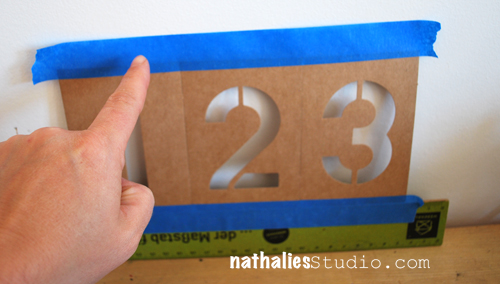
Put the spacing tool centered onto the bottom of your stair and apply the top masking tap – make sure it is nicely and evenly pressed down. Then you can easily remove the space-helper and press down the bottom masking tape- and voila an even and right spacing :)
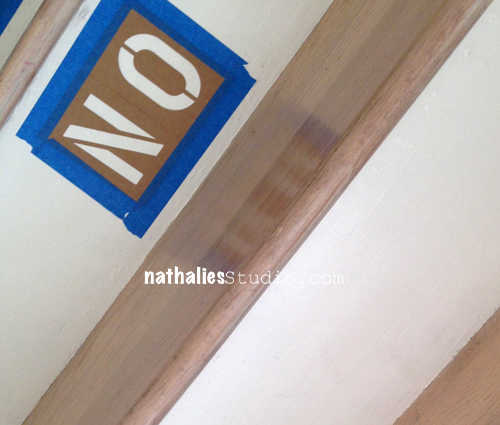
Then apply masking tape to the left and the right of the word- so that everything is nicely and flat attached to the wall. And then you can start. :) The taping work takes the most time for this project- take your time with it.
5. Have fun and enjoy your new stair decoration
Cannot wait to see how our visitors will like it :)
Here are the supplies I used

 |
|
 |
|
Have an amazing day
hugs
Nat
![]()
Comments (12)
Minna
| #
Wau! I would love to do something like this to our home!
Reply
muriel
| #
I love your stairs; more generally I love decorated or customized stairs. I have stairs in my house and I have been wanting to customize them for…….years! But I know the day will come.
Reply
Lura Brown
| #
i just love what you did with the stairs cant wait to see the rest of the apt. and studio. please???? xoxo
Reply
Laura
| #
I love this project.
Reply
Amante del Papel
| #
I need stairs! jajajja Love this!
Reply
Melisa
| #
Wow this is such a great idea!!!!! Now I wish I had a stairway in my home lol thank you so much for sharing this idea with us:)
Reply
Naomi
| #
Just fabulous!! Now I almost wish I had steps in my house.
Reply
Jean A Marmo
| #
LOVE this!
Reply
Sue Clarke
| #
Very cool and the quote is perfect for on the way up to your studio.
Reply
Madeline Rains
| #
I absolutely love this. I am going to pin it.
Reply
Jennifer Palmer
| #
Nat
You are just brillant
Reply
Irma
| #
Love your stairway to succes!!!
Have agreat start in the weekend – Irma
Reply