This video by Paper Fortress so resonates with my thoughts about life – it is a wonderful movie
[vimeo 23114063 w=400 h=300]
Have an amazing day!
Nat

Nat

This video by Paper Fortress so resonates with my thoughts about life – it is a wonderful movie
[vimeo 23114063 w=400 h=300]
Have an amazing day!
Nat

In case you missed the other posts of this series- I collected them all on this page here.
We are still discussing:

and with this last post in the series I wanted to show you which color combinations I love and where I find inspiration for those color combinations :)
So where do I find inspiration for color combos? I would say there are four main categories for me:
I usually have my cell phone which has a camera with me anyway and as soon as I see something that I think will inspire me later for some color combination I take a photo for later. If I’m stuck or want to get out of my usual color routine I just scroll through my photos. Here are some that I have taken the last couple weeks just for that purpose with my phone.
1. Nature
Nature is an amazing source of color combinations- flowers especially- like this one:

See the colors that are in this flowers

2. Street Art
Often times graffiti or street art has some amazing color combos too – like this one

Love those colors together

3. Art Work
When I go to a museum or exhibition I also love looking for amazing color combinations- Like this painting by Neo Rauch – he rocks color combinations that are unusual in my opinion

I would have never thought by myself using those colors together

4. Catalogues or Magazines
I do not read a lot of fashion or gossip magazines but if I get one I usually just look for color combinations :) and then …well…as you are looking you might as well just read the stories- right – LOL

these colors make me happy together

Here are some projects I created using some of my favorite color combinations at the moment :)

Here are the colors:
![]()
here is another one

and the colors:

And my beloved jewel tones

here is the color palette

And one last one :)

and the color palette

It is so much fun to be friends with Colors. After a while you do not even have to think much with which ones you want to hang around and which ones you want to bring together- I promise you – with just the little color theory we talked about in the past posts, you will instantly grab the right ones and make them sing in an amazing choir :)
I hope you enjoyed the “Colors Are Your Friends”- Series- you will find the complete post here
Nat
Love, love your color combinations!!!!
I love your colourful post and WOWZAH, that Neo Rauch painting is fabulous!
love all your color theory post! you could easily write a book on it! =)
Great ideas! And I love how you pulled the colors from each of your examples to show the palette–works well with my one-dimensional mind! And, perhaps I was on to something; yesterday I cut part of a clothing catalog that had a stack of T-shirts to show all the colors they are available in. I felt it could be useful somehow. Now I know how! :)
Hey there Nat, Was thinking about ya this morning. Hope you are doing well and although I know you are super busy, perhaps at CHA, we can meet for coffee. Hugs to you.
This series has helped me to see color in a different way. The color combos that you posted are not ones that I would come up with naturally so it’s fun to see how they inspired you to make your colorful art Nat.
Great color examples! Color’s are my friend also as that usually is how I see everything :]

Sgraffito is an art term describing a technique used e.g in plaster, pottery, glass or paint. Basically one or several layers of the medium are revealed by scratching into the top surface. The term comes from the Italian word sgraffiare and means to scratch. Not sure if that will help me with my next Italian vacation but hey… you never know ;)
Now why is that something that might interest me? It is cool because you can create TEXTURE- yum yum! Do you need to have more reasons?
You actually saw some stuff already where I used the sgraffito technique- like on this piece from a post here playing with the Derwent Artbars. I used a tool that Derwent especially made for this, called the scraper.
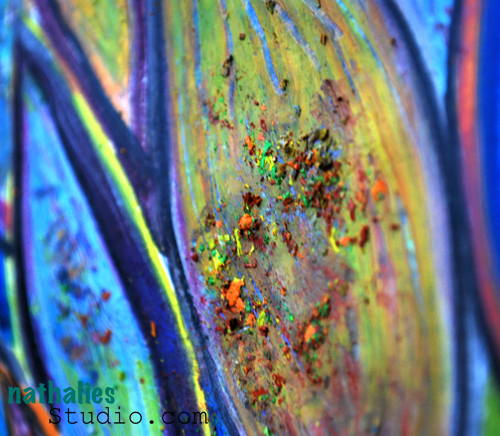
But there is more…Scratching into still wet acrylic paint – Texture heaven. You can use all kinds of tools for it – like a plastic fork, the end of your brush, palette knifes…ah there are many many possibilities.

It is fun to add some sgraffito marks to your backgrounds or art journal pages – Let’s do a quick background video – I have a list of all supplies used below :) :
I love to use Liquitex Heavy Body Paint with the Sgraffito techniques, because they are – as the name might give it away ;) – heavy bodied paint.

I already have something in mind where I will use this background as a foundation – you will see it soon.

And if you want to learn more about acrylic paint techniques and a LOT of background techniques with them…

well….;) I can recommend my Über*Media Acrylic Paint Workshop. You don’t have to have Heavy Body Acrylic Paints….but I will show you how you can overcome that problem of having none anyway so you can still do sgraffito. But hey- Sgraffito is only one of more than a 100 techniques in that workshop :)

I just love Acrylic Paint :)

Hope you enjoyed the little video :)
Nat
What fun to watch this, and wonderful results. That background ROCKS!
Wonderful Techinques and I am going to purchase some of those Liquidtex Heavybody paints … Could you tell the the colors you used ? Thanks so much for sharing!
thank you Connie, I do not recall all the colors I used but you can see the range of colors they have at Liquitex: http://www.liquitex.com/ Have fun!
Great technique, even better your use of color. Thank you
This was such a great video. Thank you so much! It helped inspire this page and I linked to your blog too. Thanks again for all you do! http://jessicasporn.blogspot.com/2012/06/mashup-wednesday.html
WOW!!!! That is gorgeous…. how could you possibly improve it?
Background?! I would have been done with it after all that! I think it looks fabulous all by itself!
Great video Nathalie, thanks for sharing.
AJ
what a fabulous video. Nathalie I love the look of all the liquetex paint and tools. I “need” that splatter brush too.
Danke für den tollen Artikel – und den Tipp mit dem kostenlosen Muster :-)
LG Danny
What a great technique, Nat! I love the possibilities of the different things you could use to scratch through the paint. The printed tissue paper layer adds nice depth to your wonderfully colored and textured piece! Also, I wanted to tell you how I much I enjoy your videos. Your fun, whimsical nature comes through in the production. Also, how amazingly clear the close-ups of your work are! What is the video camera that you use? Can’t wait to see more!
Lisa, I use a Logitech Camera Vision Pro – it is a really good camera- I like it a lot.
Well, now I need to go look for one of those splatter brushes – that made me all kinds of happy watching that! (I’ve tried with regular brushes, and wasn’t that excited about the effect)
I went to a WS on Friday and we did sgrafitto with Golden Open acrylics. If you like sgrafitto, you’ll love Golden Open. (No, Golden doesn’t pay me :D Also, I prefer liquids better because I need my acrylics to dry quickly and open takes a whole day.)
Bye, Kitty
Interesting :) I do know Golden Open Acrylics – but I feel the effect that I want to archive texture wise is more beautiful and more me with the Liquitex Heavy Body. And I do use all kinds of acrylic paints too ;) They do dry quick- but that is then when you can use a Retarder to mix in for longer opening time. I guess every artist has their own loves ;) Thanks for your comment, Kitty
nat
Love this piece!! The colors and the texture are wonderful and fun. Need some heavy bodied acrylic paints. Thanks again for sharing you expertise.
I’m in acrylic heaven:) Thanks for the vid Nat!! Your such an inspiration!
Danke für den Link! Ich habe die Probe einfach mal angefordert und hoffe jetzt ganz dolle, dass ich zu den Glücklichen gehöre…
Sonnige Grüße – Irma
Gah! I just LOVE your videos, love watching you work. Amazing piece! (I’m loving your Acrylics class by the way…working through at my own pace and having fun playing with paint and color.) You’re SO inspiring! :)
This looks like so much fun! I have lots of acrylic paint but not heavy body. Off to the store and off to creativity. Thanks for great post, Nathalie!
Simply amazing, I need to get some heavy body’s too…great video Nat!
Love <3
i’m in love. once more! girl your productivity amazes me!!!
one question: what surface are you working on? doesn’t seem to be paper…
off to get inky!!!
I used a paper block for acrylic and gouache painting with 250g. It is block made for the art supply store in my hood. I love that it is still thin enough that you can use it in an artjournal- but total sturdy and it is adhered on all four sides to the block- so you have to cut it off, which prevents wrapping. Not sure which real paper company stands behind it.
What I hear most often about my work…and sometimes I am not sure if it is meant as a compliment- hahahaha- is that my color combinations strike as unusual. Sometimes I get asked how I thought of putting those colors together. Truth is…I do not think that much about it anymore…but …I came a long way experimenting and trying things ;) So I thought I would share with you my philosophy of colors in a couple blog posts and also refresh some color theory stuff.
My philosophy which I often share in my classes is:

If you want to work with paint media- wether it be acrylic paints or others – you have to treat colors as if they are your friends. They have different personalities and there is a different time and a different place where you want to spent time with a certain friend. I could also say – Colors are LIKE my friends, but hey…I don’t want to start explaining which friend of mine reminds me of which color- LOL. I wanna keep my friends ;)
So before I go into the whole lot of color theory, color wheel and mixing …let’s look at those colors lightly first…let me introduce my friends to you, meaning the colors that I tend to meet often.

Yellow is a pretty new friend of mine, I am still a bit cautious with Yellow…I am never sure where yellow is heading to with my other friends. Yellow is light and a very positive friend. Yellow is kind of extrovert…boy…yellow is really really loud sometimes. Yellow is always intruding but mostly in a happy way. Yellow is my outspoken friend. My friend yellow can be pretty negative too though…sometimes jalous and sometimes a coward.
Here are some samples where I used yellow prominently:


As you can see I use yellow to make statements a lot.

Blue is an old friend of mine. Blue is a bit passive, calming and refreshing. What I like about Blue is, that Blue is open to everything. I like that I can bring blue in with most of my other friends and that Blue is never really overpowering. Blue makes me also sad sometimes…but Blue is a good sport…


Ah Blue….

Red is a handful! Red is so passionate and polarizing. Pretty much a drama queen when with others, sometimes also aggressive. Red is always overpowering, always wants to be in the foreground. Can’t be quiet…can’t be in the background too much. But Red is warm and it is so much fun to be around Red…it is sometimes the life of a party ;)


My first round of friends – more of my close friends will come tomorrow.
What are your favorite colors that you tend to use the most often?
Nat
I love pretty much all colors but tend to love the bold ones. Red is definitely one of my favs. :-).
I love to use all the colors at once but a combination of blues and greens is a favorite. Thanks for the articles on color.
I am a colorist! I love colors, bright and bold. My favorite combinations are yellow, lime green and pink. Sometimes I swap the lime green and pink for turquoise and/or orange but always keep some yellow. My thoughts are to keep ME happy and full of SUNshine/light. That’s not to say that I don’t use any of the other colors. My latest Art Solo Exhibit was titled Visions of Color at the Stanley-Whitman House in Farmington, CT.
Colors personified–love it! Green has been my favorite color since forever! I find myself using every shade of turquoise and orange in the last few months, however. In my art journal I try to vary my starting/background colors; I begin every spread by trying something in a completely different color scheme than the spread before. Yesterday I started a spread with brown and purple. Today, blue and green.
What a great idea with the spreads…and now you have me longing to create something with brown and purple- yum yum!
Nathalie, I loved this colourful post! In my home, I decorate in shades of pale sanctuary green, I paint in golds, plums, aquas, and cranberry reds, and quilt in all the colours of fall. It’s a complex way of loving all the colours of the rainbow. (By the way, I love the posts in German–it’s fun seeing how much I can figure out after so many years!)
That sounds like you have a lovely decorated home Anne- love your color choices!
Thanks for your thoughts on color. I love the yellow, turquoise, and orange layout!!
I love the blues, turquoises and earth colors.
Blue and rust/earth tones are my usual. You may have inspired me to try more though.
Well done, a great visual explanation of how to make friends with colour
It seems I have colour periods – when I have a brown period every LO seem to have brown and when yellow is the thing, Lo’s turn into yellow. But I think pink, turquoise and yellow are the colours I use the most. I hardly ever use purple.
Das ist wirklich mal interessant. Bis vor 1-2 Jahre habe ich gelb als Farbe gehasst…inzwischen kann ich die beim Werkeln mit Farbe kaum noch wegdenken…und am Liebsten in Kombination mit türkis…aber anderseits nervt es mich auch, dass ich so hingezogen bin zu diesen Farben…ich habe das Gefühl dass alles gleich ausseiht…
Ich freue mich auf die folgende Runde – Irma
Ja – aber das ist ja immer phasenweise- Deine nächste ist bestimmt schon im Kommen ;) Liebe Grüße
nat
Love to read about your friends ehhh…colors! And your gorgeous work! Must say, the yellow one on top.. wow!!!!
I love colors, more and more but my all time favourite must be turqoise I think.
Danke für die super genial geschriebene Vorstellung deiner Freunde, ich liebe deine Posts. Und ich habe keine Lieblingsfarben, weil alle Farben auch meine Freunde sind und ich es einfach bunt mag. Liebe Grüße, bin schon gespannt auf die nächste Vorstellungsrunde, Birgit
Es ist halt gut viele Freunde zu haben, ne? ;) LOL- sei gedrückt, Süße
Nat
I love color…all colors but I love the blue ranges…sea, ocean…space…calm!

Totally stoked to join again into the Stencil Hop for Julie Fei-Fan Balzer‘s Crafter’s Workshop Templates. I guess if you follow my blog…I do not really have to tell you, how much I love them. If you don’t follow my blog…you should (just kidding ;) )
The designs are amazing and Crafter’s Workshop creates them in a high quality way that gives you a huge versatility in usage!
When Julie came out with those amazing Templates that can be layered I was almost fainting…LOL – sooo cool!!! You can use them with different acrylic paints or with spray paints or with Derwent Inktense blocks and Artbars – oh brother…endless possibilities
Today’s blog hop is focused on the Lotus Blossom Template – it is BEAUTIFUL (insert picture of me in cheerleader outfit exclaiming each of the letters while jumping up and down…oh wait…that might be a terrible picture….better proceed reading ;) )
![]()
And there it comes another fun way on how I love to use them :) – I created a Luminaria with the n*Lighten Technique

So much fun to use the n*Lighten Technique with the Stencils- they are perfect for this. So let me show you how it works.

You need for the first steps:

How To:

I draw a circle around the image that would give enough space to hold adhesive. Then I cut a letter size kraft paper sheet length wise in half. I cut circles with a craft knife out of the kraft paper that would just show the image. I adhered the Lotus Image to the back and bend the paper and glued the ends together forming a role.

And there you go – a summer luminaria- perfect in the garden or on your dinner table.
Warning: Never leave a burning candle unattended. Keep out of reach of children, playful husbands & pets. Be careful to not have the kraft paper too narrow to the candle!
Don’t miss out the others on this blog hop:
Julie Fei-Fan Balzer
http://balzerdesigns.typepad.com/balzer_designs/2012/04/stencil-hop-lotus-blossom.html
Nathalie Kalbach
http://wp.me/p1ILec-1hq you are here :)
May Flaum
http://mayflaum.com/?p=8237
Jenny Barnett Rohrs
http://www.crafttestdummies.com/?p=12271
Nat
———
My new Über*Media Online Workshop is here – Learn the whole Shebang about Acrylic Paints

———-
Supplies I used for n*Lighten Technique:
A lovely idea and the technique is wonderful too. Thank you for sharing this
Love your idea!! and love the stencils…
Awesome! In addition to loving the template and luminaria, I can’t wait to try embossing on pastel paper! I’m going to become a follower right away!
What a clever and cool idea…will look good on my deck this summer! Thank you for sharing.
Very Cool Nat!
Beautiful. I love Julie’s stencils and seeing what everyone does with them is awesome.
love THE LUMINARIA!
Another idea is to use one of the new battery operated tea lights instead of a live flame.
This is beautiful! I love the results! What a great project!
Excellent idea, Nathalie. Thanks for sharing your creative and unusual use of this very cool new stencil. It gets me thinking out of the box in using stencils!
What a creative way to use julie’s beautiful stencil…I love your luminaria!!
Awesome project. I love Julie’s stencils.
wow…luv the lotus and your projects!
You are very creative. I’m going to try that.
I never would have thought to do that. Thanks.
Omg I looooove their templates!!!
Your project is soooo coooool!!
Hugs and Hi! If you put your tea candle in a drinking glass or jam jar, then you lower the risk of burning your paper: you can also wrap your luminaria paper around the jar as well. Just a thought. Blog Hop On! x LN
HI Nathalie, not sure if you did this or not: but if you put your tea candle in a glass (drinking or jam jar) it is much safer and you can wrap the luminaria paper around it as well and not fear it burning. blessings.
 I had another play date in the n*Lab, this time with Derwent products.
I am a huge fan of their products – be it the Inktense Blocks or their pencils or I just bought sketch pencils- all I can say is love love love. Derwent Artbars are triangular-shaped water-soluble wax bars.  So when I heard of Derwent coming out with the Artbar – I was hooked to get them ….and so here they are -in my studio and they were the perfect candidates for some n*Lab Time.
Let me tell a bit about them in this Video – what you can do with them and what I actually did on the canvas (no tutorial just blah blah!):
[youtube=https://www.youtube.com/watch?v=jQ9Xlls5V7U&feature=youtu.be]
I showed you the play sheet already in an earlier post:

Here is the progress of the Canvas – layering as I talked about in the video:

So my favorite features of the Derwent Artbars are:
Here is the Canvas now finished:

supplies: Derwent: Artbars, Shave ‘n Save, Scraper, Waterbrush – 7Dots Dreamer Paper and Stickers, 7Gypsies Tissue Paper and Chipboard Letters, Crafter’s Workshop Template


I hope you had fun joining me in my n*Lab day….already thinking of what to do next and when :)
Have a gorgeous day
Nat

One of my New Years’ Resolutions was the n*Lab. What does that mean you might ask? I realized that one of the things that got lost in my time to run my new business is the time to actually experiment with new techniques and fun stuff. Not just doing an assignment or play with the things I already know…no no – I mean doing something completely new to me, experimenting, taking things further. I really had a hard time making room for this in the last couple months.
So how do you manage to make time for it? You treat it as a fixed date – it is in the calendar now- every month – yep! Because when it is in the calendar…mmmhh – yeah ..I follow the plan….see- I have been a paralegal far too long in my life- LOL.

For a year now I have been eager to finally work with the ICE Resin – and since the amazing Jen Cushman also signed her wonderful book “Explore, Create, Resinate” for me and handed me some supplies, there had to be an n*Lab ICE Resin appointment in the calendar. I followed the instructions- which btw are very clear and amazingly written out in the book. The book is awesome! I actually felt like a cool chemist mixing the two components together in between I was thinking I should get my white chemist smock and my goggles out…and then I remembered that there is no one in the apartment to take a photo of this…, and …it went all kind of well…as long…as I ….followed the instructions ….

I had it all prepared, I had a huge garbage bag on my studio table for protection, I folded the components for 2 minutes, then I swirled them for 2 minutes, I waited for 5 minutes, I started pouring carefully into the bezel….yep…all good…until my impatient me started overpouring…mmmh …so what to do…leave it. Fine… LOL….Let it dry….fine…but have I ever told you that I’m the most impatient person in the world? I tell you this as a secret…never ever tell my students, ok! Sure, it said to be patient and it said to wait for a couple of hours, but see, I really really wanted to see how you could prevent having all the Ice Resin slowly making its way over the bezel oh and surely it had to be dry after 2 hours, let’s touch it and leave some DNA -Mark in the ICE Resin…oh and sure it says to let the ICE Resin paper dry for about 10 hours, but mmmmh- let me just lift the sticky side up after 3 hours and move the bezel at this very same moment by doing so and have it flip over like a toast on the buttered side and…ohhh noooooooo…..

You get the picture ;)
Anyway…my very first bezels are looking ok-ish….they are by no means good or perfect, I am semi-proud – they have some scratches and bubbles and you clearly see the paper lifting inside oh and don’t forget the right pointer finger DNA-mark …but I totally got the hang out of this- and I will do this soon again!

Supplies: ICE Resin, Ribbon and Paper by Susan Lenart Kazmer, 7 Gypsies Bezel, Crafty Secrets Paper, Vintaj Heart and Branch, Feather, Canvas Fabric

I love how the feather turned into this glass feather- it is hard to describe but I totally want to do something with feathers, that are entirely inlaid in the ICE Resin – sooo cool. well – here it looks like a semi-plugged chicken (Germany Saying)…at least I “put a bird on it” (American Hipster Saying) ;)

Here I wanted to see how German Glass Glitter looks like embedded and added a Prima Flower Embellishment. Actually it looks quite cool – something is missing though…but I will use this as an Embellishment for sure :)

I am actually hooked on making ICE Resin Paper- it is hard to show- but this Prima paper is now translucent and has a glass like surface. I need to do something with it- so you can see better. There are some opaque patches here and there- as the paper is pretty thick it was harder to treat when the above shown thin Paper by Susan – but still…
I hope you liked my Tales from the n*Lab…it just shows…I have to practice new techniques too and I’m actually a klotz…when I try something new…all kinds of things go wrong and that is how I know how to tell my students later all those things they have to avoid and how they can turn it into something awesome and “Perfect” ;) You didn’t really think I do know all those things because I’m so super smart, right? Just kidding ;)
Wishing you an awesome day
Nat

As promised I post a tutorial about the little Make’N Take Notebooks which I made for Prima Marketing at the Winter CHA 2012. It was lot’s of fun to be there and thanks to all that were there :)
I would like to give a special thanks to PanPastel, Tonic Studios and Scrapbook Adhesives by 3L who sponsored products for my Prima Make ‘n Takes !
Sorry for some of the out-of-focus parts in the video- it was hard to do this today with the lights here and I didn’t want to postpone it for another week :)
Nat
A couple months ago I was asked to create some projects for QVC in England for Scrapbook Adhesives by 3L™
One of the tasks was to create cards (man …they really got me LOL – me and cards ;) )

Used SABy3L Products: MyStik™ Permanent Strips Dispenser, MyStik™Repositionable Dots Dispenser, Adhesive Sheets – 4″ x 6″ / 10 x 15cm, 3D Foam Squares – Black, Variety Packv/ Other Products: Kraft Cardstock, Pink Paislee 365 Degrees Collection Daydream Paper, Pink Paislee Parisian Anthology Paper Collection, Graphic45 Letter DieCuts, Pink Paislee Parisian Anthology Dimensions Corrugated Elements, Corner Rounder, Paper Doilies, Tattered Angels Chalkboard Glimmer Mist and Glimmer Glaze and PanPastels

Instructions:
———————–

Due to popular demand and getting lot’s of emails asking about it, I decided to reopen the Über*Media PanPastel Online Workshop earlier again. So as of now you can sign up again for this 6 week long extensive workshop. It starts on February 5th, 2012 – you have access to the classroom till July 31st, 2012- Check it out here .

If PanPastel is not up your alley ;) but are interested in taking an inspiring and fun online workshop, you can check my Über*Media Gesso Online Workshop which starts on February 15th and is a 5 week long extensive workshop- also access to the classroom till July 31st – Check it out here.
Wishing you an amazing day!!! Here the sun is shining…almost unreal – LOL- but I loooooveee it!
Nat
![]()
Comments (5)
Chantalyon
| #
Love this video…you’re right…..a great way of life…….
Reply
Riikka
| #
Amazing video and music <3 Thank you for sharing!
Reply
Sue Clarke
| #
Perfect timing Nat. Thanks for posting this…I was having a down day with life responsibilities and this gave me a lift!
Reply
Sabrina
| #
Very inspirational thank you so much for sharing!
Reply
Deborah Pierro
| #
Thanks for this movie, Nat. I posted it on Facebook!
Reply