Tutorial

Spackle Tackle Technique

CJSUberMediaOWSLOGO

Those of you who were part of the Creative JumpStart 2013 saw the videos that me and my artist friends posted on my website throughout January. The videos are not available here anymore, since I have to make room for new fun things to come ..still thinking ;) …but I thought it would be nice to repost my 10 technique videos over the next couple weeks- so that you have access to them whenever you want.

And now let’s jump to the 5th video in my Über*Media Creative JumpStart 2013 Workshop which was the Spackle Tackle Technique  – one of my faves :)

If you have no external speakers on your pc – turn up the volume a lot (the audio is very low in this video)

This and the other techniques are part of some of my Über*Media Online Classes. They are there to free your creativity with techniques and how-to’s that go beyond one certain project. I want you to learn something new that you can adapt to your own style and can use for many projects to come.

Über*Media classes are dedicated to different kinds of media that cross a variety of materials.

I do have several Über*Media Workshops available right now for example Über*Media -PanPastel, -Acrylic Paint, -Gesso, -Acrylic Ink and -FoamStamplifier.

For my Creative JumpStart Über*Media Workshop I showed some of my favorite Über*Media Techniques that can be used in your Mixed Media, Scrapbooking, Altered Art and/or ArtJournal Projects.


And here are the supplies I used in the video:

nSupplies


Hope you enjoyed this :) have a gorgeous weekend
Nat

LogoBlogSignature

Comments (8)

  • Tami Howse

    |

    Thanks so much for the “refresher”, Nathalie. I didn’t take notes during Creative Jumpstart (my first year this year to attend) and I’m sorry I didn’t. I loved it, though! I can’t wait to try this technique again!
    Fondly, Tami

    Reply

  • ลиqεŁล

    |

    Gracias por tus clases! La técnica es genial!!! Te deseo unas Felices fiestas!! besitos

    Reply

  • grandscraperona

    |

    Nat…i have used this tech several times, because always the effect is different depending on on the colors and the spots of water created. !…thanks for replaying all your ten techs. Waiting for 20l4 Jumpstart!…Have nice Xmas time…

    Reply

  • Nurse Ratchet

    |

    One of my faves and I had not remembered it for awhile….TX LGL!!

    Reply

  • Pam in New Jersey

    |

    I forgot how much fun Creative Jumpstart is !!!!!

    Reply

  • rillamom

    |

    I hope you are planning to have a Creative JumpStart Summit 2014! I just loved CJSS 2012…..

    Reply

  • Dee in NH

    |

    Thanks for the revisit. I love it!

    Reply

Leave a comment

Gesso Stamping Technique

CJSUberMediaOWSLOGO

Those of you who were part of the Creative JumpStart 2013 saw the videos that me and my artist friends posted on my website throughout January. The videos are not available here anymore, since I have to make room for new fun things to come ..still thinking ;) …but I thought it would be nice to repost my 10 technique videos over the next couple weeks- so that you have access to them whenever you want.

And now let’s jump to the fourth video in my Über*Media Creative JumpStart 2013 Workshop which was a Gesso Stamping Technique – which I love a lot :)

If you have no external speakers on your pc – turn up the volume a lot (the audio is very low in this video)


This and the other techniques are part of some of my Über*Media Online Classes. They are there to free your creativity with techniques and how-to’s that go beyond one certain project. I want you to learn something new that you can adapt to your own style and can use for many projects to come.

Über*Media classes are dedicated to different kinds of media that cross a variety of materials.

I do have several Über*Media Workshops available right now for example Über*Media -PanPastel, -Acrylic Paint, -Gesso, -Acrylic Ink and -FoamStamplifier.

For my Creative JumpStart Über*Media Workshop I showed some of my favorite Über*Media Techniques that can be used in your Mixed Media, Scrapbooking, Altered Art and/or ArtJournal Projects.


And here are the supplies I used in the video:

nSupplies

I hope you enjoyed this little technique.

Have an amazing day!

nat

LogoBlogSignature

Comments (4)

  • Gerd Andersson

    |

    Thank you Nat, for reminding me of this technique! I really hope for a new CJS 2014!

    Reply

  • Laura Strack

    |

    Thank you for a blast from the past! Love Creative Jumpstart 2013!

    Reply

  • selena

    |

    merci pour cette bonne idée!

    Reply

Leave a comment

Grungy Advents Calendar or …Welcome to the Handmade Holidays Blog Hop

Handmade Holidays Blog Hop 2013 Logo


Welcome to the Third Annual Handmade Holidays blog hop!! I was invited to join some wonderful crafters, designers, and makers to come together to create and share  a series of thoughtful, handmade gifts for the holidays during this 3 day blog hop. Our goal is to inspire you to create something from the heart this holiday season as well as share how to use products in fun, innovative ways. We intend this hop to serve as a resource to you for this holiday season and for years to come.

Hop along to each blog in the list. Each day, from November 1 through November 3, 2013, we’ll be posting a brand new list of blogs to hop to. Comment on each blog, share your favorite posts over social media, and then use the Rafflecopter widget at the bottom of each post to enter to win the Grand Prize, a gift basket filled with crafty swag from the companies on the hop! We’re ready to inspire, share, and create – are you ready to hop?
Here is my Project:
NatKalbach_GrungeCalendar06
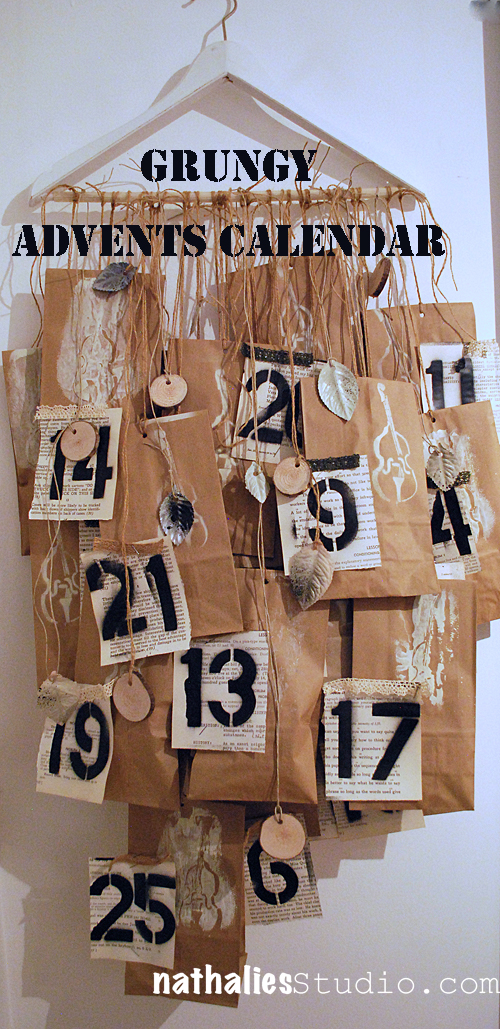
Advent Calendars are an old German tradition and they are used to count down the days till Christmas. In Germany we have a huge variety of Advents Calendars filled with Chocolate treats or little gifts and sometimes also just pictures. It is a a big token of Love when you give someone an Advents Calendar and I have always loved creating my own with little tiny gifts and give it to a dear friend or my hubs. This year I created one for a special friend…and since the task of collecting 25 little gifts is already a bit time consuming – I kept the creating of the Advents Calendar easy, fast and fun . Let’s go :)
NatKalbach_GrungeCalendar01
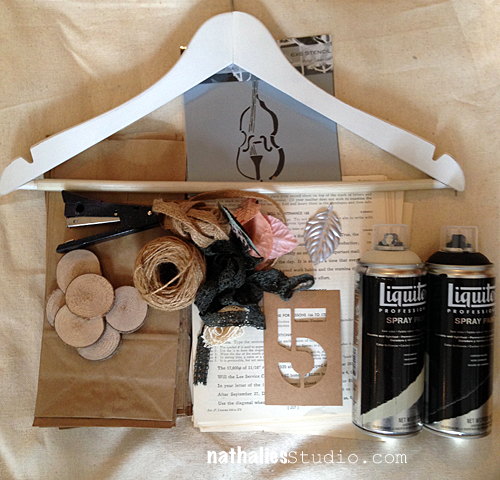
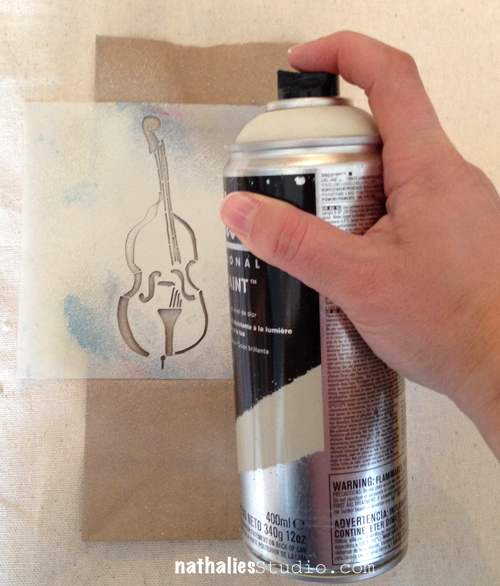
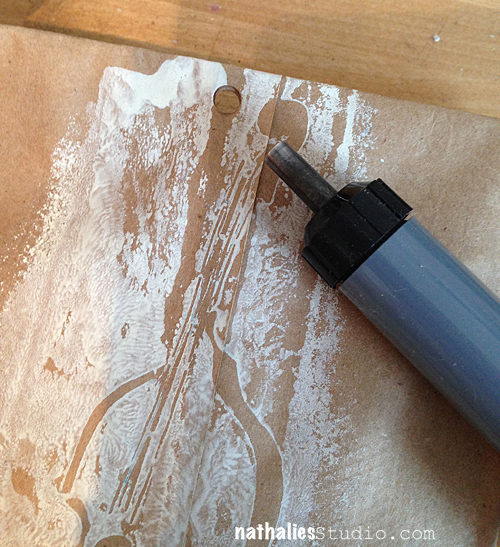
Besides the Supplies listed below I also gathered some old book paper – or music sheet paper. I started off with spraying Liquitex Parchment Spray Paint through my StandUp Bass Stencils I designed for 
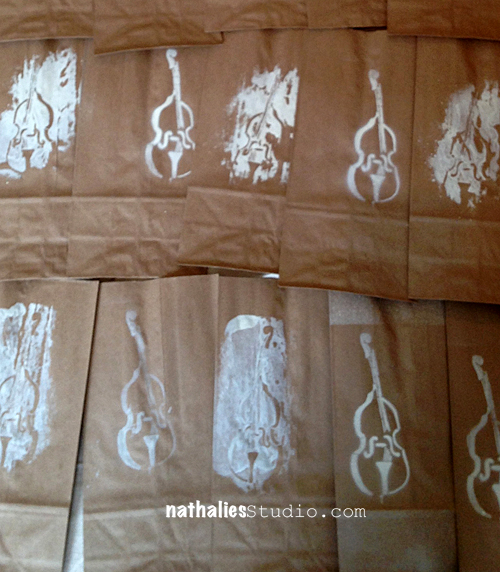
StencilGirl Products onto 25 Kraft Lunch Bags. I also flipped the Stencil once in while to rub off the excess paint and receive a negative stencil print. ATTENTION: Either wear a mask when spraying with Liquitex Spray Paint or do this outside!
NatKalbach_GrungeCalendar02
I love using these Spray Paints as you can work so quick and there is not much bleeding on the kraft paper since it is Acrylic Paint.
NatKalbach_GrungeCalendar03
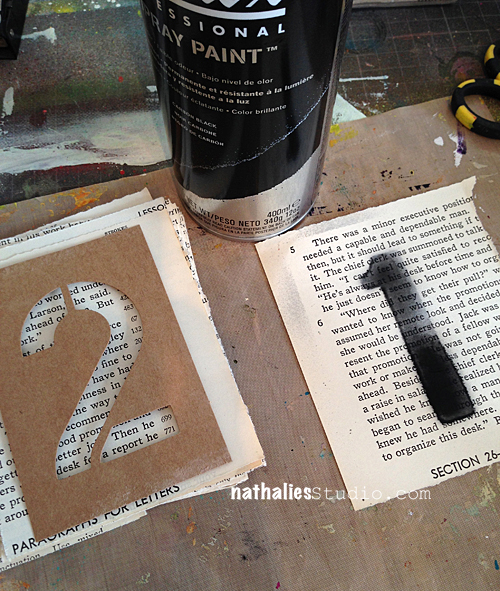
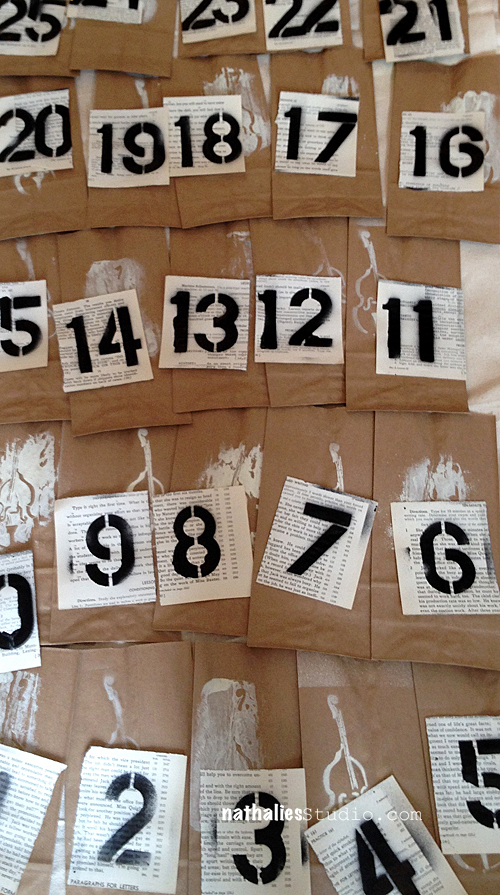
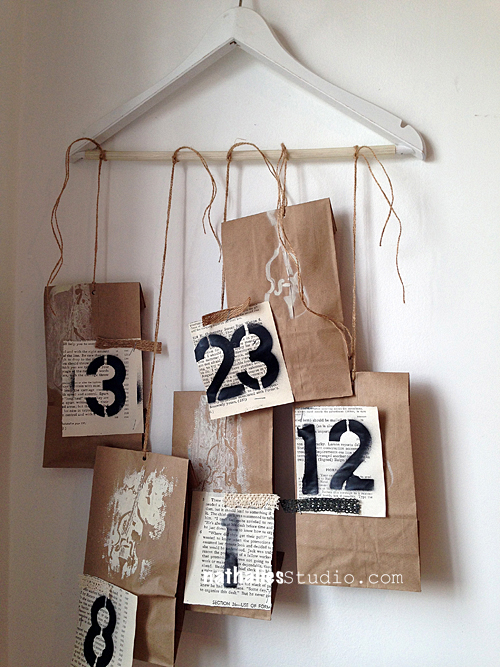
Then I used some Cardboard Stencil Numbers to spray the days from 1-25 on the book paper – I used black here.
NatKalbach_GrungeCalendar04
This is probably the most time consuming part of creating the Advents Calendar but I love the stenciled look.
NatKalbach_GrungeCalendar05
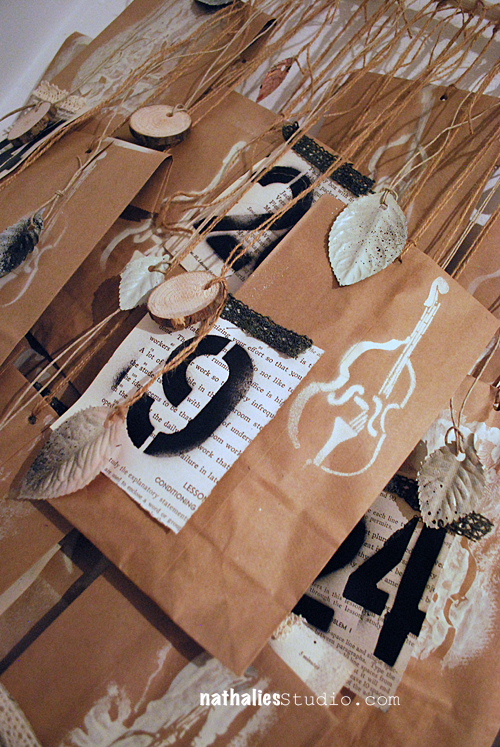
Next I spray painted the Prima Leaves a bit so that they would fit the calendar
NatKalbach_GrungeCalendar07
Then I filled the lunch bags with my gifts, attached the numbers with a stapler and added some lace to the bag. I folded the opening of the bag to the back and then used a Japanese Screw Punch to make a hole through the flap. I love the Japanese Screw Punch – a very sharp tool (use a craft mat!) which makes no noise -perfect when you share your place with other people :)
NatKalbach_GrungeCalendar08
Then I started attaching the bags on a string to the clothes hanger. The good thing about a clothes hanger is, that it can be hung anywhere – on a closet, on a nail, on a shelf edge – the possibilities are endless for the person who receives this calendar and then …after Christmas…they have another hanger… ;)
NatKalbach_GrungeCalendar09
Try to add the bags picking up different days  – I had sorted them in groups of five and then picked from each group one bag to make sure to mix it up nicely. Also make sure you keep the balance on the hanger  – you get the picture ;)
At the end I just added the Wooden Disks which I had drilled wholes into and the sprayed leaves as a little grungy decoration and voila- done :) Of course you can alter this fitting your taste- so if you do not like the grungy look you are very welcome to use for example red & white baker’s twine and add nice red cardboard numbers onto doilies instead of the book paper- and there it is- same concept – different look :) Make someone happy this holiday season with an Advents Calendar – I promise you it is well worth it when you see how much the person loves it !
NatKalbach_GrungeCalendar11
Here are the supplies and tools I used:
nSupplies

Enter here for the grand prize and comment also on my blog :)
a Rafflecopter giveaway

Now hop on over to the next person on the list:

Jen Goode http://www.100directions.com/

Here is the complete blog hop list for today

Sizzix – Eileen Hull Designs http://eileenhull.blogspot.com/
Nathalie Kalbach www.nathaliesstudio.com (you are here :) )
Tanner Bell   http://www.craftteen.com
Jennifer Priest http://hydrangeahippo.com
Vicki O’Dell http://vickiodell.com/
Have a wonderful creative day and huge hugs

Nat

LogoBlogSignature

Comments (36)

  • Susan Wilder

    |

    Really awesome looking! Thank you!

    Reply

  • Ursula

    |

    Auch eine schöne Idee, den Adventskalender an einem Kleiderbügel aufzuhängen. Bei mir gibt es dieses Jahr wieder einen ATC- Kalender, den ich in meinem Stammforum organisiert habe… Und für Junior brauche ich noch eine Idee, aber is ja noch ein “bischen” hin ;))
    LG Ulla

    Reply

  • Laura

    |

    This is fab Nat :)

    Reply

  • Janis in ID

    |

    Really different and very cool idea!!
    <3 J

    jwoolbright at gmail dot com

    Reply

  • Amante del Papel

    |

    Fantastic calendar!!!

    Reply

  • Laura Strack

    |

    Hi Nat! Very cool advent calender! Love that chalkboard paint!! TFS!

    Reply

  • Janine

    |

    I gotta start working on my advent calendars as well!

    Reply

  • Kimberly

    |

    What a great idea for an advent calendar!!

    Reply

  • Lynn Hardy

    |

    This is really unusual and a great way to be able to give slightly larger advent gifts! Thanks for the ideas!

    Reply

  • Viki B

    |

    Such a unique idea for an advent calendar!

    Reply

Leave a comment

Gel Medium Resist Technique

CJSUberMediaOWSLOGO

Those of you who were part of the Creative JumpStart 2013 saw the videos that me and my artist friends posted on my website throughout January. The videos are not available here anymore, since I have to make room for new fun things to come ..still thinking ;) …but I thought it would be nice to repost my 10 technique videos over the next couple weeks- so that you have access to them whenever you want.

And now let’s jump to the third video in my Über*Media Creative JumpStart 2013 Workshop which was a Gel Medium Resist Technique – which I love a lot :)

If you have no external speakers on your pc – turn up the volume a lot (the audio is very low in this video)

This and the other techniques are part of some of myÜber*Media Online Classes. They are there to free your creativity with techniques and how-to’s that go beyond one certain project. I want you to learn something new that you can adapt to your own style and can use for many projects to come.

Über*Media classes are dedicated to different kinds of media that cross a variety of materials.

I do have several Über*Media Workshops available right now for example Über*Media -PanPastel, -Acrylic Paint, -Gesso, -Acrylic Ink and -FoamStamplifier.

For my Creative JumpStart Über*Media Workshop I showed some of my favorite Über*Media Techniques that can be used in your Mixed Media, Scrapbooking, Altered Art and/or ArtJournal Projects.


And here are the supplies I used in the video:

nSupplies

I hope you enjoyed this little technique.

Have an amazing day!

nat


Comments (9)

Leave a comment

Embossing Tape Technique

CJSUberMediaOWSLOGO

Those of you who were part of the Creative JumpStart 2013 saw the videos that me and my artist friends posted on my website throughout January. The videos are not available here anymore, since I have to make room for new fun things to come ..still thinking ;) …but I thought it would be nice to repost my 10 technique videos over the next couple weeks- so that you have access to them whenever you want.

And now let’s jump to the first video in my Über*Media Creative JumpStart 2013 Workshop which was on how to create Embossing Tape- a technique I do love a lot for the fun effects you can get.

If you have no external speakers on your pc – turn up the volume a lot (the audio is very low in this video)

This and the other techniques are part of some of my Über*Media Online Classes. They are there to free your creativity with techniques and how-to’s that go beyond one certain project. I want you to learn something new that you can adapt to your own style and can use for many projects to come.

Über*Media classes are dedicated to different kinds of media that cross a variety of materials.

I do have several Über*Media Workshops available right now for example Über*Media -PanPastel, -Acrylic Paint, -Gesso, -Acrylic Ink and -FoamStamplifier.

For my Creative JumpStart Über*Media Workshop I will show you some of my favorite Über*Media Techniques that you can use in your Mixed Media, Scrapbooking, Altered Art and/or ArtJournal Projects.


And here are the supplies I used in the video:

nSupplies

I hope you enjoyed this little technique.

Have an amazing day!

nat


Comments (9)

Leave a comment

Weckruf (Wake-Up Call) or…A FAST Forward Making off a Canvas

The image of this window with some landmarks of Hamburg kept coming up when I was sketching things in my art journal and on my iPad. So I figured it was time to finally just put it on a canvas.

Weckruf_NatKalbach_Blog01

Here is a FAST Forward Movie of the Making off (it is not a step by step tutorial- although most steps are extensively in there ;) ) – I hope you enjoy it. I have a List of all Supplies used below

I had lot’s of fun playing with the new Liquitex Professional Paint Markers – loved that there are so many ways to use them and the colors are just to die for .

nSupplies


and
24cmx30cm Canvas
Loads of old Book Paper

Weckruf_NatKalbach_Blog03

I have some other ideas for this image – color wise etc…so you might see this coming up again in a different look :)

Would you like to see more fast-foward videos in the future?

Have a wonderful day :)

Nat

If you want to learn different techniques for art journals and mixed media canvases using Acrylic Paints, Gesso or Acrylic Inks come and take my Über*Media Online Workshops.


Comments (20)

Leave a comment

Making Your Own Molds Tutorial

MakingMolds_NatKalbach

Ever since coming back from Winter CHA 2013 I am obsessed with my new found product – which is actually not brand new – Amazing Mold Putty by Alumilite.

I used one of my first resin figurines made with a mold on this layout you saw a couple weeks ago

And here is now a video showing you how I made this mold- it is quite long with 20 minutes…but it is a several step process – I hope you enjoy it :)

[vimeo 61658300 w=400 h=300]

If you need the direct link because your browser or mobile device are acting weird, here you go :) https://vimeo.com/61658300

There are lot’s of amazing ideas and tutorials that go way beyond my basic video on the Amazing Mold Putty Blog– check it out.

What comes first to your mind to make a mold with when seeing this video?

Have an awesome day!

Nat

Looking for more free tutorials by me?  You can find more here!

Comments (12)

Leave a comment

Prima Make ‘n Take Summer CHA 2012- Keepsake Boxes

As promised I share with you the Make n Take Keepsakes Box I did at the CHA Summer 2012 Prima Booth. Thanks to all the people that came by and joined me :) – I had a lot of fun with you!

Supplies:
My Prima Place Freebie Paper or other Prima Paper
3 Prima Flowers- white and light yellow roses
1 Cherub Resin #891404
20 inches lace # 541125 or  # 529420
1 sheet of Say it in Chystals 560331 or Item# 553944 or Item# 554194

Prima Letterpress
Prima Chalks:
Teal Damask #89120,
Summer Field #891329,
Rusty Bucket #89109,
Tin Can #891152

papercutter, pencil, bonefolder, ruler, scissor, MyStik Permanent Scrapbook Adhesives by 3L

Have an amazing and wonderful day

Nat

Comments (5)

Leave a comment

Typical Northern German or…Weather Talk

A couple of days ago I showed you the amazing project by Janna Werner which was the result of our collaboration regarding Typisch Norddeutsch or in English “Typical Northern German”

I would like to share my page with you too and also my video on the process for this artjournal page.

When Janna and I thought about which theme we could choose for a fun project day together on our blogs, we realized that we both live in Northern Germany.

So what is typical Northern German for me? Well…first of all the weather…hehehehe – we are constantly saying that there is no bad weather, only bad clothing.Here is a typical summer week in Hamburg


And then also typical northern german for me is that we are for southern germans sometimes a bit cold and maybe also arrogant. Well..but on the second glance we are pretty cuddly ;)


And then …for me personally – Hamburg , my city- is pretty typical northern german – and there is a German song that kind of features all those thoughts and sentiments above in regards to Hamburg and that was my inspiration :)”City Blues” by Beginner

The song starts with the sentence:

This is Hamburg…and the sun shines….NOT (we put the not always at the end of a sentence, which cracks my mother in law in the States off…like ohhh long long sentence and then surprise ….everything is different from what you expected…NOT ;))

You can hear the song while watching how I made the page in this video

[vimeo 44299123 w=400 h=300]
BTW…did you know that Hamburg has more sun days when Munich? Pretty unbelievable ;) So hey…if you are ever in Germany – please come to Hamburg- it is a fun city, just take some warmer clothing with you ;)

Have a gorgeous day

hugs

nat

Comments (5)

Leave a comment