Nat

Hello from my Creative Squad! Today we have Emilie Murphy with us using my Lady Liberty stamp and my Central Ave 4×4 stencil and sharing her fresh and funky take on our theme: Wild and Free – After so many months of careful living, it’s time to go Wild and Free… In our Art! Go a little crazy in there and live it up with bright colors, exuberant mark making, bold colors – however you want to go a bit bananas. It’s time to let loose!
Hi there! Hope you are doing well and enjoying the summer so far.
My first thought of “Wild and Free” theme was to use Nathalie’s stamp “Lady Liberty“, well known symbol of Liberty and emblem of New York City. Lately, I got nostalgic about my trip there, already ten years ago. I had spent such a great week in this fantastic and energetic city.
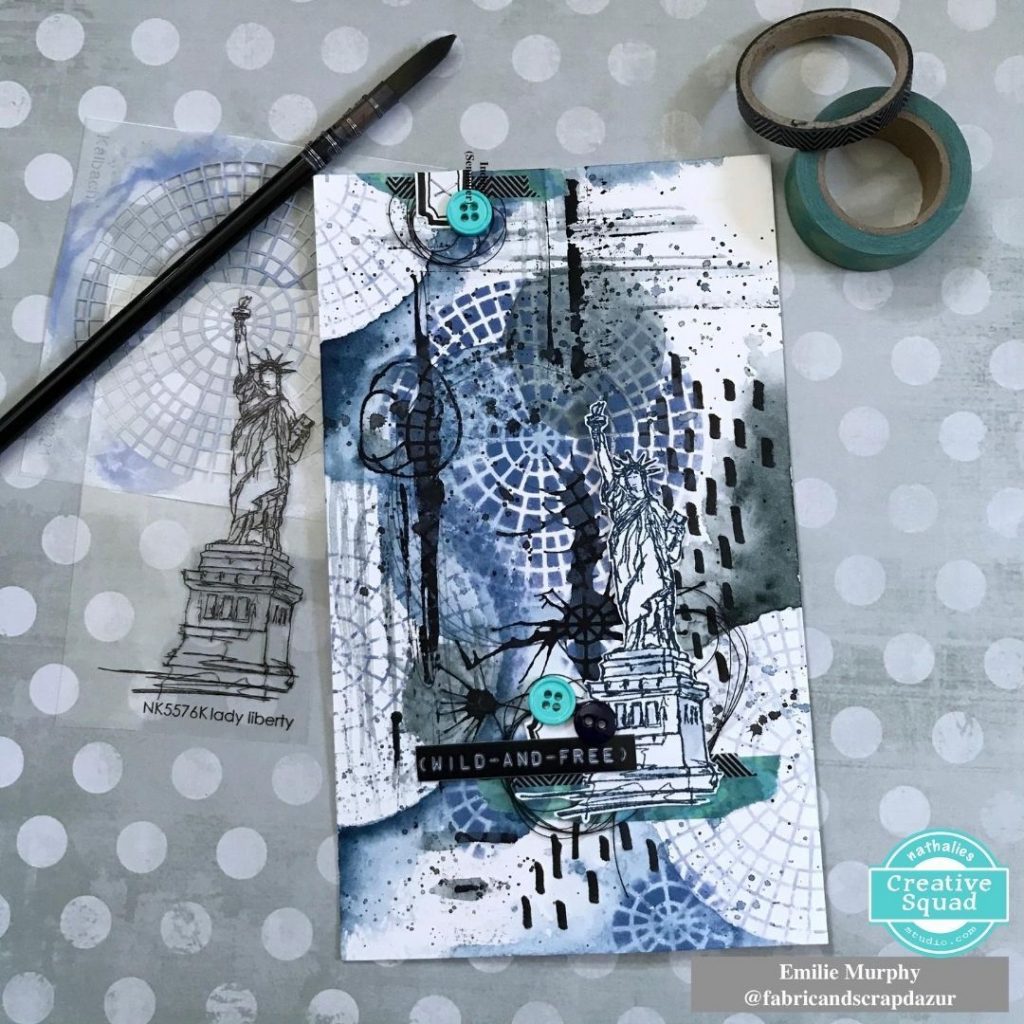
I started my page making some marks with permanent black pens on watercolor paper. I used a Posca pen to make blobs of black paint that I spread with a plastic card and straw. I let it dry completely.

Then I applied some watercolor and limited my colors to two ones with kind of neutral tone. I slightly sprinkled a little bit of salt in some wet area because I love the effect when it dries.

I decided to work on my background with the “Central Ave” 4×4 stencil. I first laid down my stencil and applied distress oxide ink directly through the stencil with a foam tool. Then, as I wanted to keep some blank less busy areas, I applied distress oxide ink on my stencil and spritzed a mist of water then laid down my stencil on the paper. I let the stencil down few seconds before removing it. As a result the paper absorbs the ink and you get a light negative print of your stencil. That is a cool effect giving a kind of ghost print.

In order to unify all together the different areas of my background, I added more watercolor in order to make pop the stencil pattern out and get some circles.
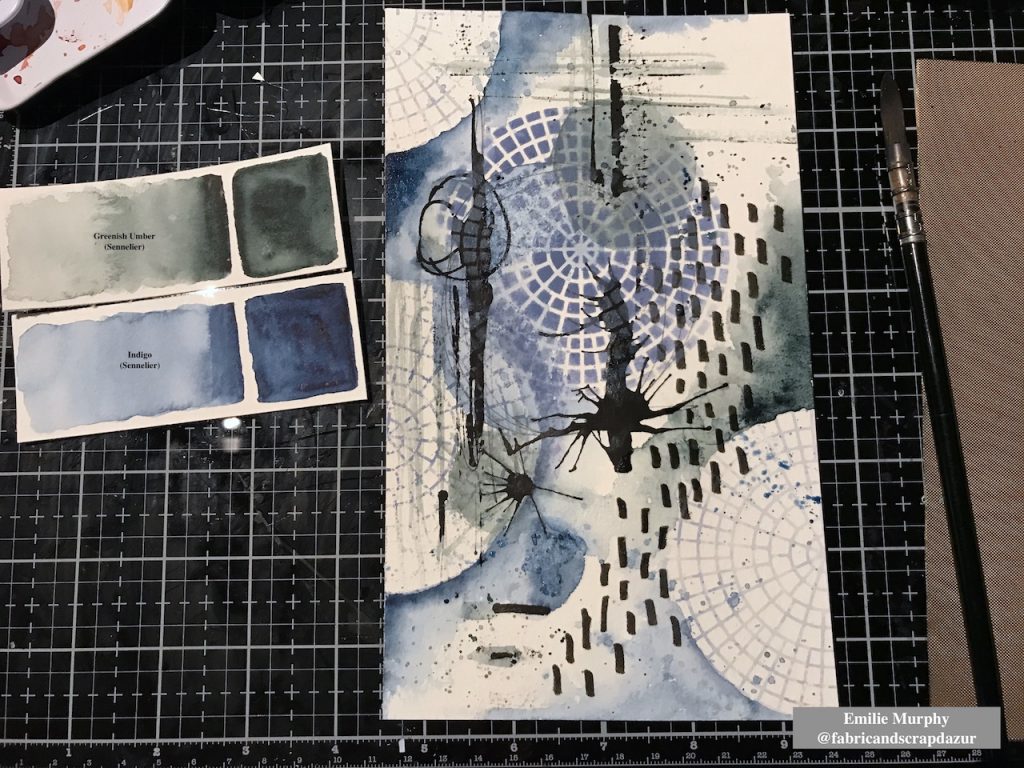
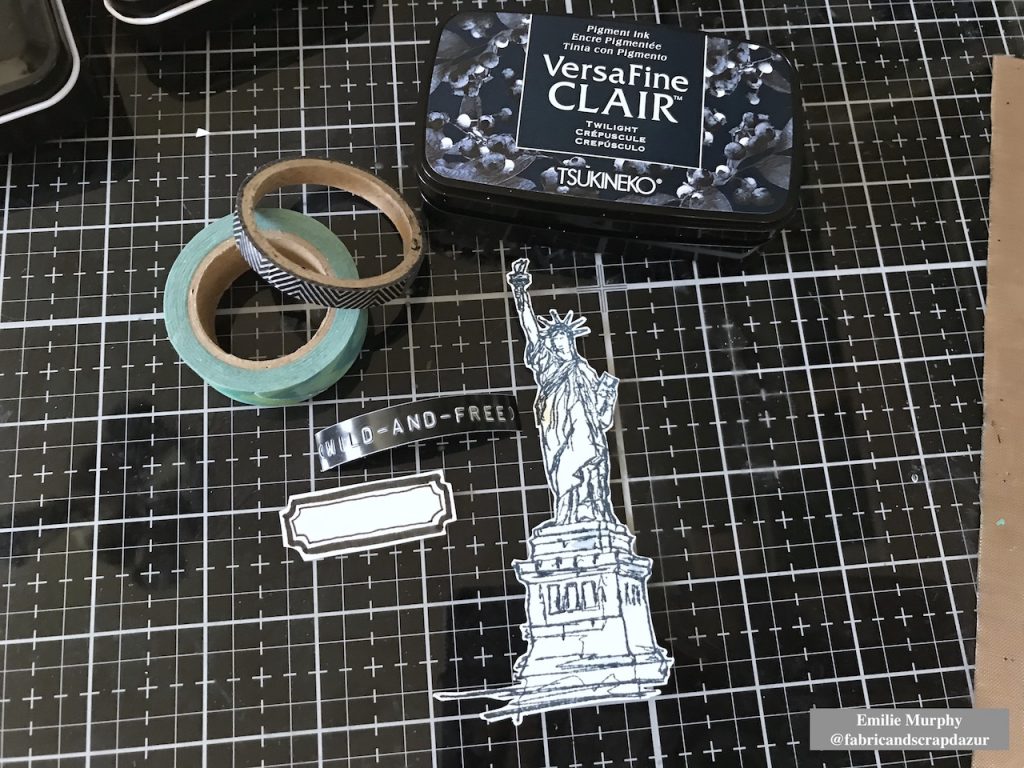
I introduced smaller circle shapes made only with the central part of the stencil. I think it brings an interesting dynamic to the background having different sizes of circles. It’s amazing what we can do with this simple stencil. I also added some black splatters with a water-soluble crayon. I can’t help myself… I love splatters!

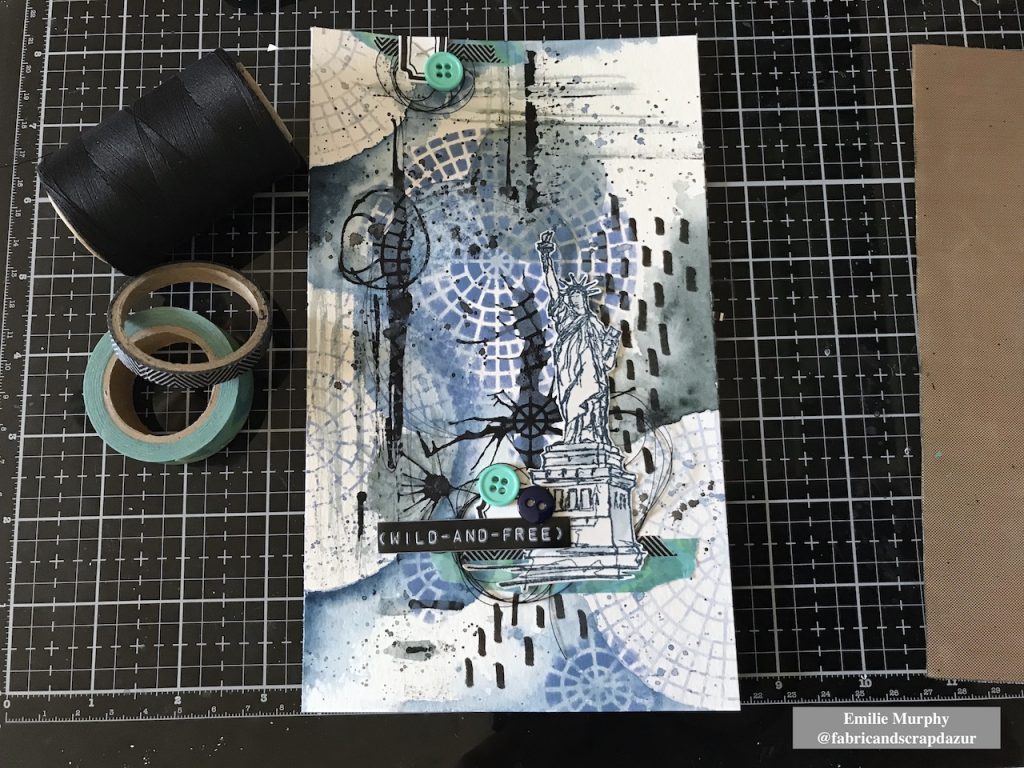
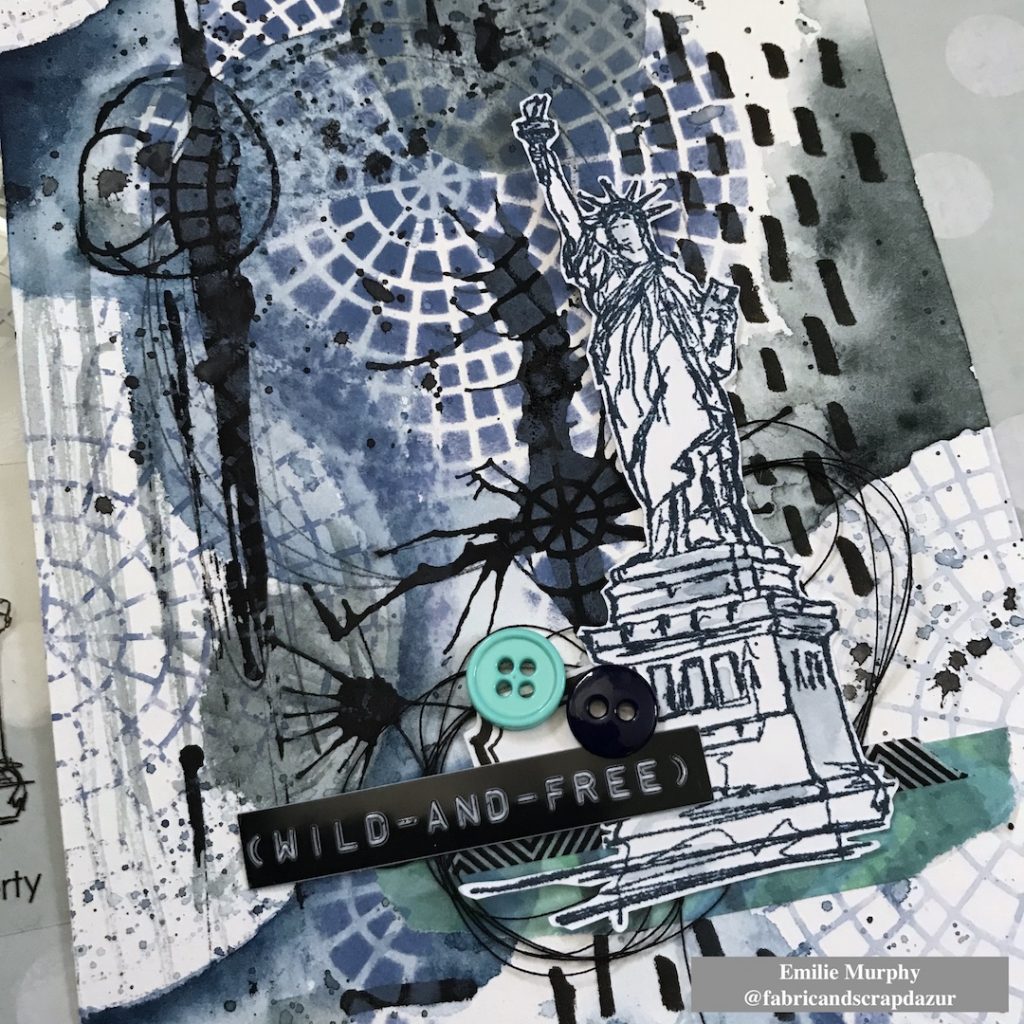
Then I prepared my focal image. I stamped the “Lady Liberty” stamp with VersaFine Clair ink. It is just a matter of preference. I could have used also archival ink. I gathered few other elements with coordinated colors that I wanted to add like a handmade label, a couple of Washi tapes, black thread and buttons. The “wild and free” sentiment has been made with a hand-label tool.
Finally, I assembled all the elements the way I wanted to finish my page.
Hope you have enjoyed this easy and pretty quick tutorial. I made the choice of doing a journal page but this could have been also great as a card.
Have a good rest of the week and see you next month!
Thank you Emilie – love how you tied everything together with the splatters, colors, and mark making!
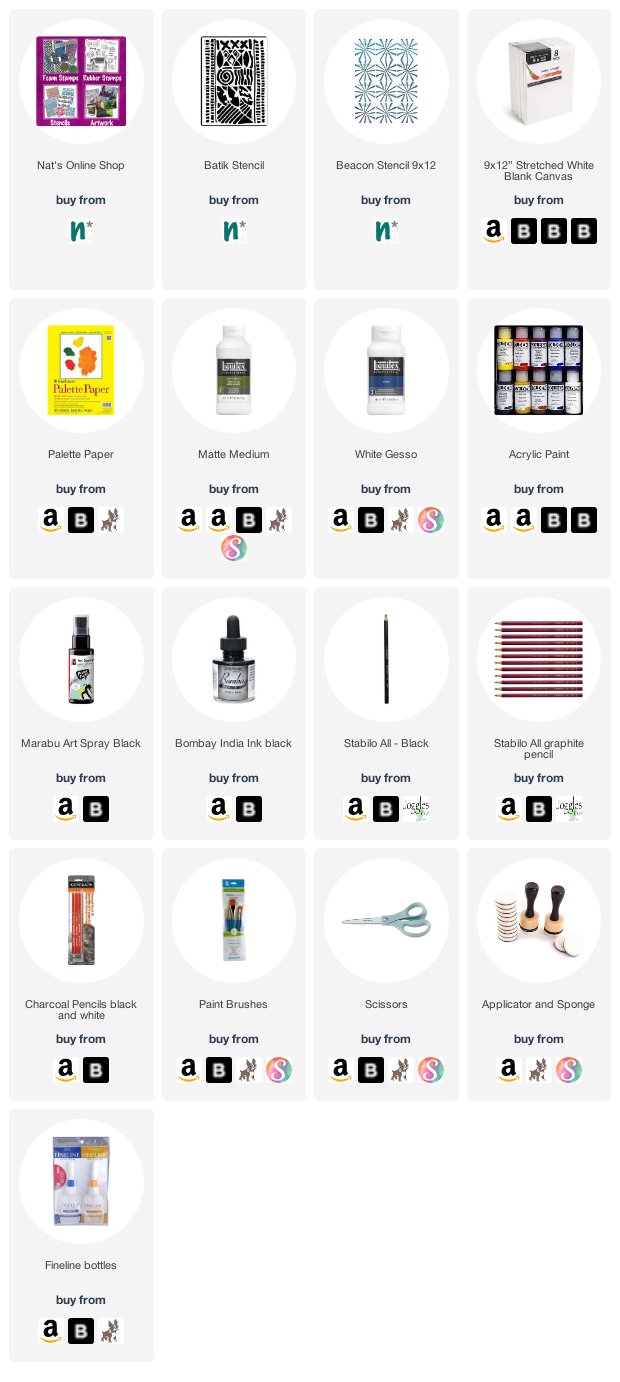
Give it a try: you can find all my Rubber Stamps and Stencils in my Online Shop and here are some of the other supplies Emilie used:
Play along with our monthly themes and weekly projects! Working on something yourself that you’d like to share? Email me how you used my stencils and stamps with the theme and email me an image – I would love to share your projects in my next “n*Spiration From Around the Globe“.
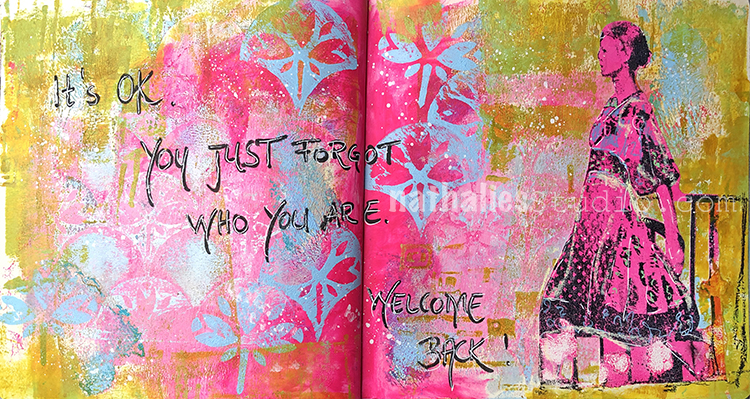
“It’s OK. You just forgot who you are. Welcome back!” Happens to all of us every now and again and it is ok :)
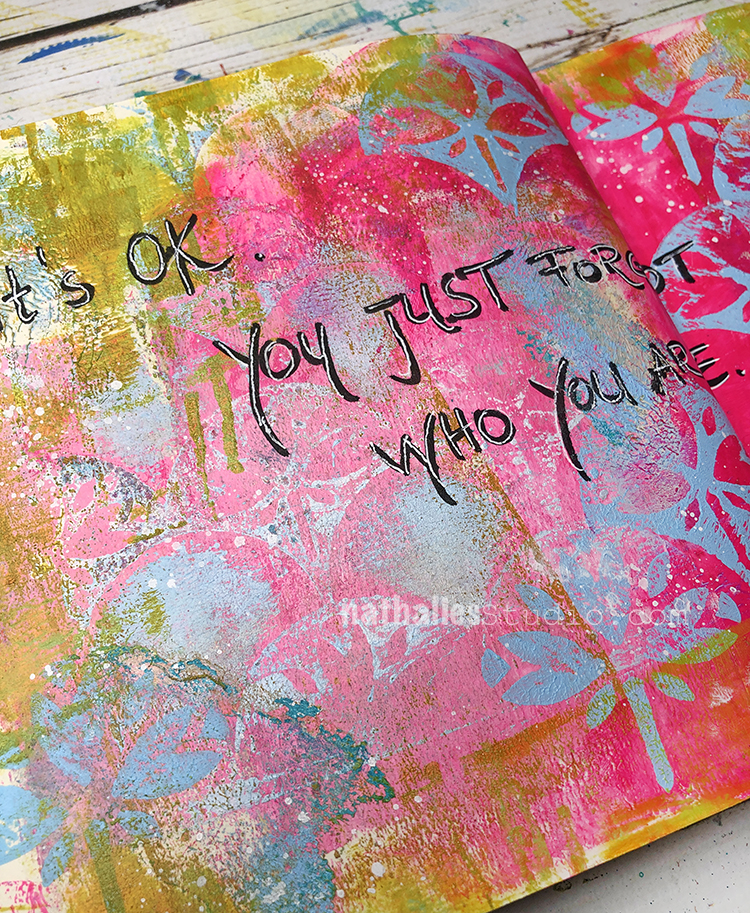
I’m pretty happy with this background – the colors, the layers, the grunge. I used acrylic paint and my Jewett Fan foam stamps and my Art Nouveau Wallpaper stencil.
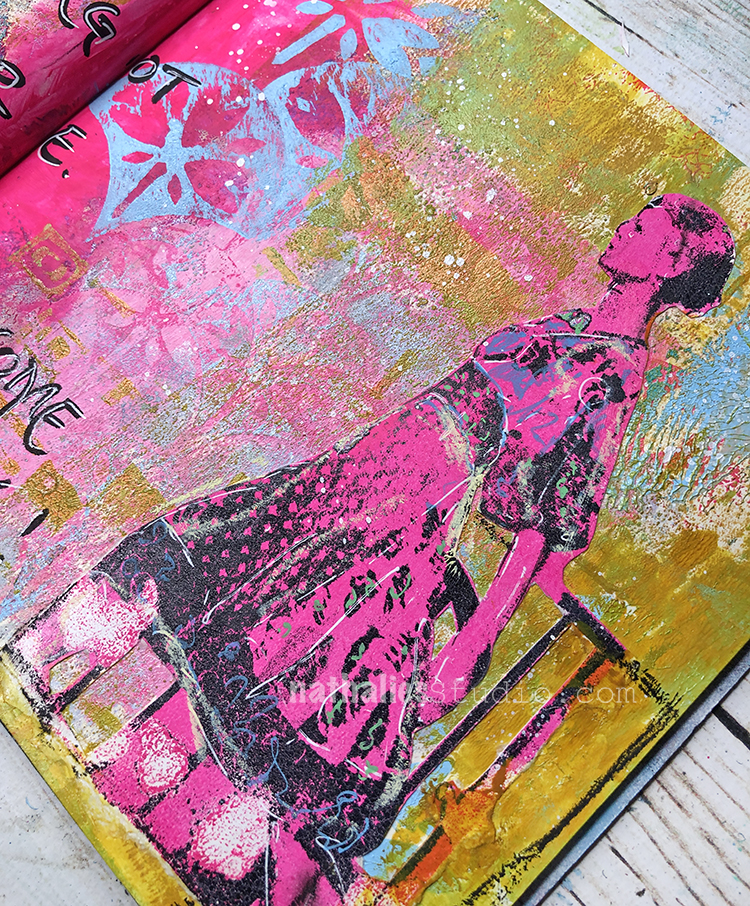
I used a transfer technique for the figure with acrylic paint and some posca markers to add line and detail.
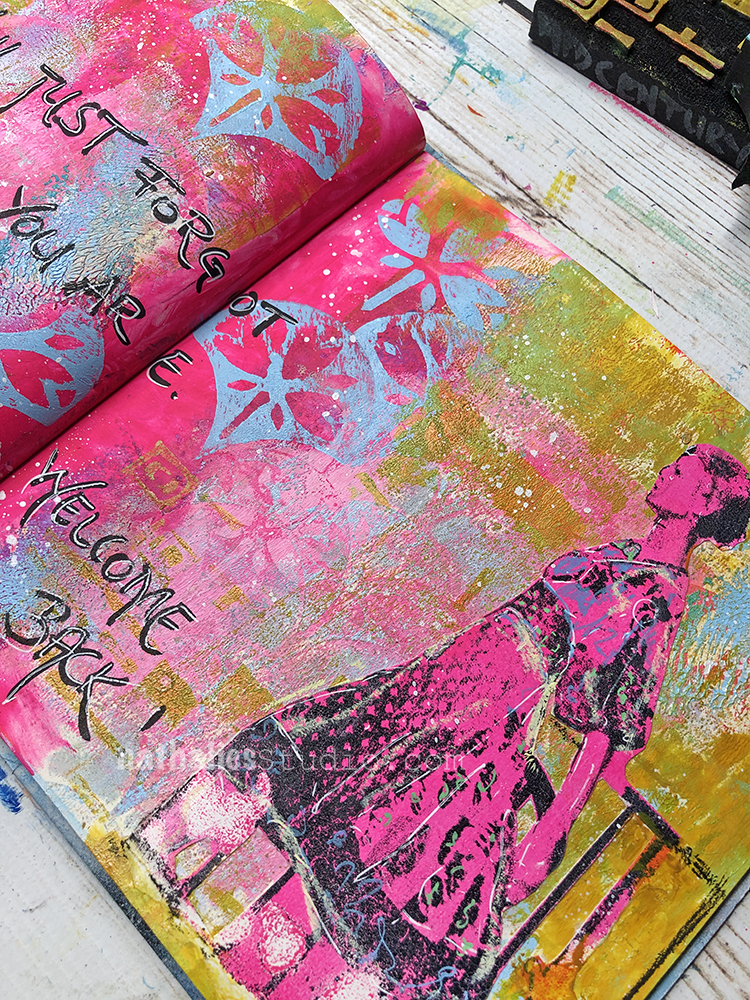
Here are some of the supplies I used:
Strolls through my hood get me out of my studio, they help me get unstuck and often I get inspired by what I see and get new ideas to create something. It is part of my philosophy about Artful Adventures in Mixed Media – which is the subject of my book. Here are some photos that I gathered in the last couple weeks.

This is a gorgeous statue on the waterfront of Jersey City.
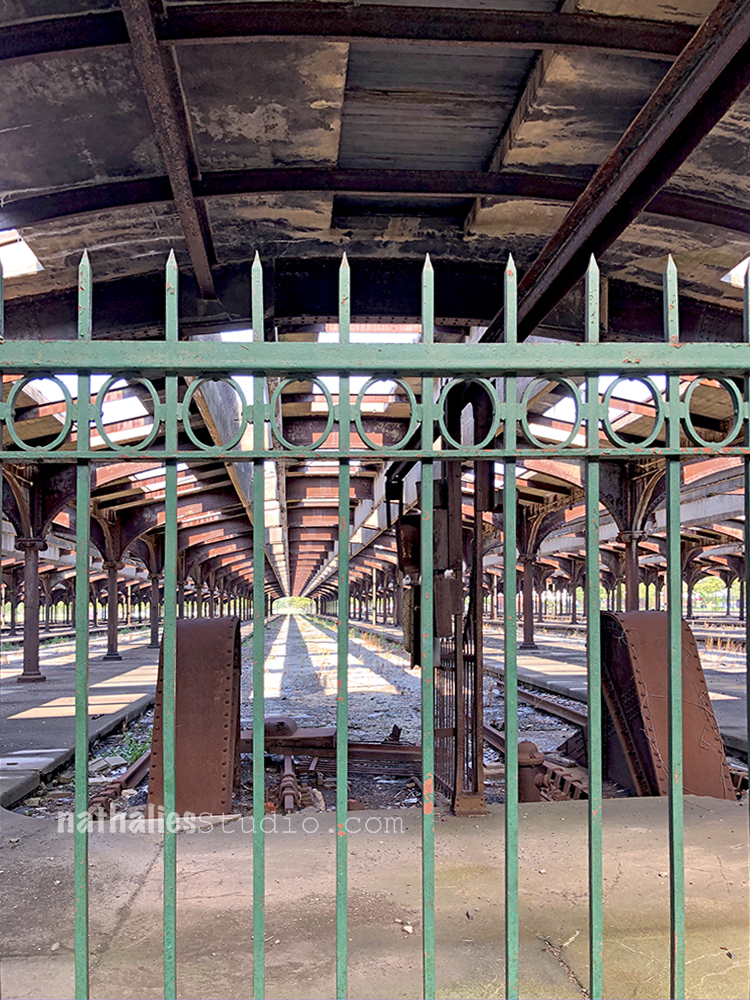
For the first time in a long time the train station on Liberty State Park was open again . This is where the immigrants that came through Ellis Island would set out to their new homes all over the U.S. Unfortunately this historic landmark has been hit hard by Sandy – but I still love all the lines and shadows when I walk through.
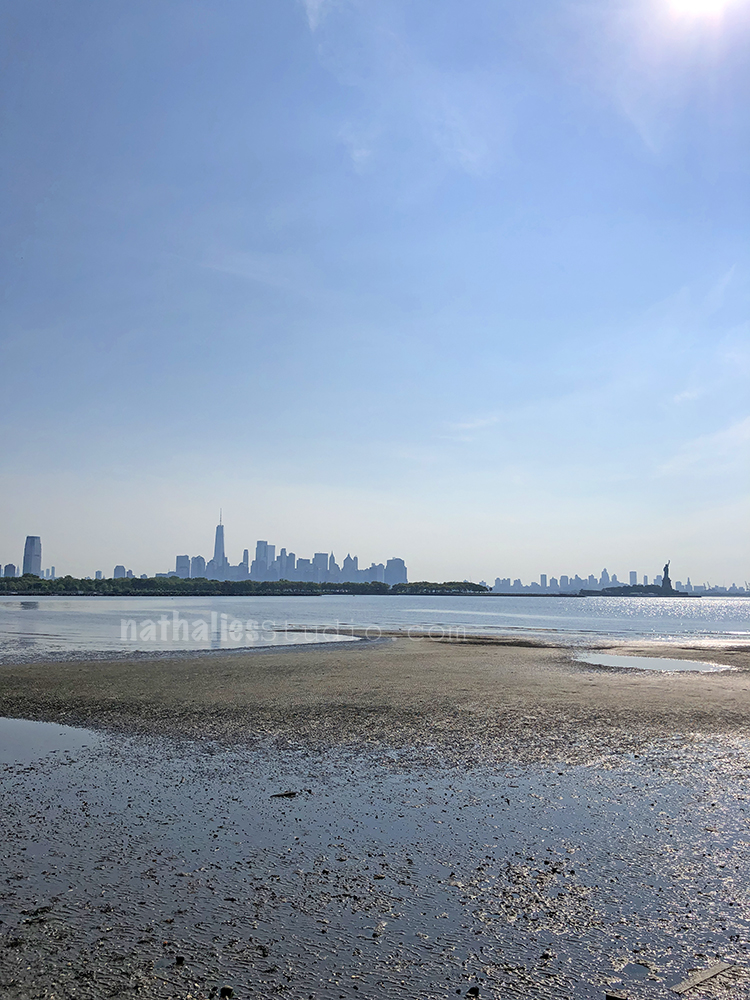
Low tide and a wonderful view of Jersey City to the left, Manhattan and Brooklyn and the Statue of Liberty – it was a wonderful early morning bike ride with my hubs.
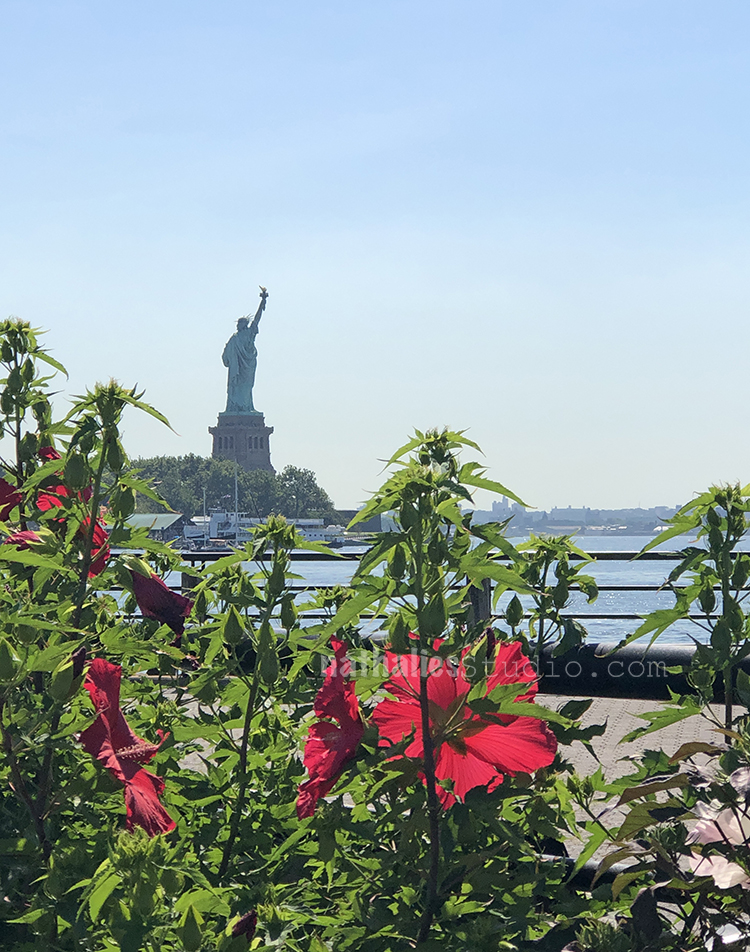
Lady Liberty and some really big Hibiscus flowers – gosh red and green – speaking of natures color scream :)
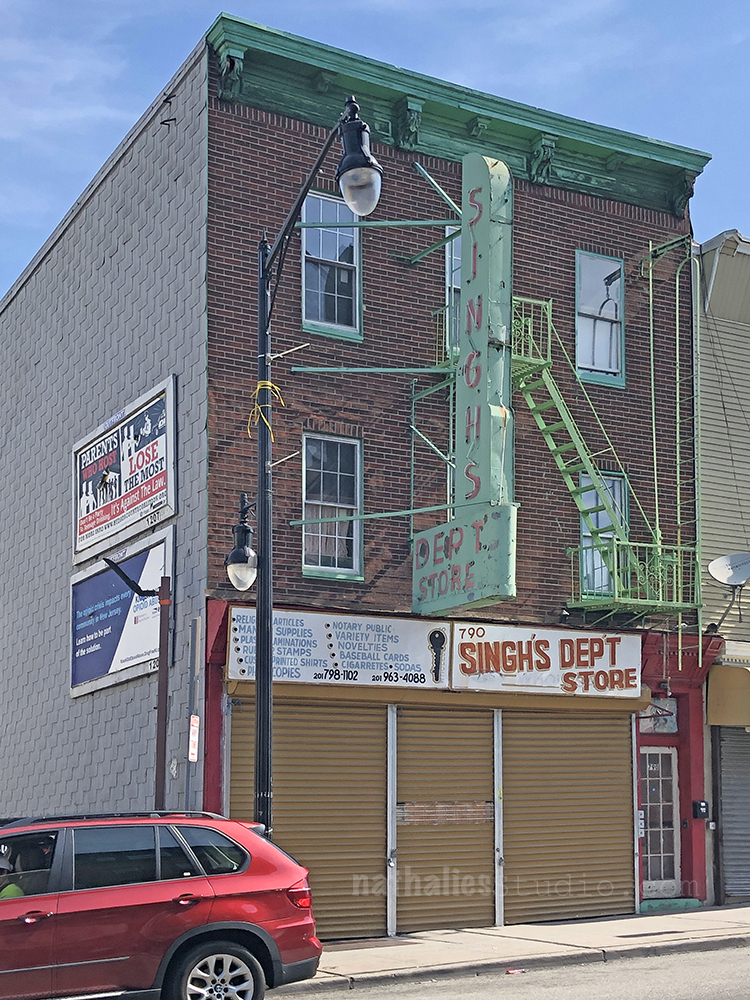
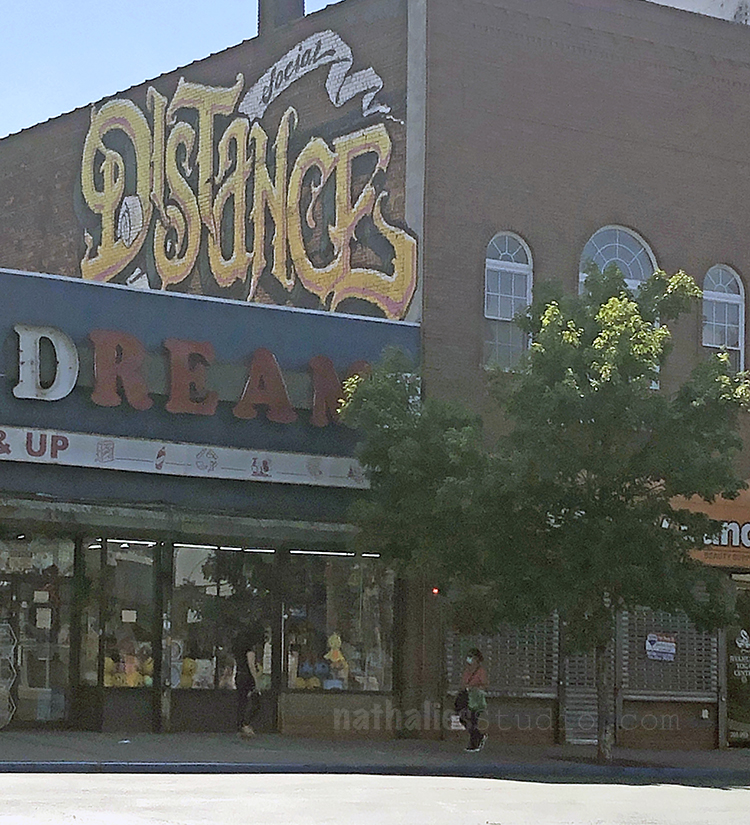
I still love love love this gorgeous sign of this old store front in Jersey City’s little India – I put this building on my list of “paint some day”
Fabulous mural!
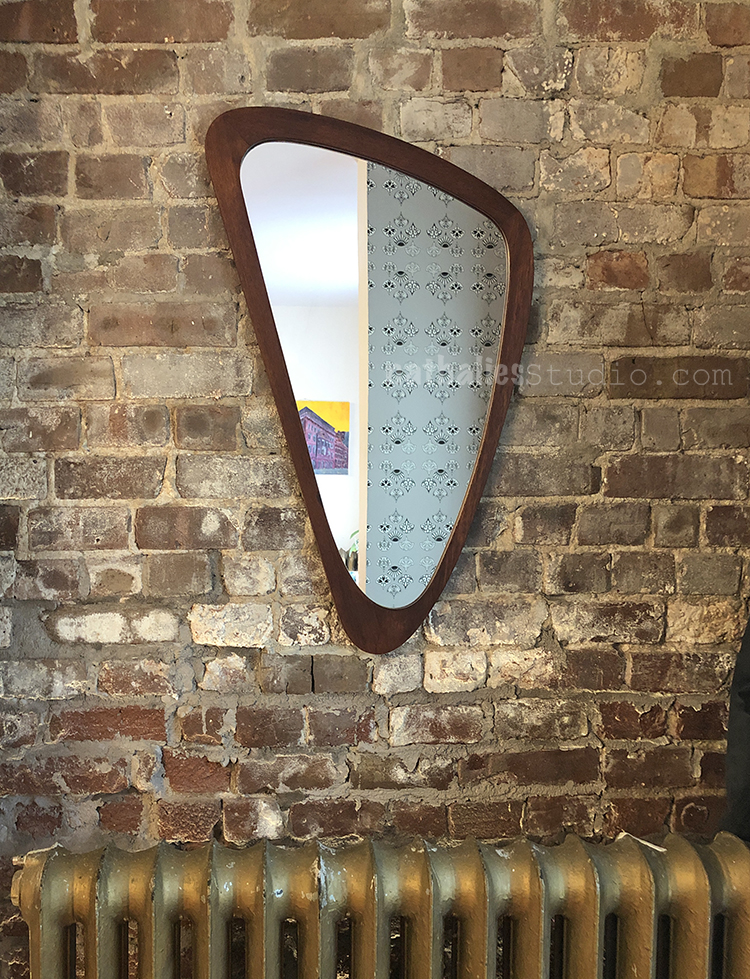
Got a new mirror for the entrance which also leads to my studio. Love the cool shape. I think it is time to repaint our old radiators. The things you notice when you take pictures LOL- Old houses – never a dull moment.
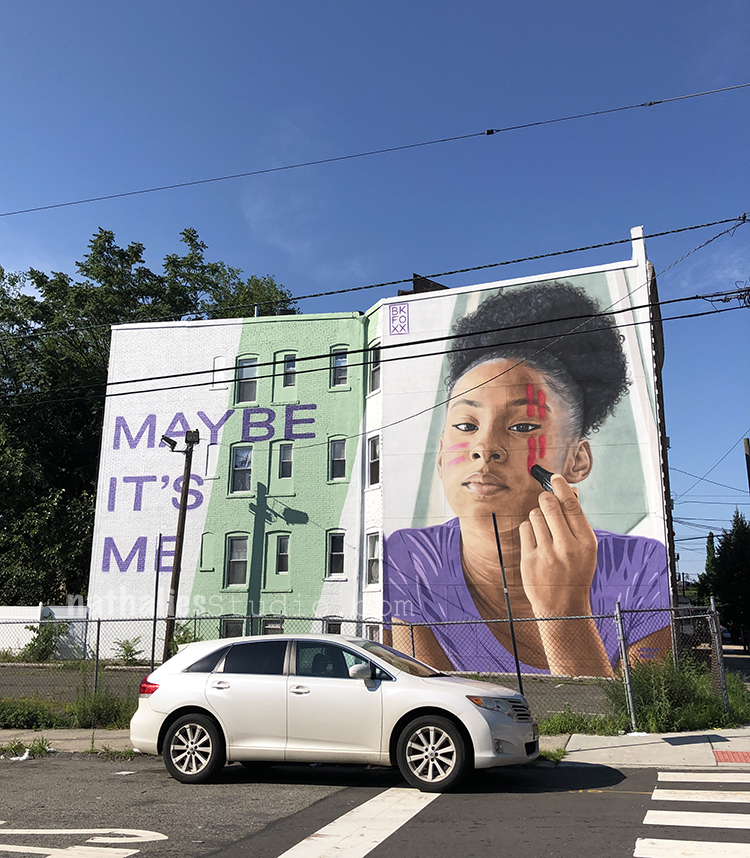
Mural down town – it is one of the things I love most about street art and murals – how they are a reflections of the time we live.
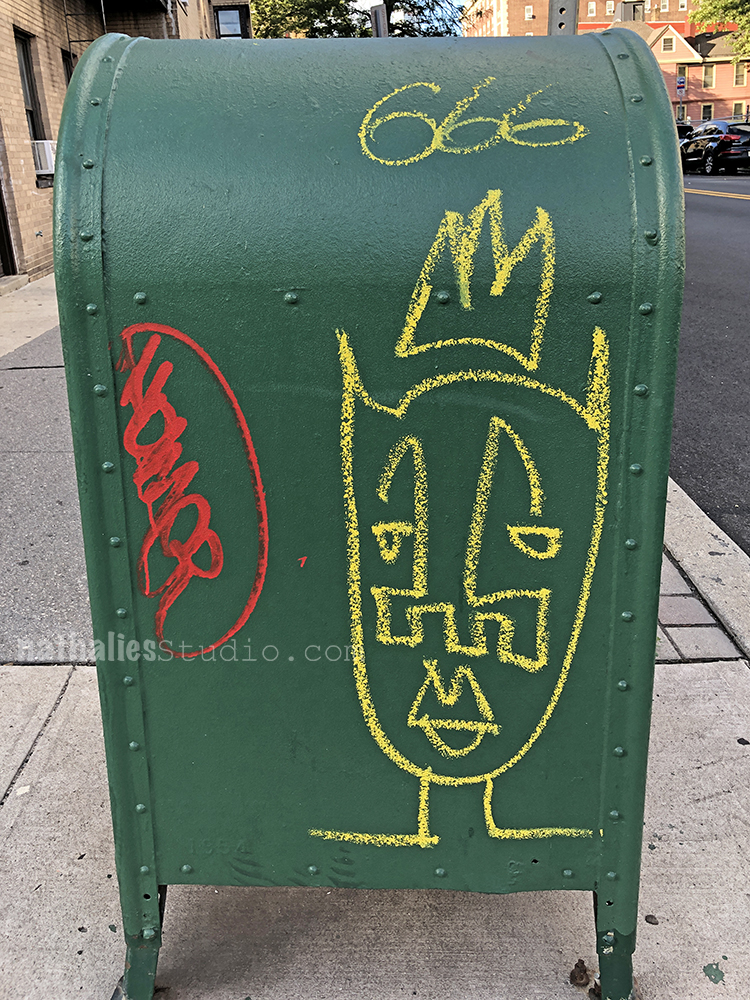
This guy showed up recently on relay boxes.
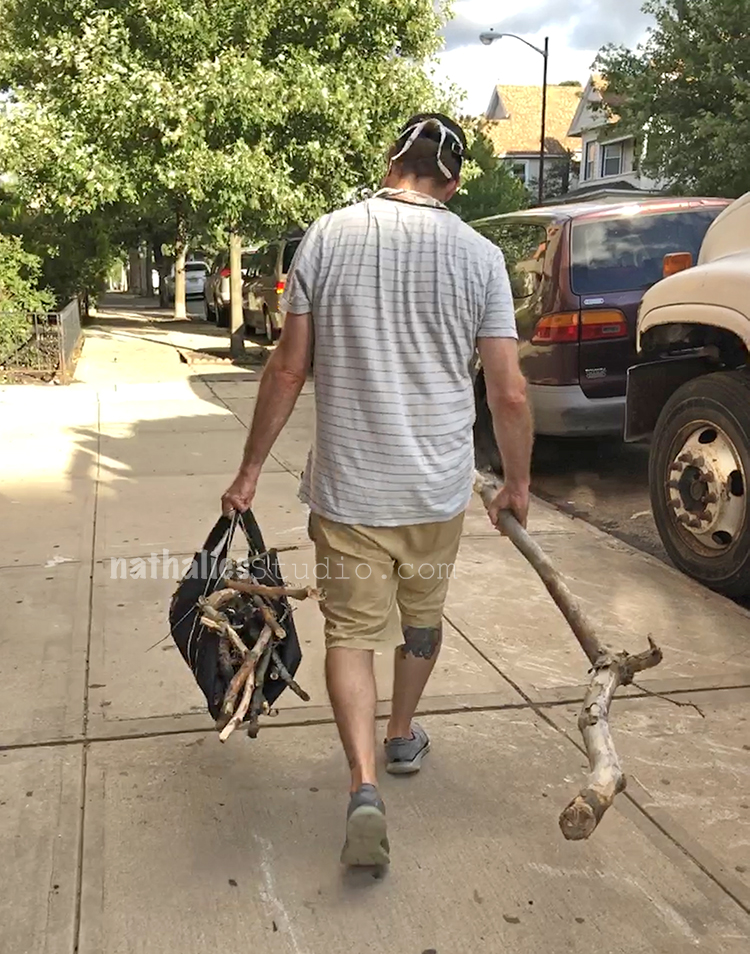
Big storm knocked out a lot of trees and branches in New Jersey – we also lost power for about 6 hours which is nothing in comparison to some other areas of New Jersey. Of course my nifty husband took the opportunity to get some fire wood – LOL- we just bought a little fire pit for the garden and I cannot wait to sit in front of it in the fall.
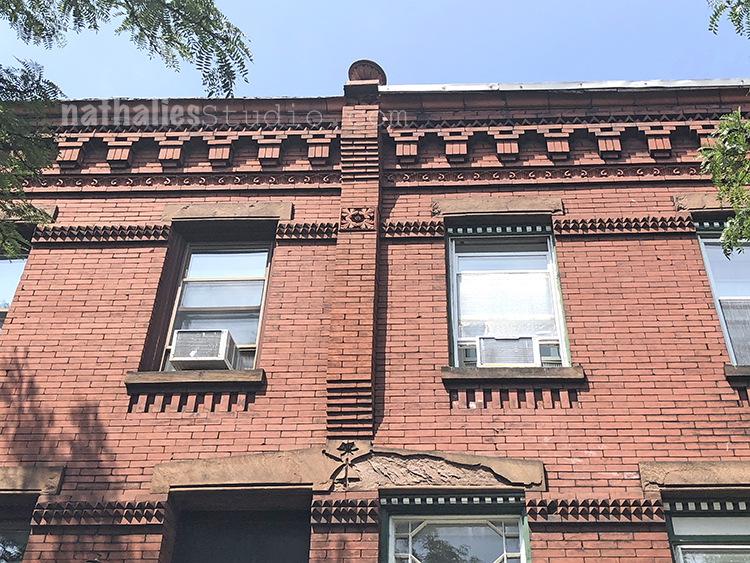
I looooovee this brick cornice- usually the cornices around in my neighborhood are made of wood and it is the first time I noticed on those houses that they are made with brick- and how beautiful it looks.
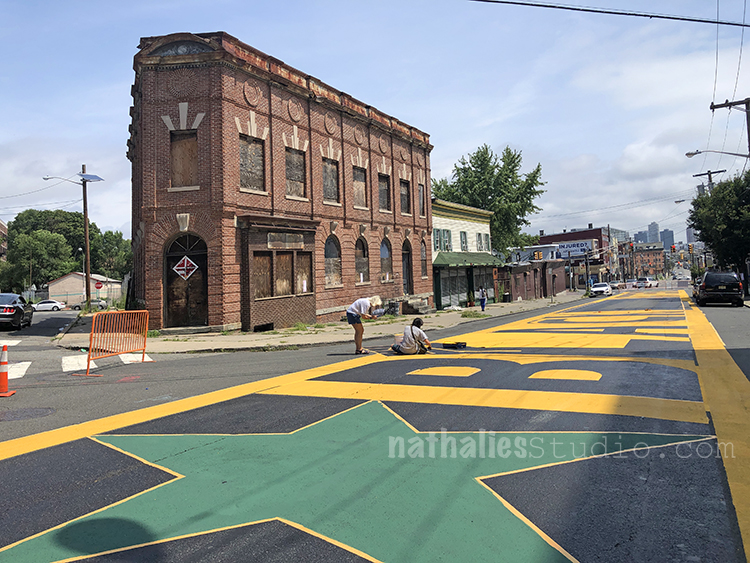
you might remember from a former stroll this really cool building that I also painted – now it is right next to a Black Lives Matter Street Mural. I have to go back now that the artists are finished with it .
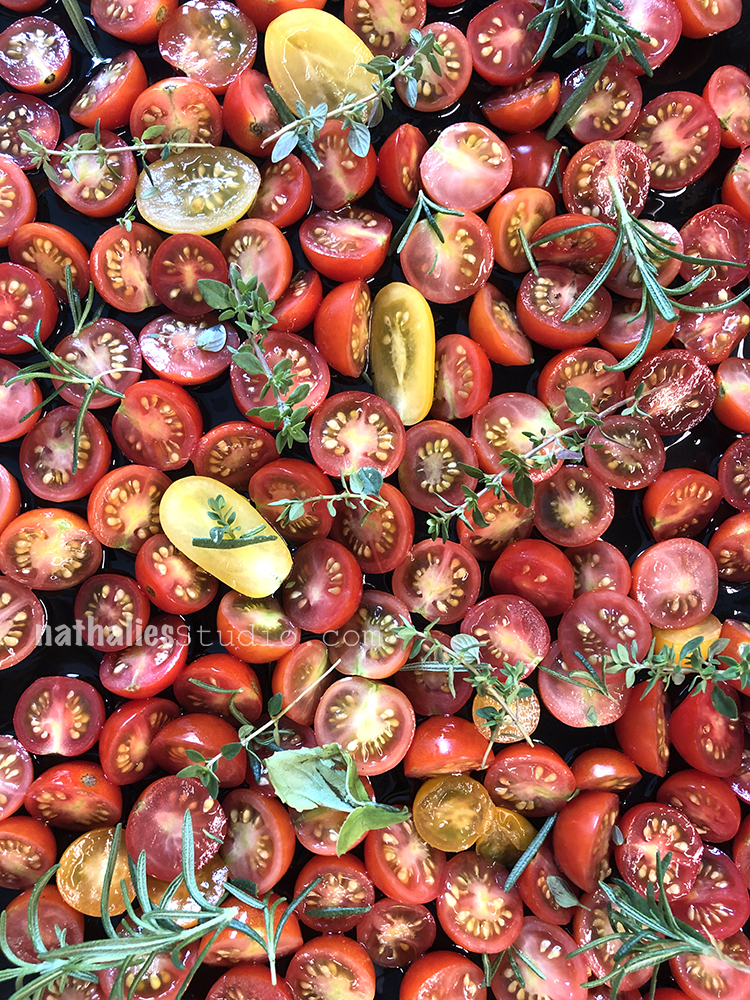
Definitely tomato season – I am loving it. Lots of roasted tomatoes, tomato sandwiches, tomato salads …well …they call Jersey City the Garden State and we do have for sure amazing tomatoes.
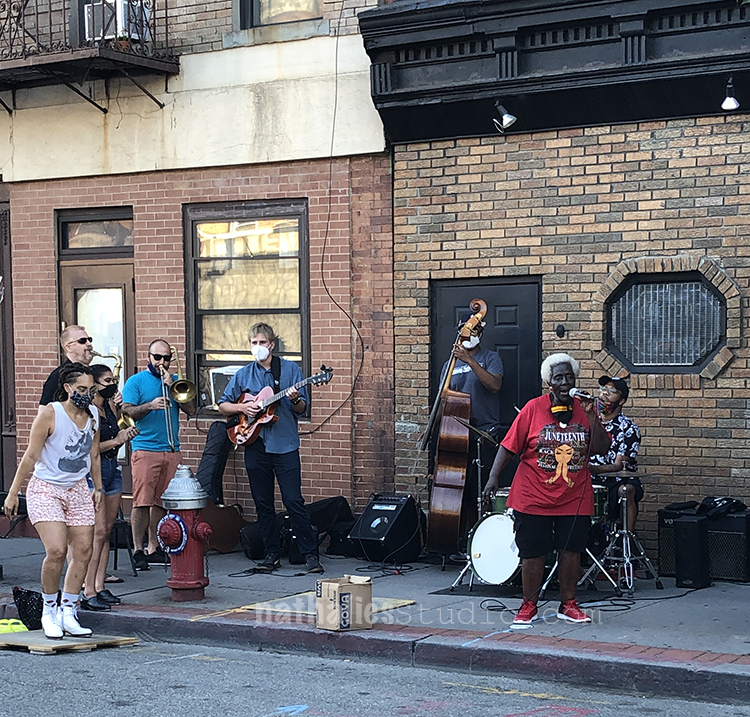
Love our city coming a little bit back to live. One section of this street has been closed off to traffic on Saturday afternoons and there is a jam session with a lot of amazing jazz musicians. Mary, who is in the red t-shirt singing, is a Jersey City institution and boy it was so wonderful listening to music an seeing them all.

This last shot is a weird one- it is an old power plant and we drove by on a bike tour – I had never really noticed this place- took a picture and two days later I – along with thousands of other Jersey City peeps woke up at 5.30 am because of a huge implosion of the place. A little warning for us would have been nice. Anyway- it is gone now – not really a loss- although the structure was interesting.
I hope you enjoyed this little stroll through the hood. Until next month :)

A Look Back – This time I’m looking at a project I did back in 2007 called Deck of Me. It was a challenge organized by Emily Falconbridge where we used a deck of playing cards as our artistic substrate and each day had a prompt to help guide us in creating a personalized deck. I was still in my scrapbooking phase back then but the transition to mixed media was definitely happening. There was a full deck in the end and you can go through them all in these posts but I thought sharing some of my favorites would be interesting. Also I thought how fun it was to transform something we probably all have in our homes, and is such a small manageable size to create on daily. Hmmm maybe worth a round two…
A Look Back is a blog series to show you some projects and posts that you may have missed – sometimes going WAY back in the archive. I think it will be fun to revisit a few ideas that we haven’t seen for a while. I’m excited to see how a little look back might inspire something new in the future :)
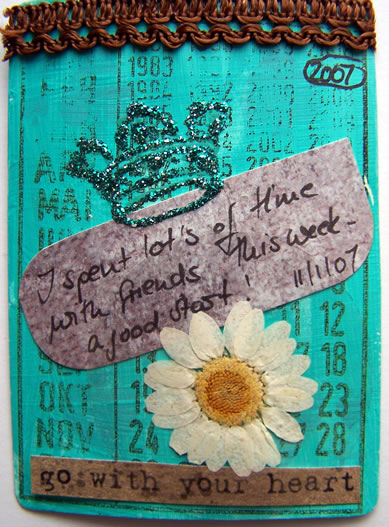
The first card was in early January and the prompt was “Something I’m Proud of” – kinda like a New Year’s resolution I suppose. You can read the post here to get a feel for what the Deck of Me challenge was all about and also to see the other side of the card. Each day I worked on both sides of the card – one side featuring the prompt and one side my take on it. So definitely check out the old blog posts to see both sides.
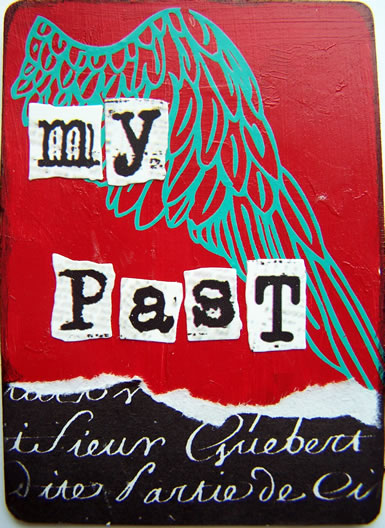
As the goal of the challenge was to get personal, I jumped right in on Day 2 and shared what gave me strength – my past! Yup, you know they say what doesn’t kill us makes us stronger. You can read that post and see the flip side here.
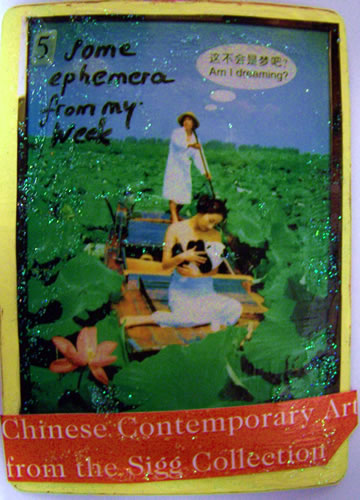
Day 5 was about using some collected ephemera from the week and I had just visited a museum show in Hamburg at the time. Here is the post and my take on the prompt too.
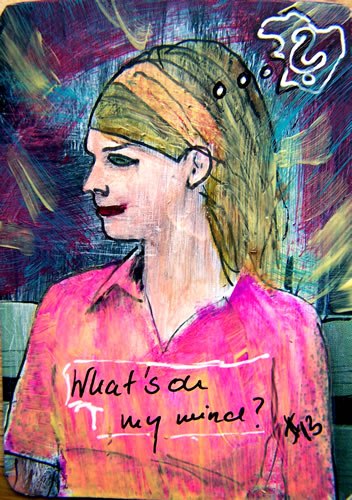
On Day 13 I did something that I would use again and again as a technique in my art journal for many years – using magazine images and working them in with paint and other media. I wouldn’t say this is the first time I ever did this, but it is an early example of mine. You can read “What’s on my mind” in the post here.
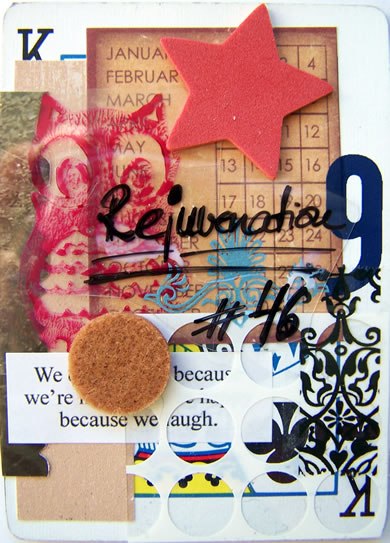
Jumping way ahead to Day 46 here with a nice example of some collage. The prompt was “rejuvenation” and you can see in the post here how I interpreted that on the other side of the card.
Maybe you have an old deck of cards at home that you are not using that could be your next little daily project. I sometimes need a challenge like this just to get working consistently every day on something artistic. This was also an interesting look inward when I was considering some of the very personal prompts.
I hope you enjoyed this look back and maybe it inspired you to give something new a try :)
If you are a newsletter subscriber of mine, you know that I start my monthly newsletters with some thoughts. Thoughts on creativity, making art, and being an artist – along with some other info about what is going on around here. Last month I shared the following. I hope you enjoy and you can sign up for my newsletter HERE for more of these :)

At the beginning of the year I chose the word “Vision” as my word to strive for in 2020. I chose the word because I was feeling a lack of vision for my work as an artist. For a long time my vision was “quit your job and become a full time artist”, then it was “make being a full time artist work”, “license designs”, and “write a book”… until I was just doing my work day in and out without a big vision.
The problem with that is: if you have no vision you cannot grow. So for the first 3 months of this year I tried searching really deep, writing each morning on where I saw myself going. While that was a good exercise in counting my blessings and getting ready for the day, it did not provide me with a clearer direction. Then the pandemic hit and everything that I felt about the future and the uncertainties of my art business was magnified. I thought, who needs a bigger vision – just be glad you have some work and shut up! And I just kept on going.
At the same time, as you may know, I joined a Roundtable with writers, actors and artists. We still meet once a week on zoom, talk about projects during this pandemic and hold each other accountable for the goals we set. We continue to share our work and give feedback and have recently decided to “perform” our arts to our family and friends via zoom, discussing the work with the audience afterwards. We also started collaborating: I sent some of my urban paintings to a writer in our group and he was inspired to write a monologue, which was then performed by one of the actors. We showed my paintings afterwards and talked about our collaboration with the audience.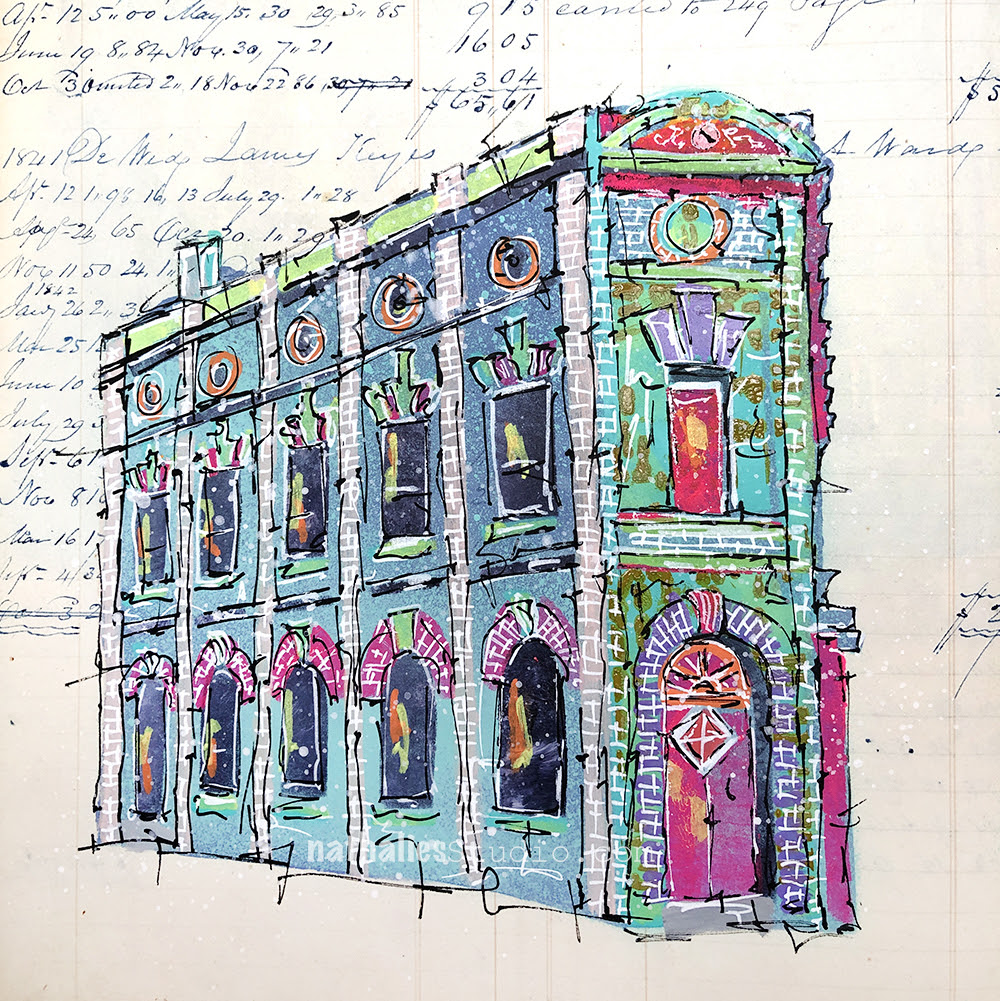
I cannot even put into words how uplifting and amazing this collaborative work feels. Spending time with these storytellers has fed into my love for storytelling. I have always loved learning the stories behind the buildings in my paintings – especially since I am exploring the topic of gentrification. How deep could I go? I started to reach out to others and I connected with a city historian who was nice enough to let me come to his office (twice so far) – masked up and socially distanced – and let me go through his extensive archive. He showed me piles and piles of letters, photos, and scrapbooks dealing with the buildings, businesses and most importantly the people of this neighborhood. 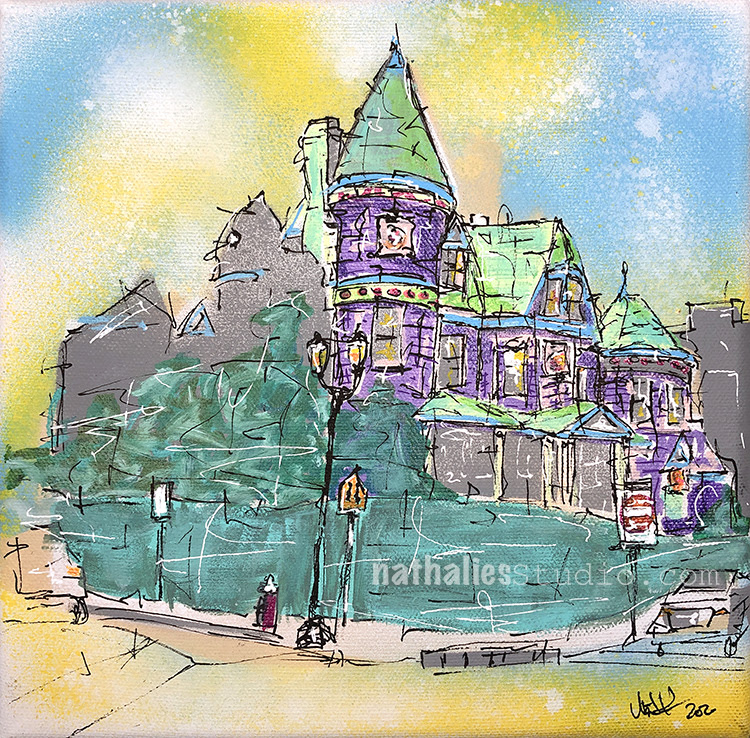
I am totally enthralled with this research right now. I want to reach out to the elderly members of this community and ask them about their life and the stories of the neighborhood. What was it like to live here as a child or young adult? How did it look? How did they experience the Urban Uprise of 1964? How do they feel about the changes in this city? I want to tell the story of the buildings not only from my standpoint, but also I want to connect them with the stories of the actual people that lived in or around the buildings.
How am I going to do that? I don*t know yet… I am still in my student modus – listening, researching, collecting and connecting the dots. But I feel I am one step closer to a new purpose and a new goal and a new vision for my business. And that my dear friends makes me so excited, I wanted to share it with you! I will keep you posted… but maybe you have an idea? I would love to hear :)
Nathalie, this sounds so cool!!! I’m excited for you and the path your vision seems to be taking you. I would like to introduce you to another artist in New Jersey. Her work is amazing. She is a dual citizen of the US and France and does quite a few collaborations. She did a project of portraits and interviewed each person before she painted them. I think she might give you some insights that could help you. Let me know if you would like me to make an introduction and I could check with her first.
Oh, I am so excited for you…you could write a book (again)!
It could have pics of the buildings, pics of your art work of the buildings, some of the history of the neighborhood and stories from the elderly and others!!!
I love it already. The way you always talked about your Aunt on layouts and journal pages makes me think that you can do a fabulous job with this project! Keep us posted Nat.
Our current Creative Squad is in search of NEW members. Read on and let us know if we should be looking at you!
PLEASE NOTE: Due to COVID restrictions, at this time we are only accepting applications from US residents
+ Are you a Mixed Media Artist, Art Journaler, or Card Maker with a unique style and a passion for creativity?
+ Do you love to use stamps and stencils in your work and love to try new techniques and media?
+ Do you love to share your projects on social media and engage with other artists?
If the answer is yes, yes, yes, we are looking to fill some spots on our n*Studio Creative Squad and would love to hear from you!
Email nat(at)nathaliesstudio.com with “Creative Squad Call” as the subject. Please include:
1. Full name, email address, links to social media sites/blog/website where we can see your work
2. A couple sentence bio or description of your work
3. 4-5 low res images of your work that best represent your style
*Enter by August 25, 2020, US Applicants only at this time :)
As a Creative Squad member for Nathalie’s Studio you will serve a 6-month term beginning 10/1/2020. As part of the Creative Squad, you will receive a variety of Nathalie’s Studio products. You will create one project per month, using specified products or groups of products and inspired by a monthly theme. You will be featured once a month on the nStudio blog, Facebook page, and Nat’s Creative Squad Instagram page, and you will be part of an amazing team of artists with a legacy of awesomeness!
Don’t be shy, apply today – we would love to see how you are rocking your creativity!
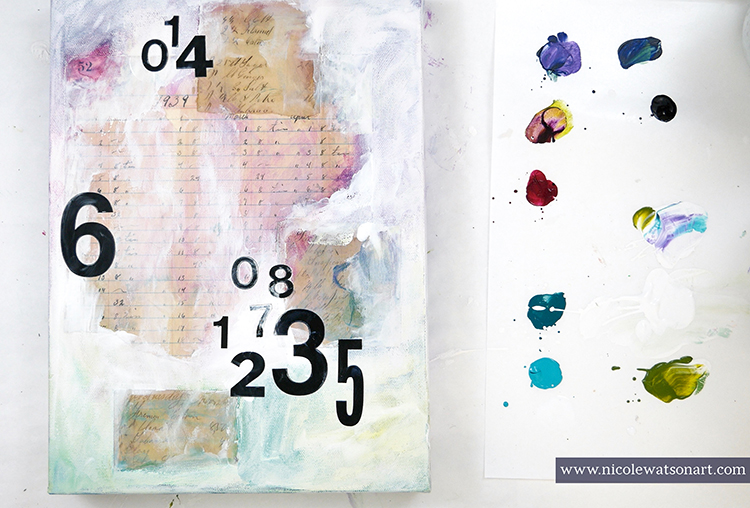
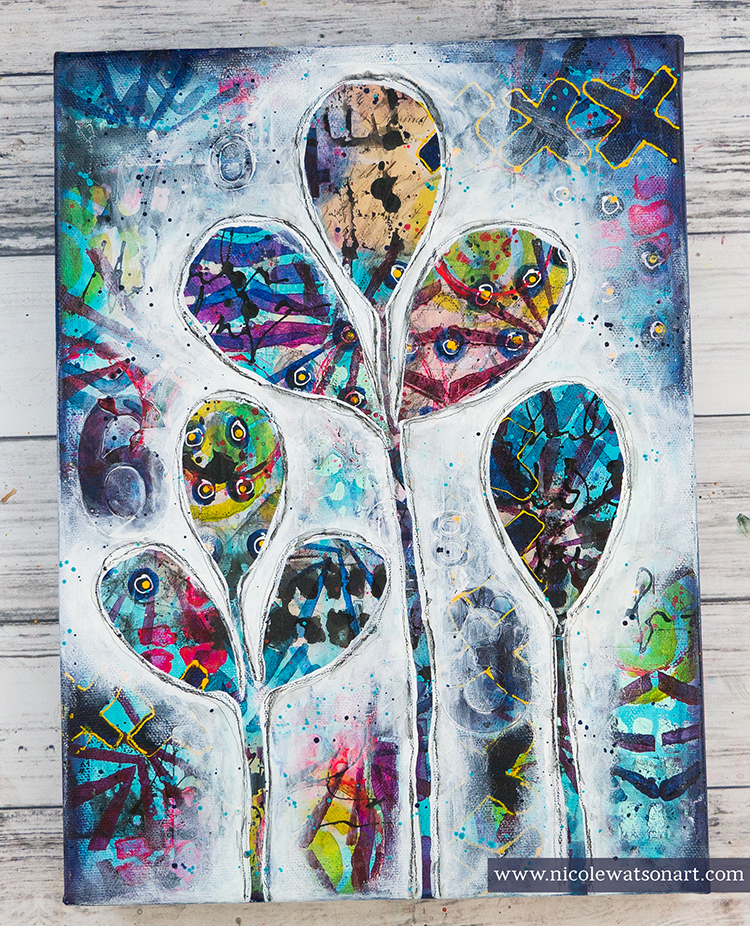
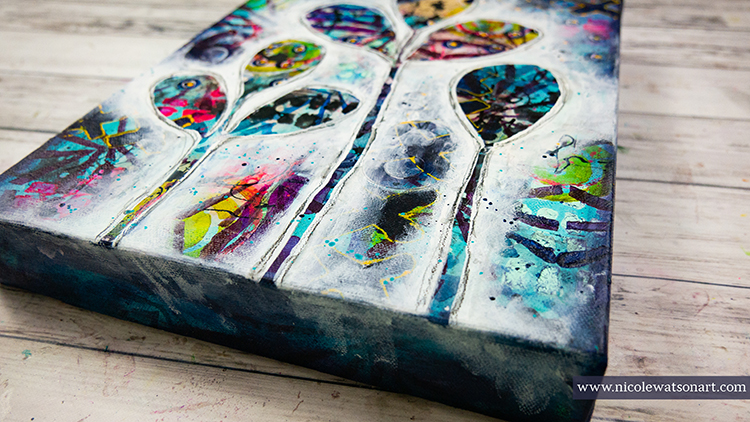
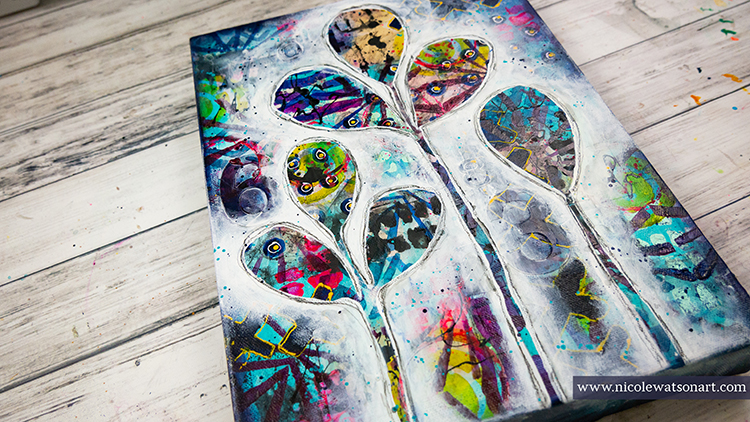
Hello from my Creative Squad! Today we are going a bit wild with Nicole Watson and her reductive style painting using my Batik and Beacon stencils. Check out her video below, inspired by this month’s theme: Wild and Free – After so many months of careful living, it’s time to go Wild and Free… In our Art! Go a little crazy in there and live it up with bright colors, exuberant mark making, bold colors – however you want to go a bit bananas. It’s time to let loose!
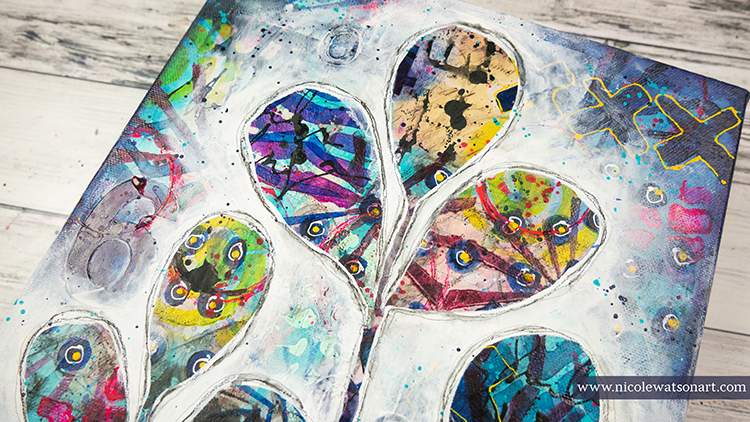
Warning! Before you begin this project, know that it might get a little ugly, and you might want to give up and gesso over the entire canvas.
I thought I had the perfect idea for this month’s challenge of wild and crazy using only two of Nathalie’s products. So, confidently, I prepped a canvas, added some ephemera, and well… it got a little messy and the ephemera bubbled, so I threw it down to grab another canvas. The next canvas started a little better, but after all my crazy layers of ephemera, stencils, stickers, drips and scribbles, I went to bed extremely worried that I would not be able to recover. My canvas was looking like bad ‘80s fabric.
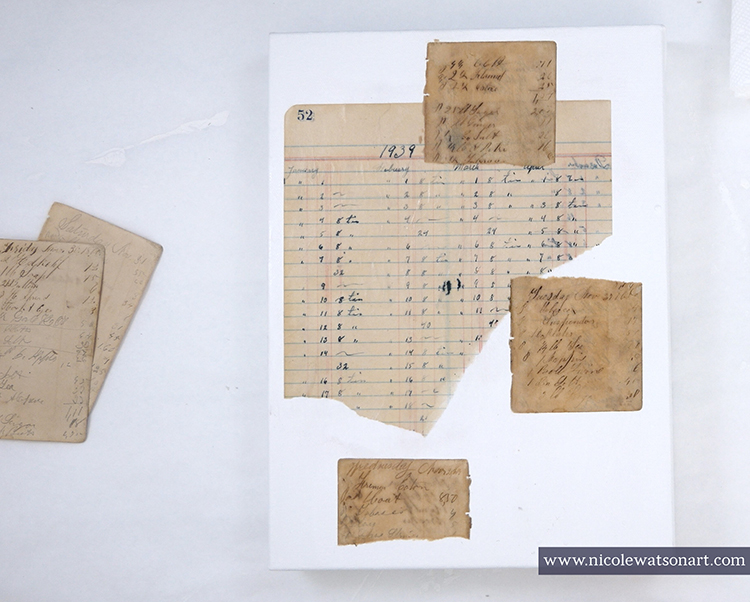
Spoiler: I recovered, barely! My project began by picking up a 9×12 canvas and gessoing it. This is total personal preference here. Even though the canvas is pre-gessoed, I still like to add a layer or two to prep it. Then, I stuck a ledger page and a couple handwritten note pages on with matte medium. Bravely, I broke the white blank canvas with color.
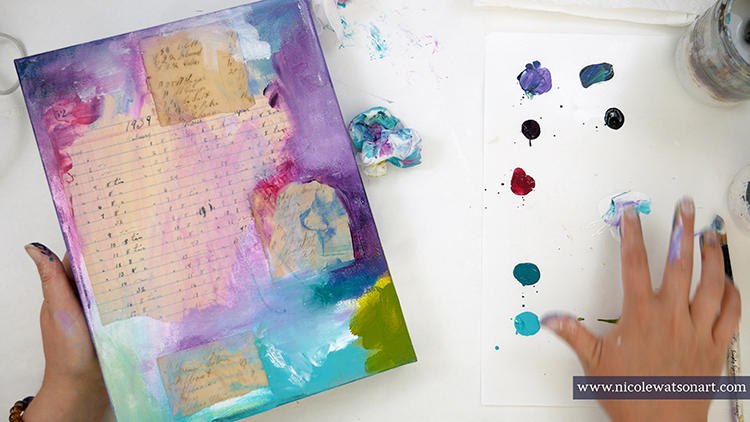
My next steps were to create layer upon layer upon layer. First with some number stickers and more paint.
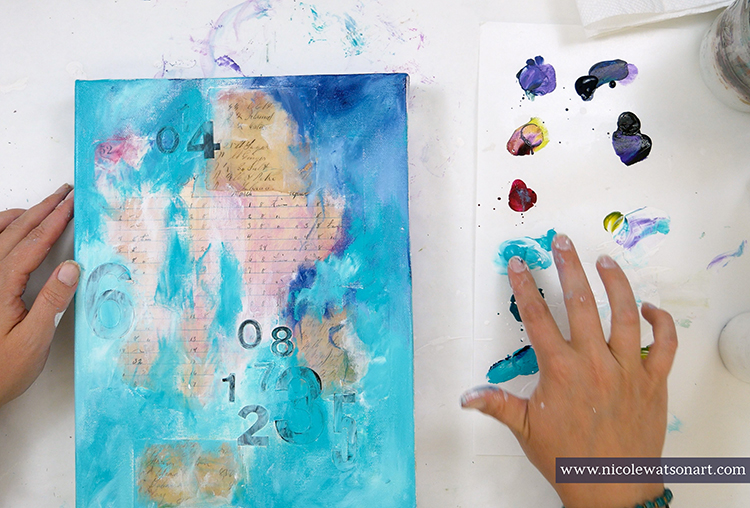
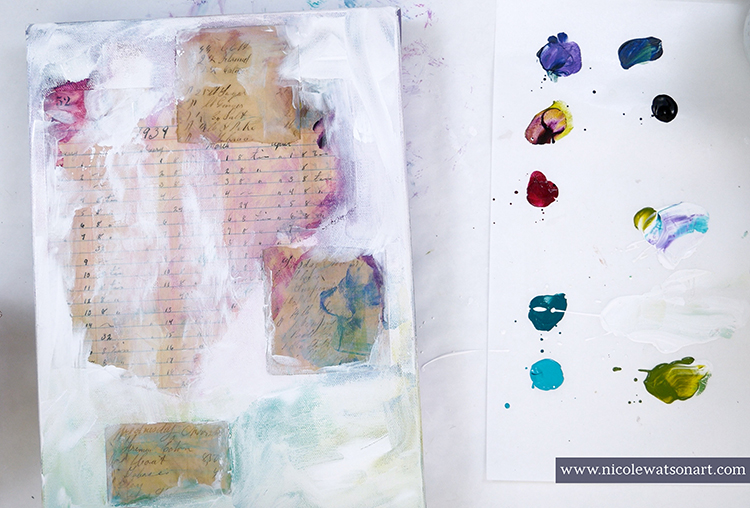
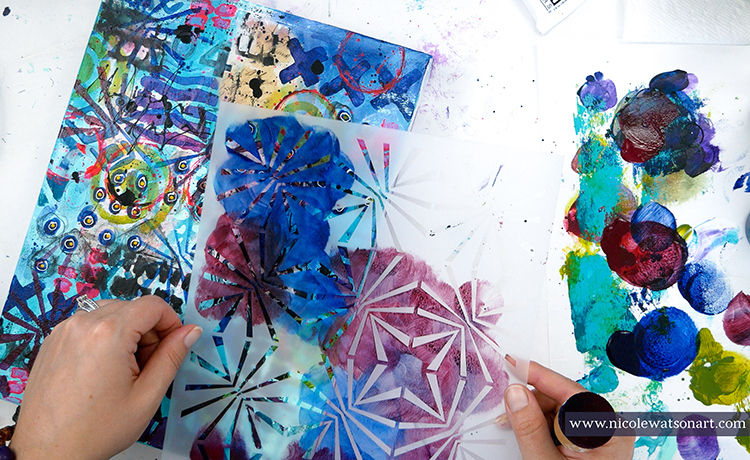
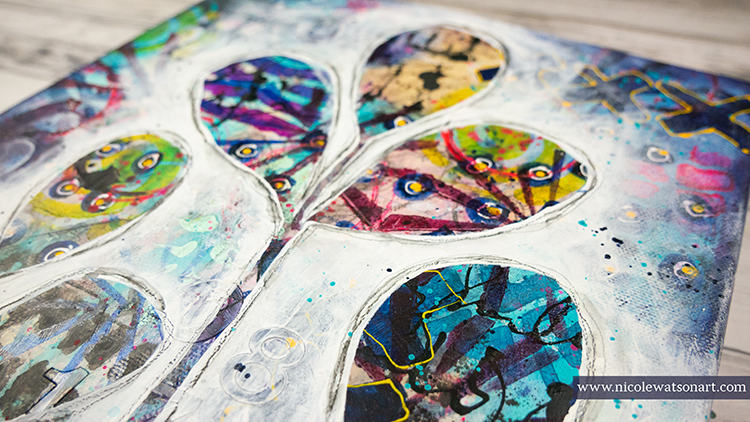
Then, I used Nathalie’s Batik stencil as it was perfect for this task. I was able to isolate parts to use each design separately with different colors and techniques from a sponge applicator, palette knife, tracing, spray, and even my fingers! All these layers created chaos in the background.
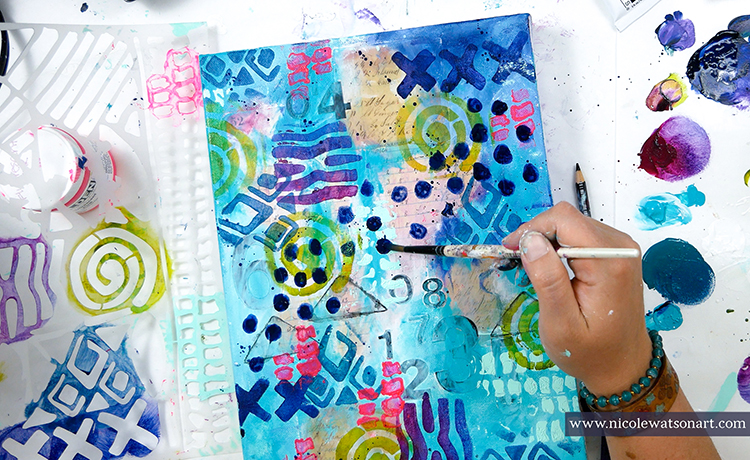
Besides the stencil, I also made some circles that I doodled around, splatters, ink drops, and scribbled some words.
This is where the canvas started looking a bit concerning. I left it to dry hoping to rescue it the next day with fresh eyes.
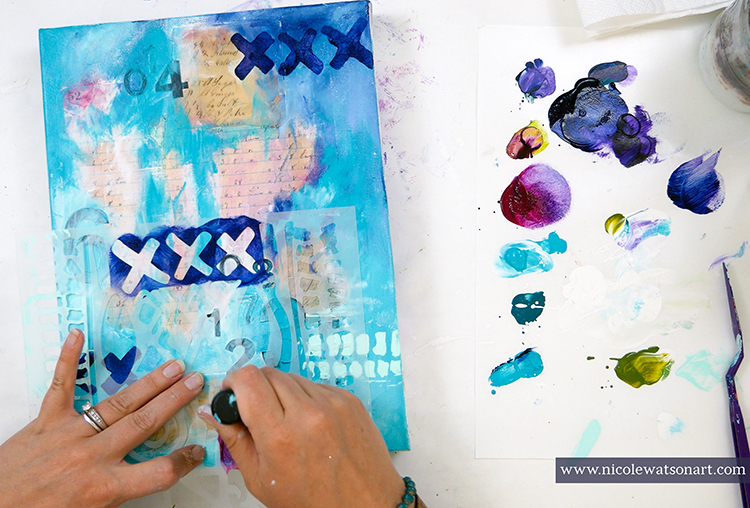
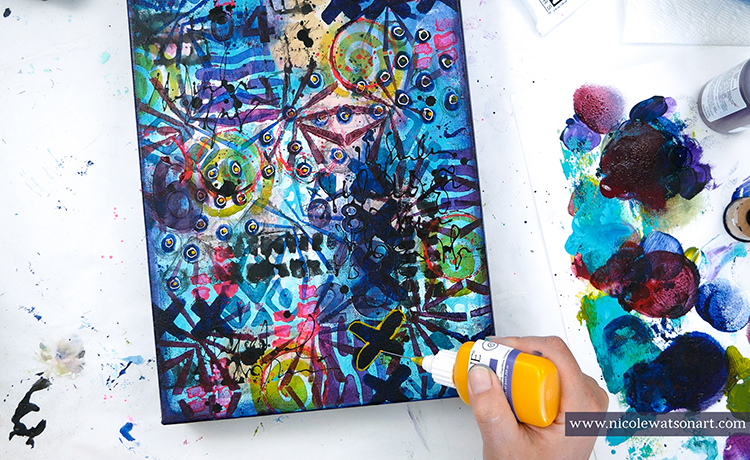
After my morning walk and coffee, I returned to my studio. I picked up Nat’s Beacon stencil as my second item. The piece needed some more delicate shapes between the larger ones. Using a foam applicator, I randomly placed blues and reds in the stencil around the canvas. This stencil helped to unite the other shapes. Finally, I grabbed a fineline bottle that had yellow inside from another project and outlined the X shapes for added dimension.
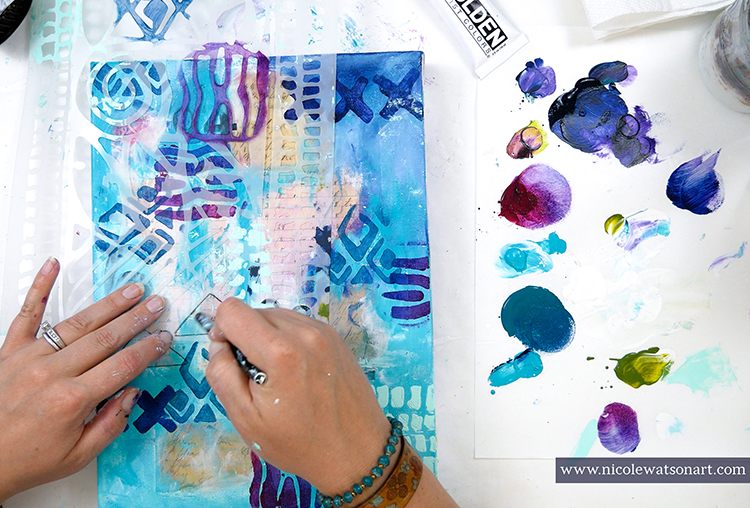
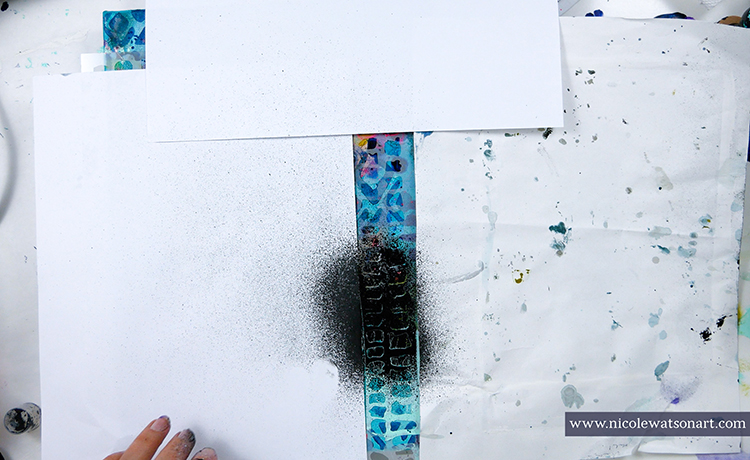
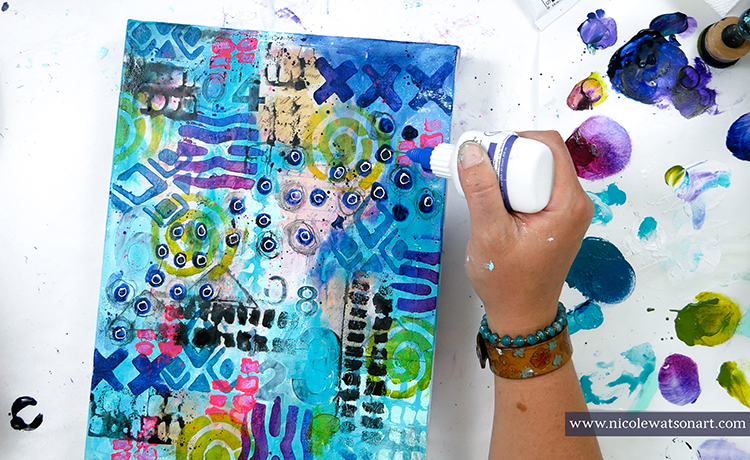
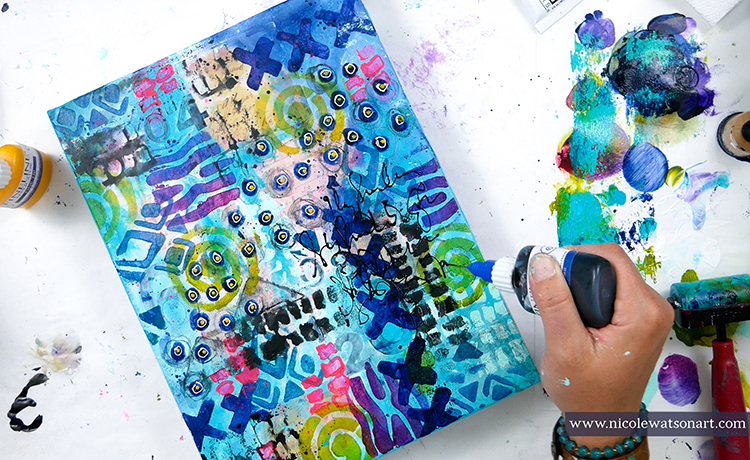
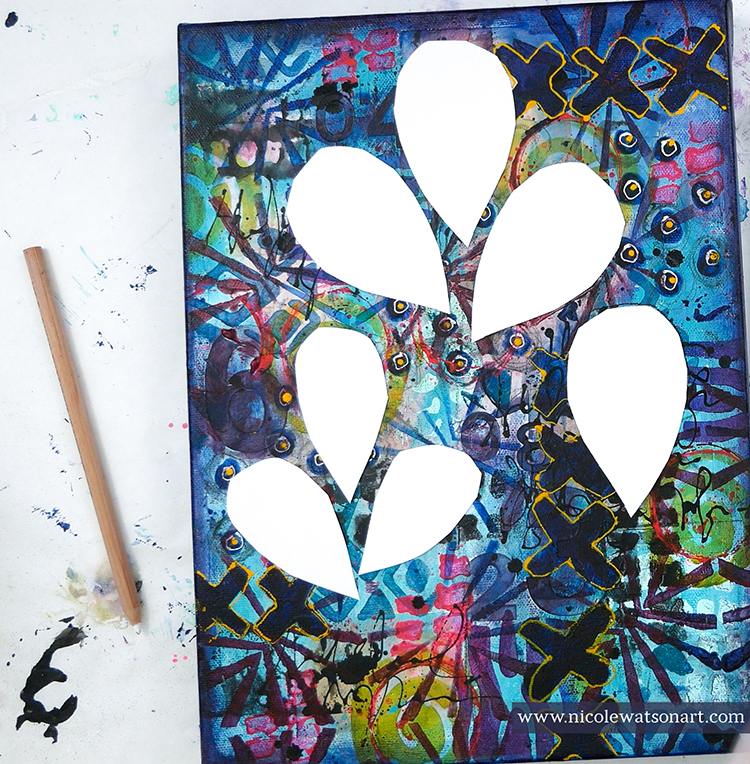
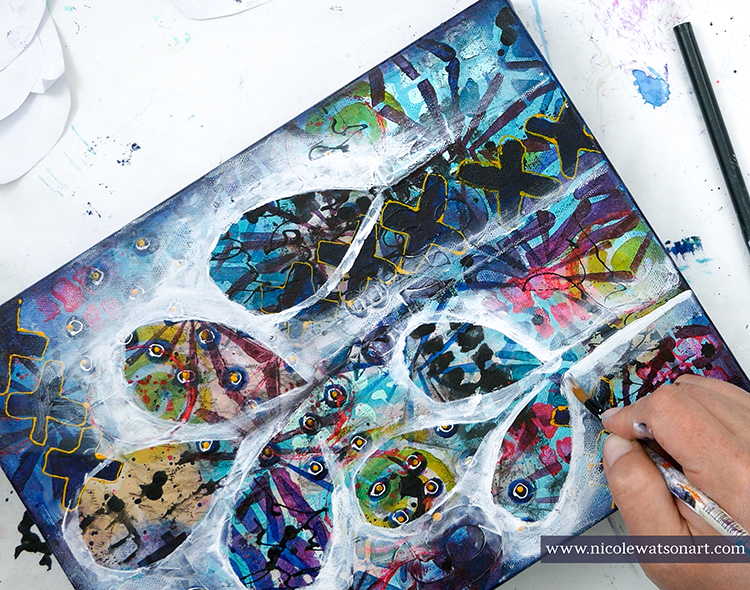
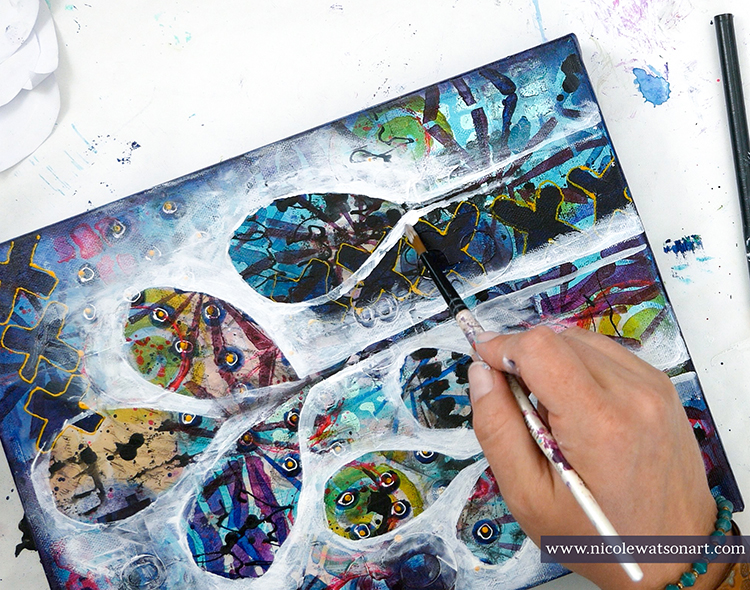
With the crazy canvas ready, I began my last step. I wanted to draw the leaf shapes I use a lot in my artwork and isolate them with some gesso. Usually I am able to do this with charcoal pencil. I like to use charcoal because it wipes off so easily. I tried with black and white charcoal, but it just wasn’t working enough to tame the chaos. So, I cut out leaf shapes form paper and used those as a mask to begin the gesso.
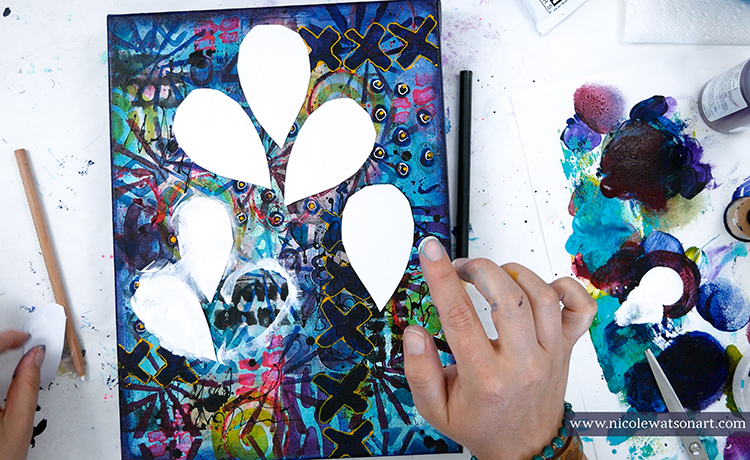
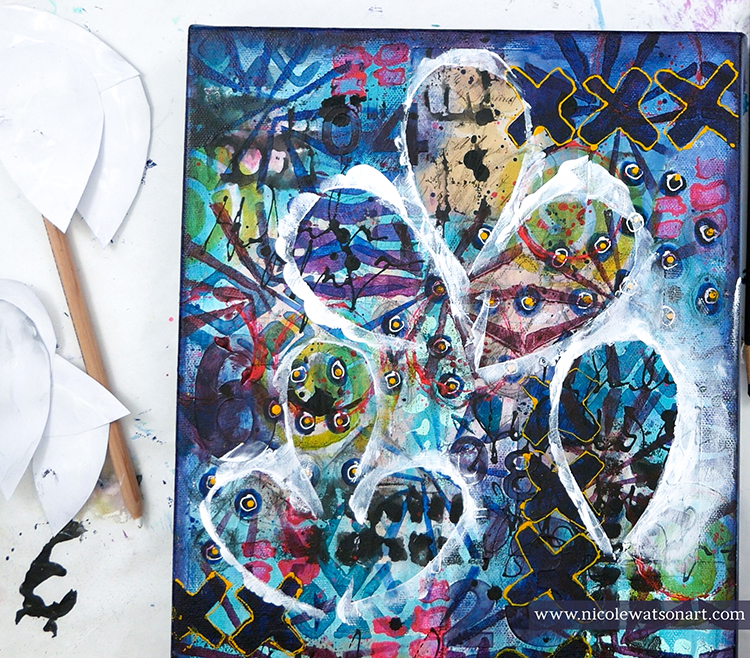
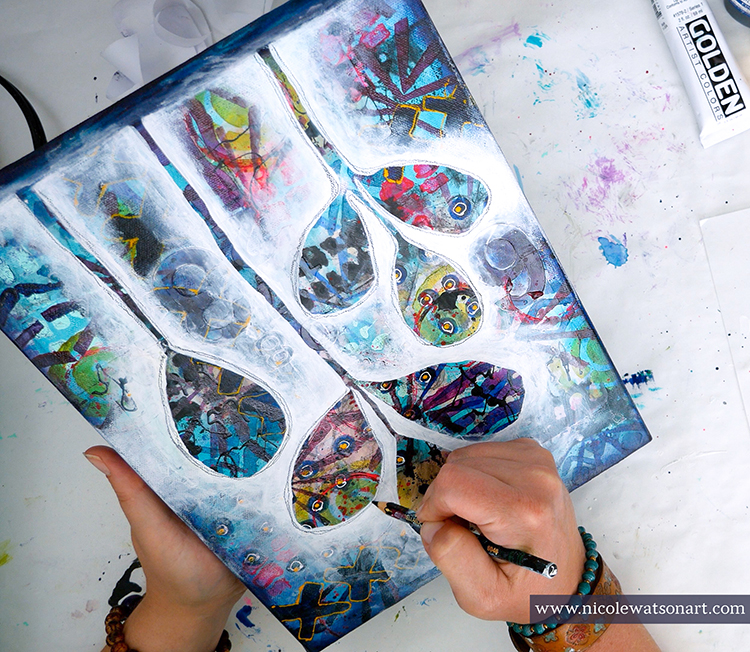
Using a paintbrush and my fingers, I spread gesso around my leaves and stems to isolate them from the crazy background. The process of watching the leaves pop and come to life was so enjoyable!
When they were finished, I spattered some paint on the white and outlined the leaves with my stabilo pencils.
This was such a fun canvas to make….even if it was a little stressful! Beginning with the ephemera layer and ending with adding the leaf, there were over 25 different layers to bring my leaf shapes to life.
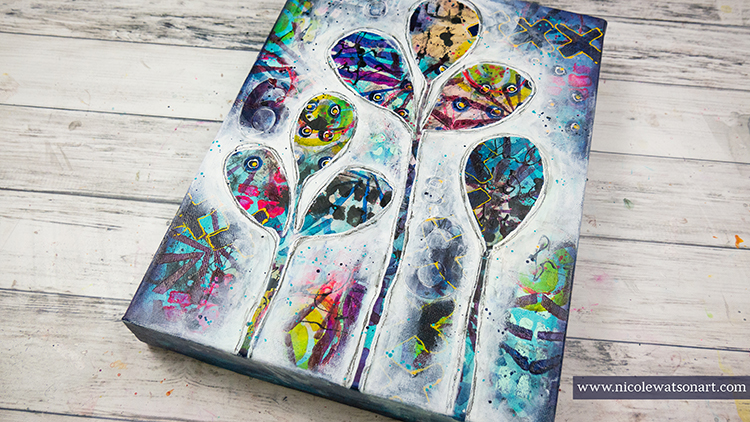
Thank you Nicole for sharing your process! It can sometimes be hard to know what to do when a piece gets a bit out of control and you have given us some great ideas on how to resolve that.
Give it a try: you can find all my Stencils in my Online Shop and in addition to some ephemera and printer paper, here are some of the other supplies Nicole used:
Play along with our monthly themes and weekly projects! Working on something yourself that you’d like to share? Email me how you used my stencils and stamps with the theme and email me an image – I would love to share your projects in my next “n*Spiration From Around the Globe“.
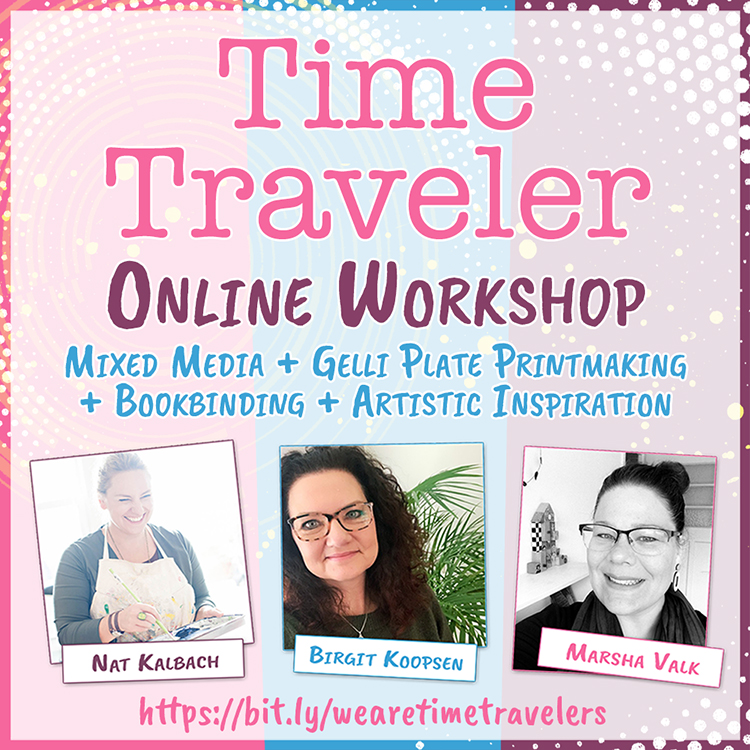
Time Traveler begins TODAY!!! This is my newest online workshop and I have teamed up with 2 of my favorite mixed media artists for this one: Birgit Koopsen and Marsha Valk. So you get 3 amazing teachers, 21 videos, and TONS of ideas for gathering inspiration, gelli plate printing, and making your own books.
The whole idea of this course is that we are traveling back through time, finding inspiration in the design and flavor of the past, and then using that in a modern way to create!
Today is the last day to get this course for $99 USD (until Aug 17, 11.59pm EST) – tomorrow it goes to its regular price of $139 so sign up HERE and get started with us :)
Here is a promo video with more info:
I’m looking at your workshop that starts today August 17. If I subscribe do I have a lifelong access to these videos? Thanks in advance for your answer
Yes- as long as the n*Studio exists you will have access.
I always love these strolls. Thank you so much for providing a peak into your neighborhood.
Reply