Nat


Hello from my Creative Squad! Today we have a project from Emilie Murphy that will transform the outside of your art journal. Emilie is using my Buenos Aires Border, Valley Road, Gnarly, and Signals foam stamps and this month’s theme: A New Day – Let’s try something new today :) Although these are tumultuous times and we never know what each new day will bring, it also seems like the perfect time to throw caution to the wind and just jump into something new with both feet. Try a new material or technique or approach. Why not? Today is a new day… and tomorrow is too!
Hi there! Hope you are doing well.
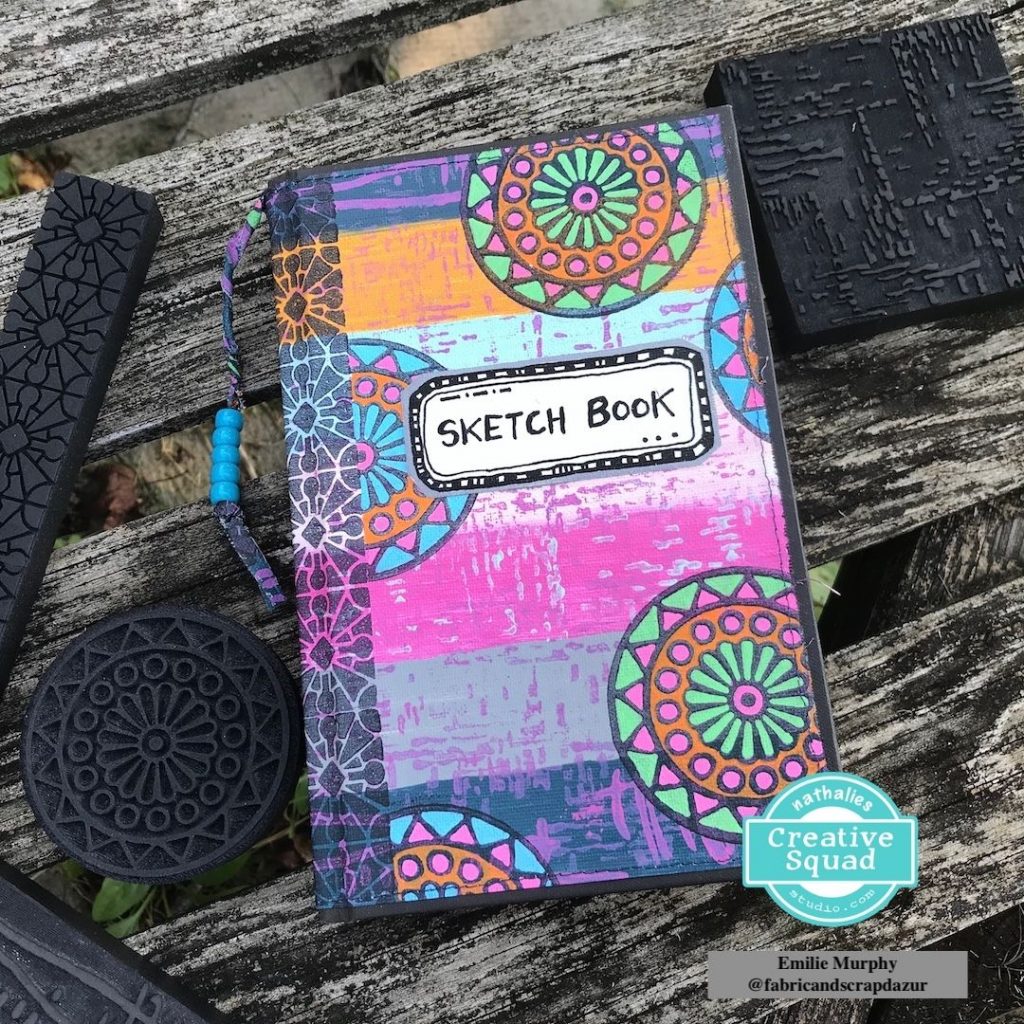
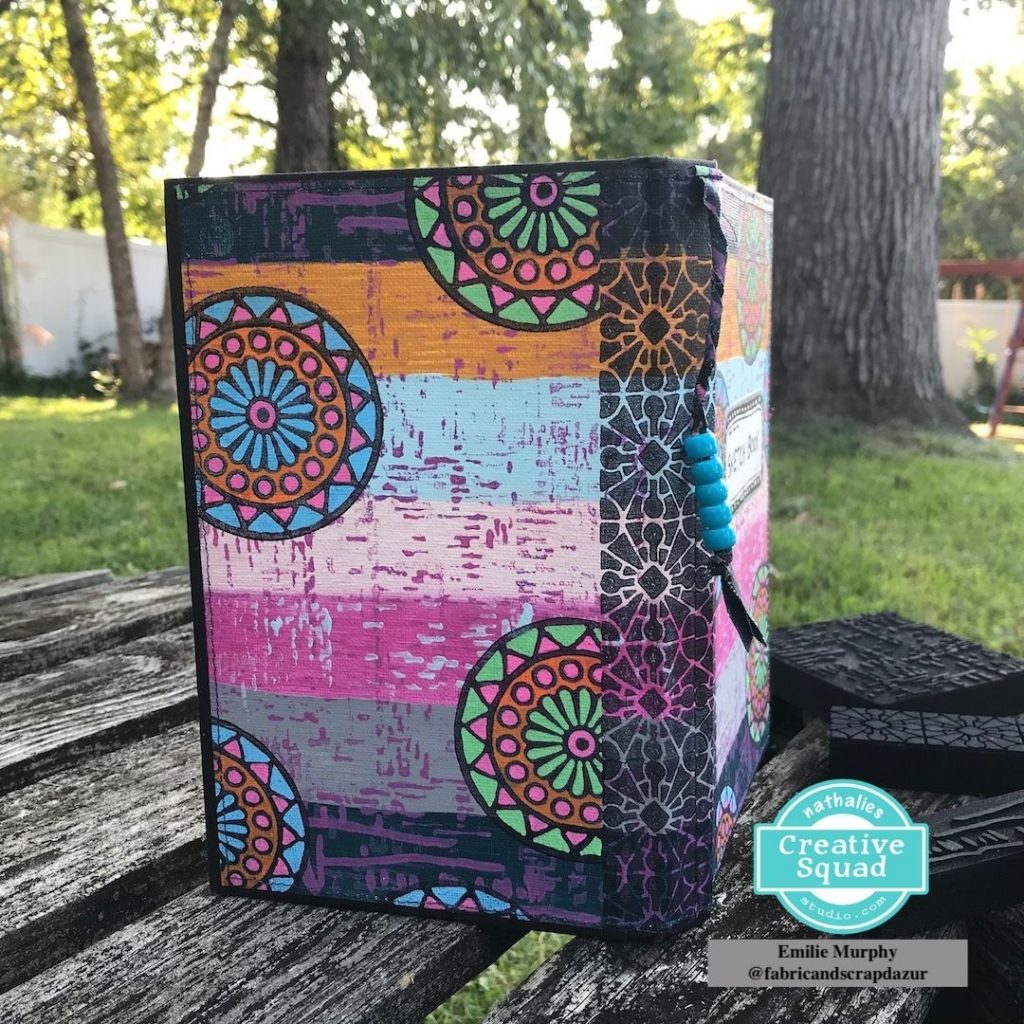
As we have to try something new this month, I decided to make a cover for my sketchbook with a sheet of Canvas. It’s not what I usually do when I make a cover for an art journal or embellish the cover of a notebook that I purchased. Therefore it’s a new technique for me, and I tried using only foam stamps and a single canvas sheet.
Let me show you how quick and easy this technique is. Foam stamps are such great tools for that purpose.
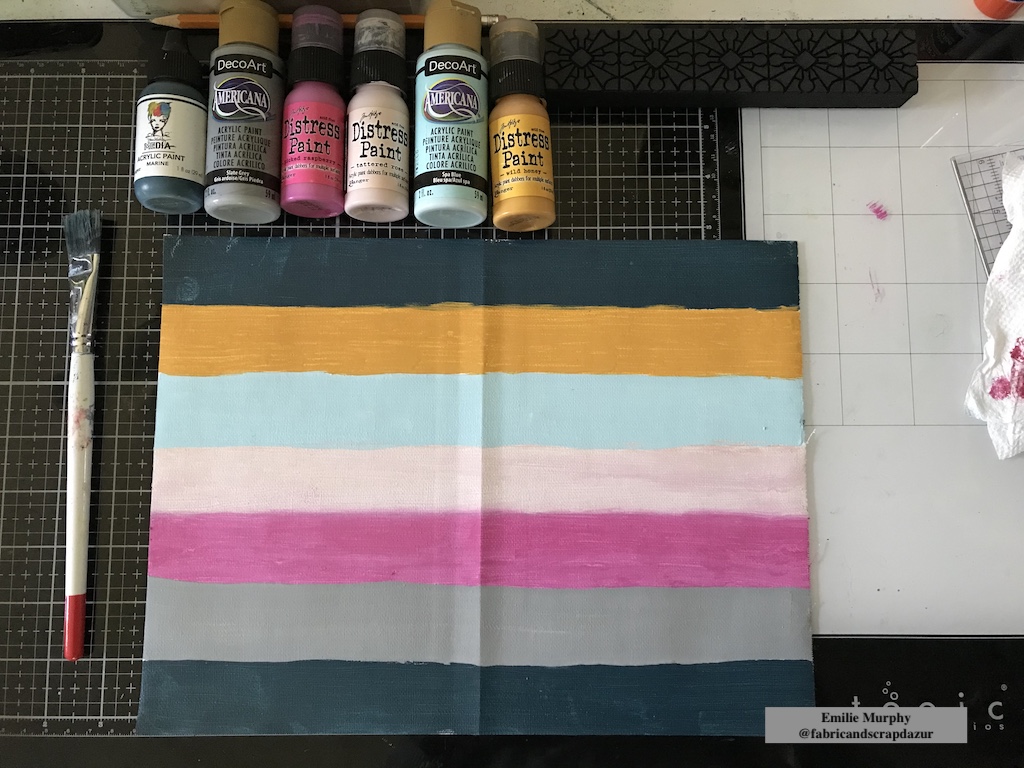
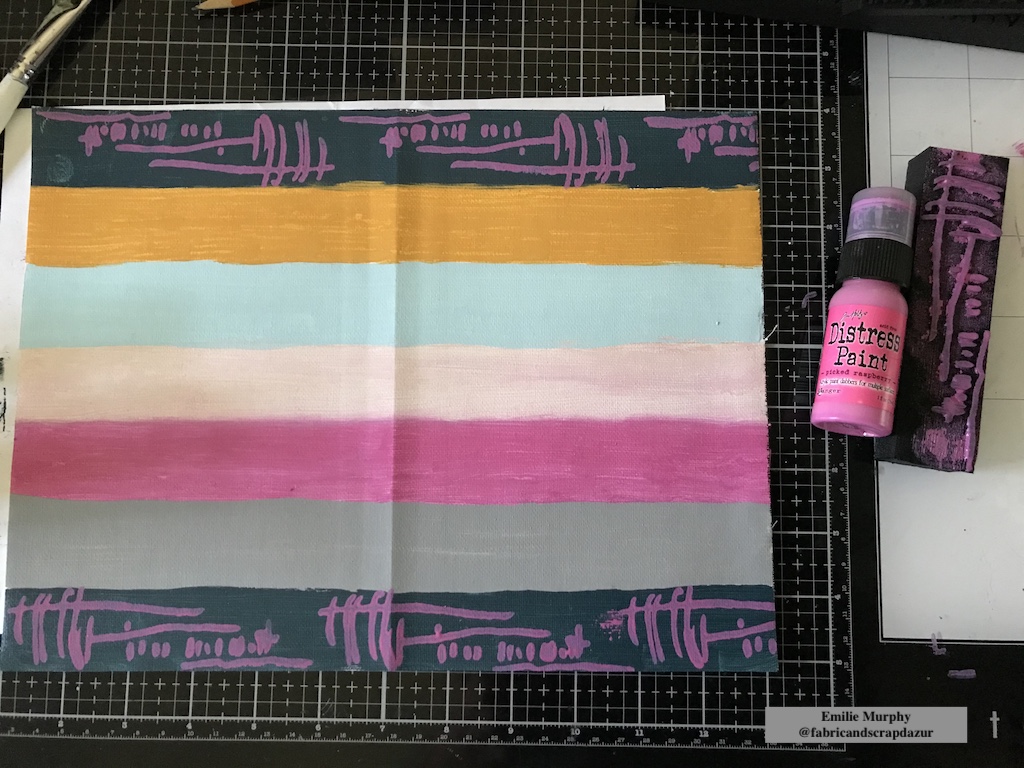
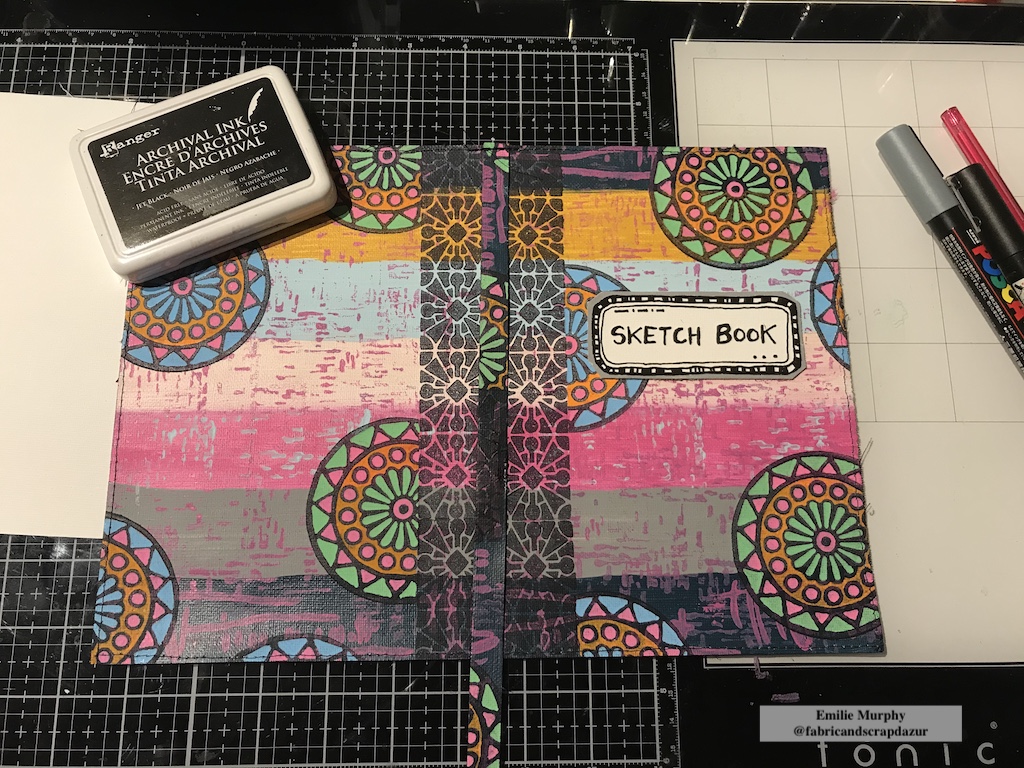
I started to trace lines to get equal strips on a 9×12 canvas sheet. I used the side pre-coated with gesso.

Then, I applied different acrylic paints I have in my stash to color the strips.
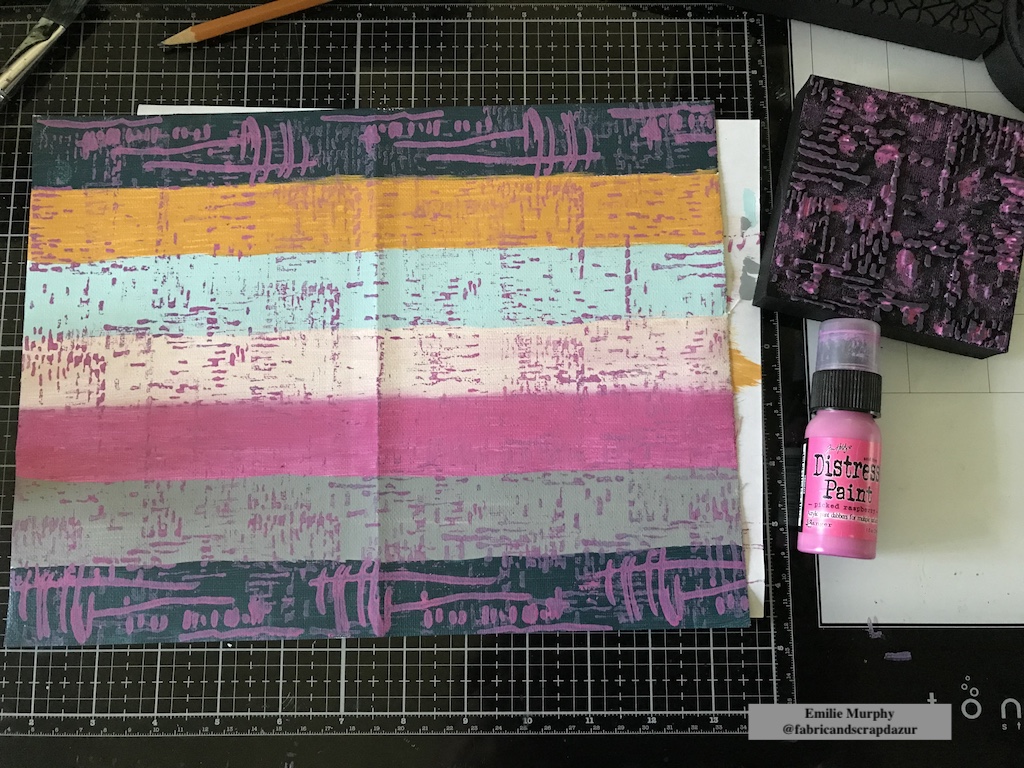
I added some texture with the Gnarly and Signals foam stamps on all the background to unify all the strips together.
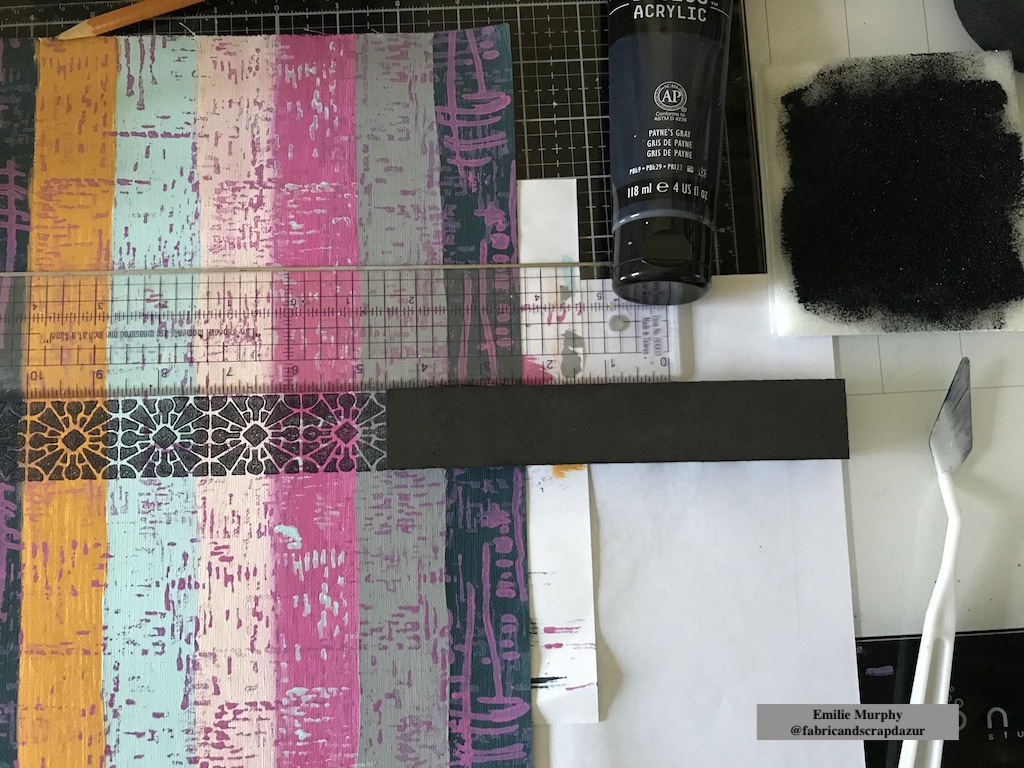
As I wanted to show up an hinge of my sketchbook, I stamped the middle part of the cover with the Buenos Aires Border foam stamp. First, I slightly folded my canvas sheet in half to mark the middle. Then, I used a ruler to be able to stamp straight. I didn’t mind to have an imperfect impression for the background texture but for the hinge part I wanted to get a crisp impression so I used a “stamp buddy” (that can be purchased on the ArtFoamies website) that allows you to apply paint uniformly and smoothly on the stamp.
I could have used a brayer instead but, as none of my brayers are brand new, it leaves some marks than I didn’t like for this purpose.
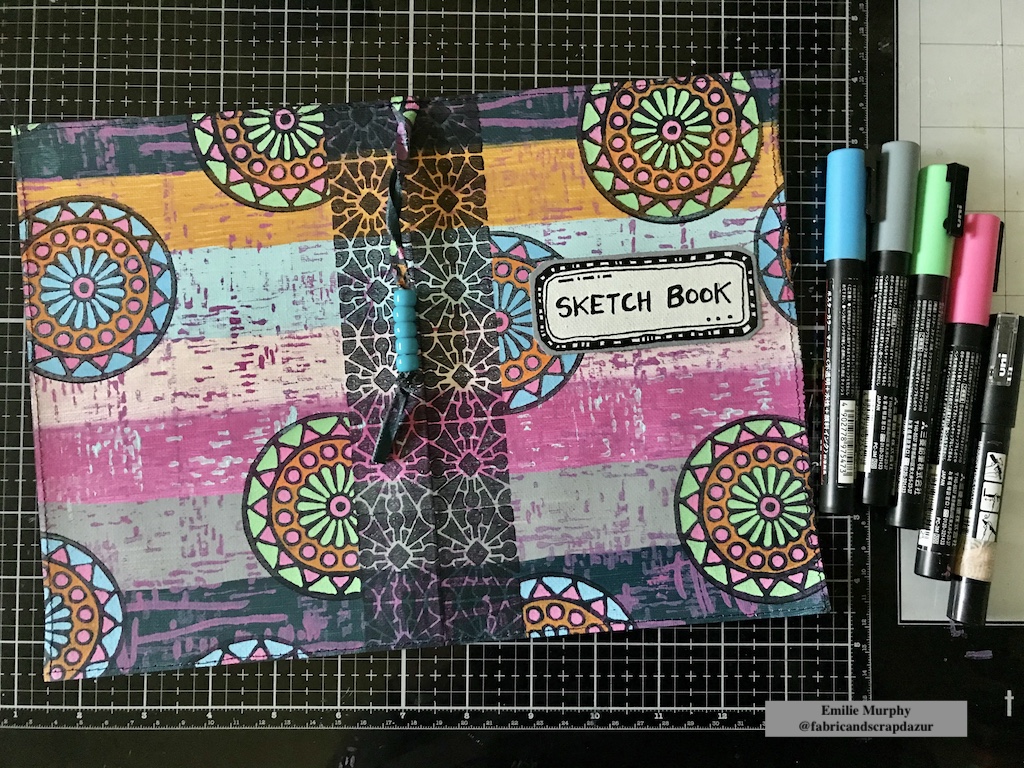
Next, I stamped repeatedly the Valley Road negative stamp to add more interest. Once again, I used my “stamp buddy” because I wanted a crisp impression.
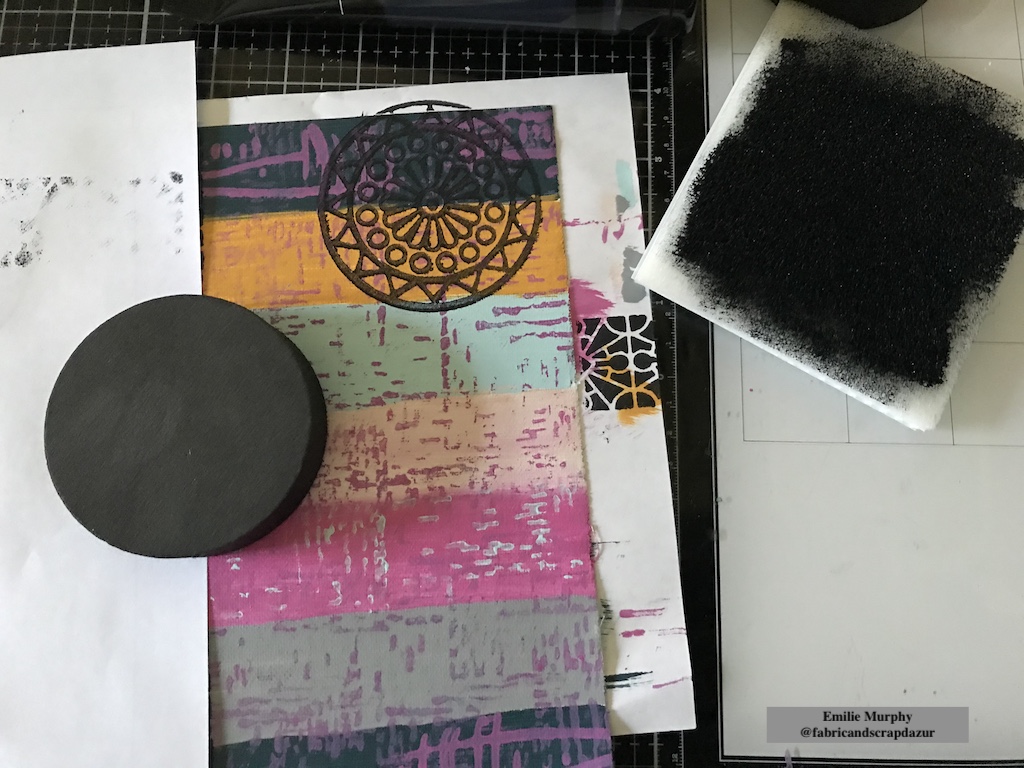
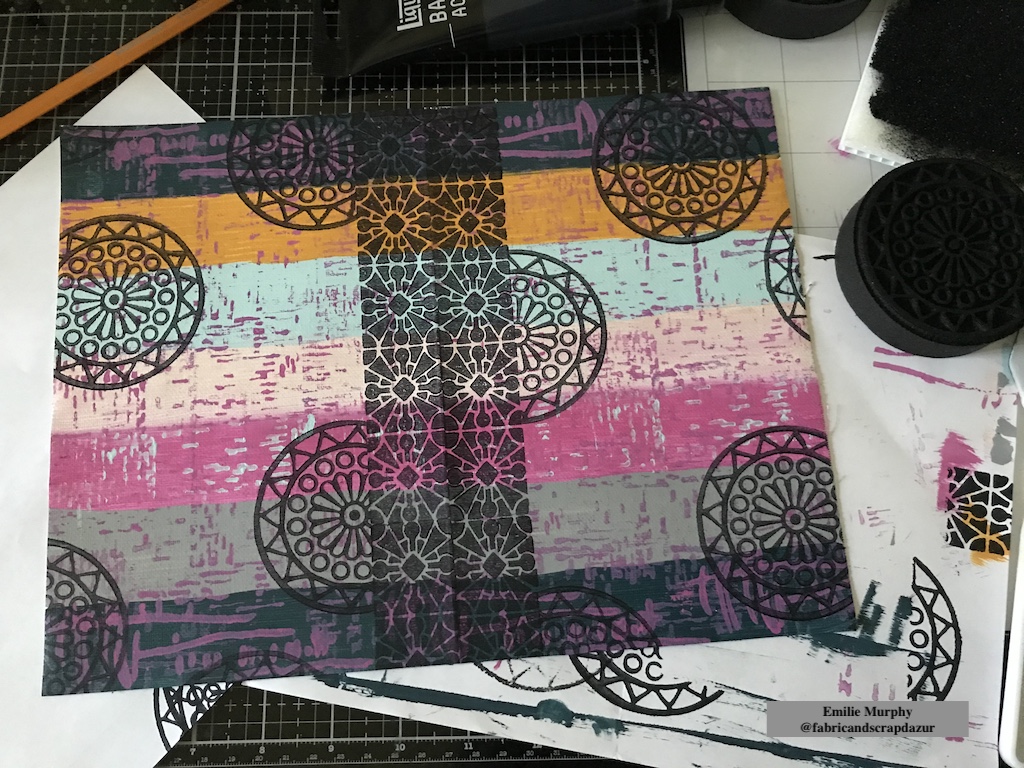
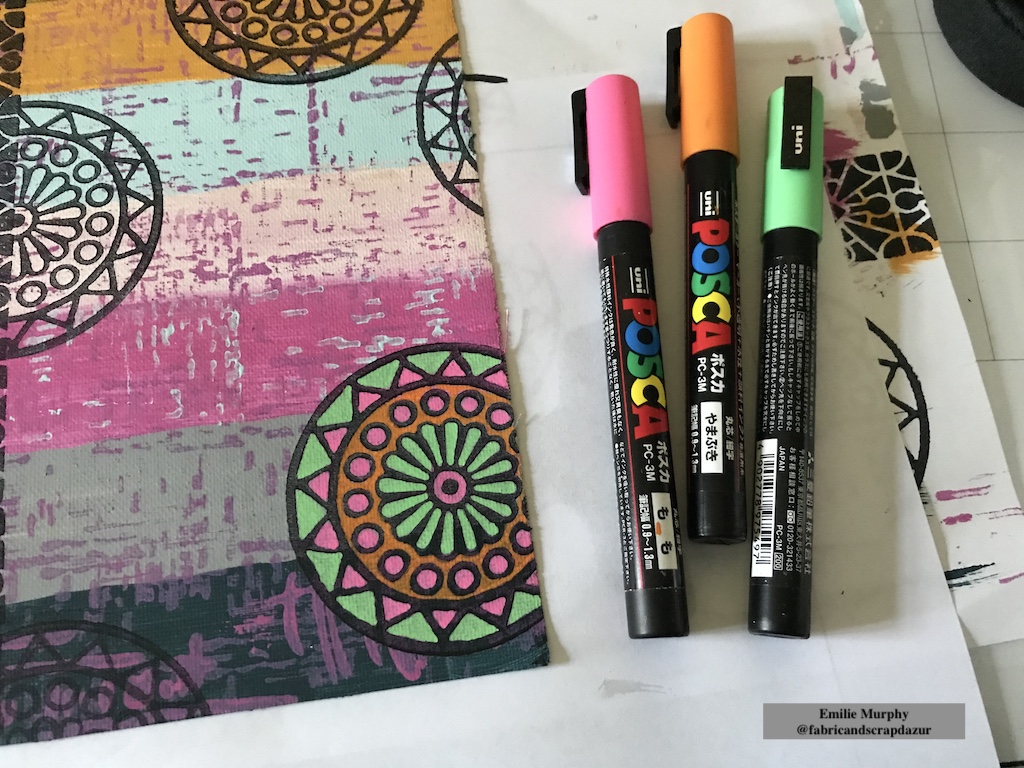
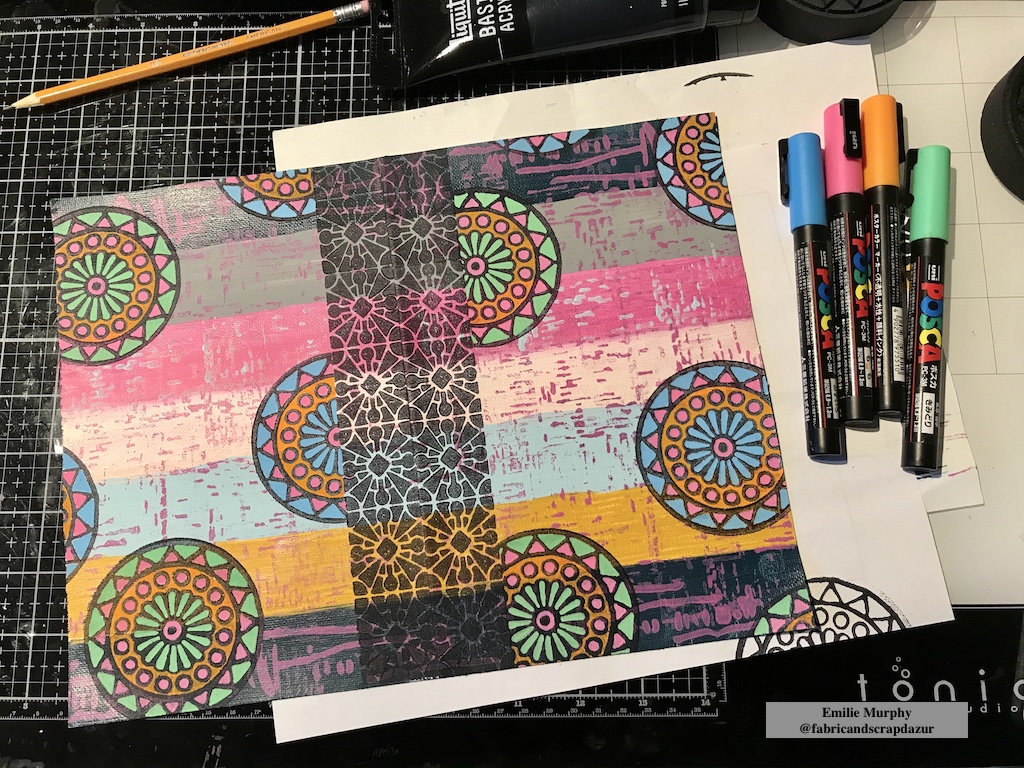
I colored my entire Valley Road motifs with some Posca pens. I just love the way that it allows the Valley Road design to pop out and create some dimension.
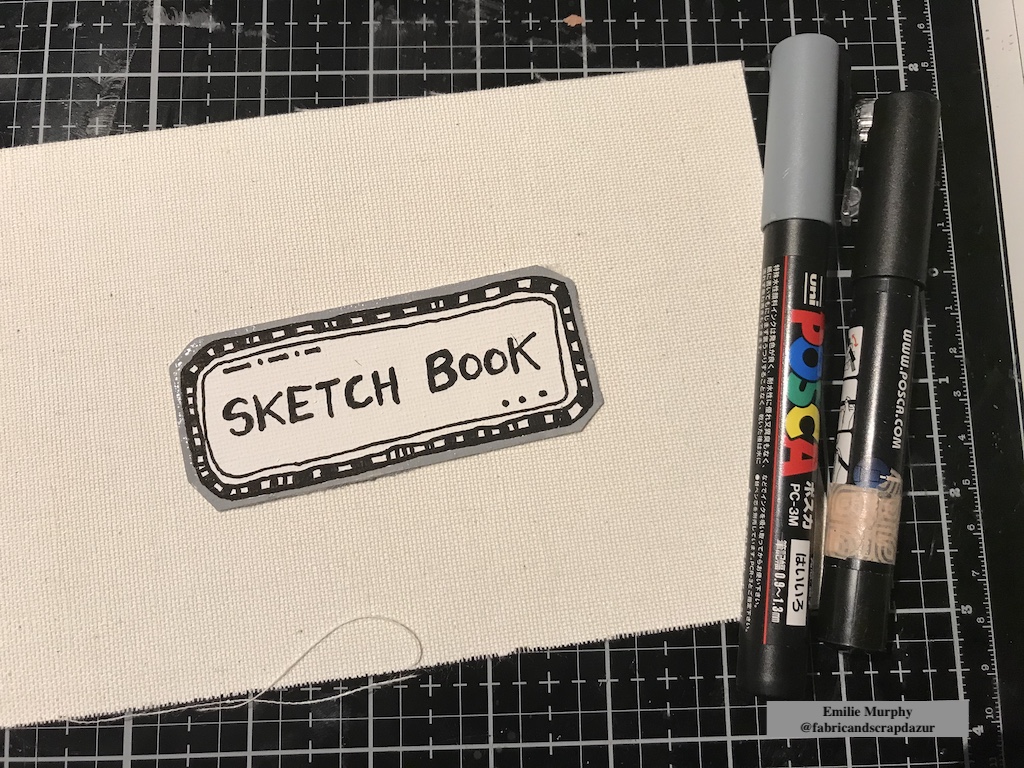
In order to complete my cover, I created a simple label with an extra piece of canvas sheet.
I finished up my cover by machine stitching all around the edges. This step is optional if you don’t like to sew or don’t have any sewing machine.
Tip: You can also simply create a false stitching line with a black maker.
As you can see I also stitched in the middle the remained half-inch strip I got when I cut the canvas sheet to fit the height of my sketchbook.
I embellished the middle strip with some plastic beads. I first twisted the strip and added some dots of glue here and there to keep it in shape. Then I added the beads and tightened a knot to secure it. I think it’s a nice addition to the cover.
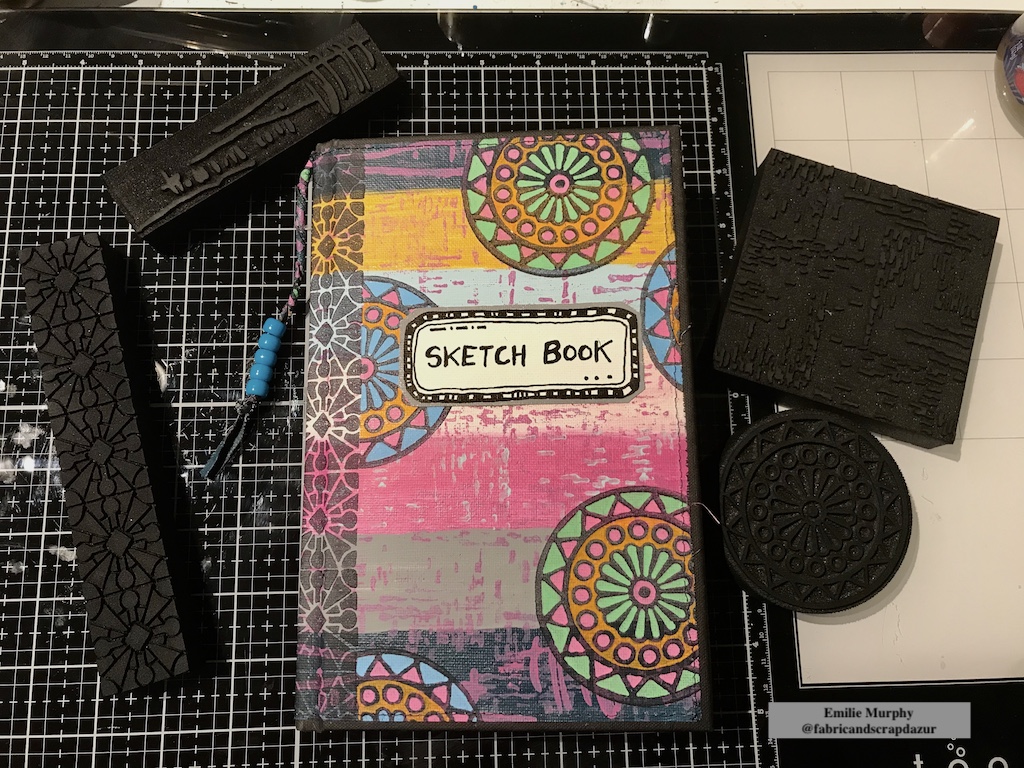
Finally I glued down my canvas sheet on my sketchbook. I used PVA glue that I applied uniformly with a brush. I think it is better to use wet glue for this type of project because it allows some time to make adjustments if needed. I first started to apply glue on a half of the cover and burnished it well with a bone folder. Then I glued down the second half. This way the canvas sheet will adhere well. It also removes potential air bubbles and won’t peel off with time.
Personally I enjoyed trying something new this month. Hope you will take the plunge and try something new as well. Foam stamps are so fun to use specially for this kind of project.
Have a great rest of the week! See you next month!
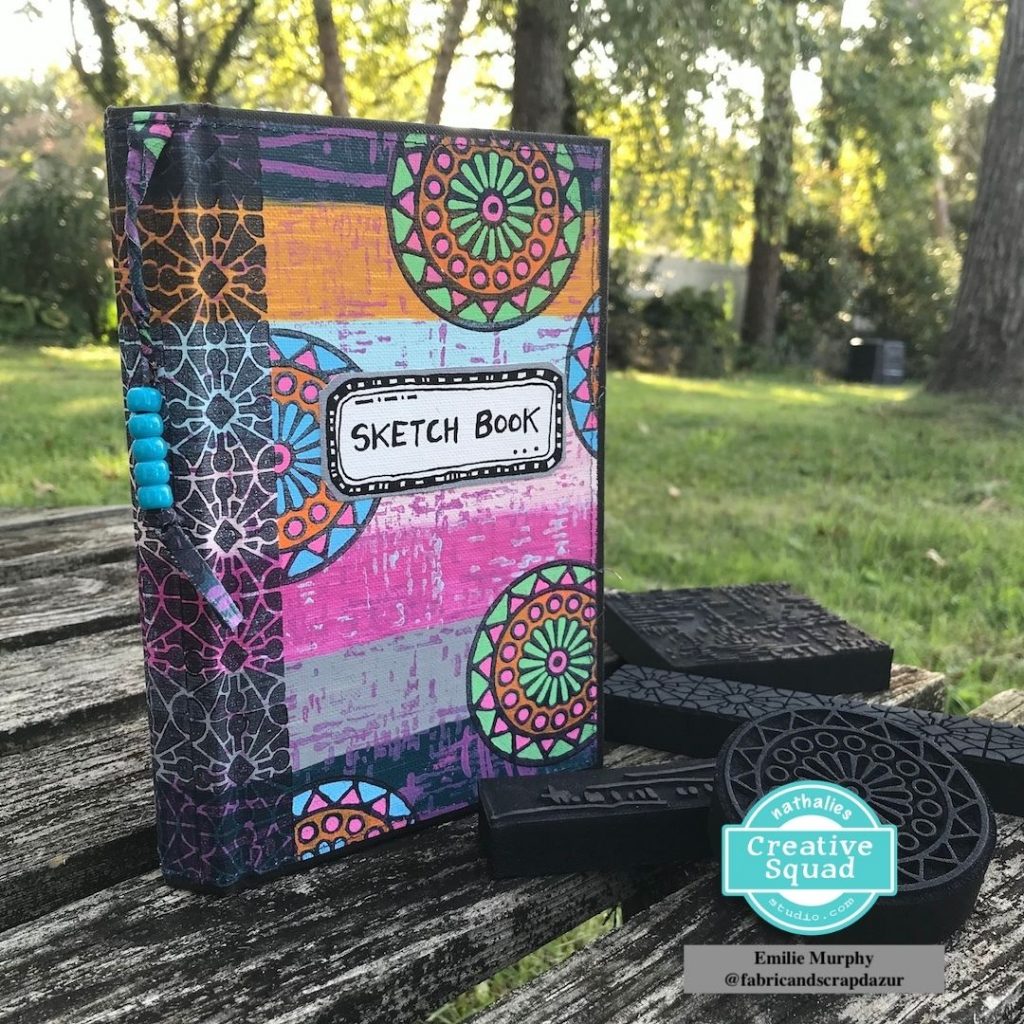
Thank you Emilie – love how those colors make the foam stamp patterns really pop!
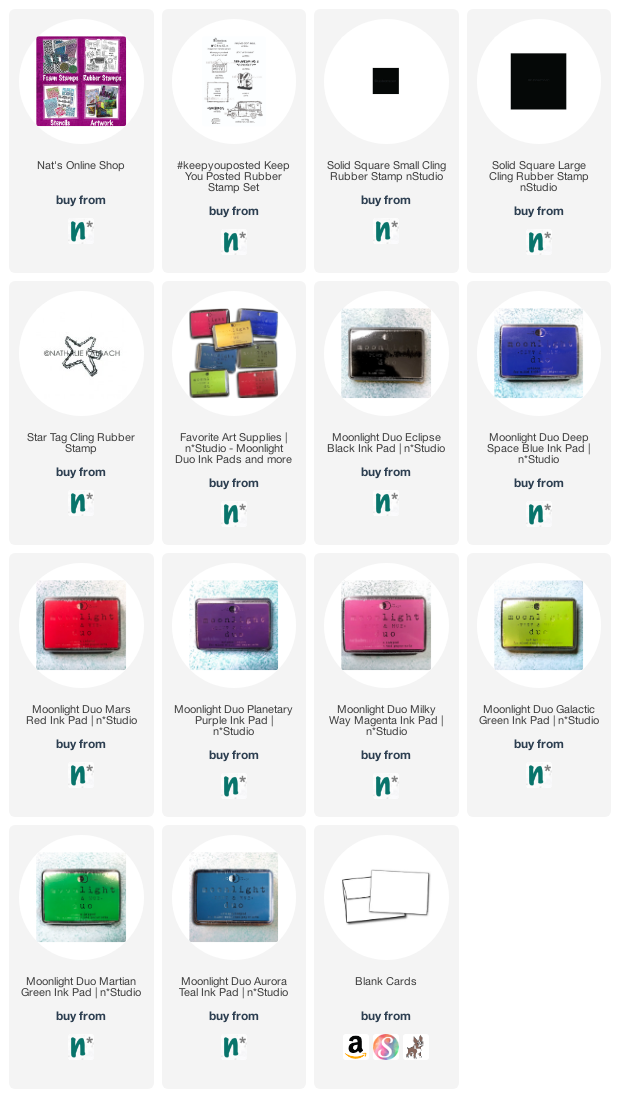
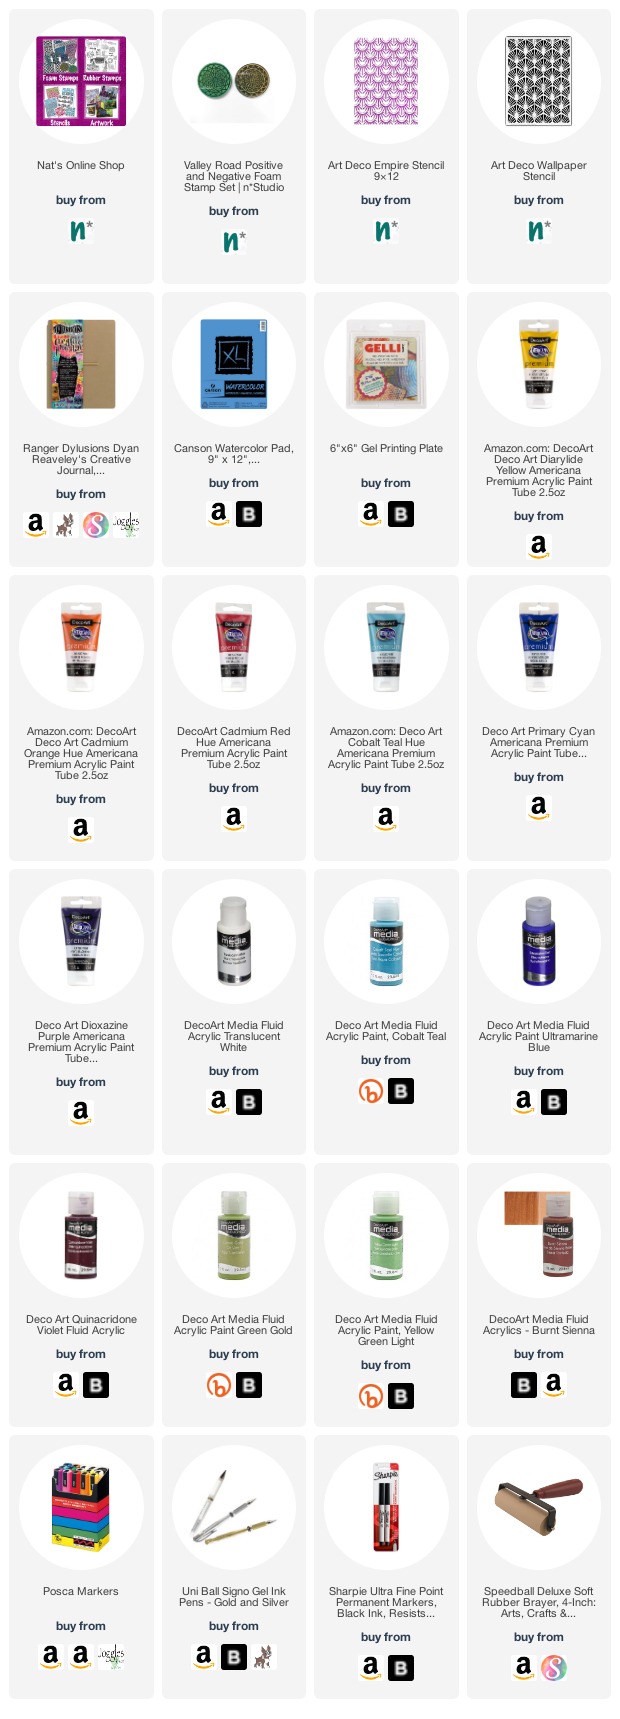
Give it a try: you can find all my Foam Stamps in my Online Shop and here are some of the other supplies Emilie used:
Feel inspired? Working on something yourself that you’d like to share? I love to see how you interpret our monthly themes. Email me how you used my stencils and stamps with the theme and email me an image – I would love to share your projects in my next “n*Spiration From Around the Globe“.
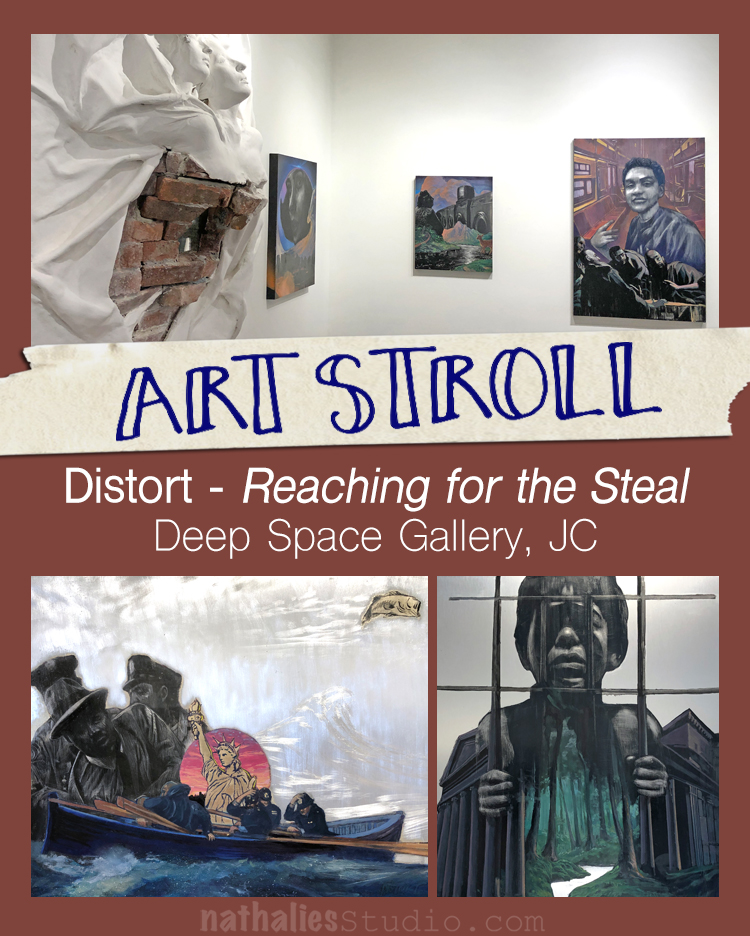
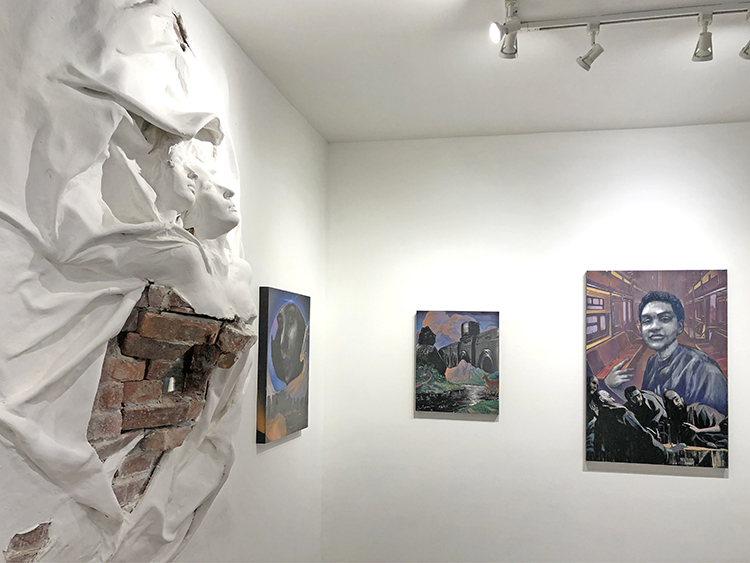
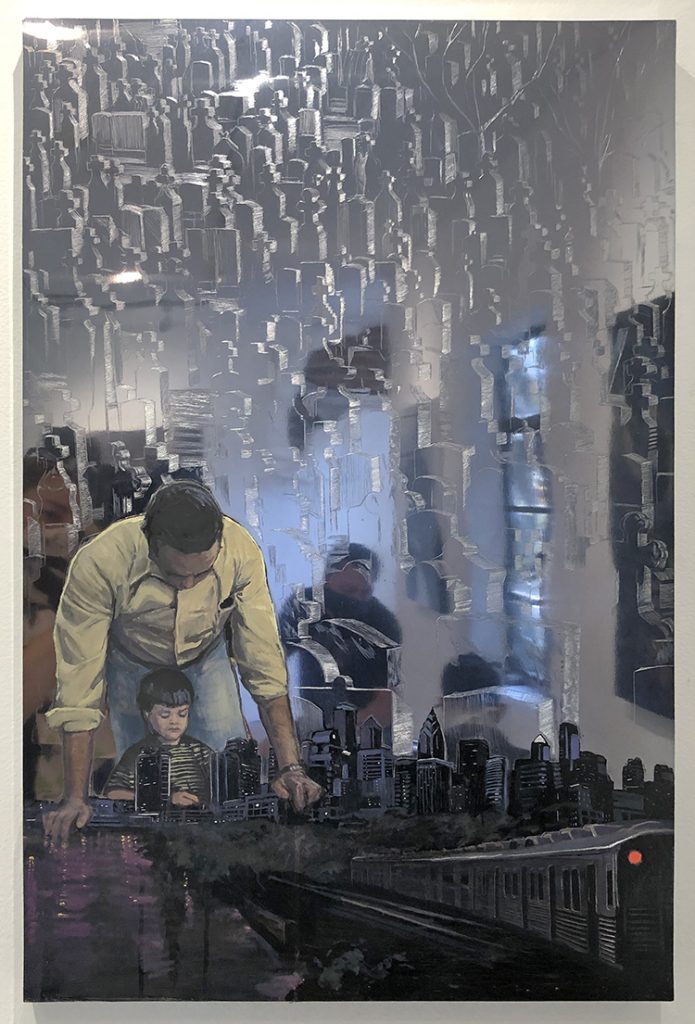
Last weekend we went to a really amazing art show by Distort – a mural artist I really admire at the Deep Space Gallery.
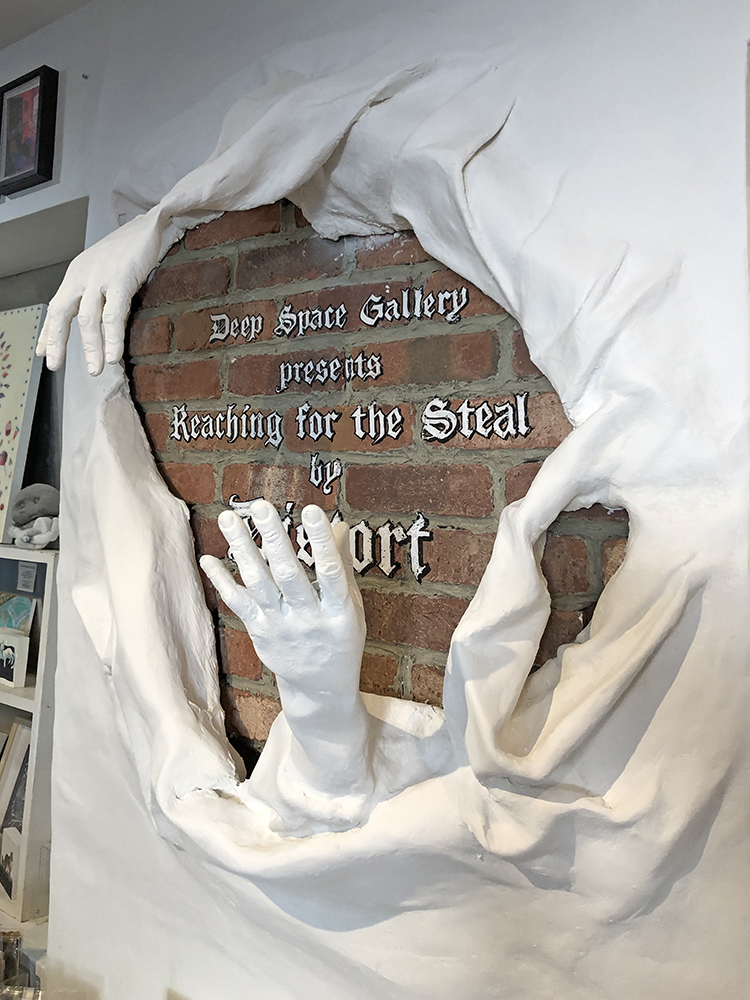
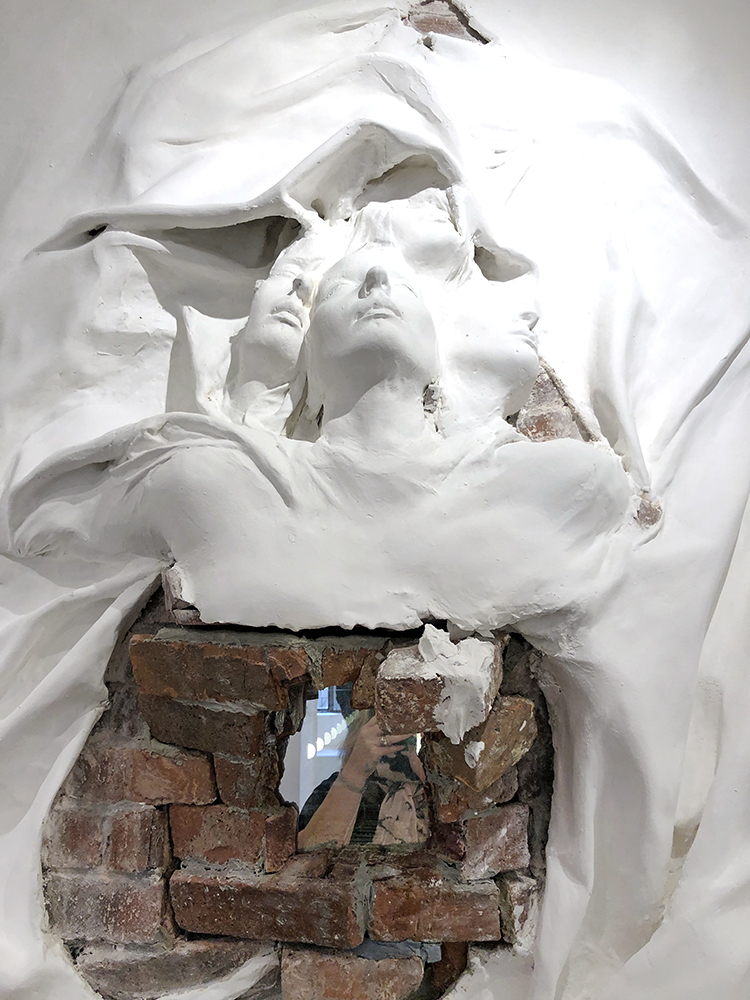
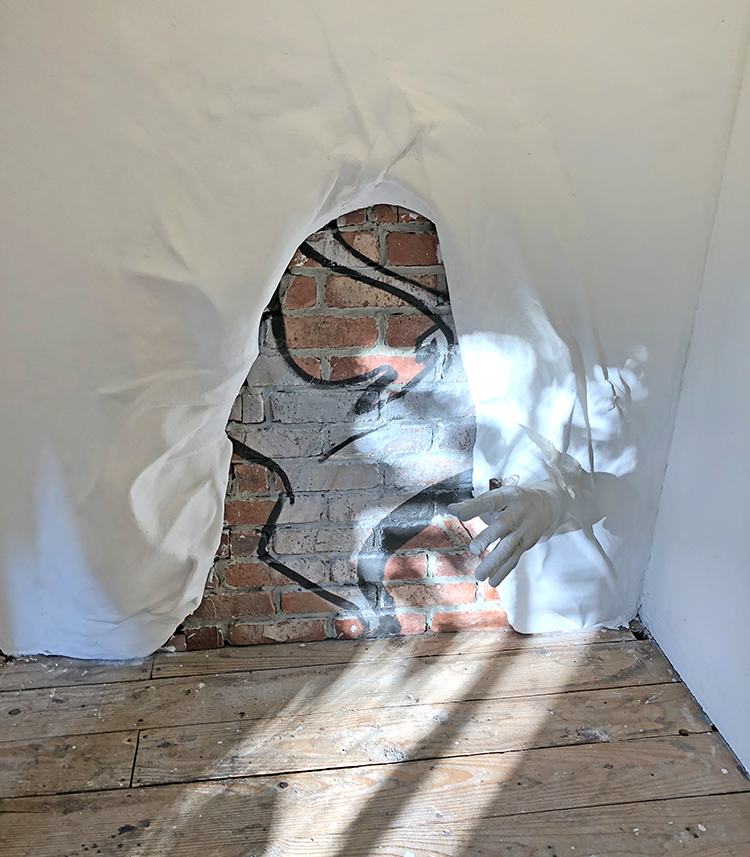
Upon entering the showroom you see one of a many absolutely awesome wall installations in brick and plaster also done by Distort.
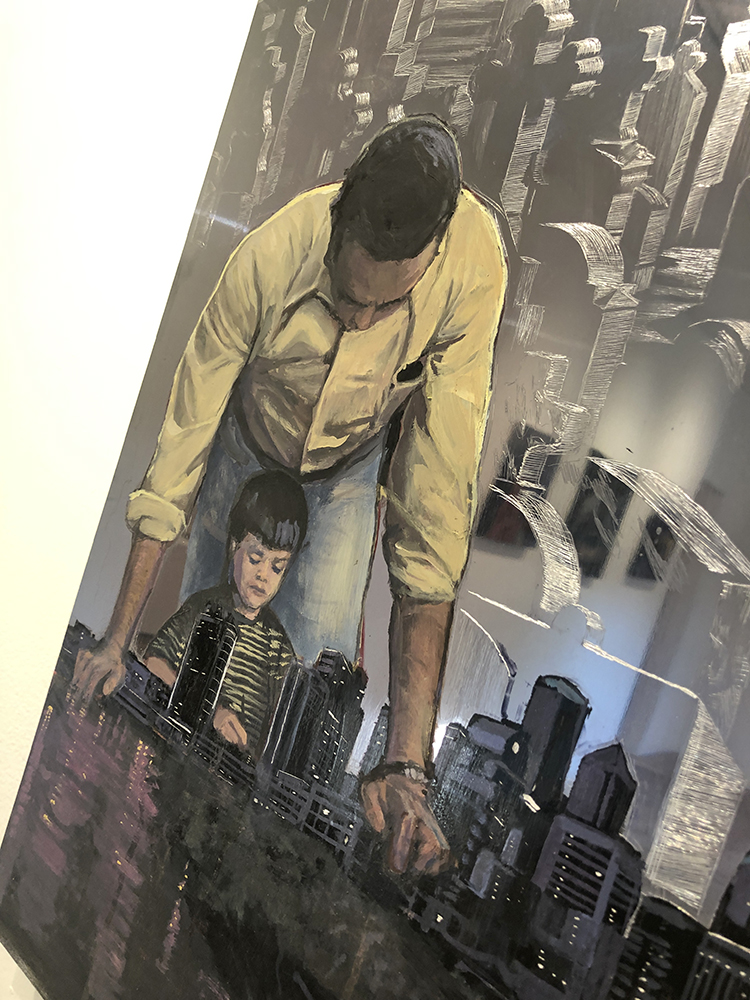
Most of this work was on engraved metal plates and oil paints. Photos can not really show you the depth and dimension Distort creates in his work and boy – It is awesome!
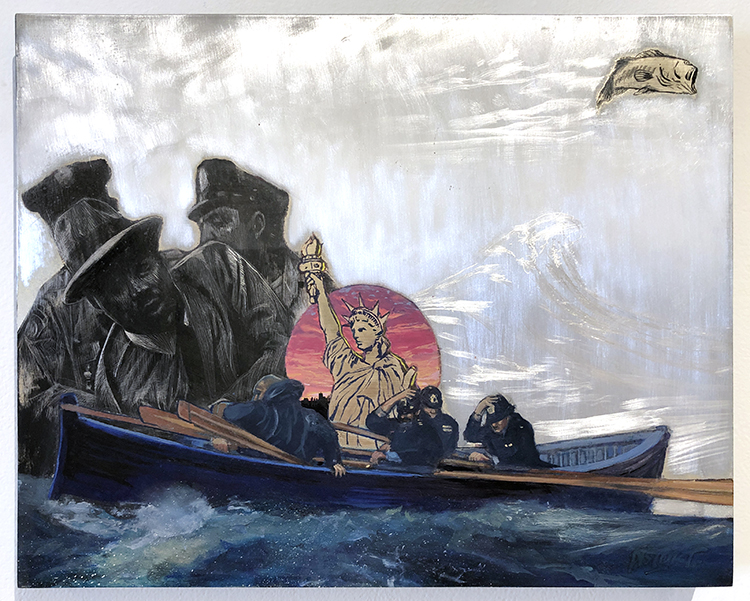
Above Against the Current, 2020
Style Warriors, 2020
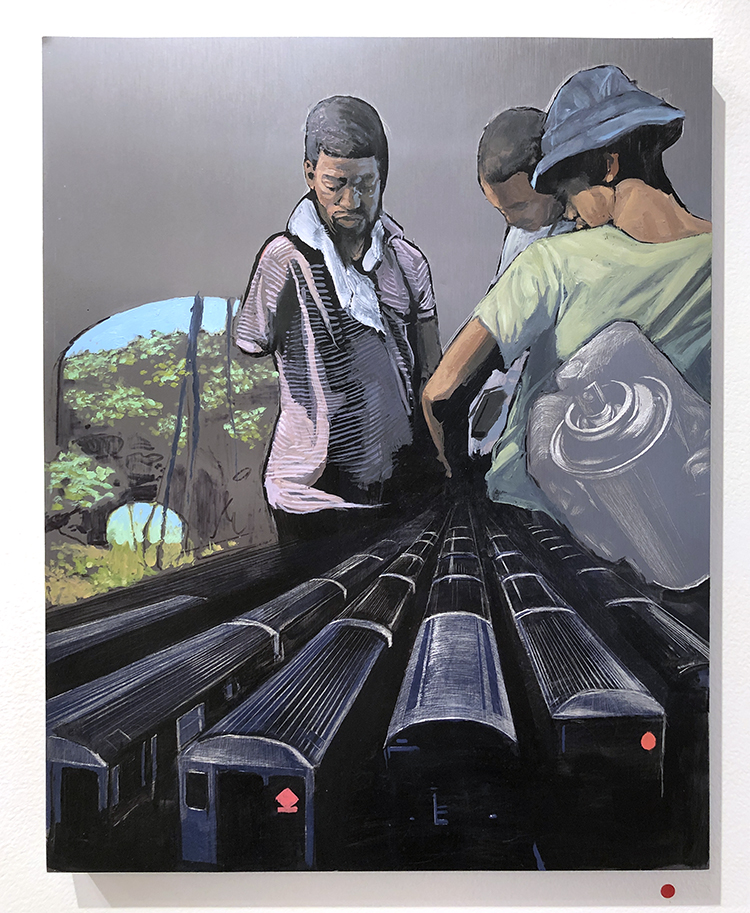
Watching Machines, 2020
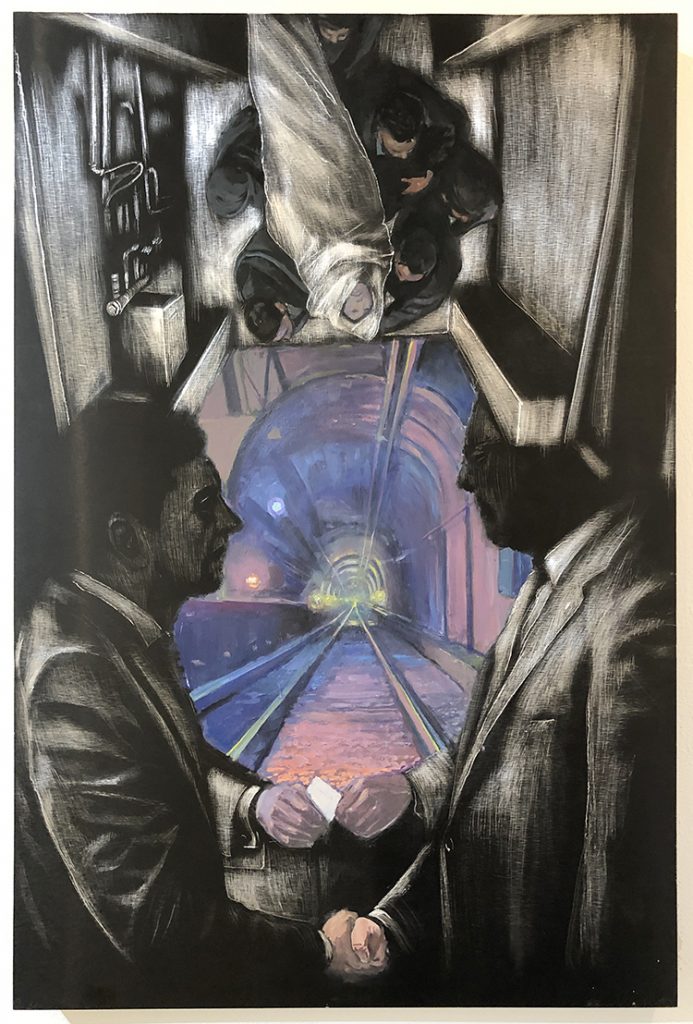
This wall installation was sooo dope- when you look inside you see a train track vanishing into the plane – Amazing.
Distort had a zine at the exhibition that would show the collage work he did as prep work before painting the work. It was amazing to see the magazine clippings and imagery and then see the actual work resulting from the “draft”
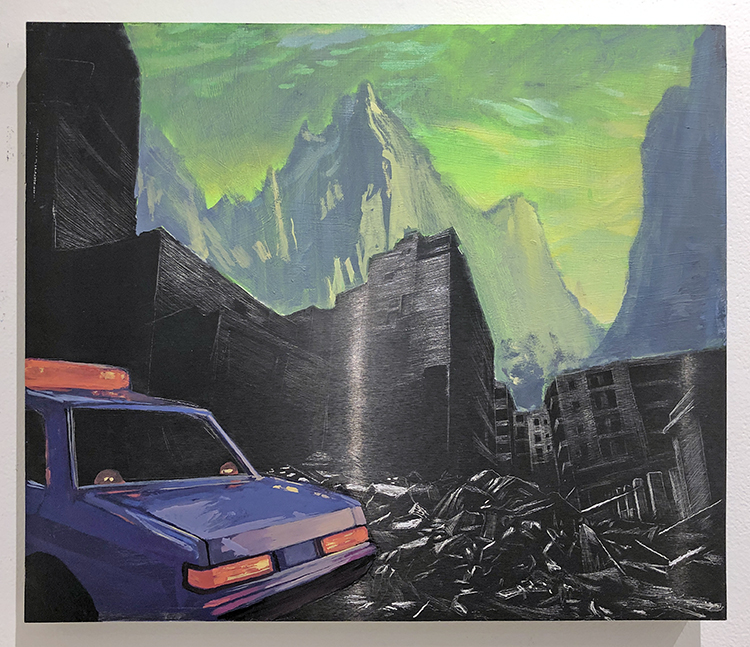
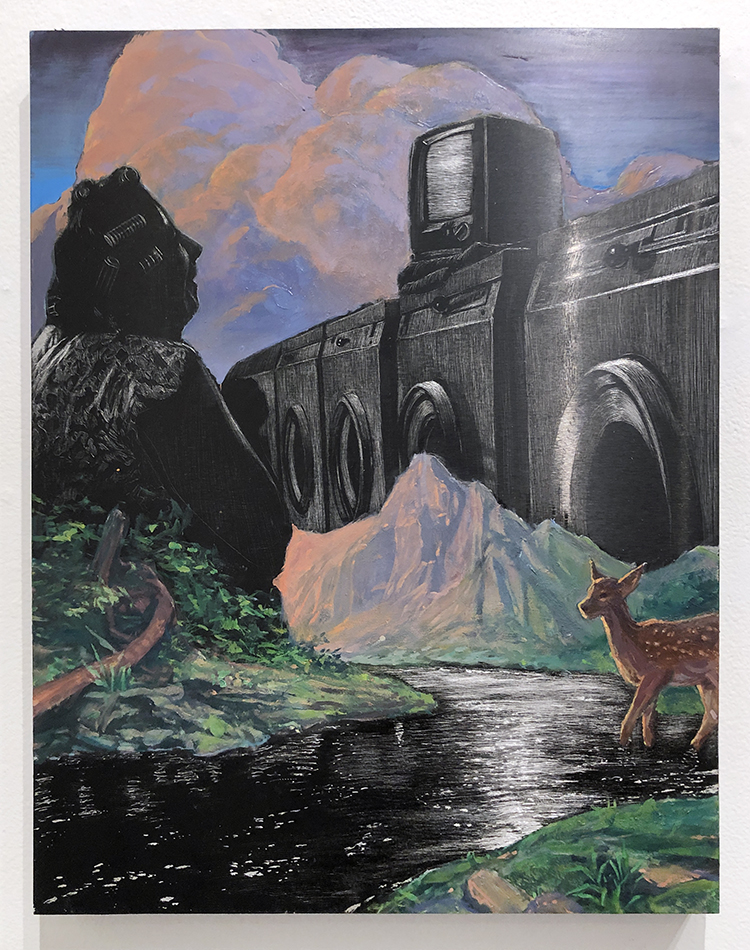
Mountain Dew, 2020

such an awesome reference to his graffiti and mural background
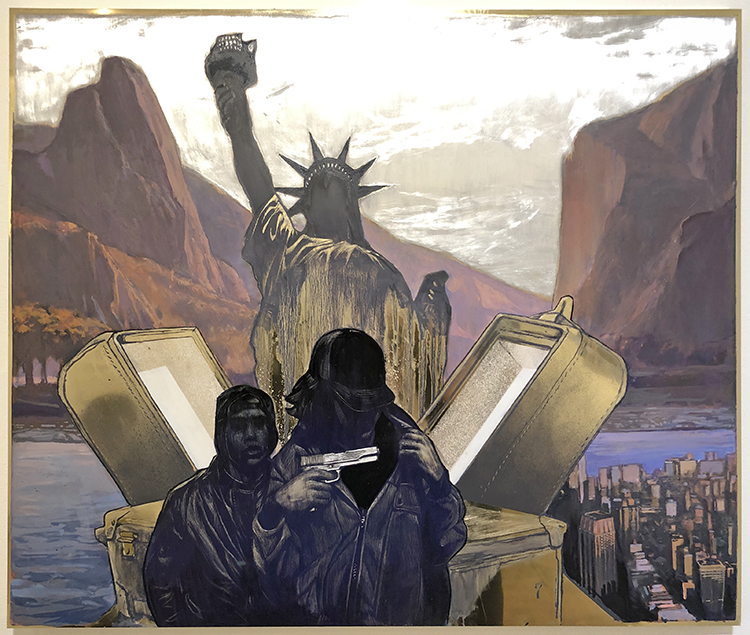
Supreme Court hit me …it was my favorite piece of the show!
I love how abandoned buildings, the theme of nature taking back areas of architecture and human artifacts are woven over and over into his work.
Another favorite of mine – this one was actually created on a mirror! Distort is mirrored talking to someone else in the background …I did not talk to him …I am always very shy when I am a groupie hahahaha.
It was such a cool exhibition! If you are in Jersey City or close to it – make an appointment this month with Deep Space Gallery and see it. I love the work that Deep Space Gallery shows but this exhibition was my favorite so far. And really …nothing beats seeing art than seeing art in person!
TFS Nat, Supreme Court called out to me (as well)!
Not to copy you. LOL
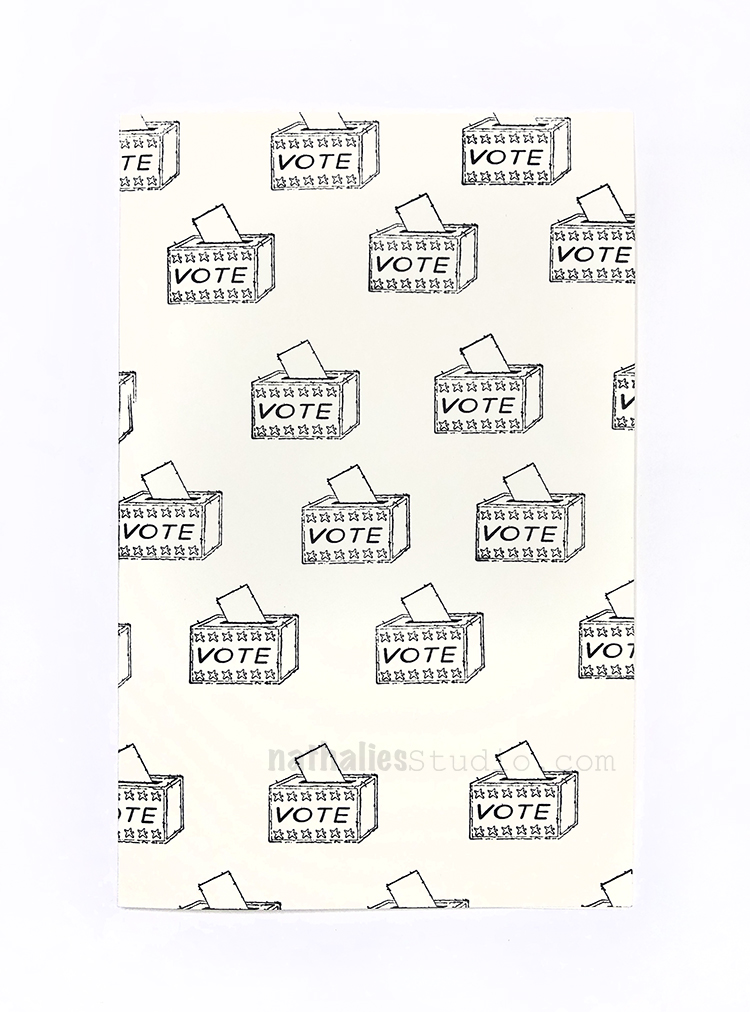
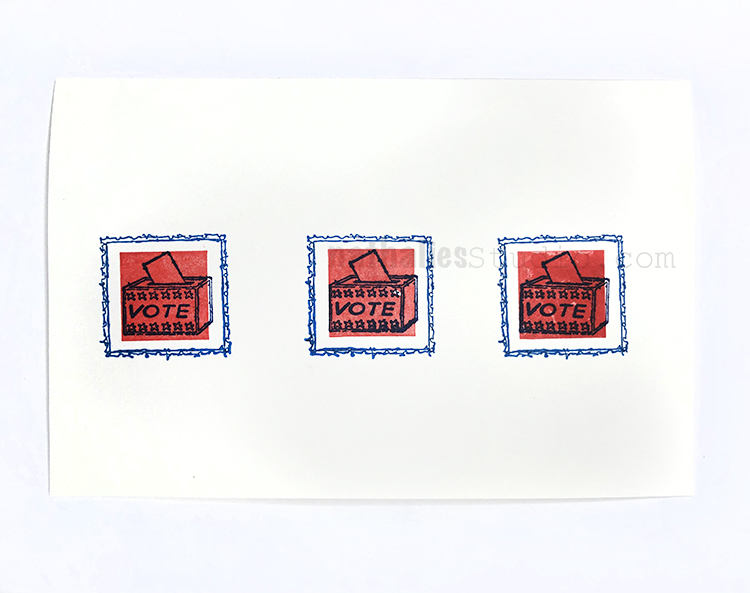
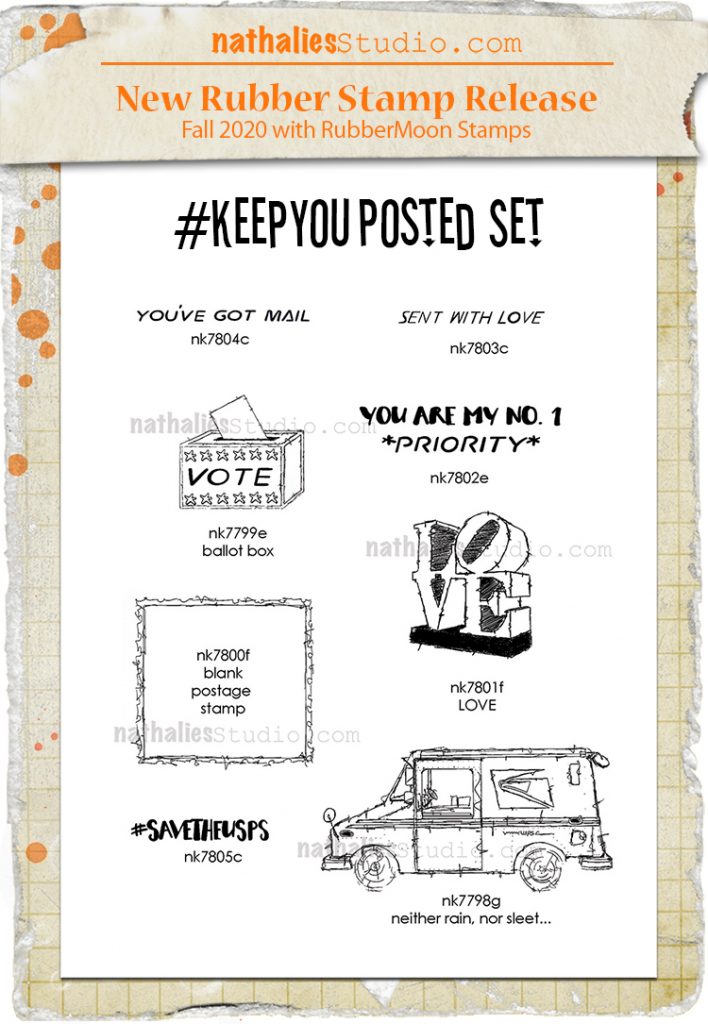
This is my first Presidential Election and so a ballot box really had to go into this stamp set. I thought it would be nice to use my new Ballot Box stamp in my #keepyouposted set to send out some cards to remind folks to get out and vote. Then I just had fun playing :)
I used my Ballot Box and also the Blank Postage Stamp and a colorful selection of Moonlight Duo ink pads…
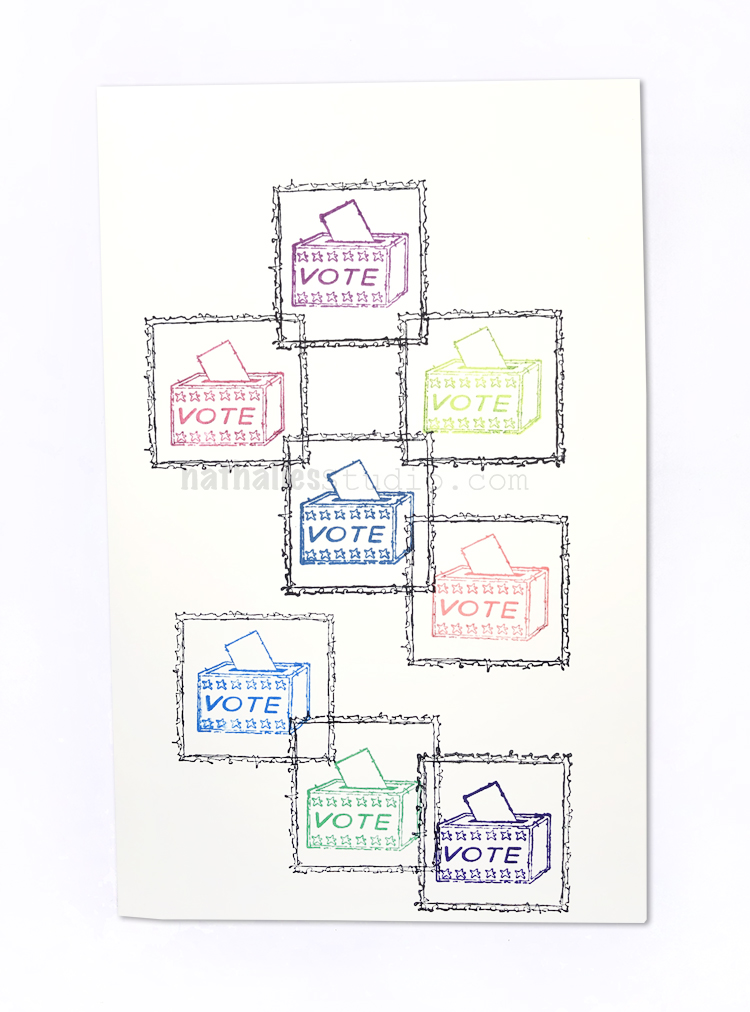
I even added my Solid Square Small stamp for a pop of red (red, white, and blue!)
Then I played with my Star Tag, Solid Square Large, and stamps from the #keepyouposted set. Getting my pattern groove on!
And then some more stars…
So all my friends here in the US – get out there and vote!!! And tell your friends also… maybe with some new stamps lol

Here are some of the supplies I used:
Love them all!!!!
thank you Robin!
Happy to share this new set with you today as it was pretty important for me to design this one. I call it #KeepYouPosted and I think you can get the gist about it.
It includes 8 different cling rubber stamps, a mixture of text and graphic ones and some that are really appropriate right now…. but if you think about it, these messages are totally timeless. Check it out HERE. It might also get you into the big Mail Art craze that is going on right now because these guys are perfect for cards and envelopes!
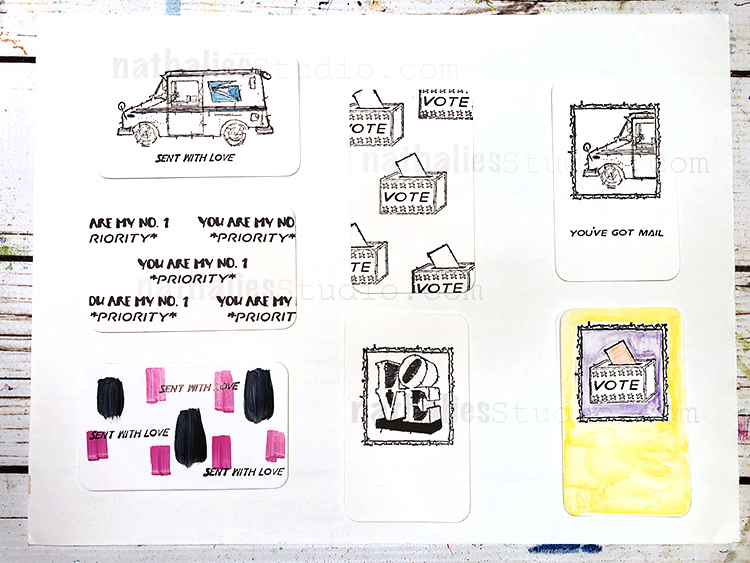
Here is the set:
I made some small tags so you can see how they look and also how some of them work together:
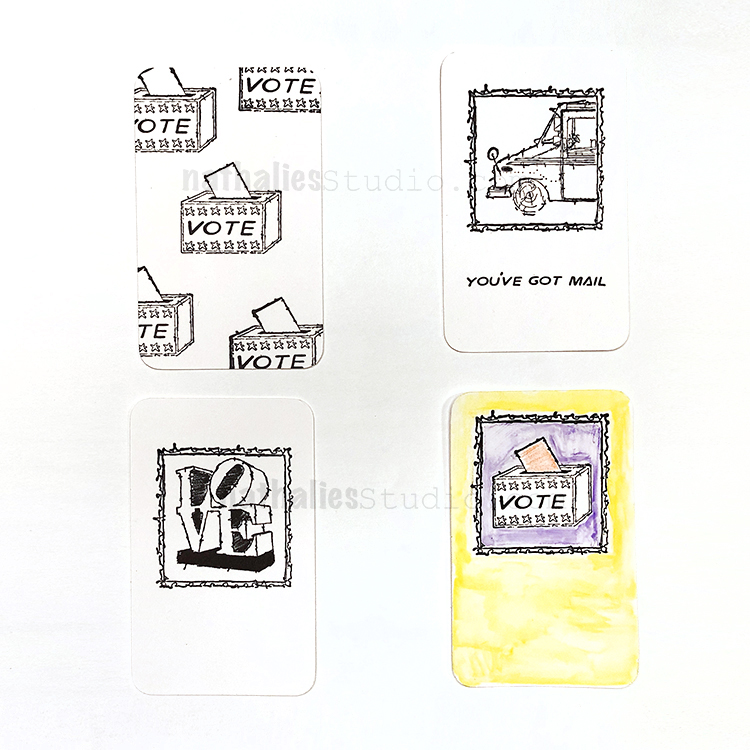
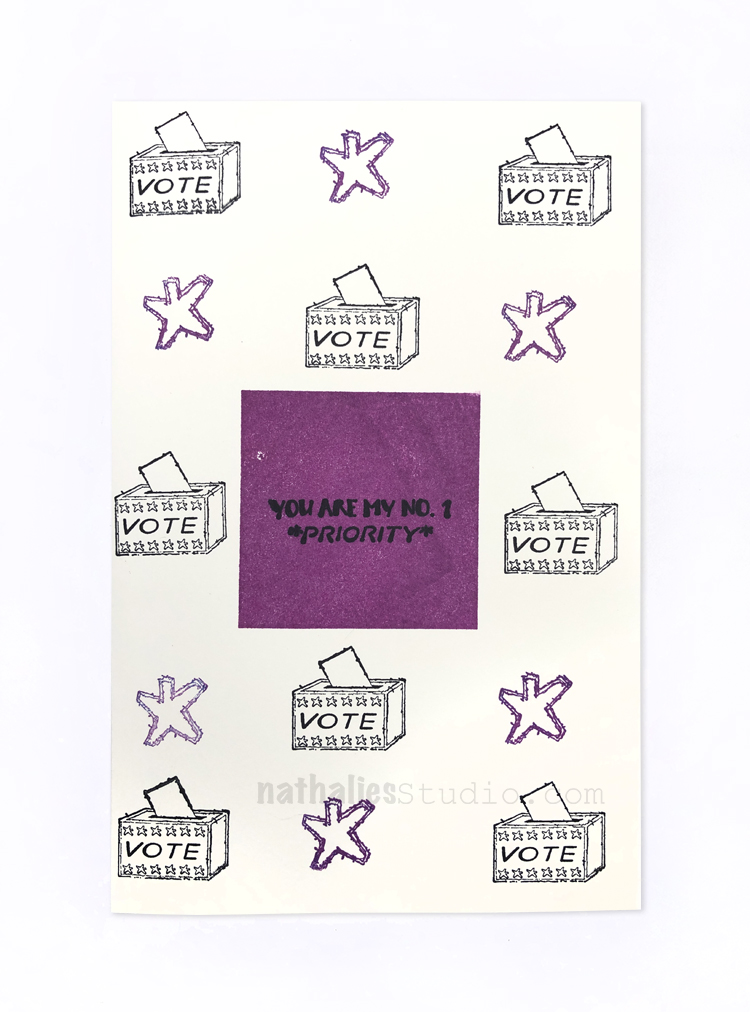
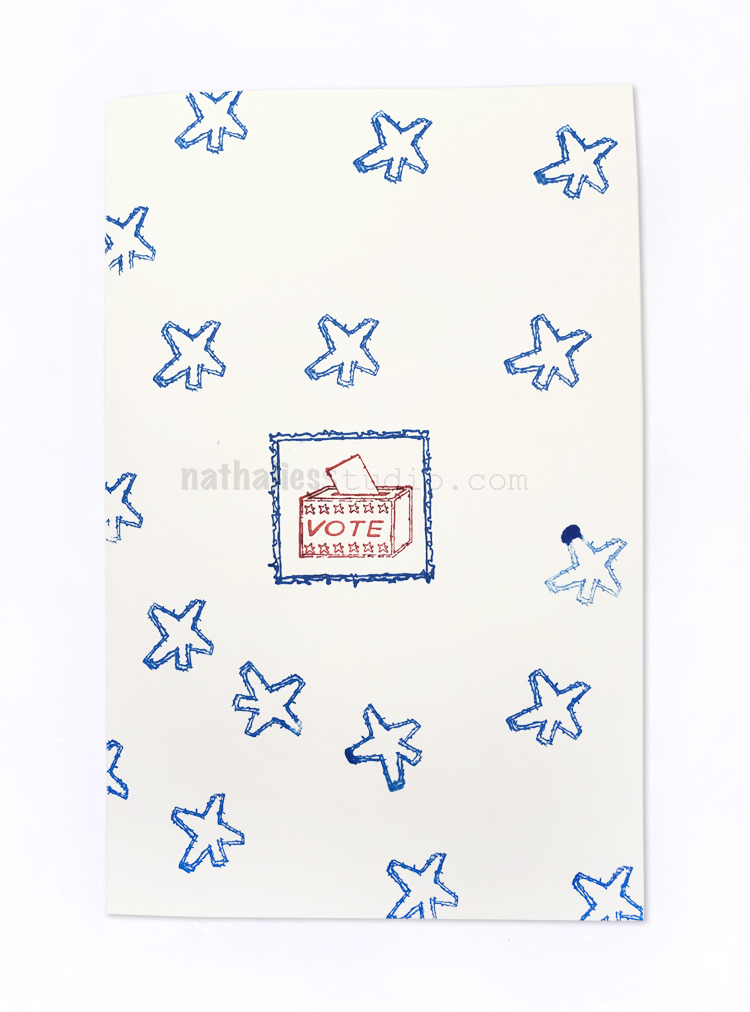
The Blank Postage Stamp design can accommodate some of the other designs inside to make a faux postage stamp design. It’s also fun to put your own thing in that frame. And the Ballot Box is just such an important reminder now.
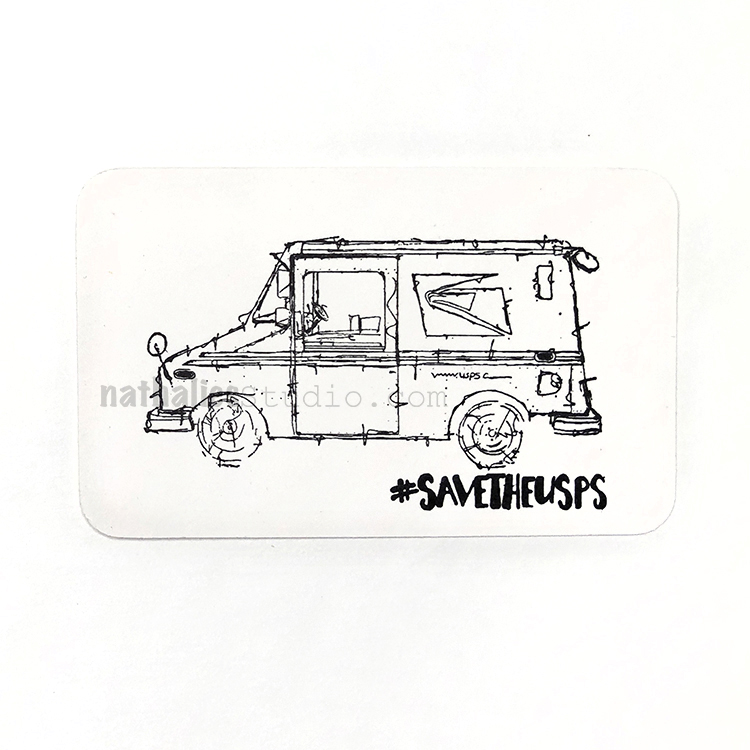
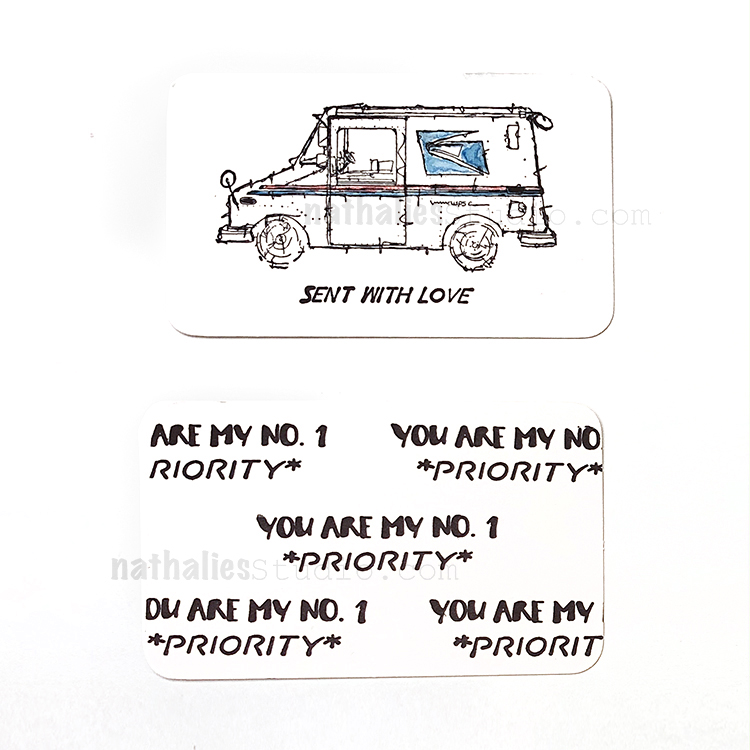
I love the USPS trucks here – such a unique vehicle – I had to capture that. And #savetheusps, well you know ;)
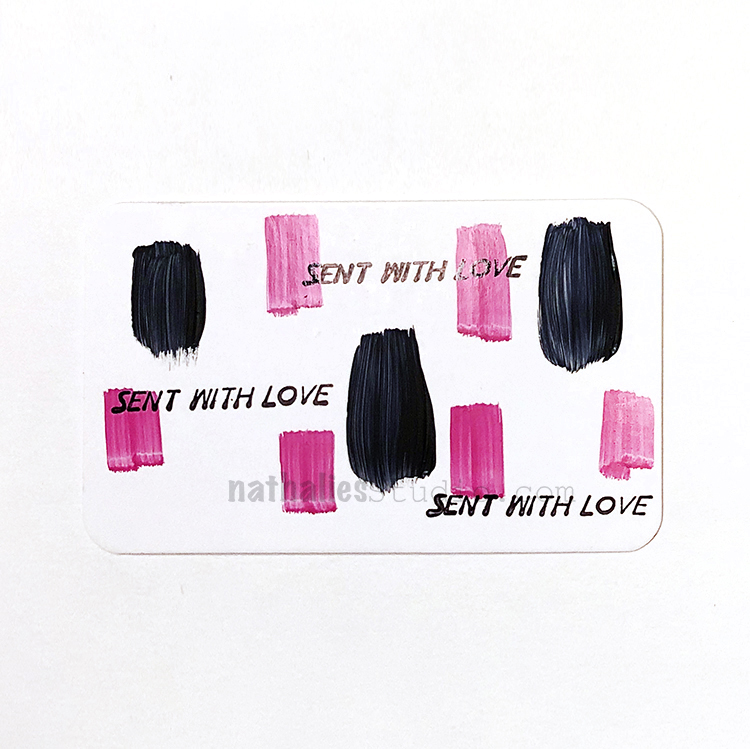
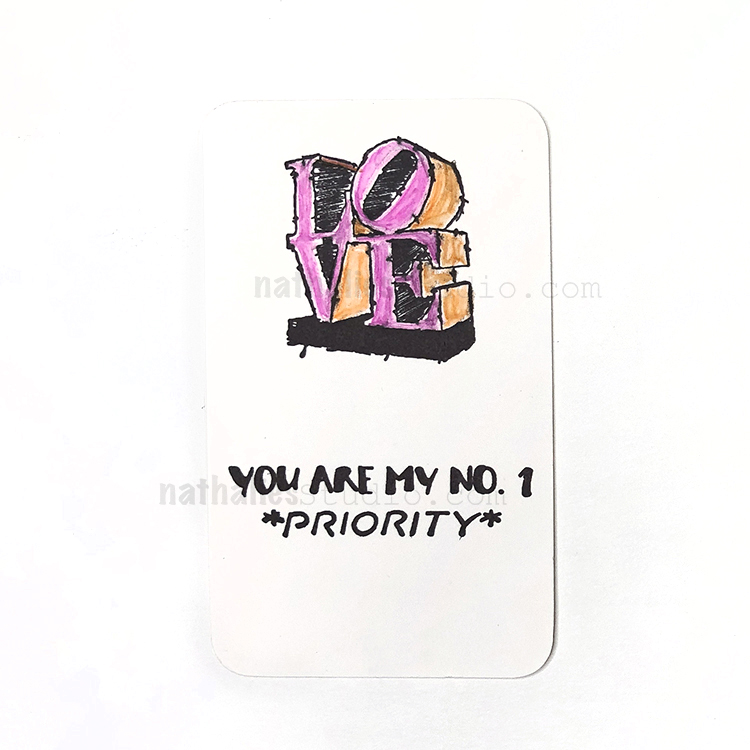
Sent with Love is such a classic. And I send out a LOT of Priority boxes so I thought a play off that would also be nice. Why not send a special note to your No. 1 Priority?
My LOVE stamp looks good on its own or in the frame.
Here is the whole bunch – tons of fun to mix these up. Anybody else want to spend the whole day making cards???
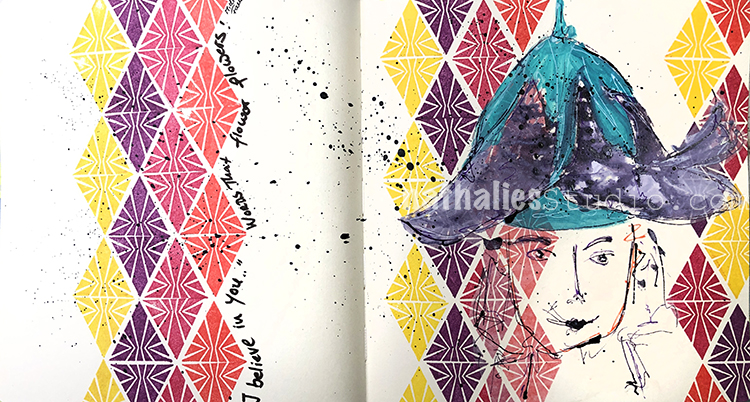
“I believe in you”… Words that water flowers! – Michael Faudet
I messed up the quote but oh well, happens to the best of us :) I didn’t see it until I looked at the photos for this blog post and then decided to leave it …Flower Flowers – you know what I mean ;)
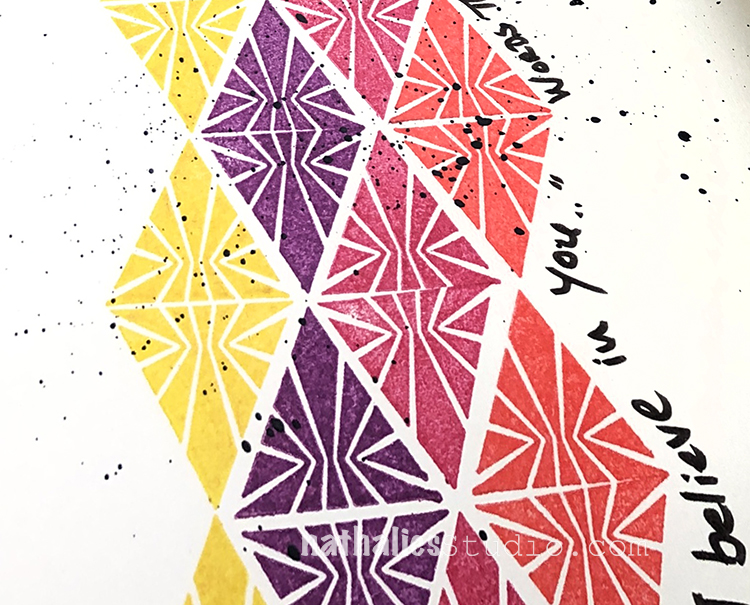
For my background I used Sunshine Yellow, Planetary Purple, Milky Way Magenta, and Mars Red moonlight duo ink pads and my Sunburst Triangle rubber stamp from the Triangle Love set.
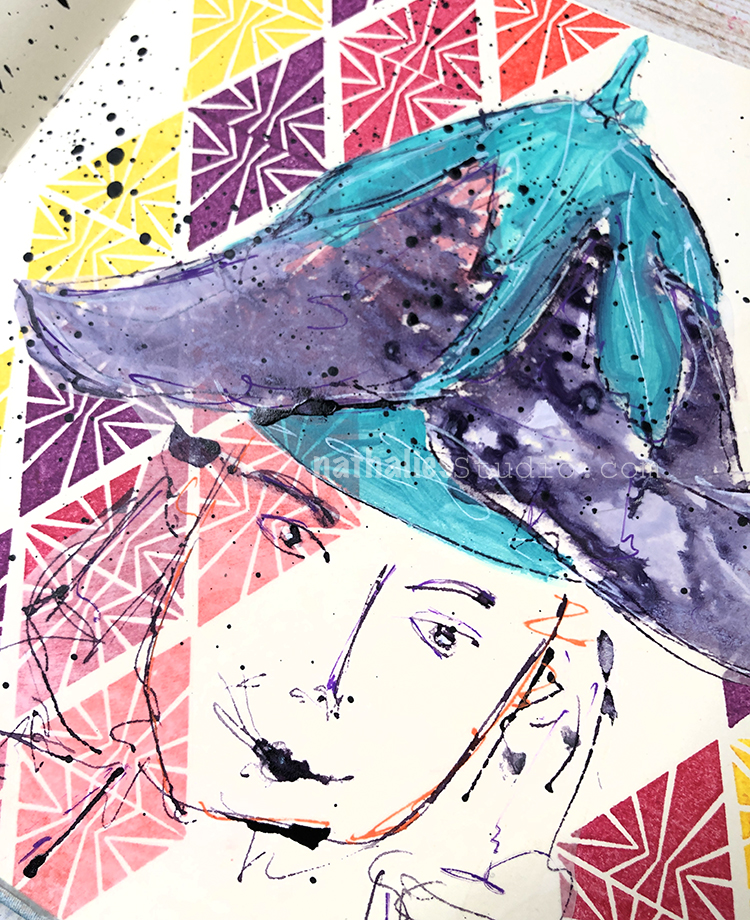
I sketched on deli paper using acrylic ink and acrylic paint, then added it to my page. I used some delicate black splatters to bring it all together.
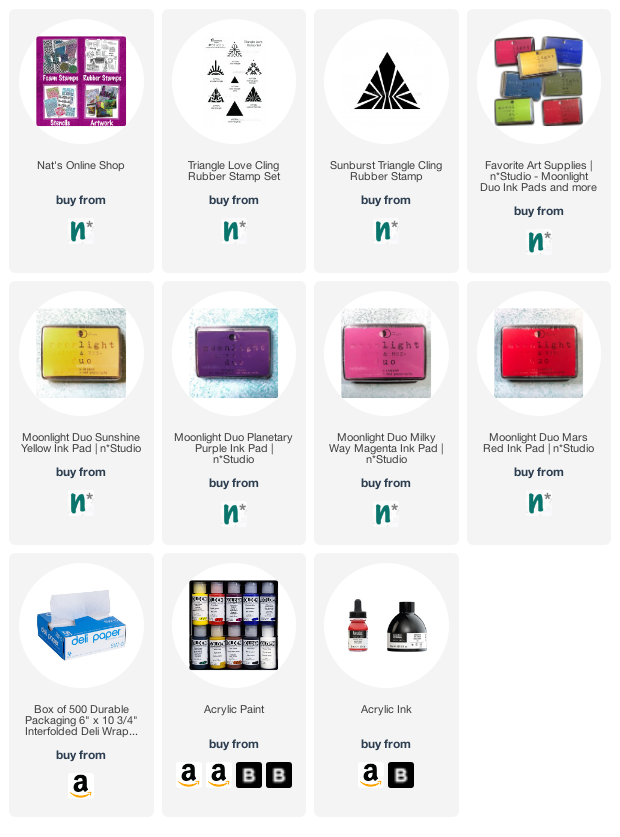
Here are some of the supplies I used:
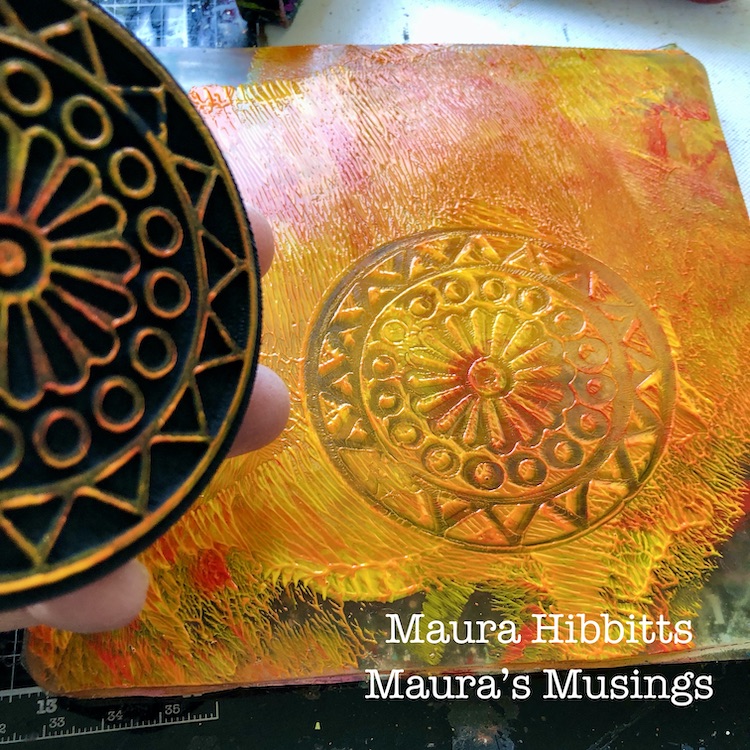
Hello from our Creative Squad! Today we are kicking a new monthly theme off with a project from Maura Hibbitts. Maura is creating an uplifting celestial inspired art journal page using my Valley Road foam stamps and my Art Deco Wallpaper and Art Deco Empire stencils. And bonus: you get a little science lesson too :) Our theme is: A New Day – Let’s try something new today :) Although these are tumultuous times and we never know what each new day will bring, it also seems like the perfect time to throw caution to the wind and just jump into something new with both feet. Try a new material or technique or approach. Why not? Today is a new day… and tomorrow is too!
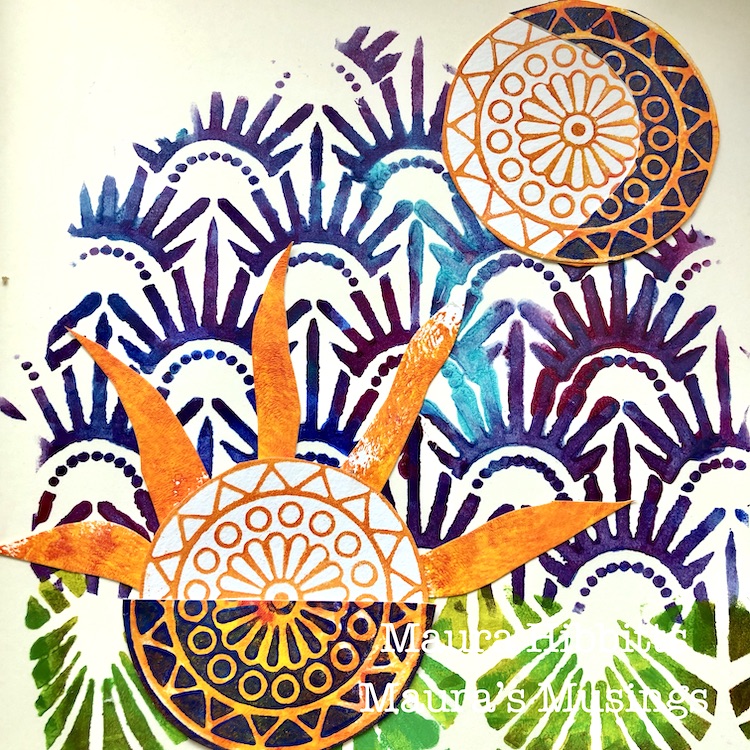
I find myself rather fascinated with the cycles of the sun and moon…must be my Earth Science background. So, when I thought about a new day, the setting of the sun and rising of the moon came to mind. We’ve had some glorious sunsets over the summer, so I wanted to pull in that gorgeous orange with my sun, and carry a bit of it into the moon. Since the moon rises 50 minutes later every day, sometimes the moon is rising as the sun is setting, and other days the moon is visible during the day. Just like the sun and moon, we each have the opportunity to make changes with each new day.
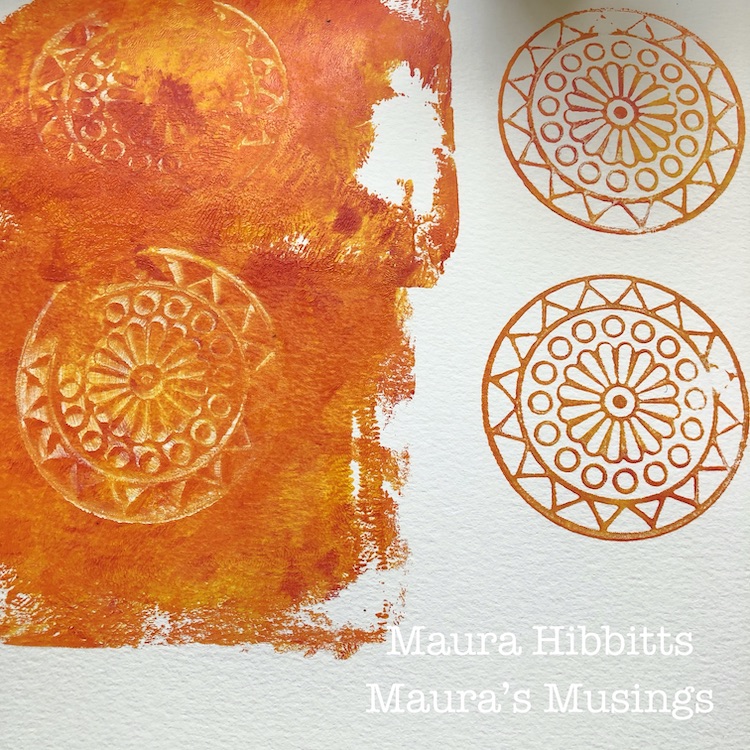
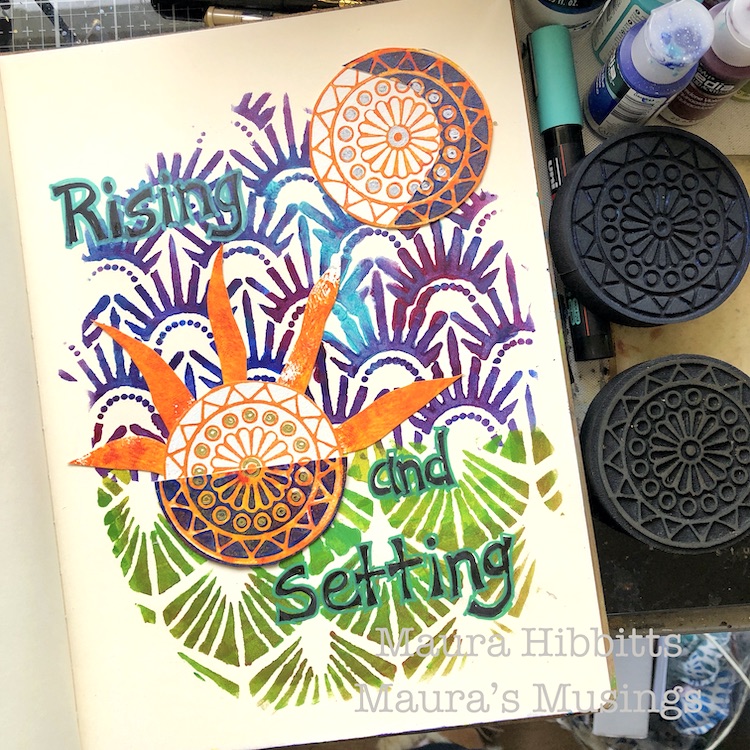
I decided to use my large art journal for more impact. I mixed orange, yellow and red on the gel plate and stamped out the Valley Road Positive ArtFoamie on watercolor paper. I stamped several, and also pressed the paper onto the gel plate for a different image. Sometimes when I work, I have an idea of where I am headed, but it’s fluid.
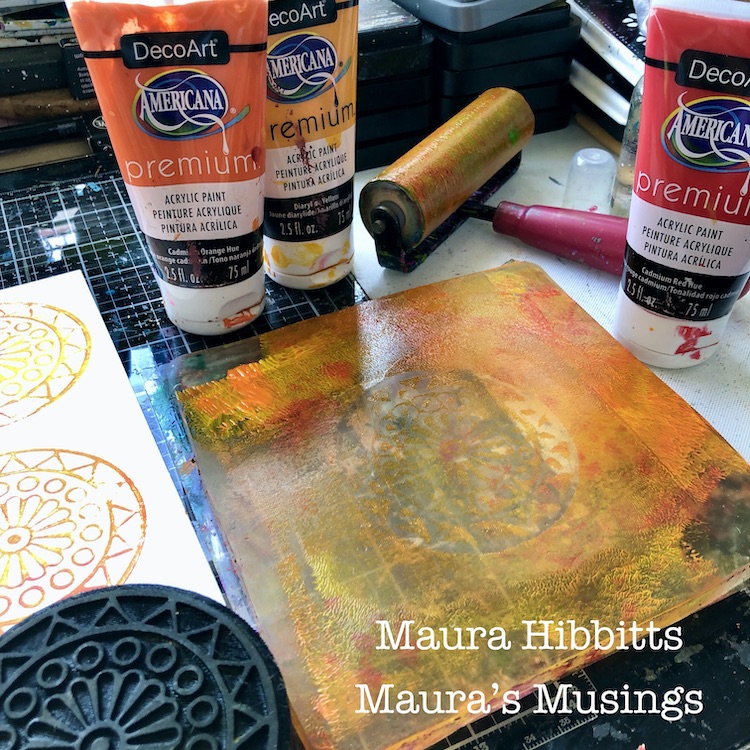
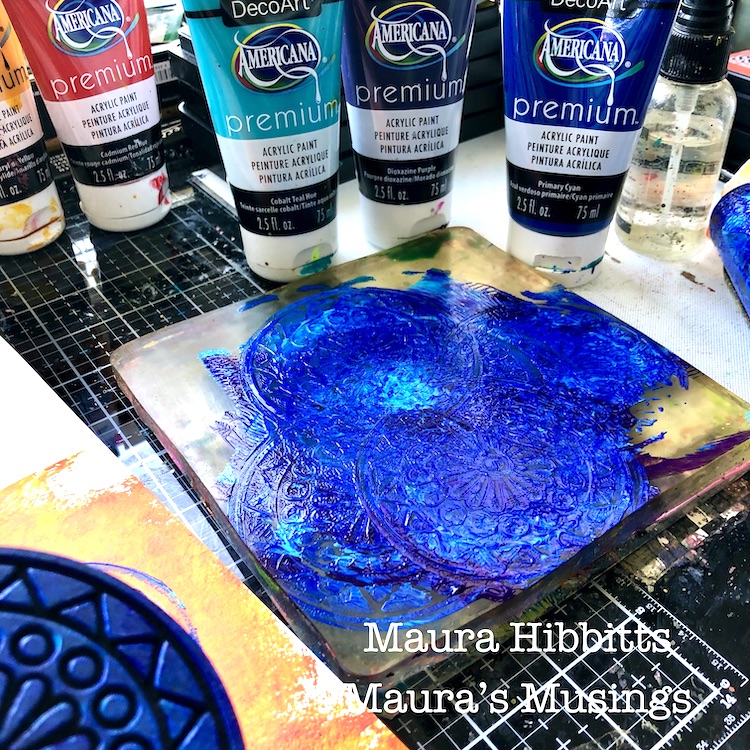
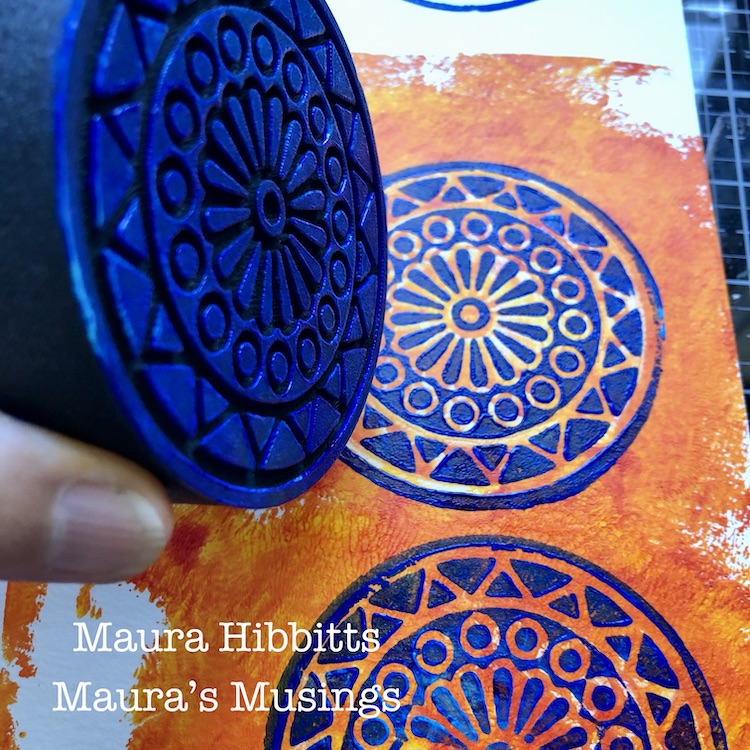
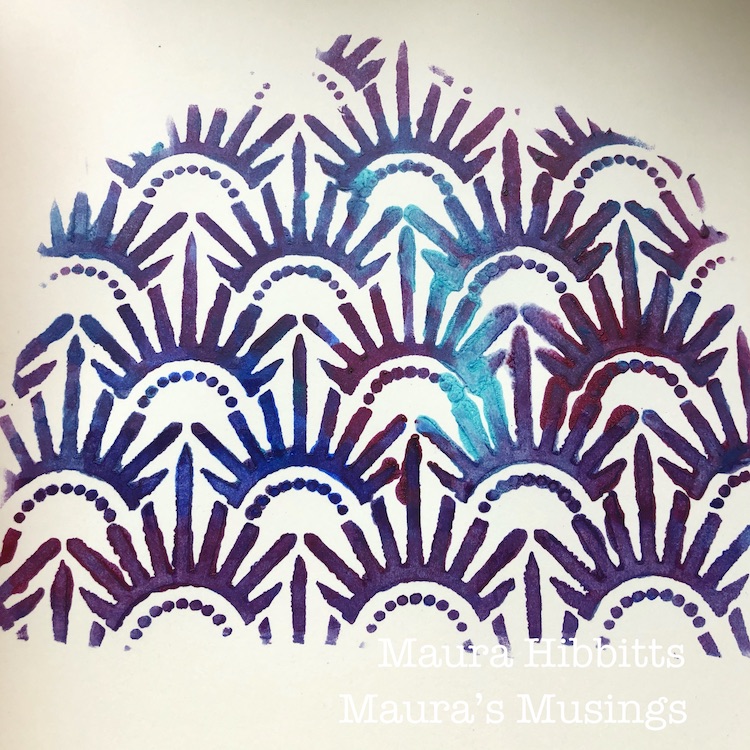
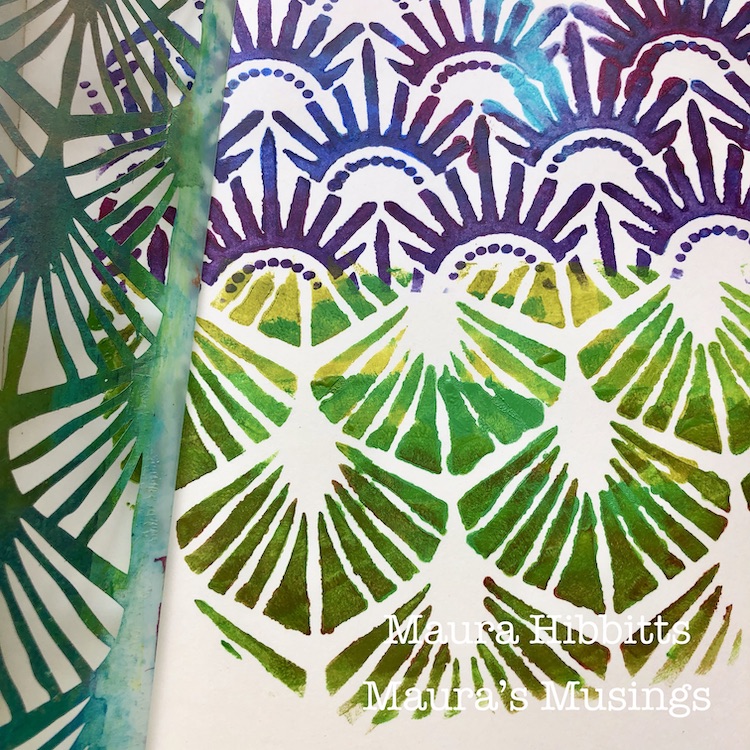
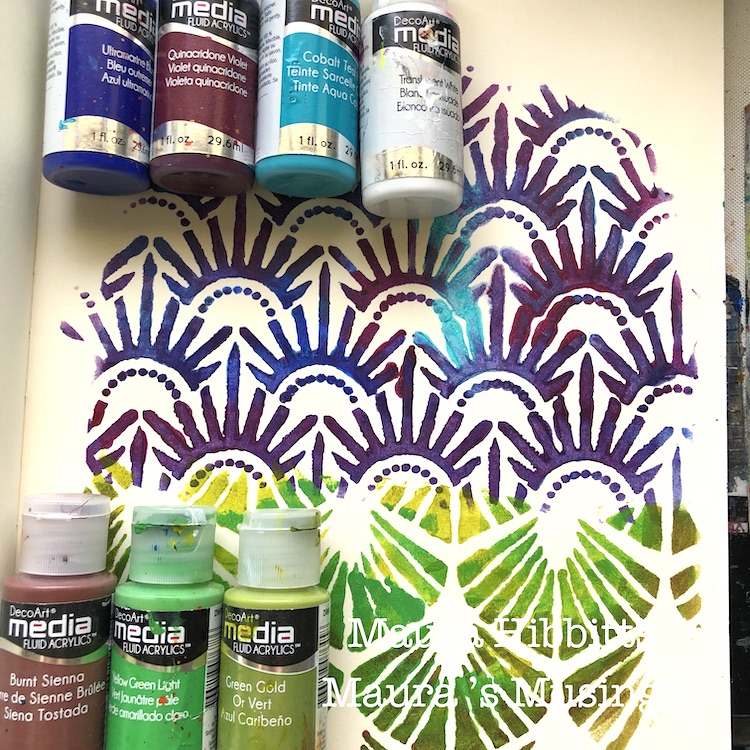
I repeated the first step with a mix of blues and purple with the Valley Road Negative Art Foamie. I stamped several images onto the watercolor paper, and also over the image on the orange print.
I wanted to create sky and earth with the stencils. I began with the sky and the Art Deco Empire stencil. I sponged in a mix of the blues, purple and a touch of white, with fluid acrylics and a cosmetic sponge.
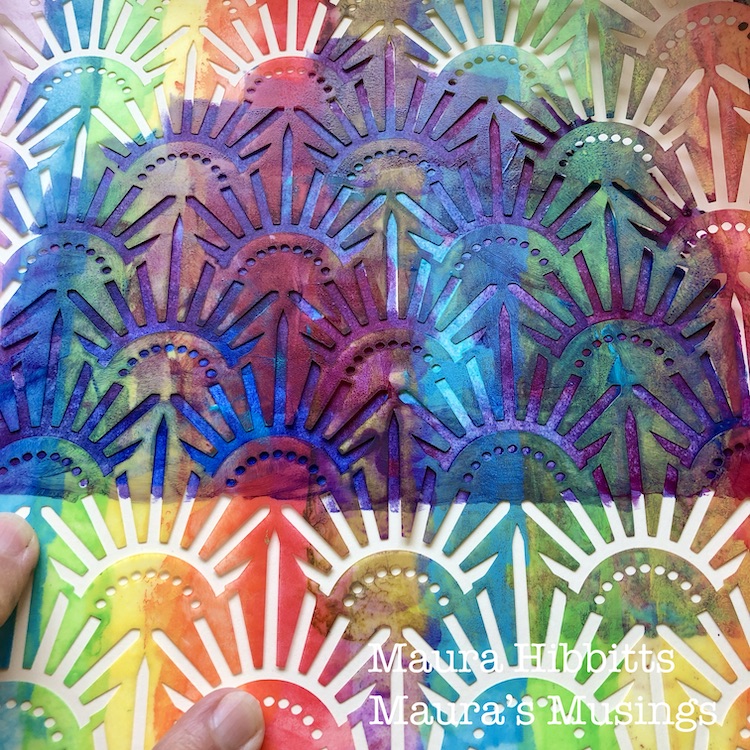
To create the earth, I used a mix of greens and a touch of brown in fluid acrylics. I used the Art Deco Wallpaper stencil to represent the earth portion. I curved the sky and earth because after all the Earth is round, no matter what those “flat earthers” want to tell you, lol.
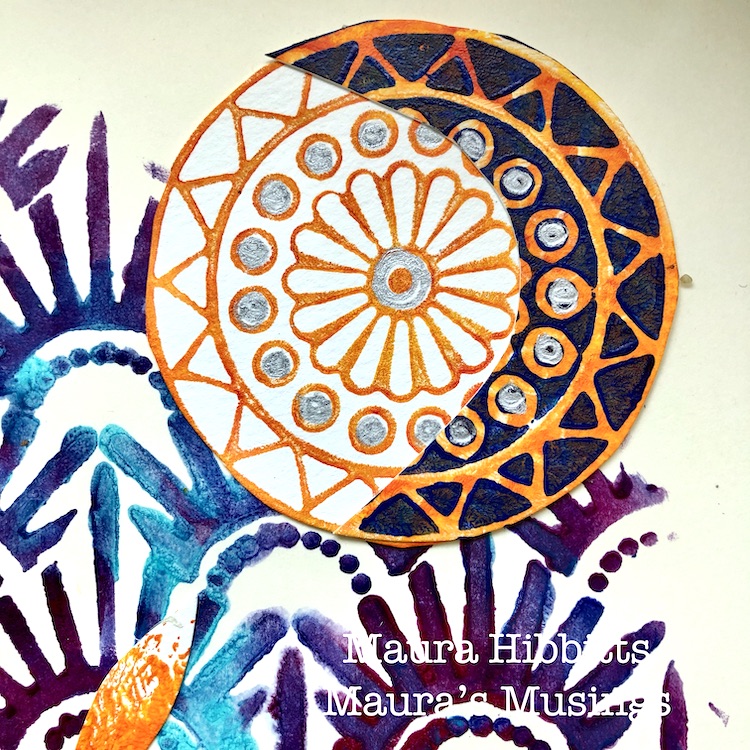
Next, I cut out some of the images and free cut some sun rays to assemble the sun and moon. I started out with the moon as just a crescent, but once I tried it on top of the full image, I liked that better.
Final step is to do some pen work. I hand lettered “Rising and Setting” in black, then outlined the words with Posca paint pens. I also added some silver to the moon, and gold to the sun with pens.
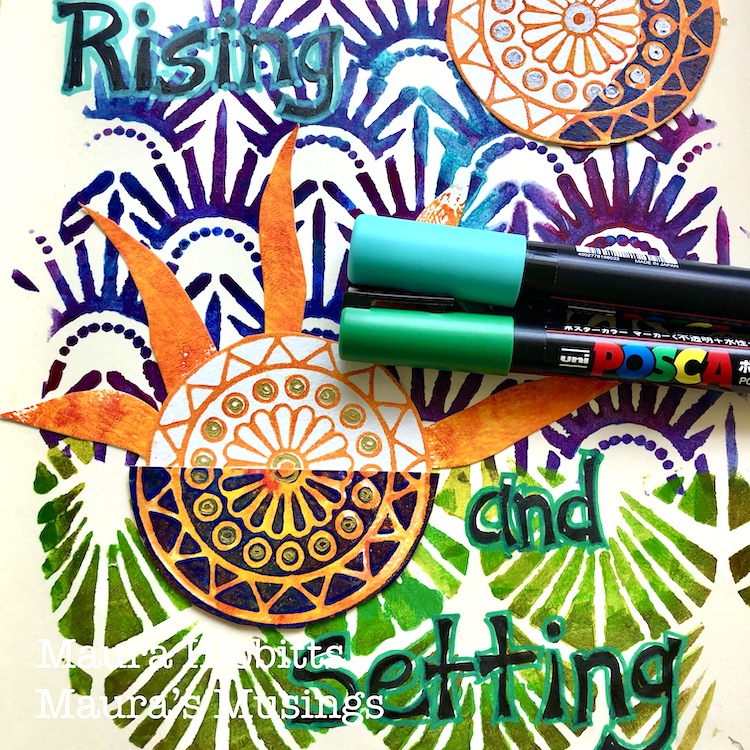
To illustrate the idea of the sun setting below the horizon, I had the sun’s rays extending up into the “sky”, and added a half circle of the blue and orange image for the portion below the surface to show the sun sinking below the horizon.

My moon shows a waxing crescent, meaning it is on the path towards the full moon. The moon is always there, even though we only see a portion of it illuminated by the sun. I wanted to show that by placing the crescent over the circle.
Hmm, I guess you just got a bit of a science lesson today with the art. That is the way I often taught my classes, mixing in art and science, as well as a few other subjects. When you stop and think about it, you can see all the connections, like the sun and moon being connected to a new day. My wish for you is that each new day is a better one, filled with love, hope, health and joy. – Maura
Thank you Maura! Love this colorful page but also getting the science lesson too – we forget some of that stuff as time goes on!
Give it a try: you can find all my Foam Stamps and Stencils in my Online Shop and here are some of the other supplies Maura used:
Feel inspired? Working on something yourself that you’d like to share? I love to see how you interpret our monthly themes. Email me how you used my stencils and stamps with the theme and email me an image – I would love to share your projects in my next “n*Spiration From Around the Globe“.
Love the colours!
Loved this post! Particularly loved the description of the thinking behind the process. Thank you.
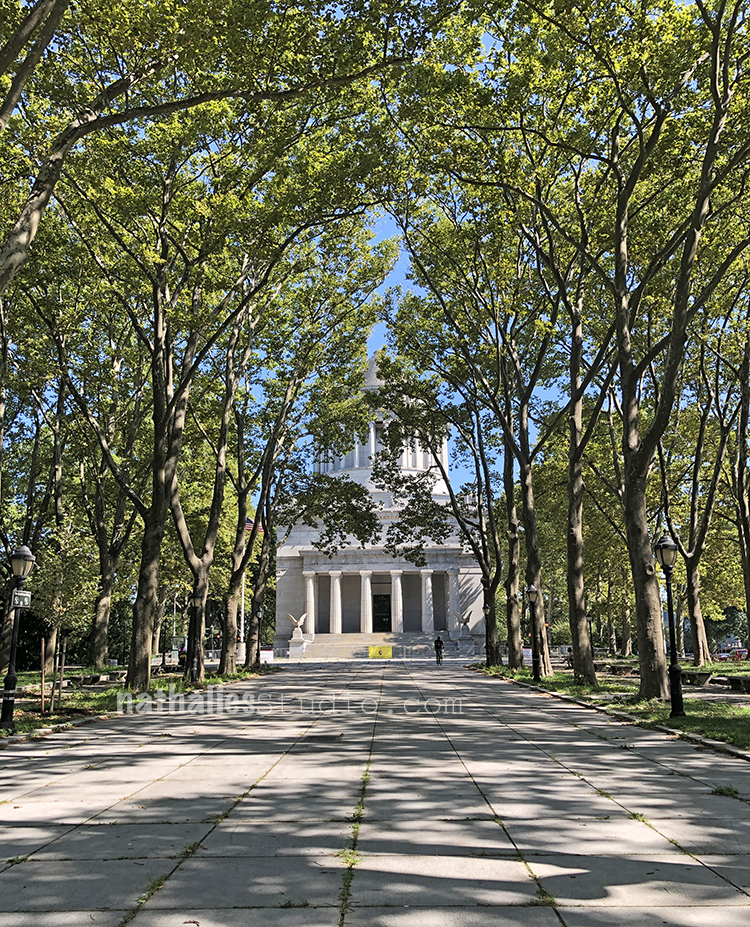
As we are getting used to the idea that we won’t be really traveling for a while we started doing some day trips to fight the cabin fever that started to set in lately. I thought I’d share some pictures with you. One day we did an amazing bike tour on the Westside of Manhattan all the way up to the George Washington Bridge. on the picture above you see General Grants Tomb which is actually a National Monument.
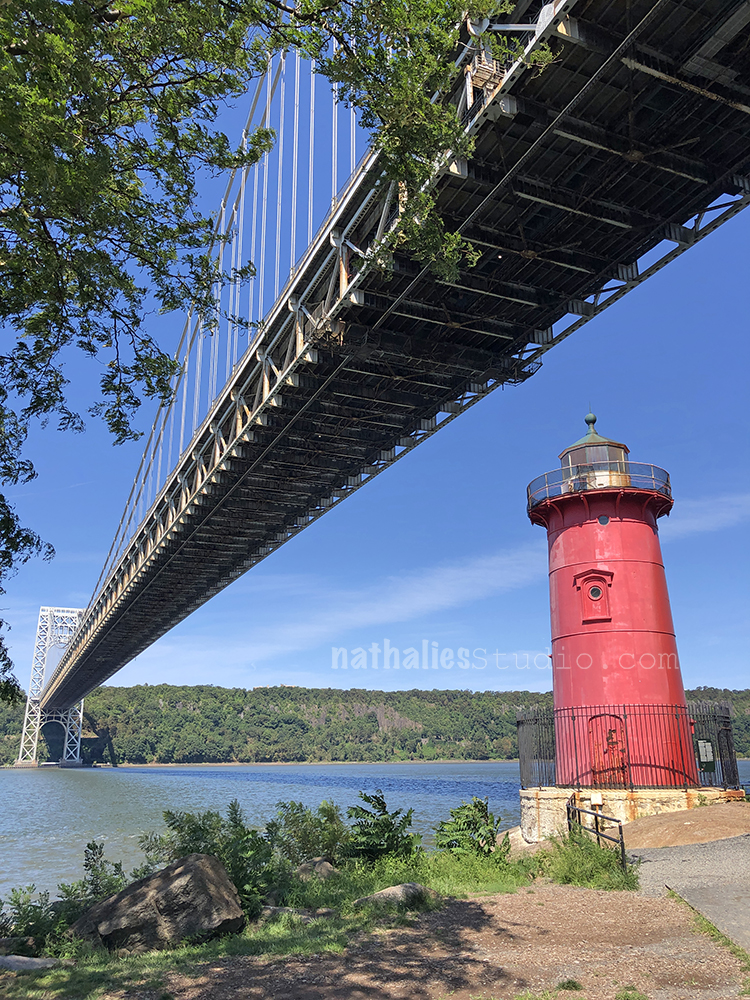
The little red lighthouse under the George Washington Bridge. I love the story behind it and also the children’s book about it. I still need to get it.
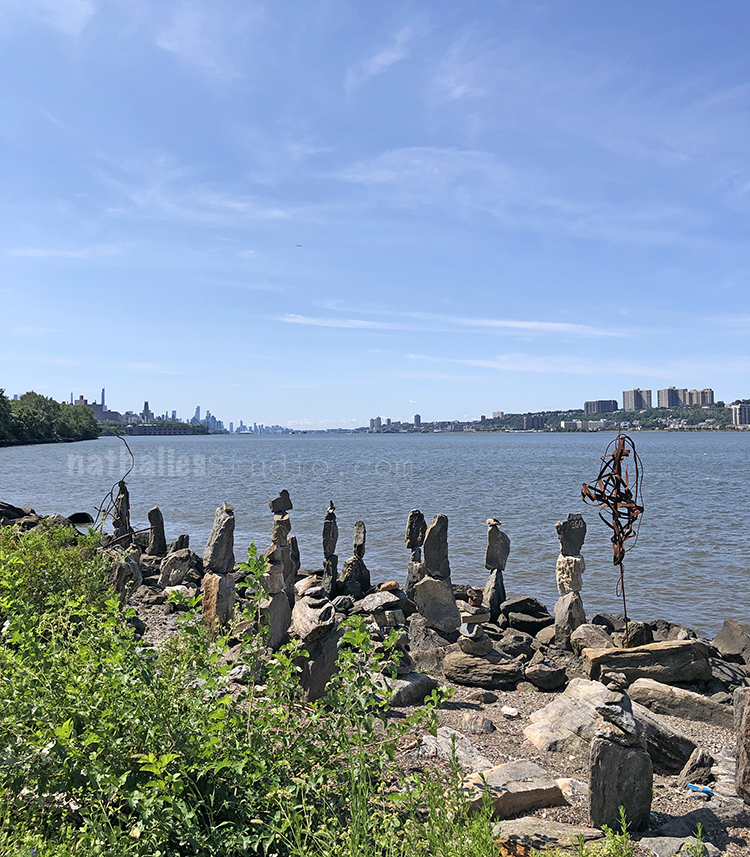
Sisyphus Stones Sculpture– another amazing story to read – I like stories my friends, can’t you tell? It was a lovely bike ride- we clocked 28 Miles (45 km) and I would do it again – totally fun!
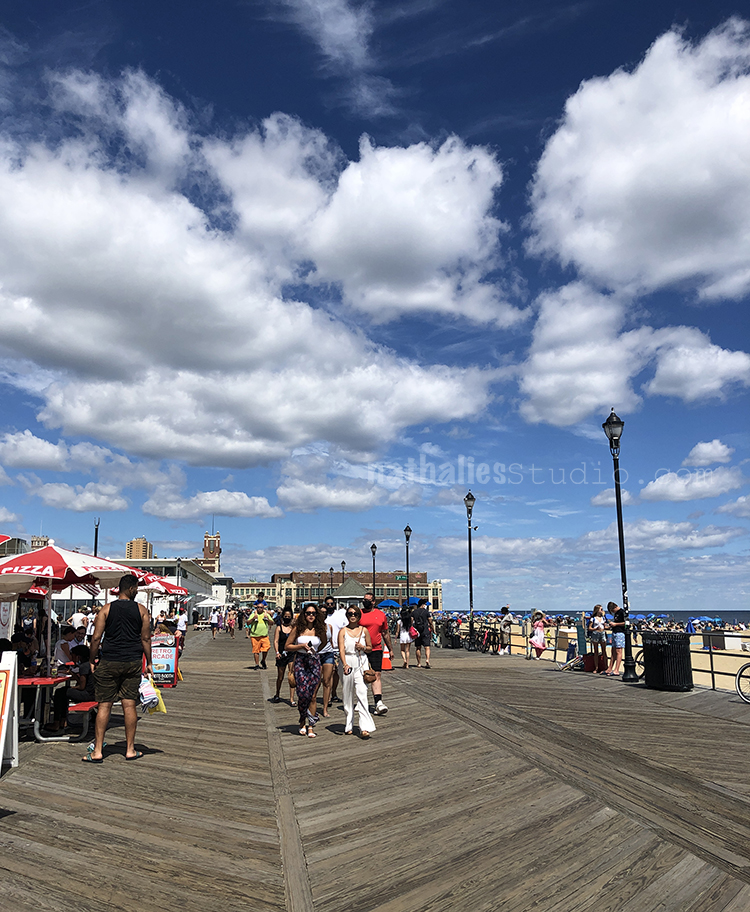
On another day we rented a car and had an outdoor visit with some friends who have a place in Asbury Park down the Jersey Shore.
It was super fun to stroll around and it felt almost a bit normal given that I hadn’t been in any stores since March that are not essential businesses.
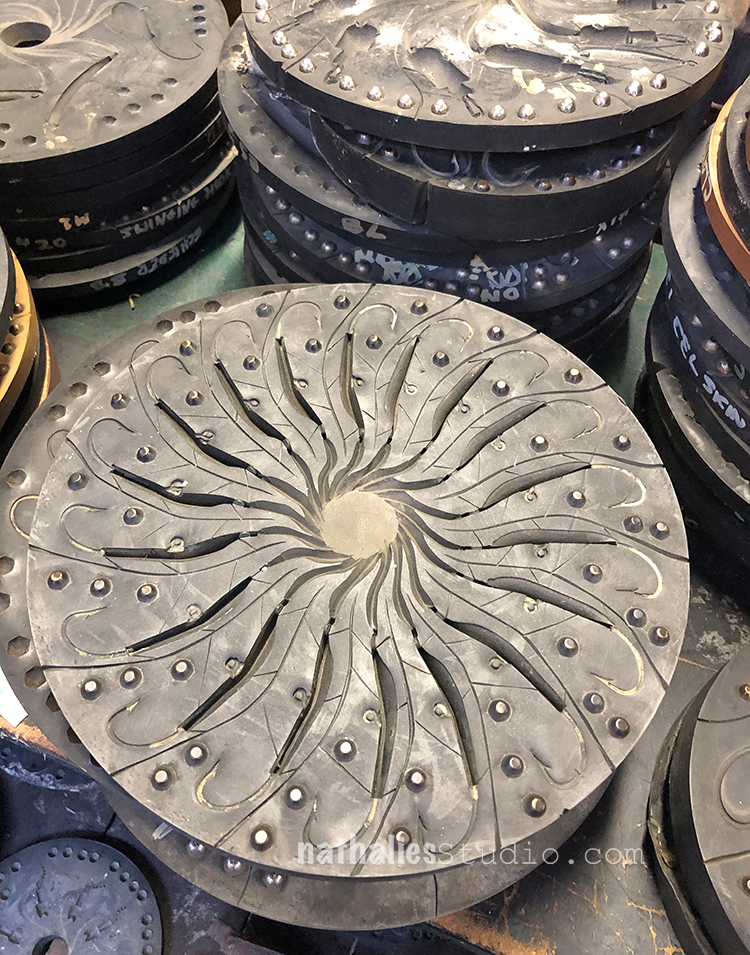
I loved spending some time in an antique store …can you tell what this above is? It is a mold for fishing hooks- soooo cool!
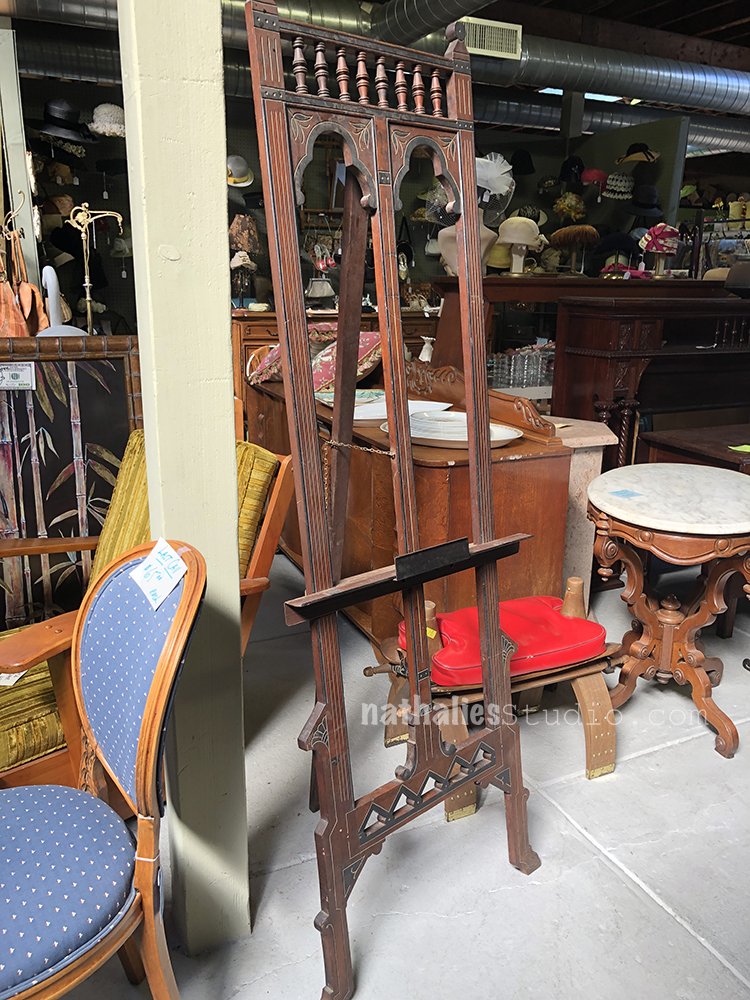
If I’d had more space and more money I would have taken this beautiful Eastlake Victorian Easel with me ….but alas …still thinking of it though.
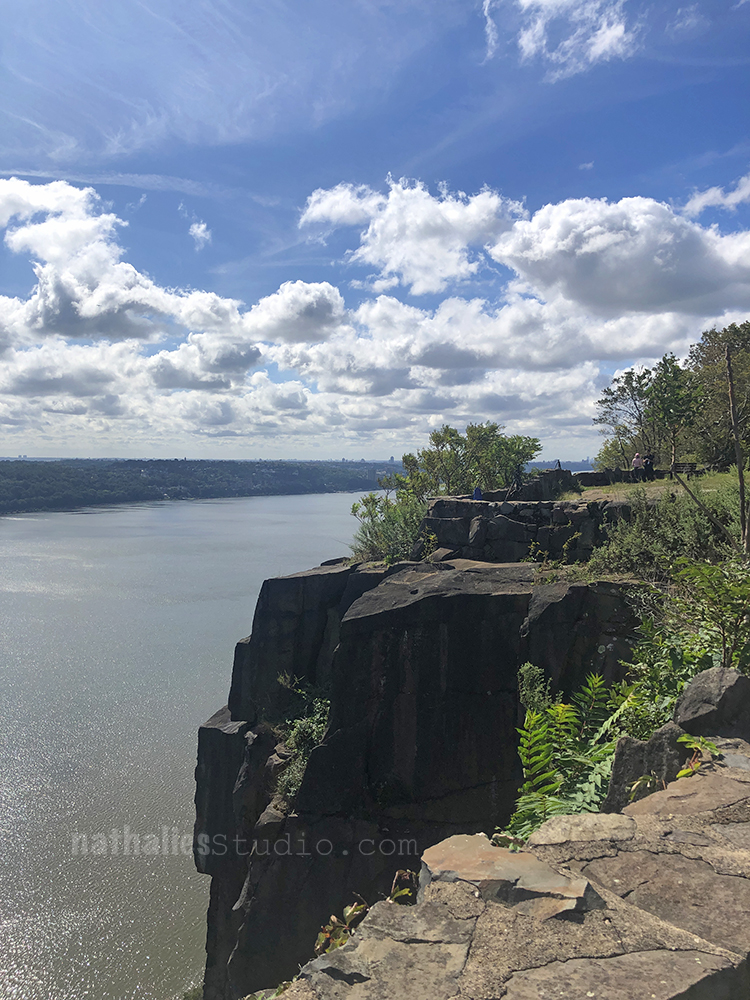
Then we took our new Covid Car …yet …we got one – you know some people get Covid Puppies, we got a Covid car and took it out for a ride to the Palisades Interstate Park
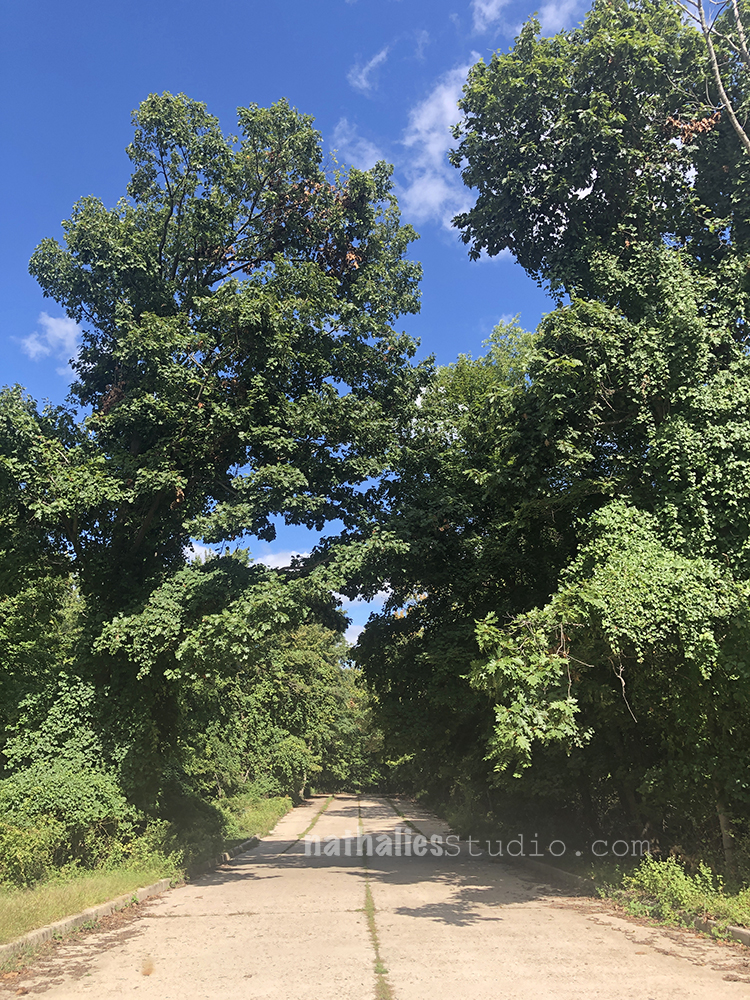
We did a really nice little walk and then ended up in Terrytown – a gorgeous town in New York State.
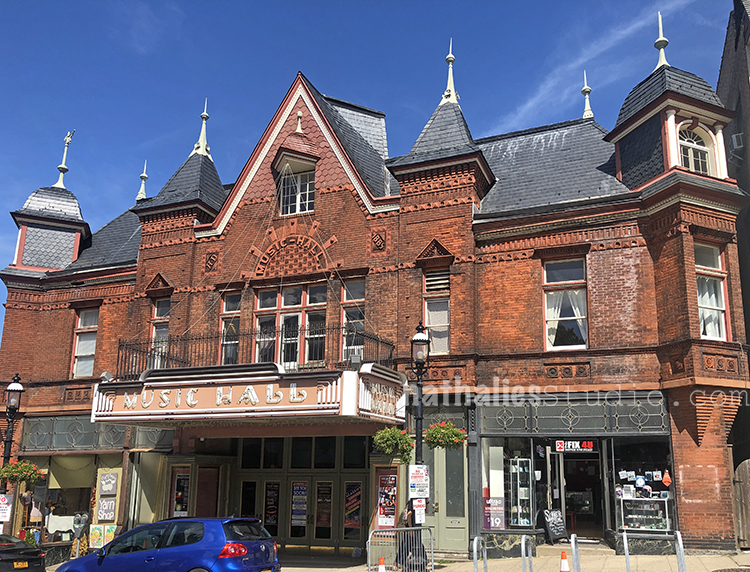
Isn’t this building amazing?
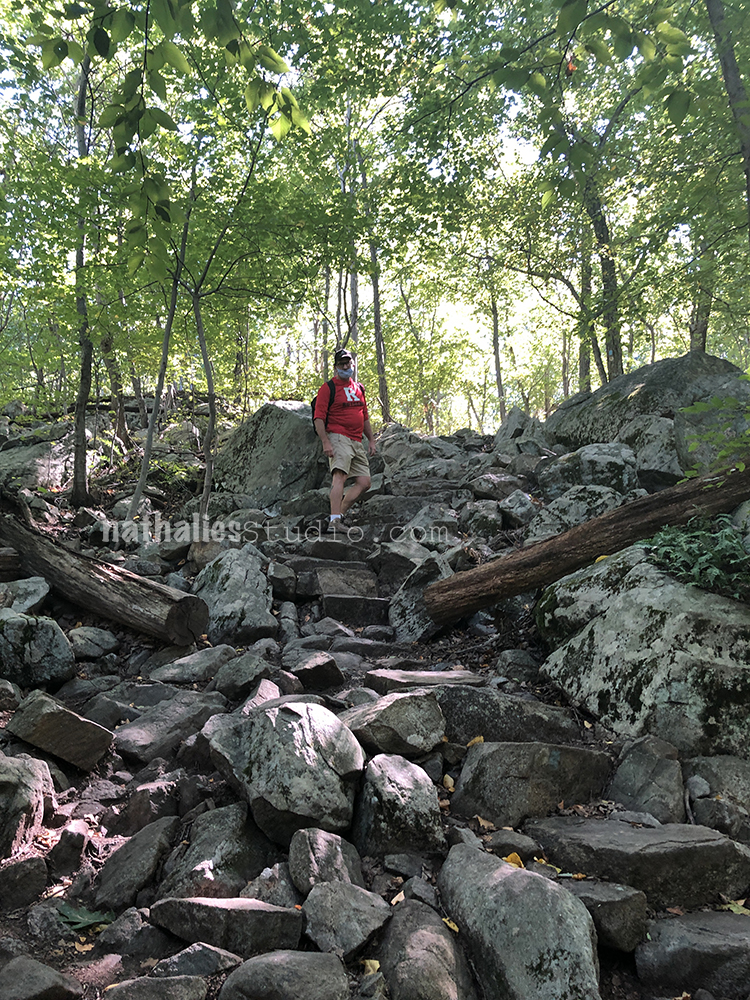
One of the favorite hikes we did recently was in Norvin State Forest, where we hiked to high point.
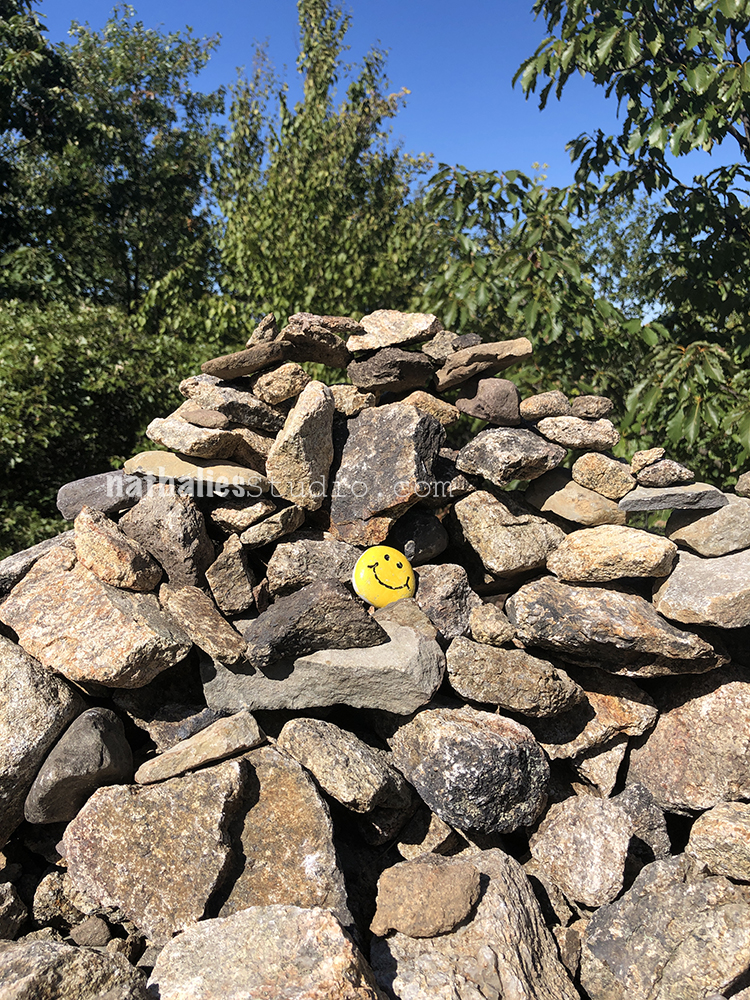
This made me smile …guess that was the intention LOL
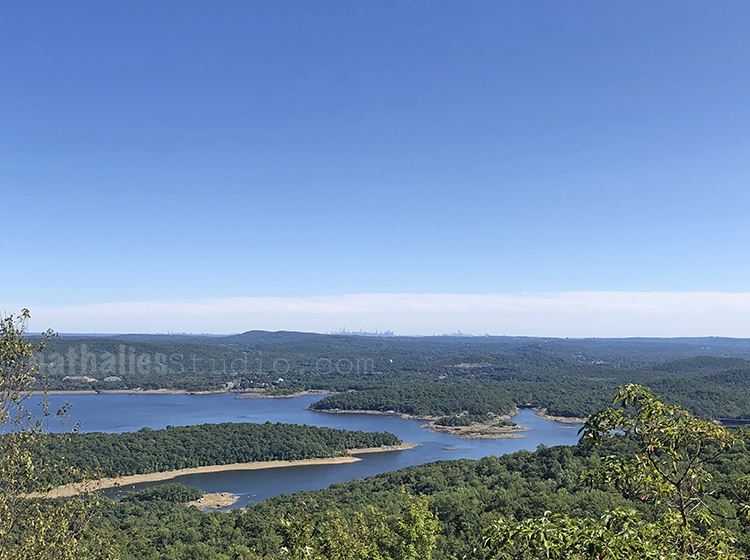
Wonderful sandwich picnic at highpoint with a nice view of Manhattan wayyyyyy back there …can you see the tiny silhouette?
Loved being out and about and forget about the stuff in the world for a bit.
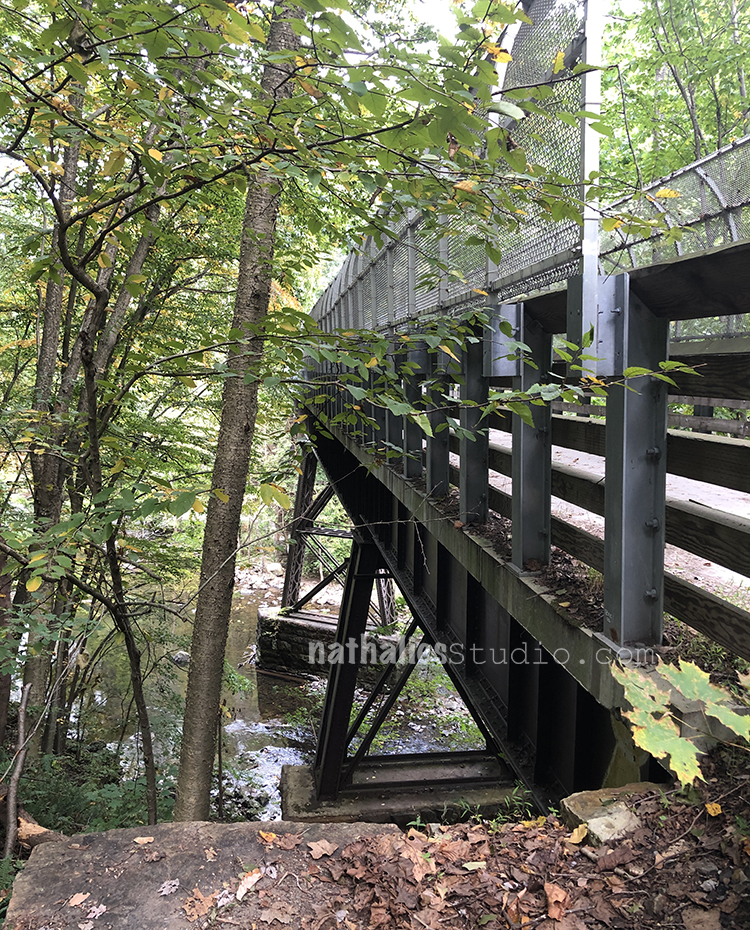
These pictures are from a bike tour in Long Valley on the Columbia Trail – super fun – the bike and hiking trail is very even and smooth, built on an old train track and you cross several little villages.

Historic places
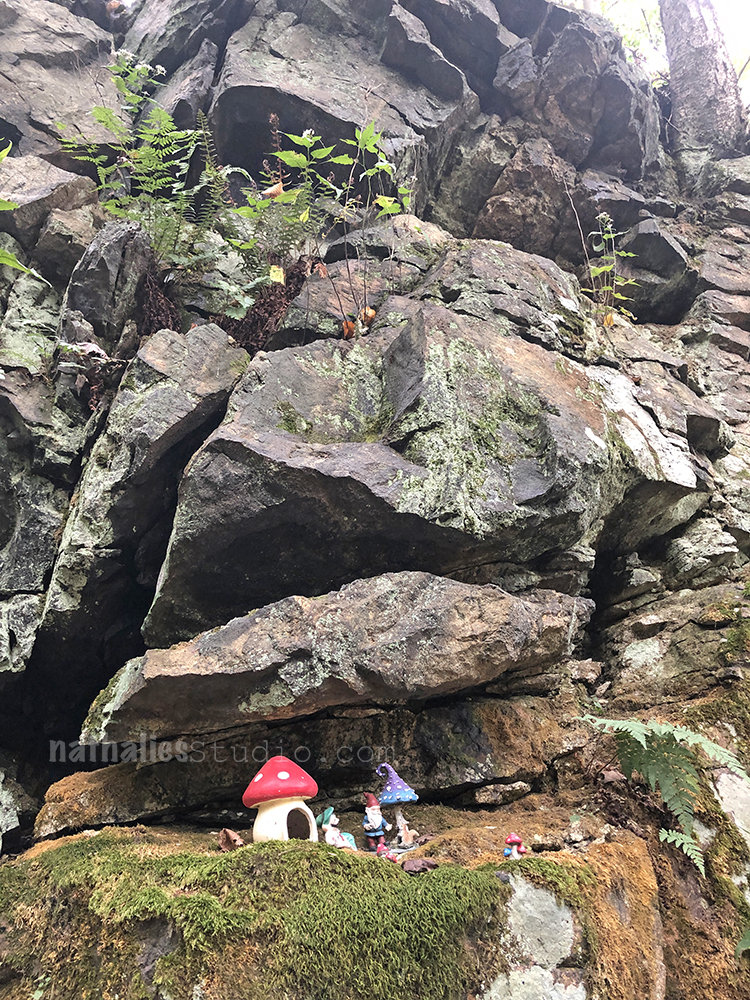
and fantasy villages :)
It was a great bike ride until I had a flat when we were still about 13 Miles away from the car and of course we did not have a bike kit with us. Rookie mistake – oh well.
It feels good to be reminded that in 1/2 and hour to 45 minutes you can be out and about in nature …it is a nice addition to city live right now and I actually enjoy some closer areas. Cannot wait to get out next weekend again- as long as the weather holds- we will try to do at least one day trip a week.
I enjoyed the pictures along w/the writing as to where they were taken.
Oh, Nathalie, thank you so much for sharing these pictures. I just love them.
Mold for fishing hooks…interesting.
Smile in the rocks…perfect.
That easel…go back for it in your new car.
Now off I go to read the story of the lighthouse.
Thanks for the stories and photos Nat.
So vibrant and pretty Emilie. I love this idea!
Reply