A Look Back – This time I’m looking at some fun fall play dates that Kim and I had back when we could get together in person and play with my stamps and stencils. Some of these are very seasonal (pumpkins) and others are just nice ideas for when you need an indoor activity to do. Read on and I hope you try some of these project ideas too!
A Look Back is a blog series to show you some projects and posts that you may have missed – sometimes going WAY back in the archive. I think it will be fun to revisit a few ideas that we haven’t seen for a while. I’m excited to see how a little look back might inspire something new in the future :)
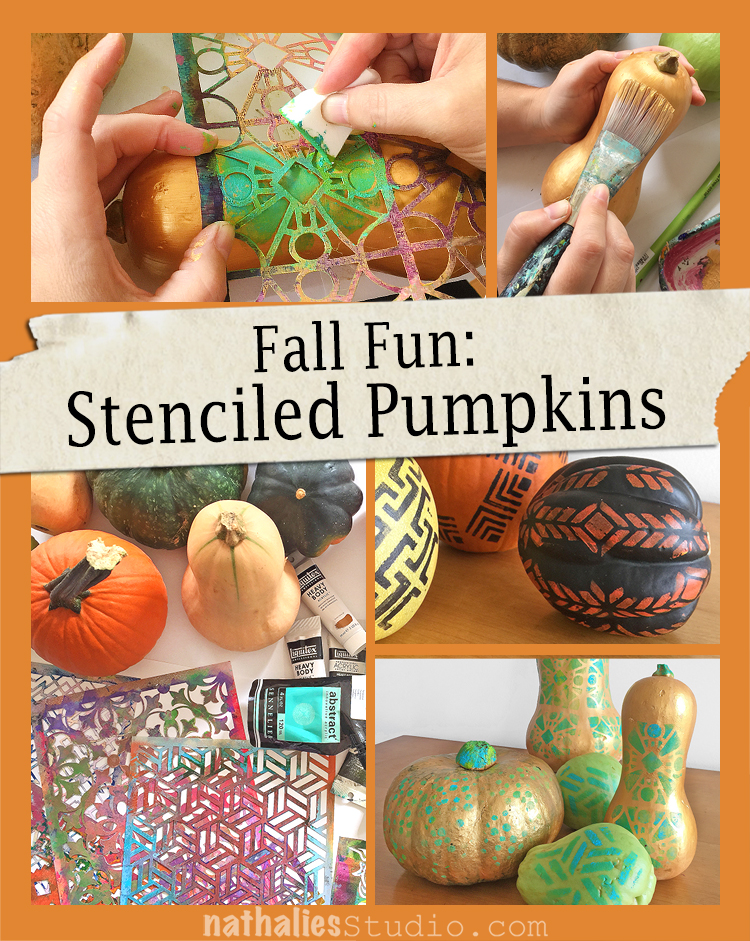
This project was a great way to decorate pumpkins without getting out the carving knife and spreading gourd guts all over your kitchen LOL. We used my stencils and acrylic paint and came away with some very cool decor. Check it out here.
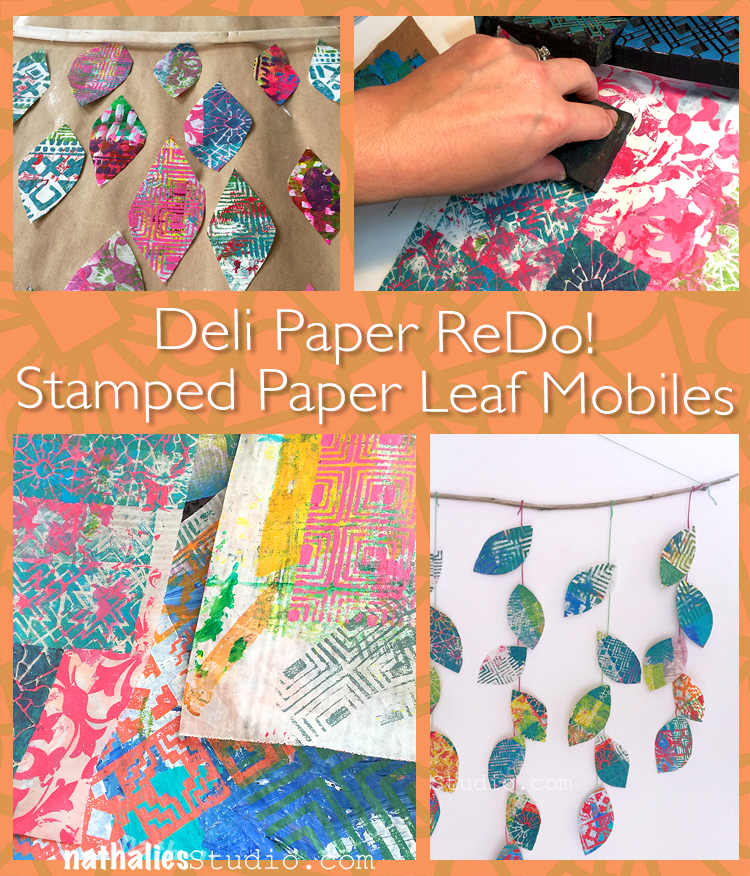
Here is a project that you can pull together with all those collage papers and deli papers you have in your stash. We gussied some of ours up with my foam stamps and acrylic paint and then cut out simple leaf shapes for a wall hanging. This is an easy fall project for all ages and abilities. Check it out here.
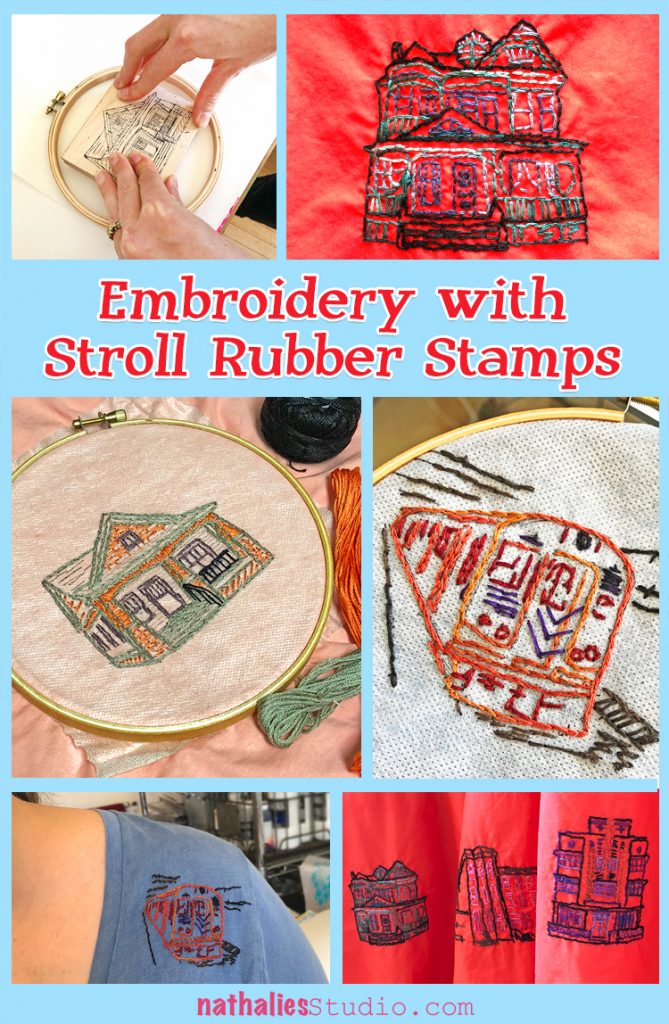
Has colder weather and shorter days got you thinking about indoor activities, curled up in front of a fireplace? Embroidery is an ideal activity if you just want to relax and chill. We used my Stroll Around the Block and Stroll Through the Hood 1 and 2 rubber stamps as a guide for our colorful stitched projects seen here in this post.
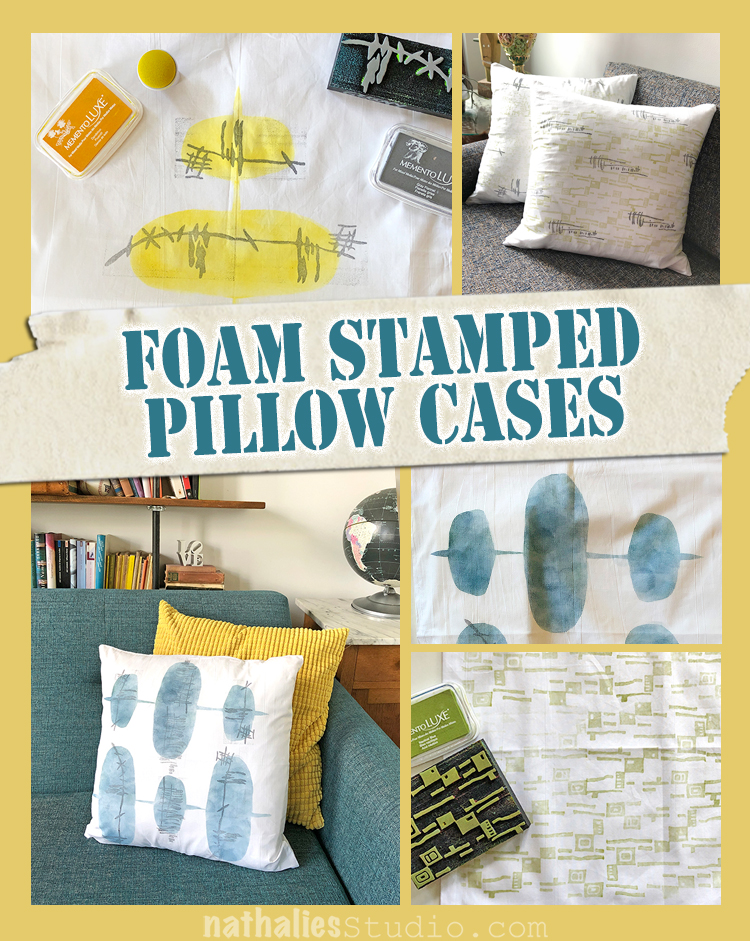
Thinking about sprucing up your decor while spending more time at home? We used my foam stamps and fabric ink to create modern pillow covers for our living rooms here in this play date post.
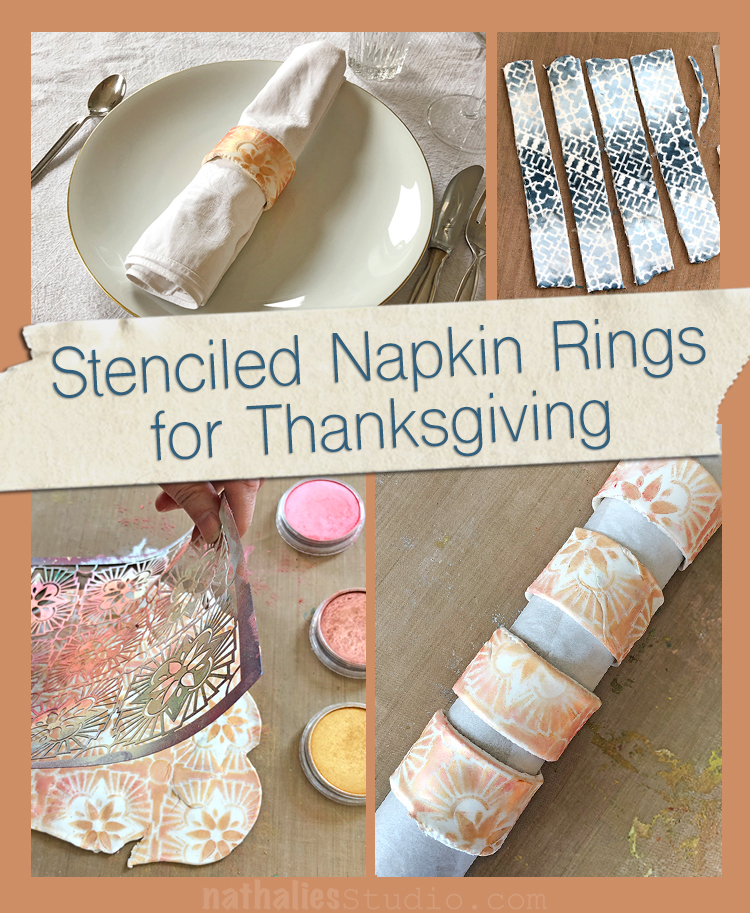
Your Thanksgiving table may be a little smaller this year but it doesn’t have to be any less Instagram worthy – check out these napkin rings we created using my stencils and pan pastels for a one-of-a-kind holiday tablescape.
I hope you enjoyed this look back and are inspired to try a few of these craft ideas.
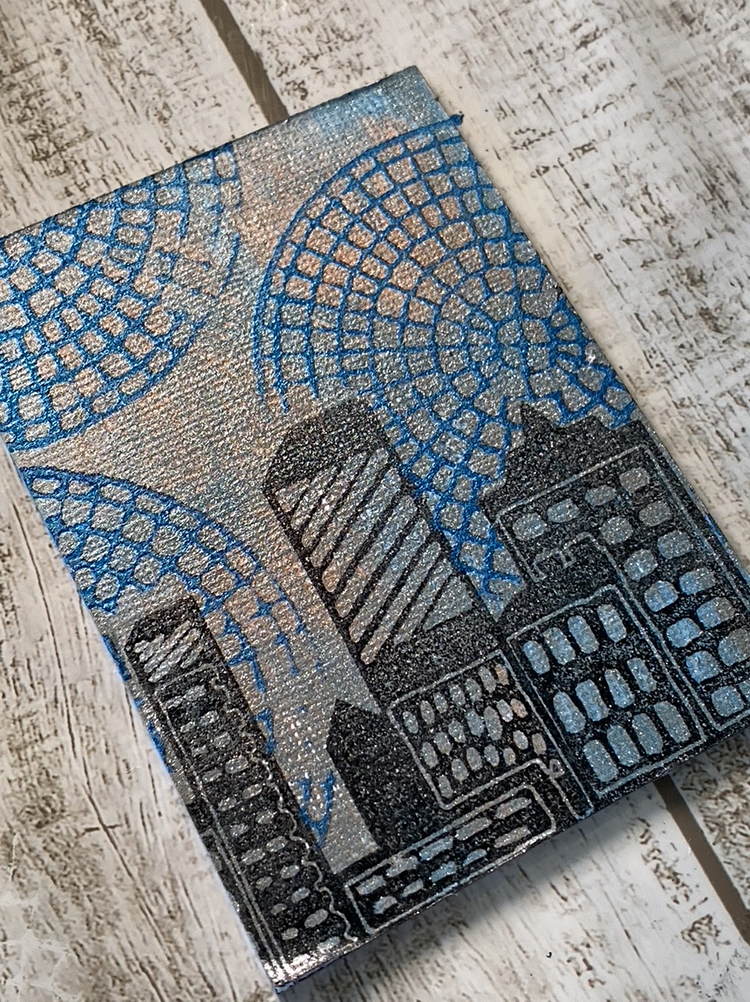
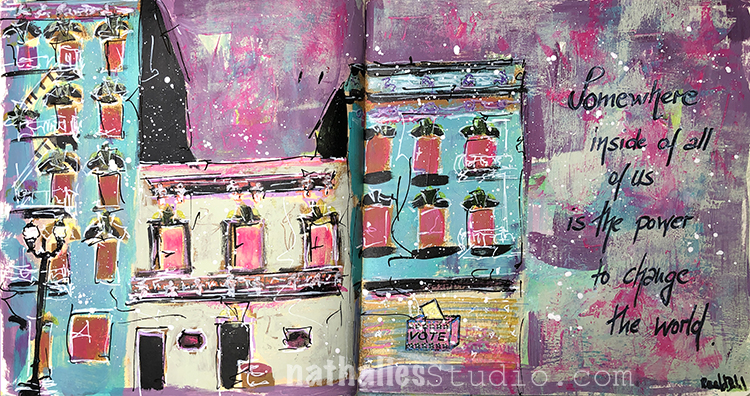
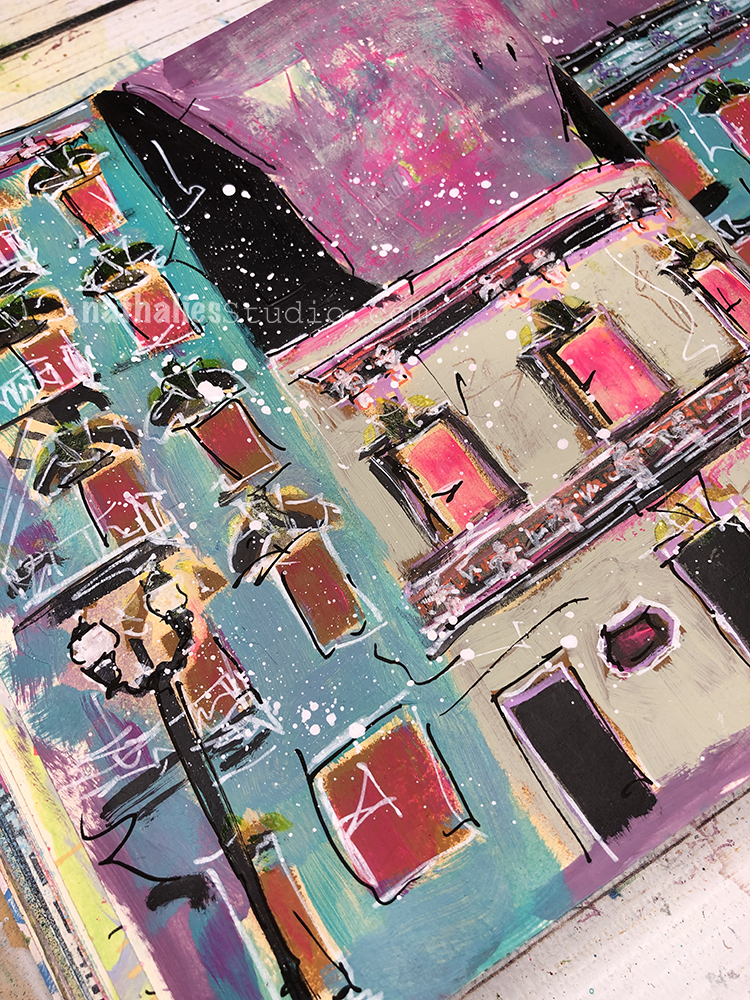
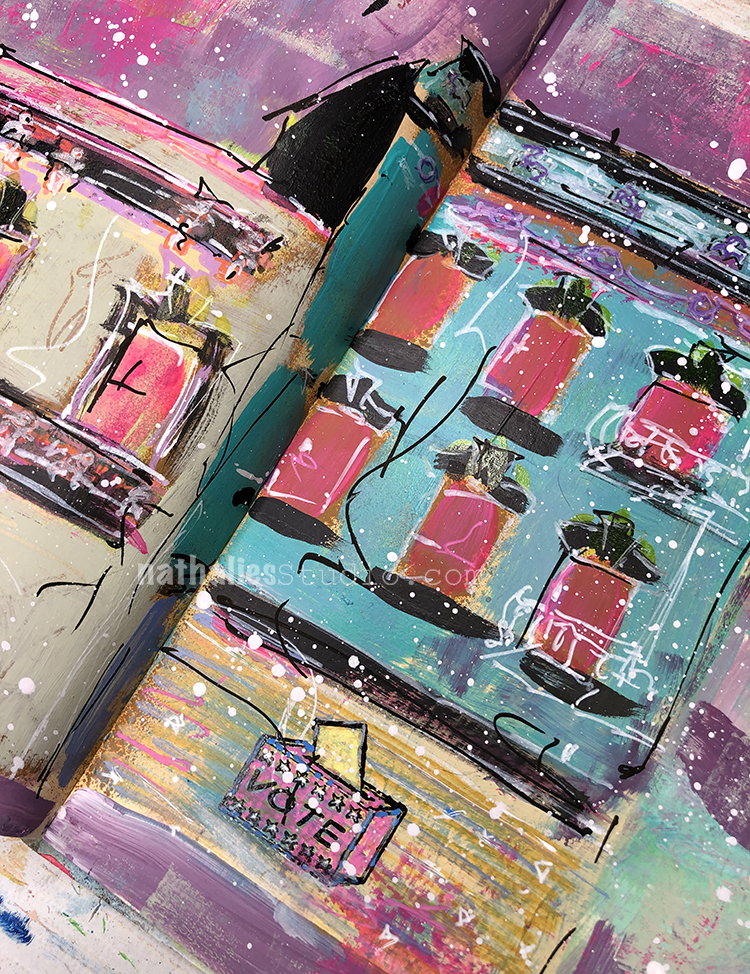
Hello from my Creative Squad! Today we have a post (and video!!!) from new member Robin Seiz – sharing her mixed media panel painting using my Midtown Minis and Central Ave foam stamps and this month’s theme: A New Day – Let’s try something new today :) Although these are tumultuous times and we never know what each new day will bring, it also seems like the perfect time to throw caution to the wind and just jump into something new with both feet. Try a new material or technique or approach. Why not? Today is a new day… and tomorrow is too!
I am very excited to be one the newest members of Nat’s Creative Squad. When I thought about the theme for the month, A New Day, I immediately thought about the morning. (even the song in my video is called “Morning Mood”), but as often happens in my artwork, as I worked on this little scene, I felt more of an evening mood. But really, don’t we each have the “promise of a new day” every evening as the sun sets? Whether out day was wonderful and we look forward to a repeat for the next day or our day wasn’t so good and we look forward to tomorrow —— that is promise of A New Day.
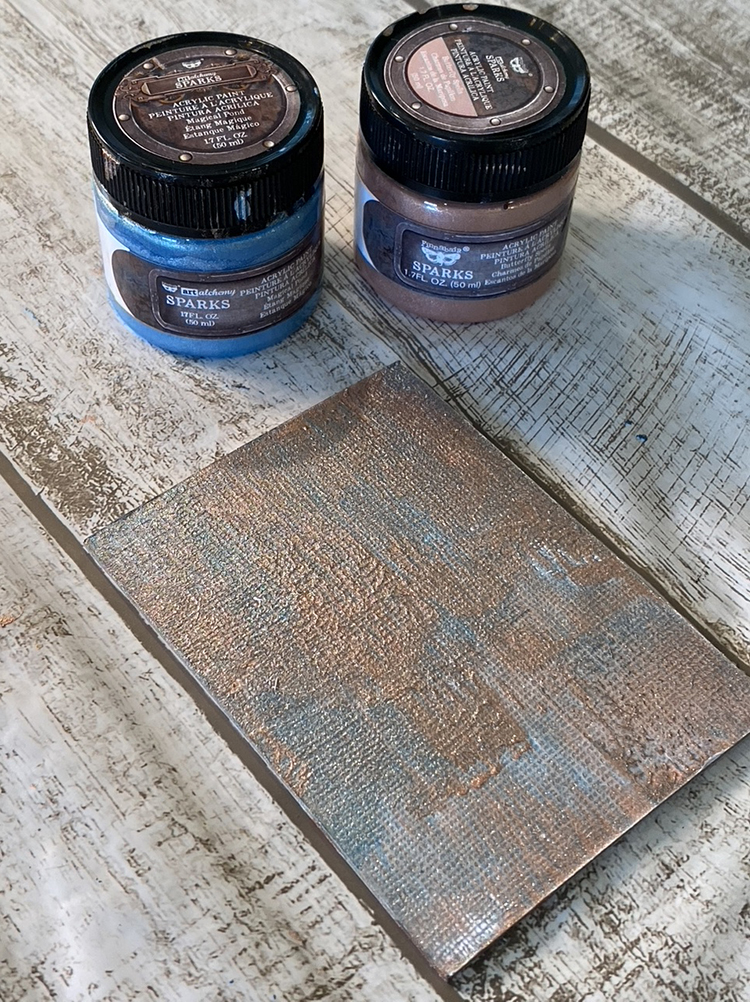
In this project, I worked with new paints (as my New Day theme) and I have to say that I absolutely love them. They are paints by Art Alchemy and they come in both a variety of finishes and a variety of yummy rich colors. I also hadn’t worked with Nat’s Central Ave Artfoamies and I see so many uses for them for the future.
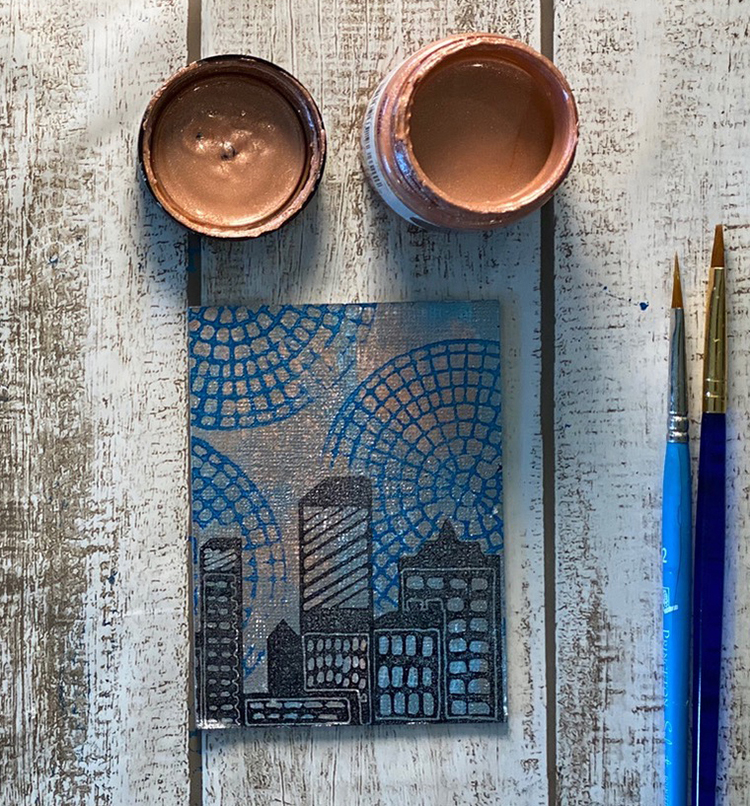
I started this project with my gel plate, the Art Alchemy Spark paints, (colors Butterfly Spells and Magical Pond) and a 3” x 4” Art Bite Panel. I often use my gel plate to put paint on a substrate whether it’s a piece of paper, canvas or something like what I used here, an Art Bite. I do this because I like the organic look which always includes lots of texture.
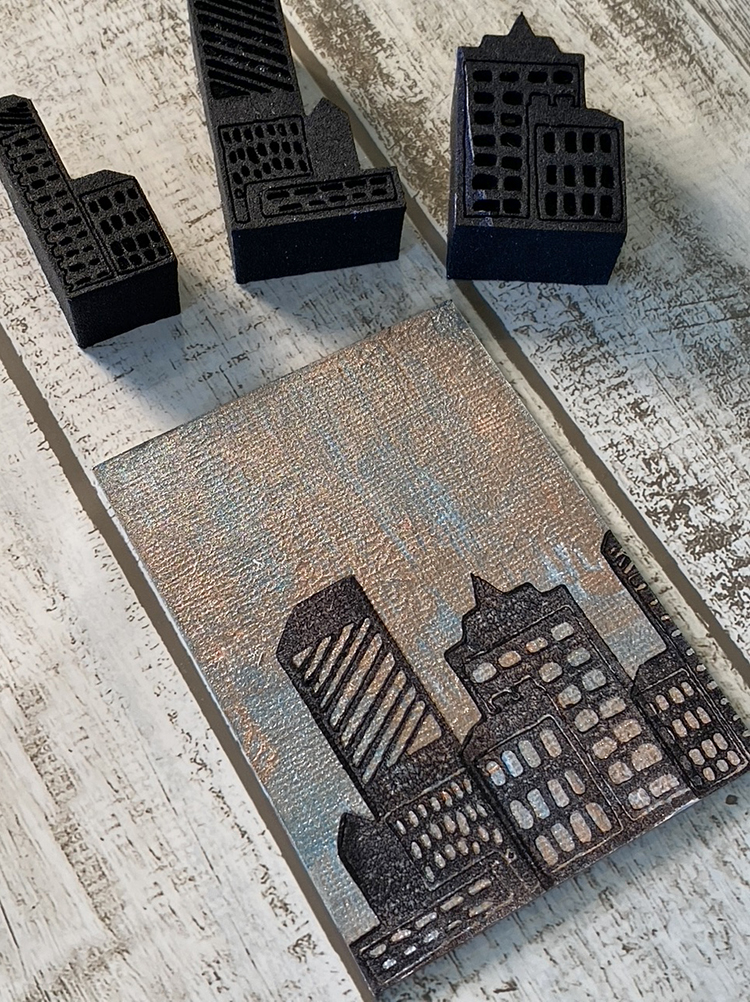
Once I was happy with the finish on the Art Bite, I used VersaFine Clair permanent Nocturne ink to stamp the Midtown Minis Artfoamies on the substrate.
The next step was to stamp and cut out a mask of the Midtown Mini Artfoamie buildings so I could apply it to the buildings. This allows for the buildings to be in the foreground and the Central Avenue Artfoamie to be in the background.
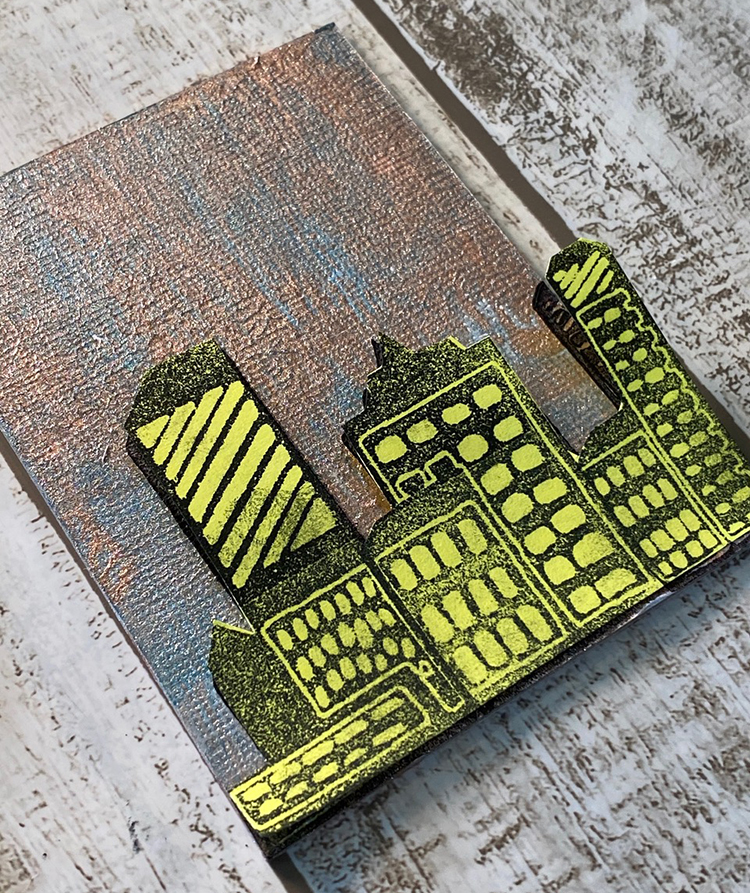
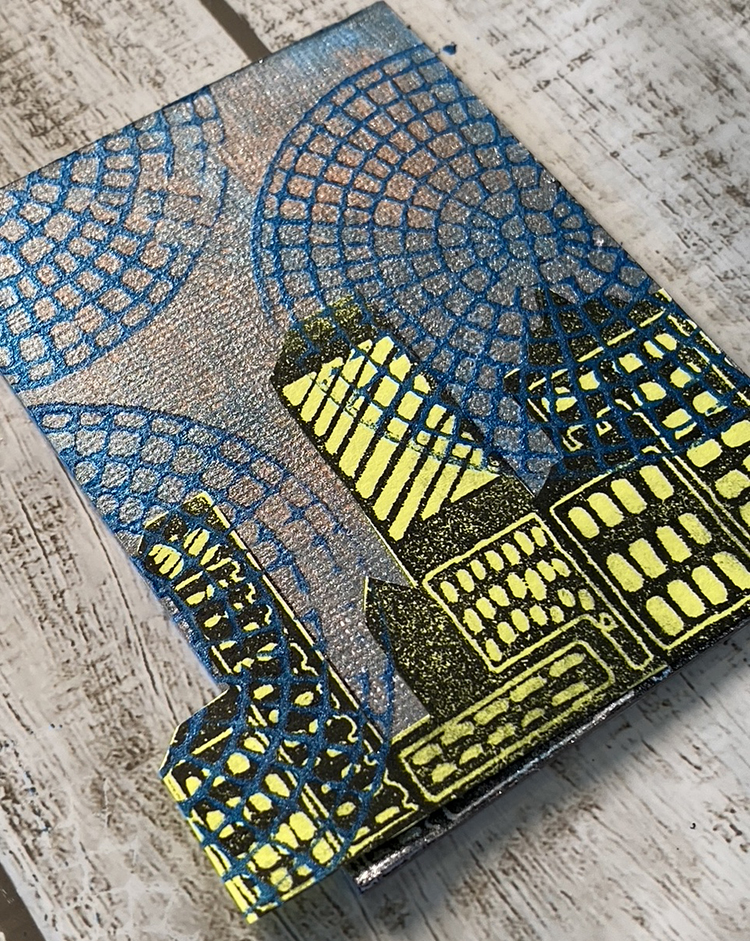
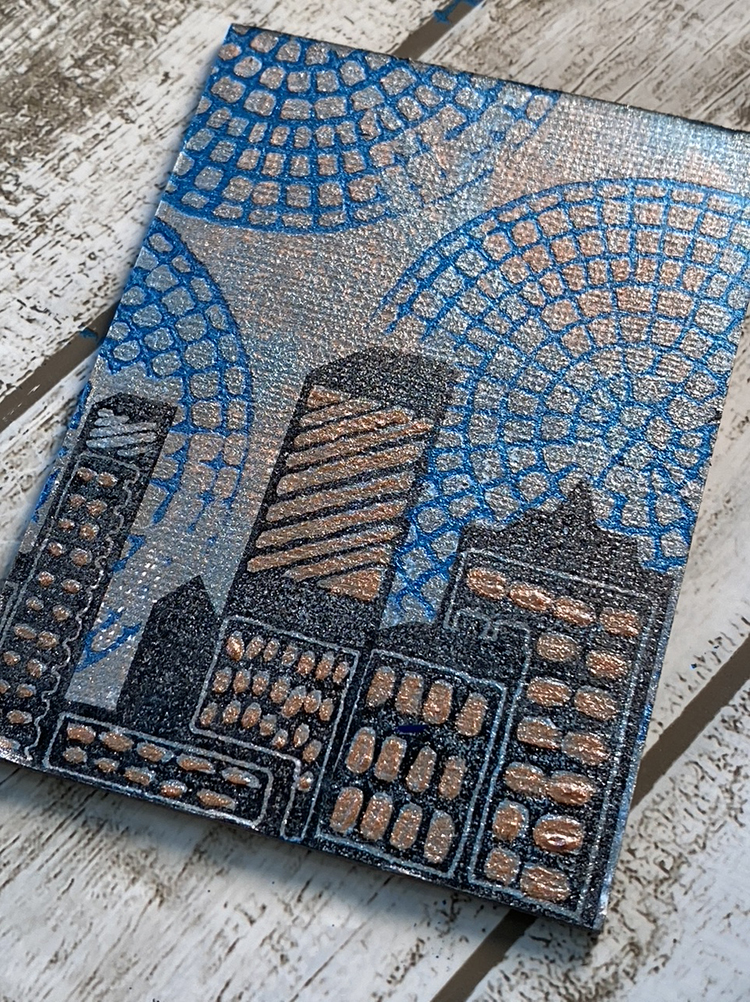
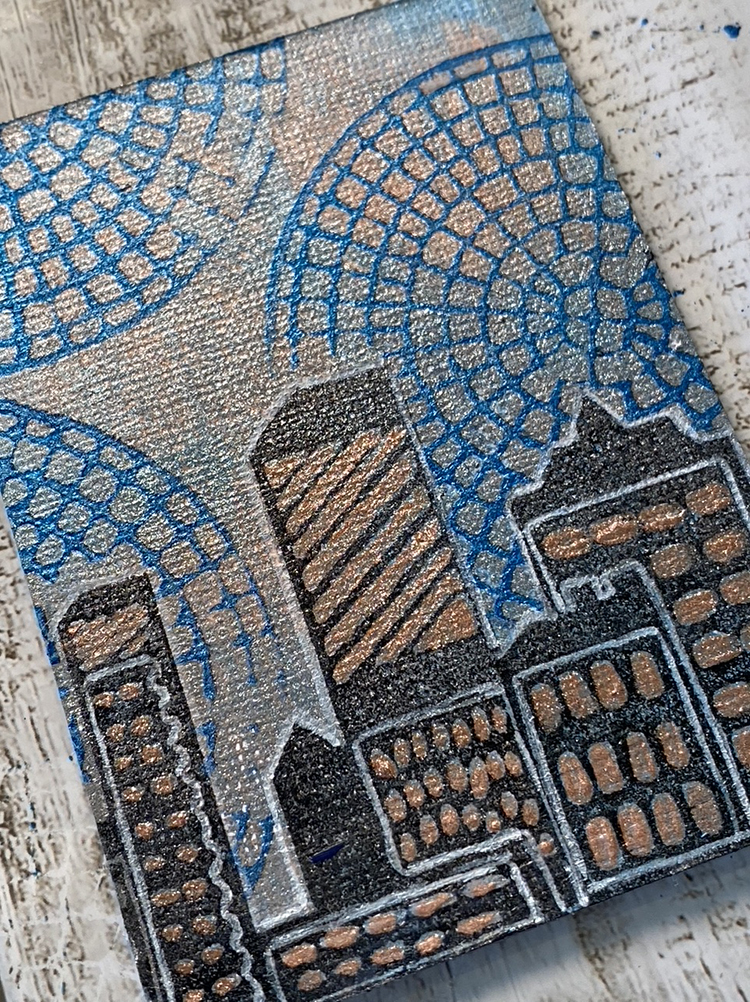
To apply the Central Ave Artfoamie, I used Art Alchemy’s Metallique Paint in Deep Waters blue.
Since I was seeing more of a evening, sunset sky, I applied the Butterfly Spells paint I used in the background with a #2 rounded brush for the detail and a #6 flat brush for the larger windows and spaces giving the piece and evening glow.
The finishing touch was to apply a Posca White Paint Pen .7mm to outline the piece.
This piece could be framed or used as is to sit on a shelf.
It’s an easy project and, all told, it probably took me about 60 minutes to complete from start to finish.
Thank you Robin for this gorgeous panel – love the color palette and your making technique!
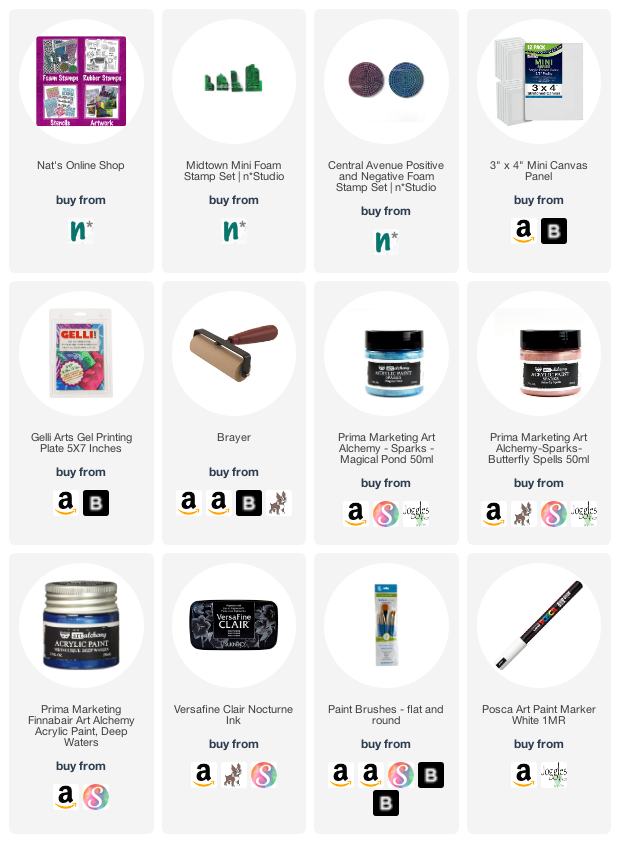
Give it a try: you can find all my Foam Stamps in my Online Shop and here are some of the other supplies Robin used:
Feel inspired? Working on something yourself that you’d like to share? I love to see how you interpret our monthly themes. Email me how you used my stencils and stamps with the theme and email me an image – I would love to share your projects in my next “n*Spiration From Around the Globe“.
Love the demo. Must see if I can get the building stamps in Australia. I do miss going to the craft shows this year, but with COVID, no shows to go to. However, I may have missed out on an online show!
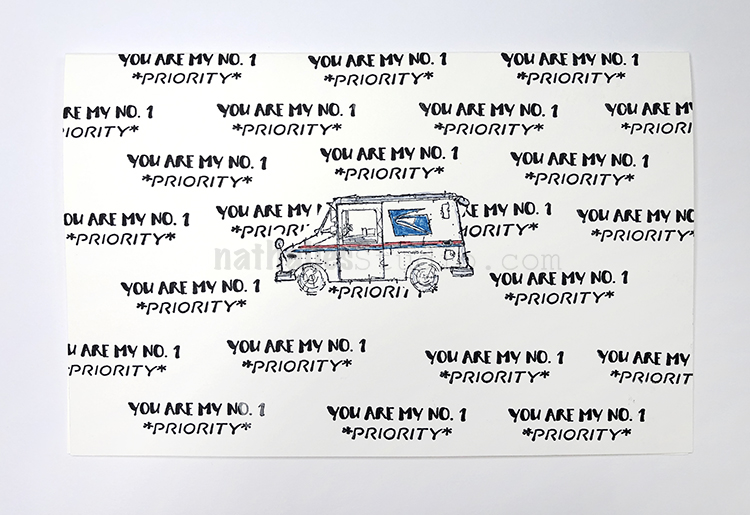
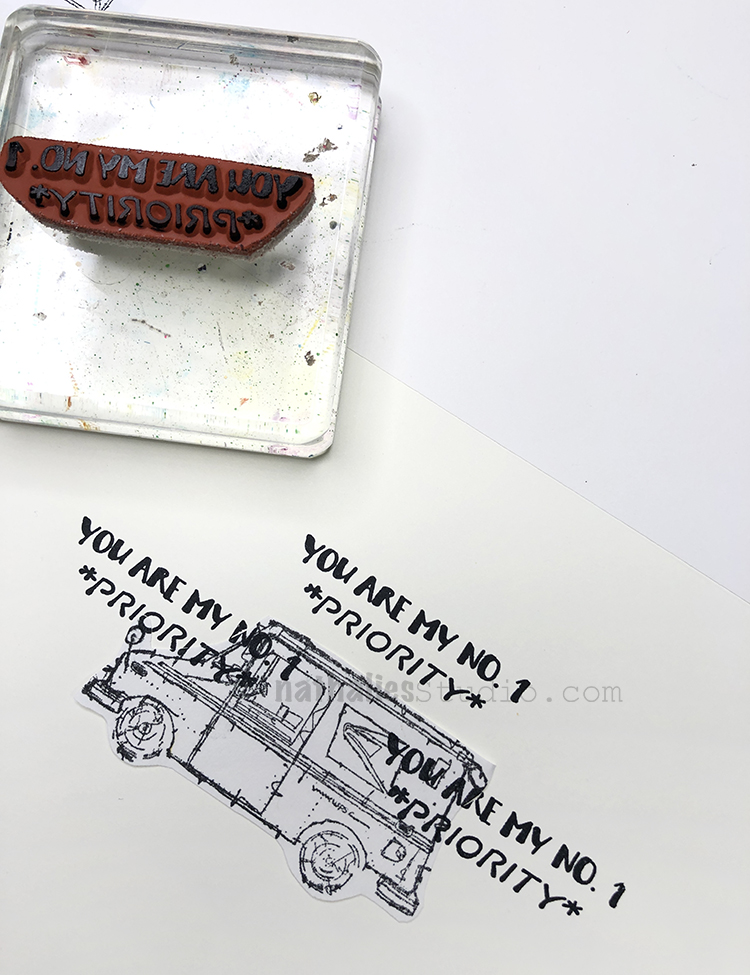
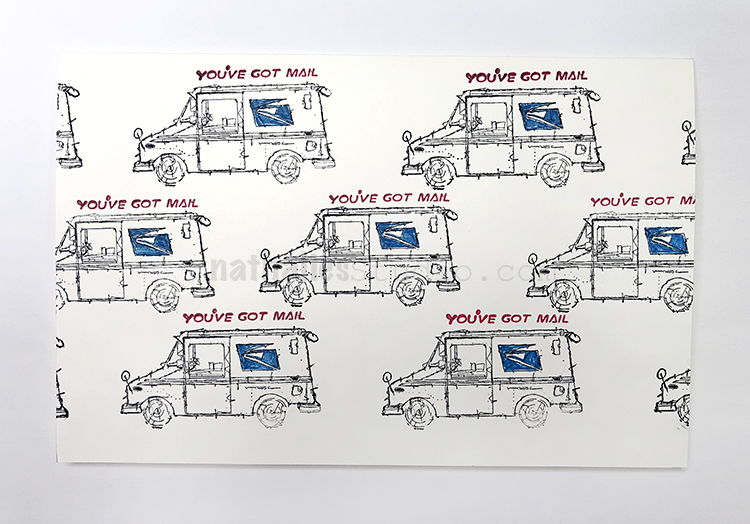
I was playing around with my new #keepyouposted rubber stamp set and found myself making cards. For the one shown above I used a masking technique to create a layered look.
I wanted to have my mail truck stamp over some of the word stamps, without collaging. It’s easy – here’s how:
First I stamped my cute truck (I just adore these distinctive US mail trucks – so unique looking!) where I wanted it on my card. Next I stamped the truck onto some scrap paper and fussy cut it out. Then I put some repositionable adhesive on the back – I like E-Z Dots. This is my mask.
With the mask stuck onto my card on top of the truck image I stamped my background and overlapping the masked area with with my “You are my No.1 Priority” stamp.
Then I removed my mask – clean and easy peasy. I also added some color using a very nice new set of EMOTT Mitsubishi pens in the links below – love how they work for fine detail and intense color.
Here are a couple others I made, all with stamps from the #keepyouposted set:
Are you sending cards through the mail these days too? I definitely had a ton of fun with those.
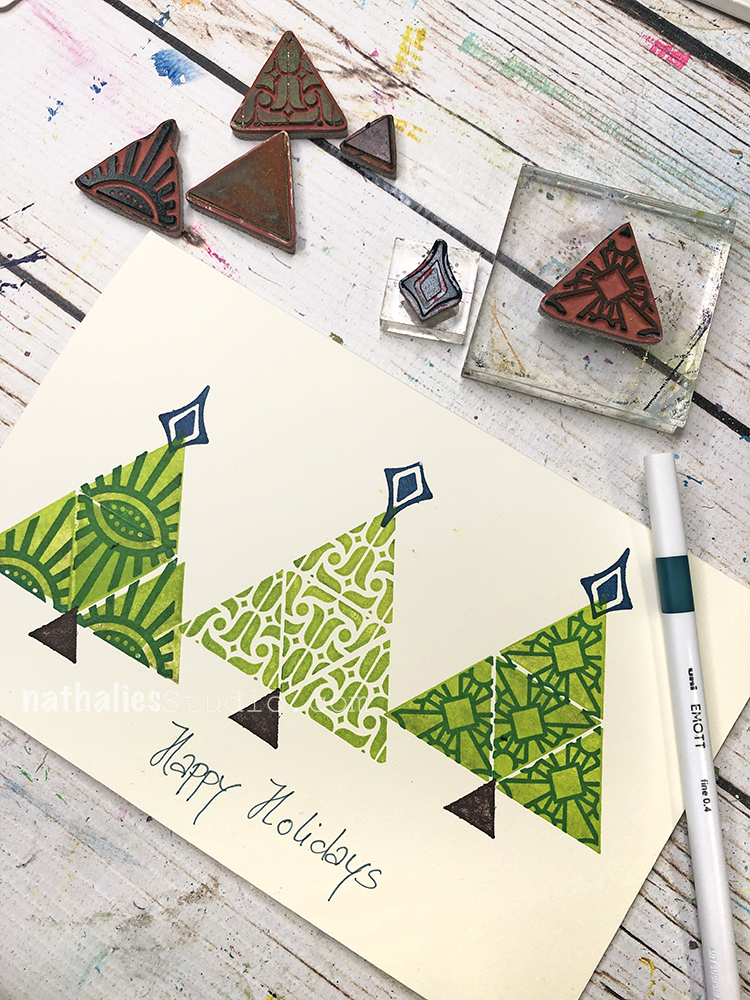
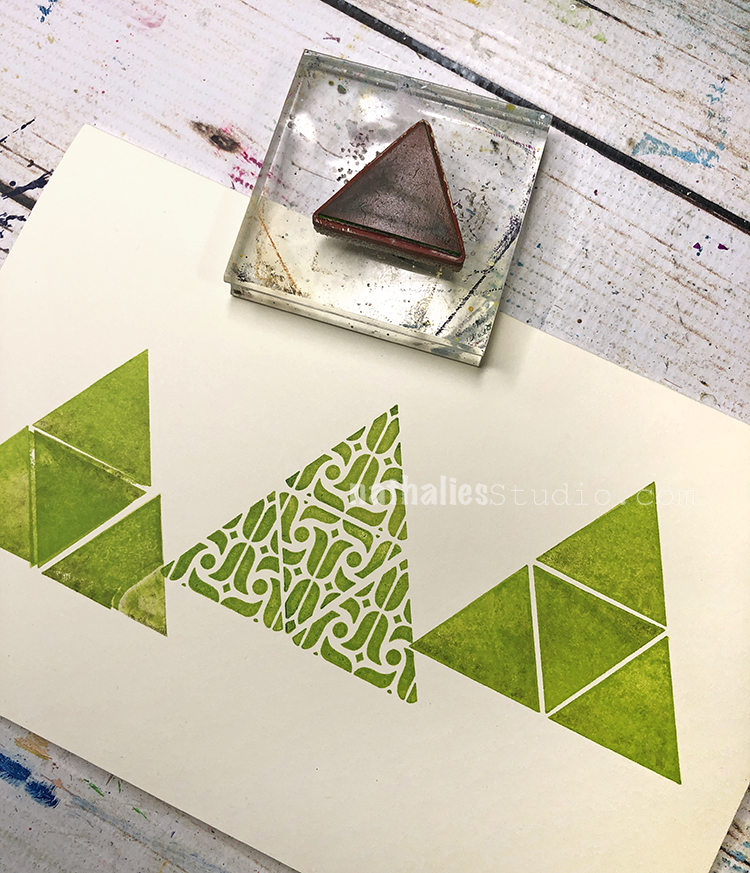
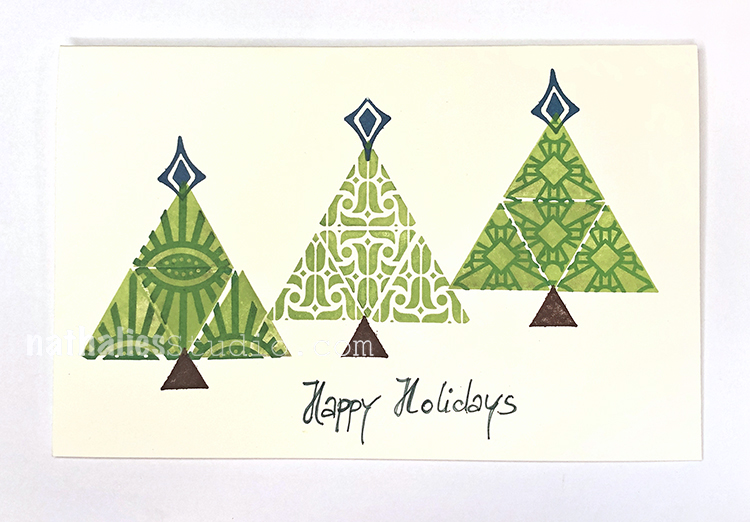
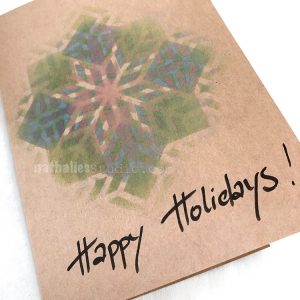
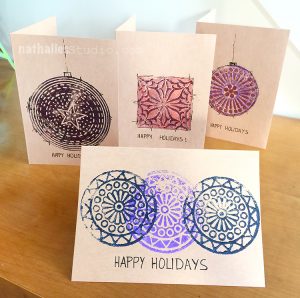
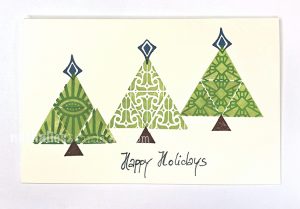
It seems so early to start making holiday cards but I am determined to not get caught in my usual December panic “waahhhhh I didn’t even start yet” LOL. Because quite frankly – I looooovee to get holiday cards, but of course …you gotta spread the love yourself, no? So, I wanted to share with you some holiday cards I put together using my Triangle Love and Fan-fare rubber stamp sets. These are just a few ideas that I was playing around with. Both of these sets are super versatile so I can even imagine a bunch more ideas will come once you start creating.
Let’s get started!
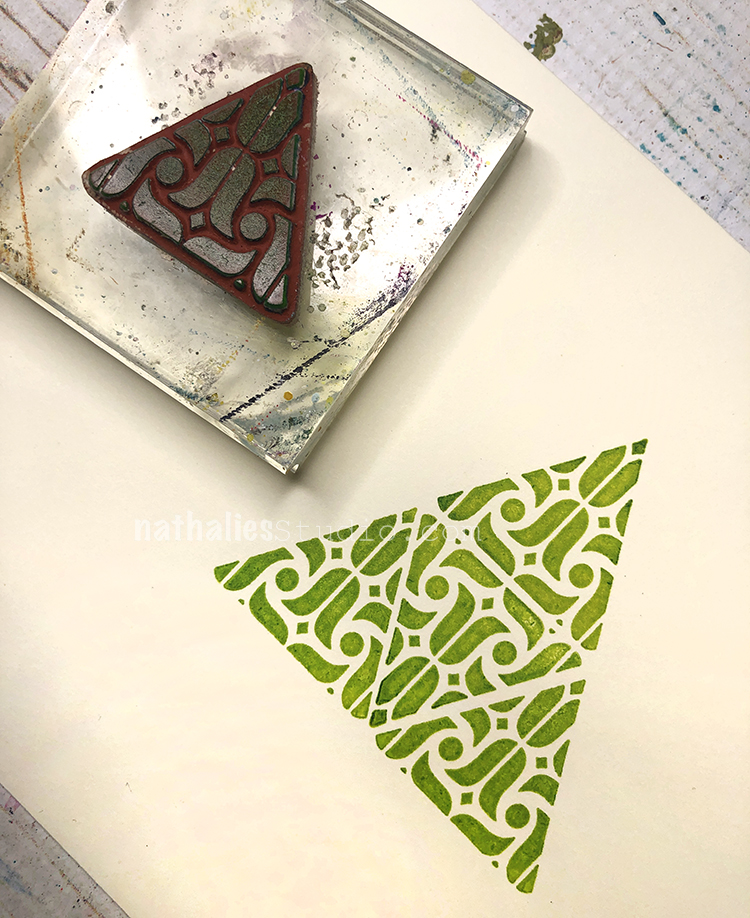
Using my Tulip Triangle, I started lining up the pattern to build a larger triangle shape on my card.
I stamped my Solid Triangle off to either side, in the same manner, building larger triangles.
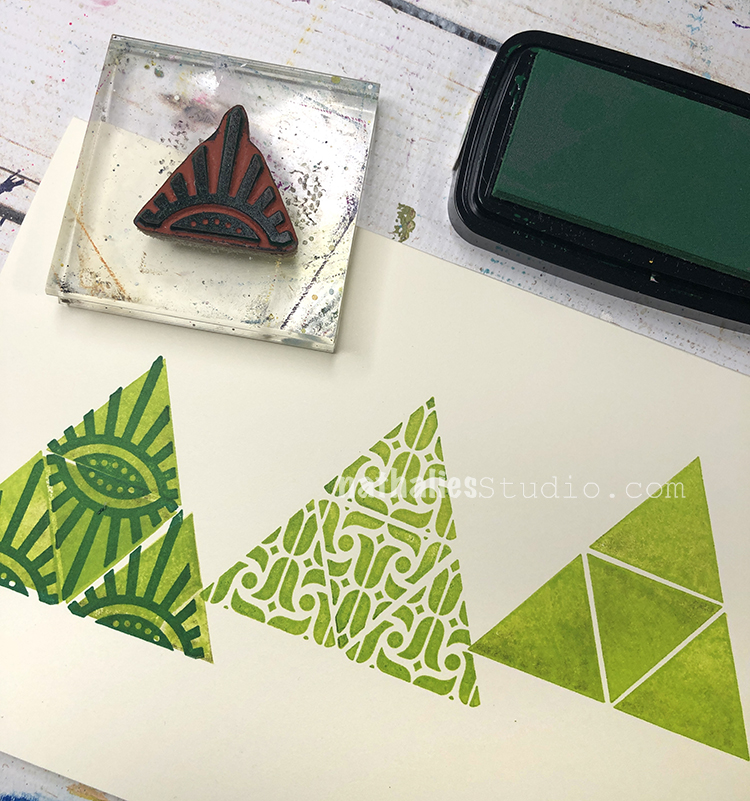
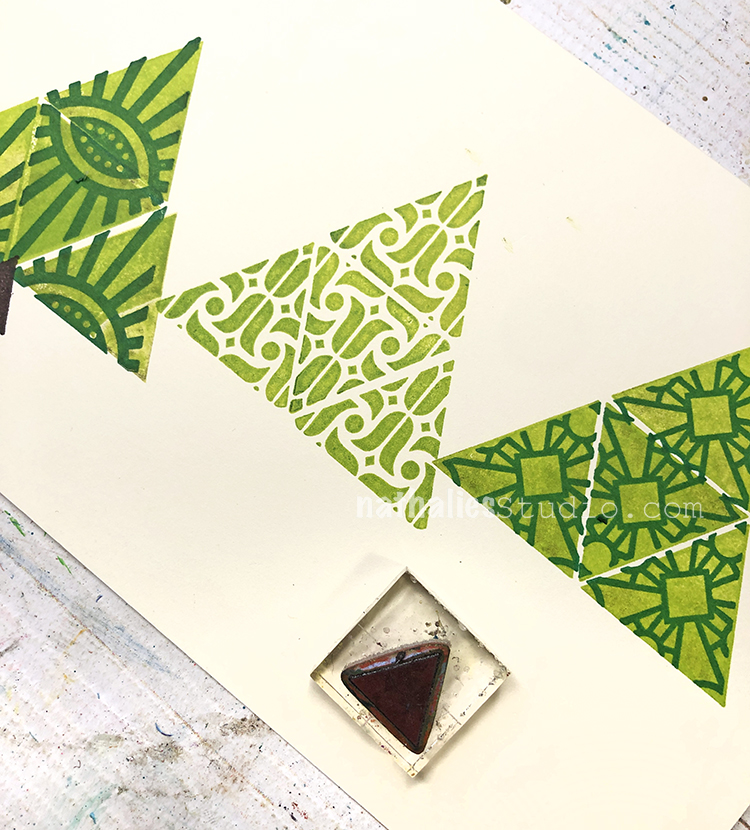
Then I added another pattern on top in a darker green ink. I chose my Empire Triangle and Stained Glass Triangle. I think you can see where this is going ;) I also used the Small Solid Triangle to create the tree trunk because, you guessed it, these are nice little Christmas trees.
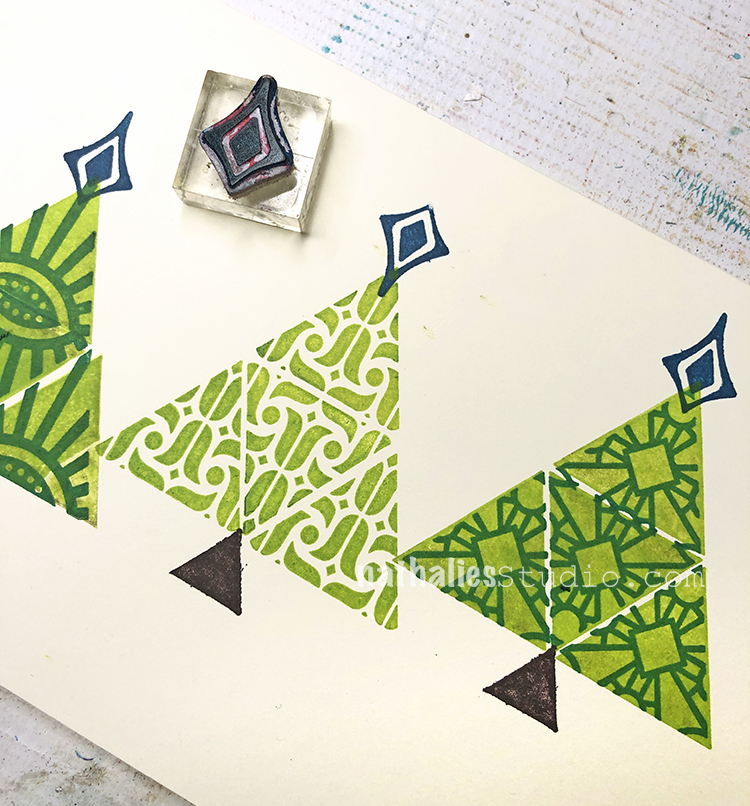
And then I used one of the small stamps from my Fan-fare stamp set as a tree topper.
Next just add your message and there you go – easy card idea #1 for you.
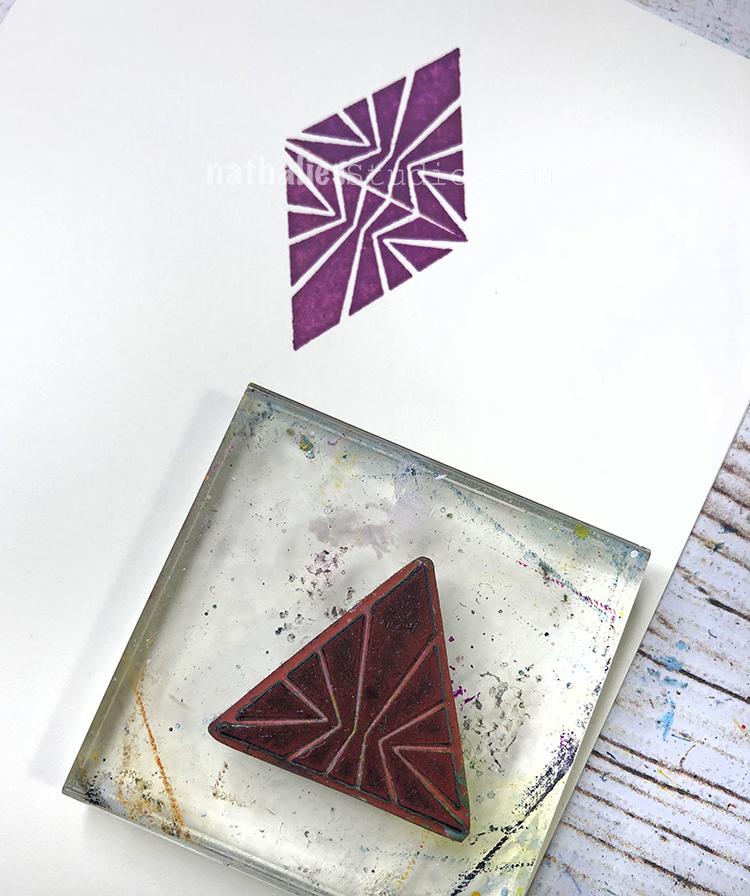
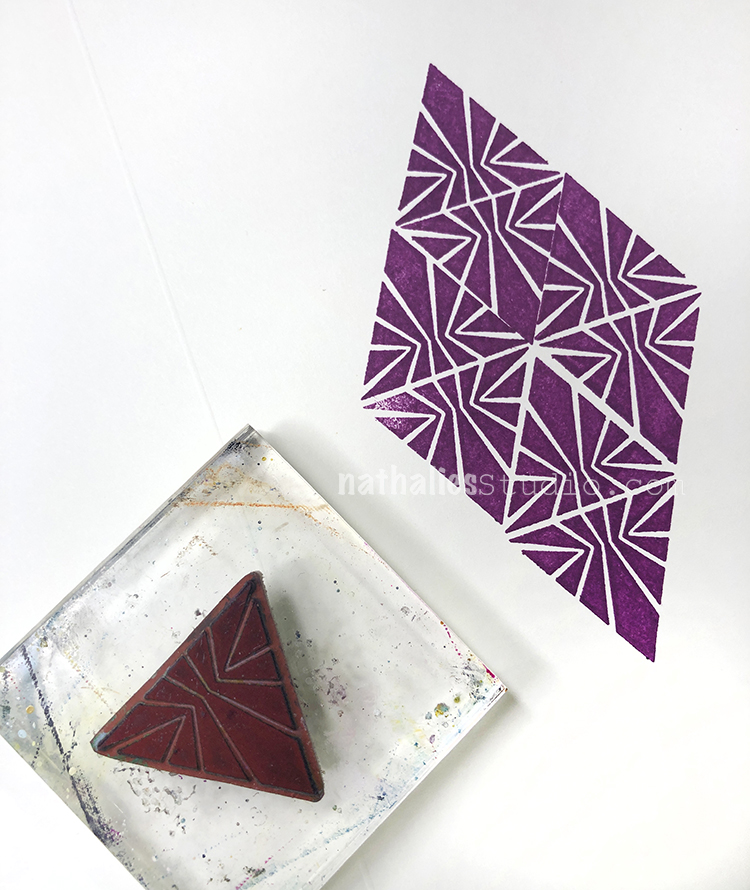
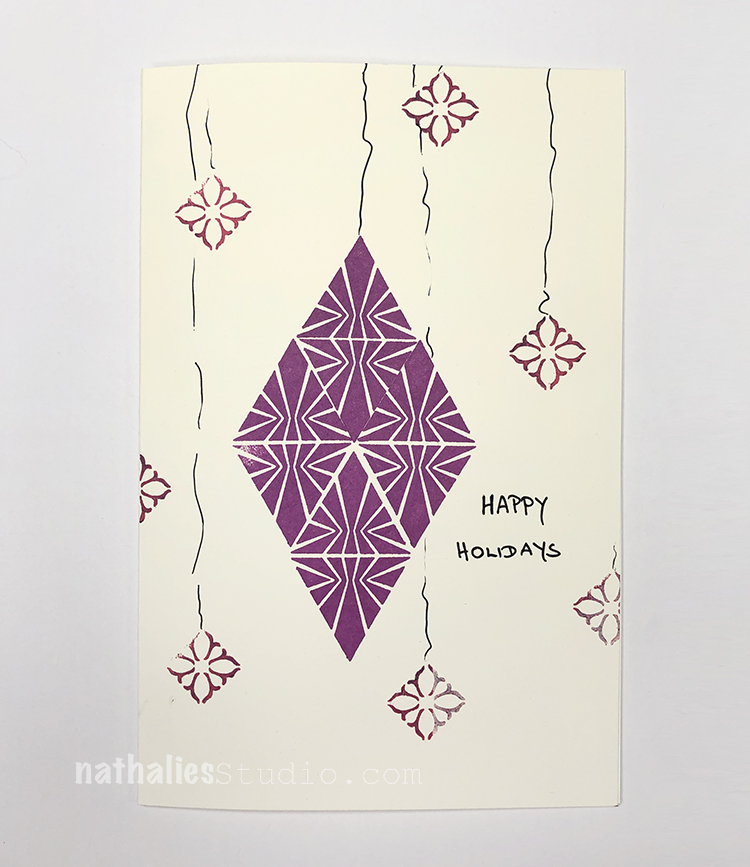
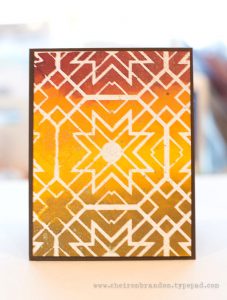
How about a card that features an ornament for the holiday season? I began by stamping the Sunburst Triangle from the Triangle Love set onto a card, flipping the stamp around to double it up.
I added another pair to the left and right, and then below to create a larger diamond shape.
This reminds me of a vintage glass ornament. I then added one of the Fan-fare stamps here and there to give the scene a little sparkle.
Then you can add your hangers and tinsel and a nice message to finish it off. There you have it – card idea #2!
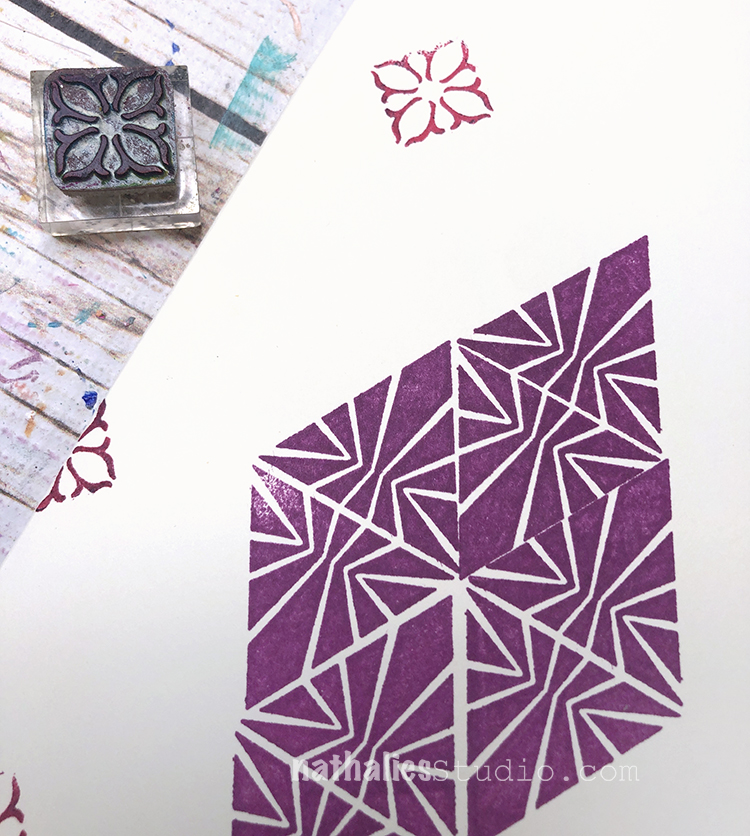
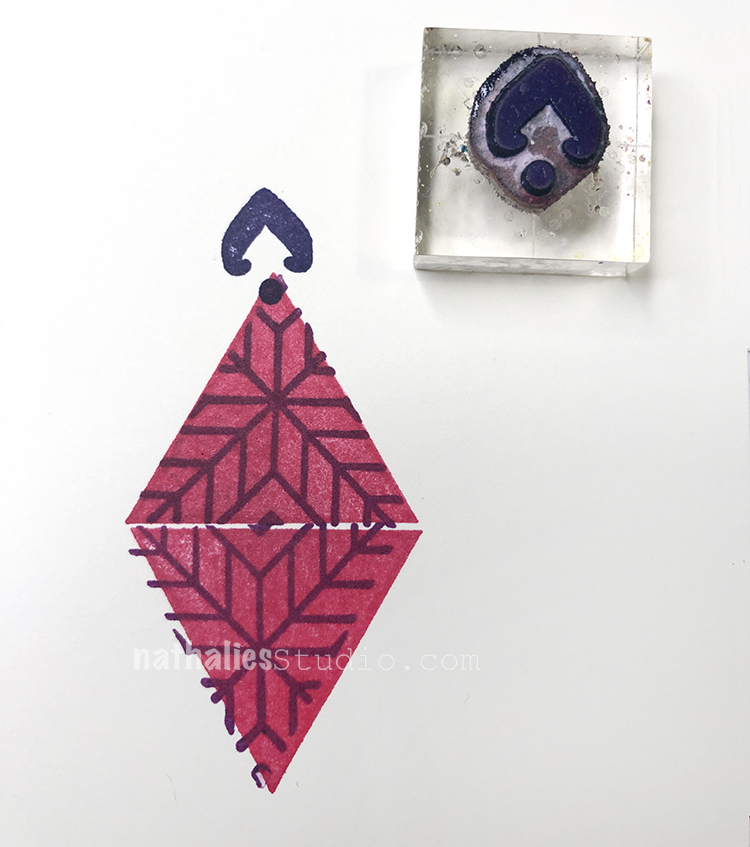
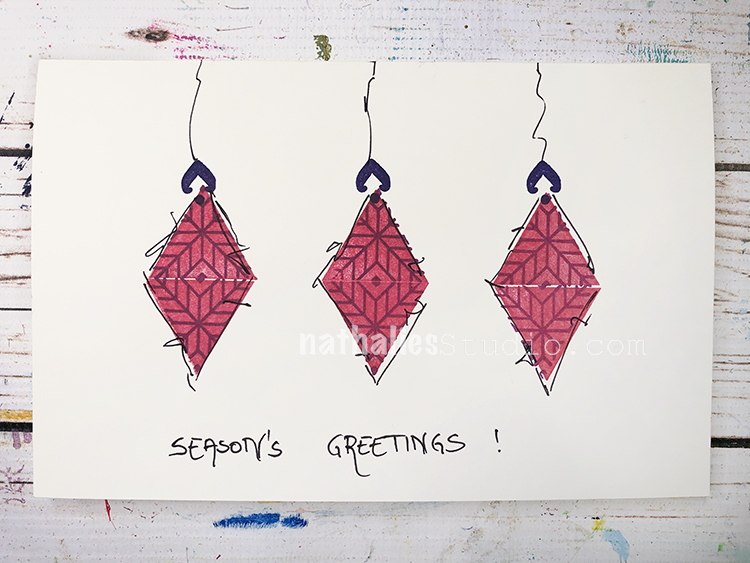
Finally another ornament idea, this time layering the Star Triangle over the Solid Triangle.
One of the stamps from Fan-fare makes a very nice ornament topper.
Then tie it all together with some sketchy lines and your sentiment. Voilà! Card idea #3 and hopefully you are on your way to a stress free holiday season (lol) now that you are ahead of the game with cards. I am not sure that holds true for me in regards of making holiday cards, but now that the first ones are done – my ideas keep on flowing :)
Very cute cards and I really like the shade of green and purple which you used.
December will be here before we know it, so it’s not too early to make cards!
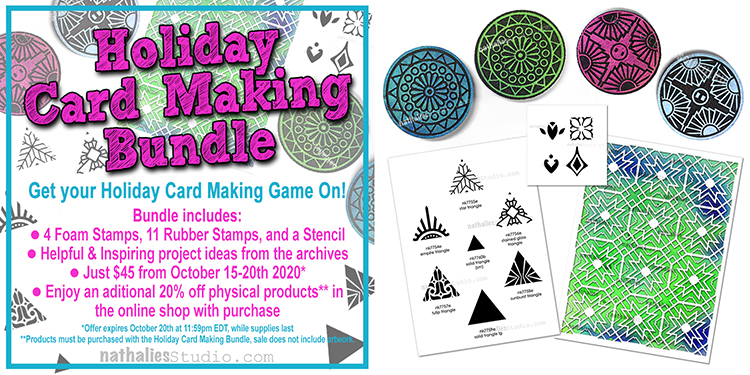
Are you ready to get your Holiday Card Making Game on??? I’ve put together this special product bundle to help you create tons of unique holiday cards for everyone on your list this year.
My Holiday Card Making Bundle includes a selection of foam stamps, rubber stamps, and a stencil, as well as some inspiring card making ideas from our archives to help you on your way.
The bundle is just $45, a big savings off the $71.60 regular price, and supplies are limited so hurry in to get your bundle before they run out for good. This offer expires October 20th at 11:59pm EDT.
Special 20% Off Deal: Also, during this offer, if you purchase the Holiday Card Making Bundle you may receive an additional 20% off any other physical products (foam stamps, rubber stamps, stencils, ink pads) that you order at the same time. Just use the coupon code holidaycard20 when you check out. Artwork is not included in this offer.
Here are the stamps and stencils that are included in the set:
Valley Road Positive Negative Foam Stamp Set
Broadway Positive Negative Foam Stamp Set
Triangle Love Cling Rubber Stamp Set
Fan-Fare Cling Rubber Stamp Set
Toledo 9×12 Stencil
In total you will receive 4 foam stamps, 11 cling rubber stamps, and a 9×12 stencil.
Once you purchase, you will receive an email with links to project ideas from the archives to get you started on your holiday card making.
Here are some of the tutorials from our archives that will come with the Holiday Card Making Bundle once purchased:
This bundle offer is only available through October 20th at 11:50pm EDT. And don’t forget to use the coupon code holidaycard20 to receive 20% off any additional physical items in your order.
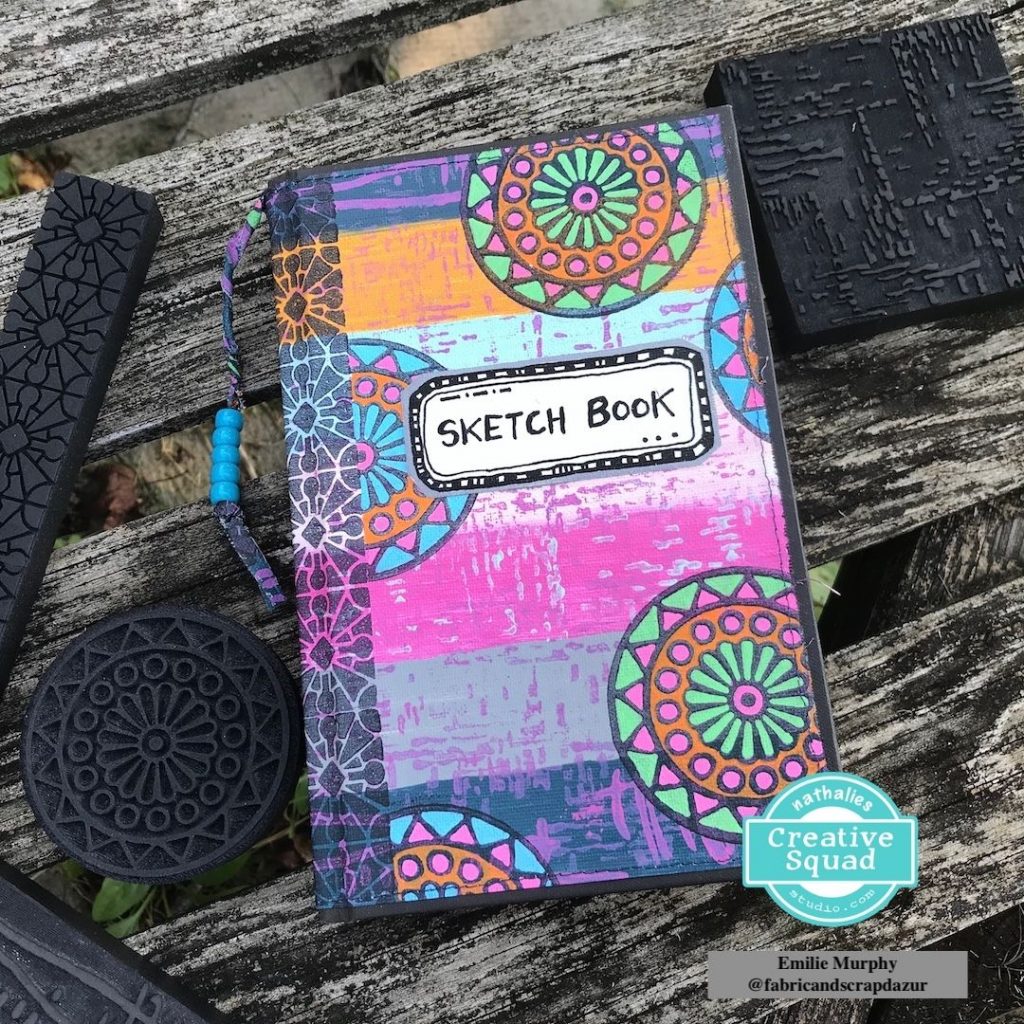
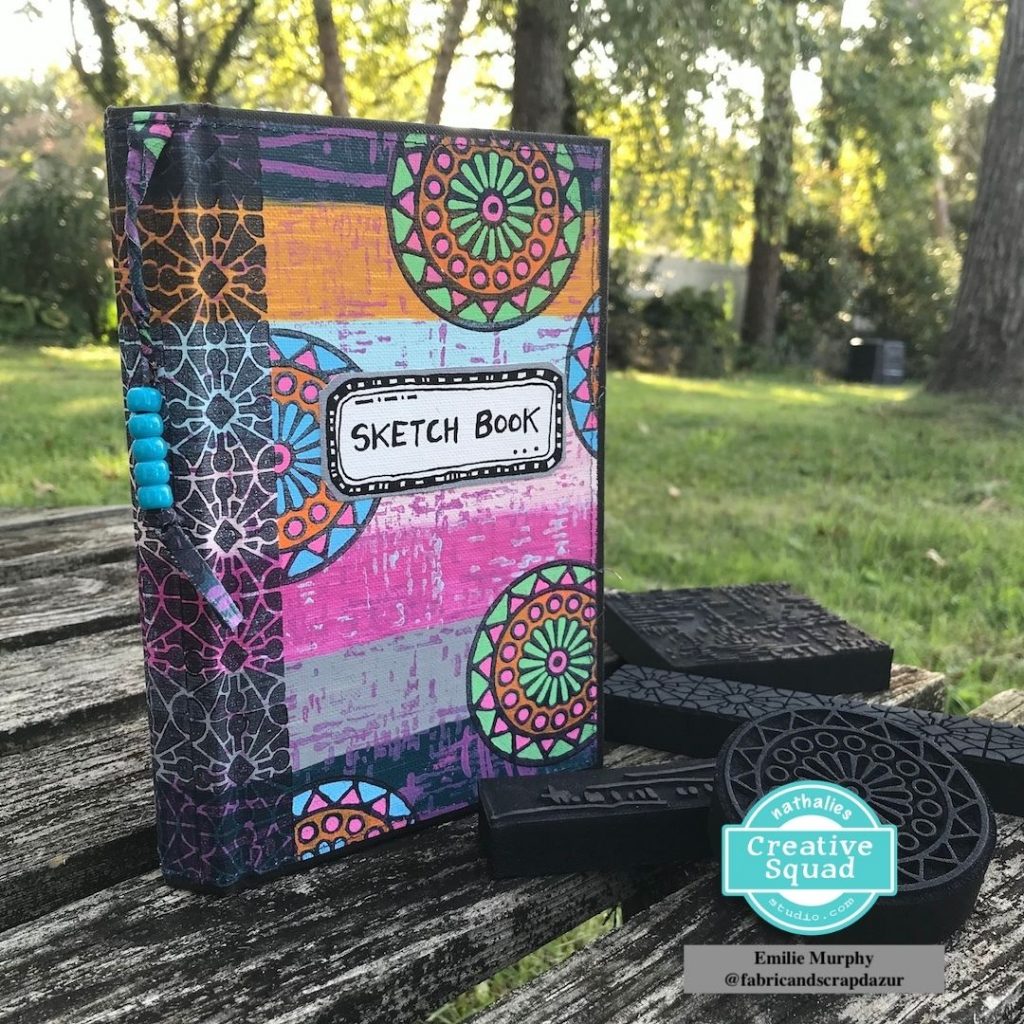
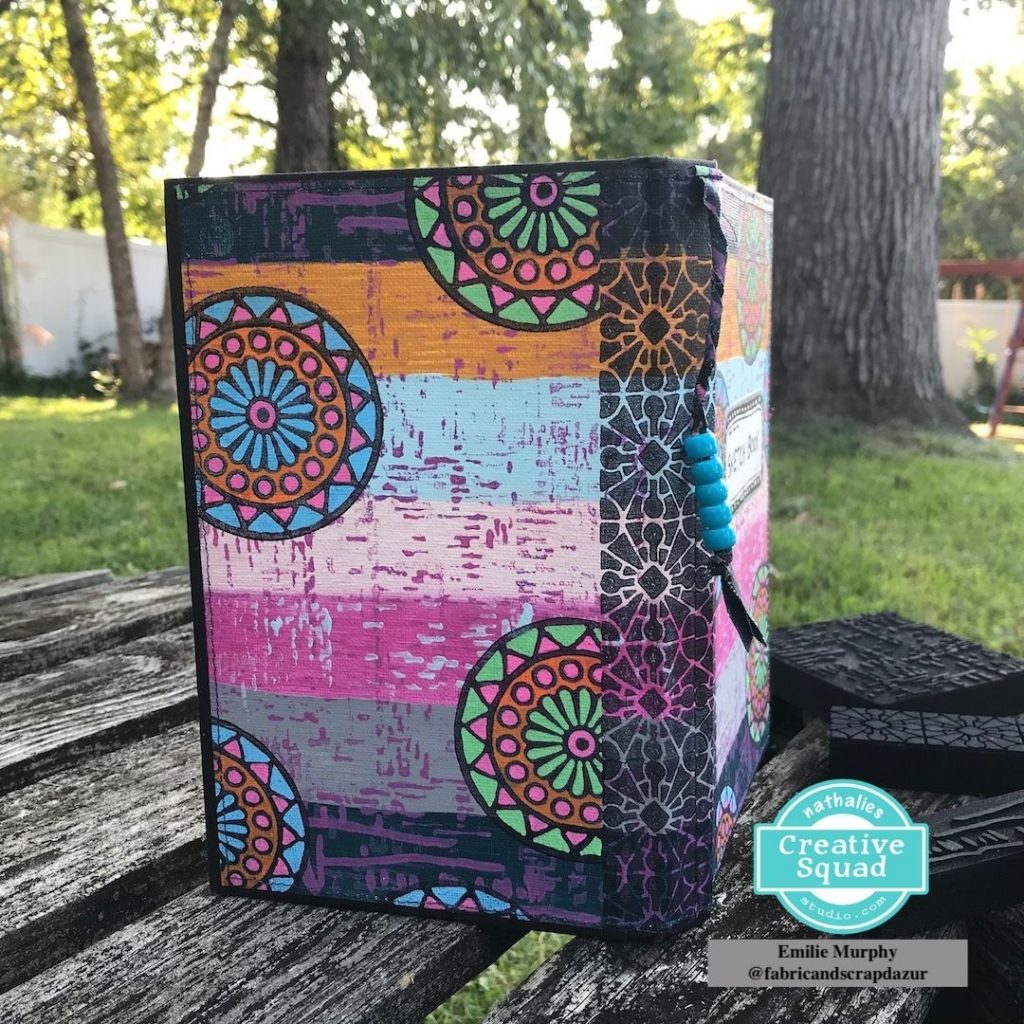
Hello from my Creative Squad! Today we have a project from Emilie Murphy that will transform the outside of your art journal. Emilie is using my Buenos Aires Border, Valley Road, Gnarly, and Signals foam stamps and this month’s theme: A New Day – Let’s try something new today :) Although these are tumultuous times and we never know what each new day will bring, it also seems like the perfect time to throw caution to the wind and just jump into something new with both feet. Try a new material or technique or approach. Why not? Today is a new day… and tomorrow is too!
Hi there! Hope you are doing well.
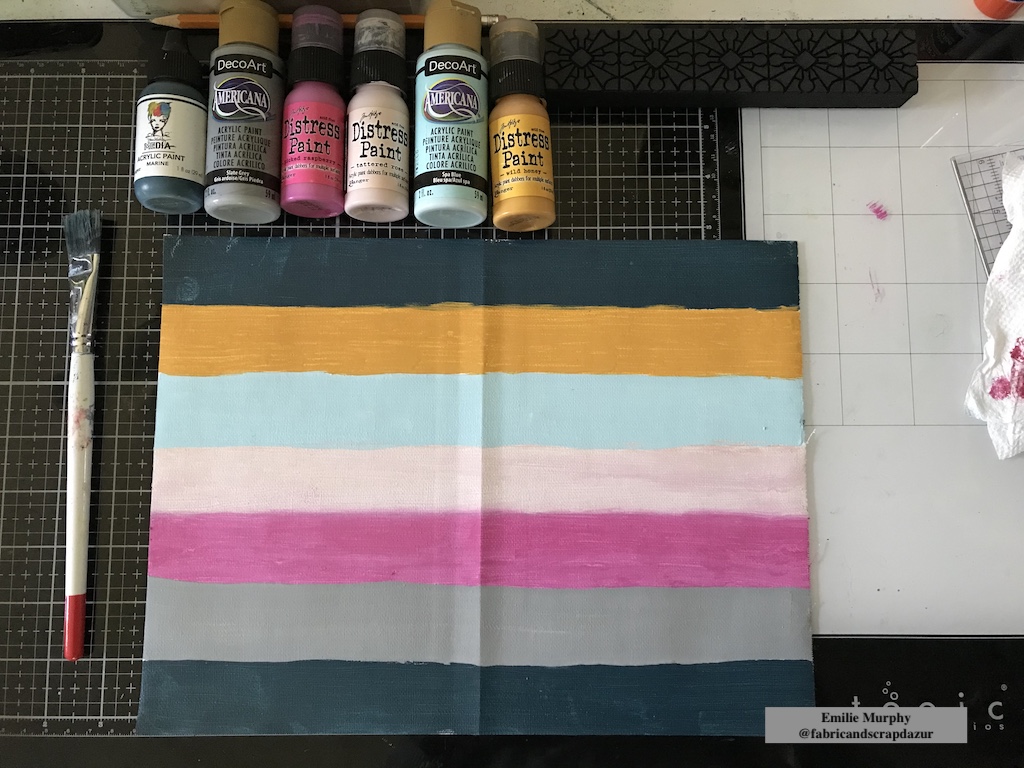
As we have to try something new this month, I decided to make a cover for my sketchbook with a sheet of Canvas. It’s not what I usually do when I make a cover for an art journal or embellish the cover of a notebook that I purchased. Therefore it’s a new technique for me, and I tried using only foam stamps and a single canvas sheet.
Let me show you how quick and easy this technique is. Foam stamps are such great tools for that purpose.
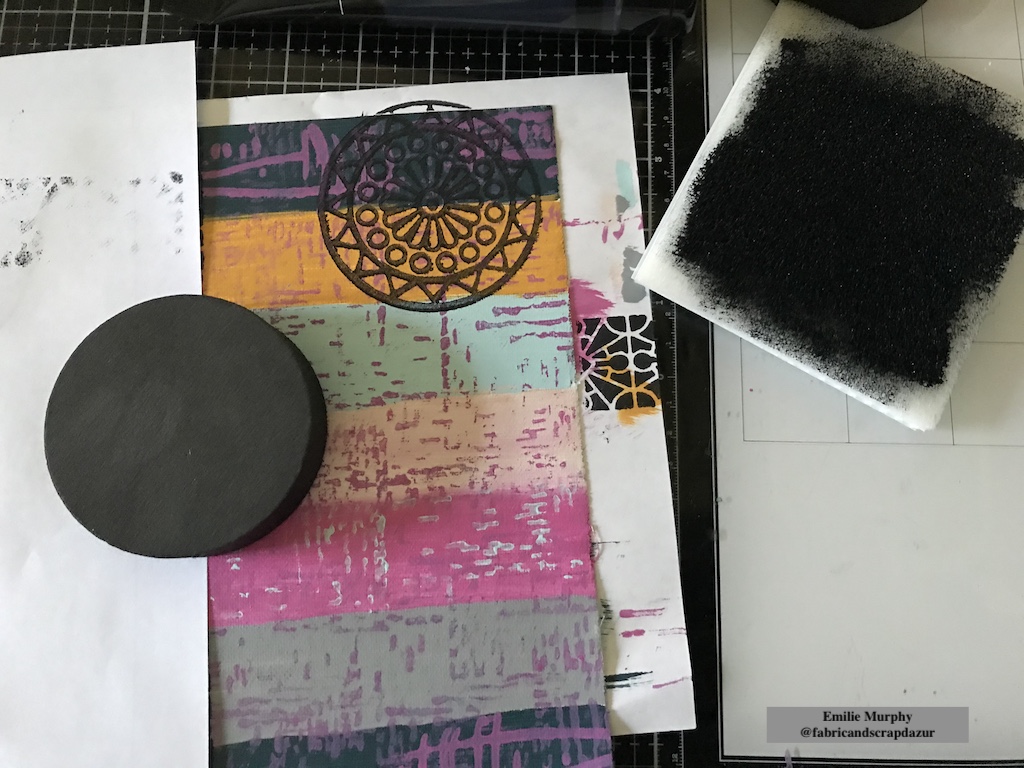
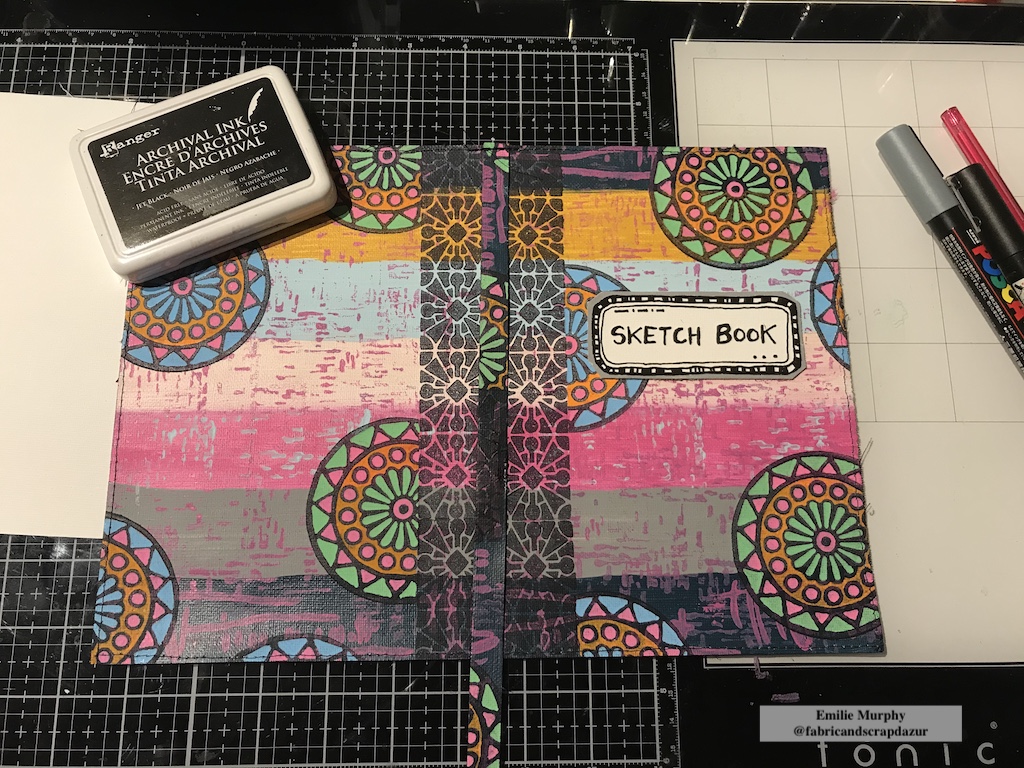
I started to trace lines to get equal strips on a 9×12 canvas sheet. I used the side pre-coated with gesso.
Then, I applied different acrylic paints I have in my stash to color the strips.
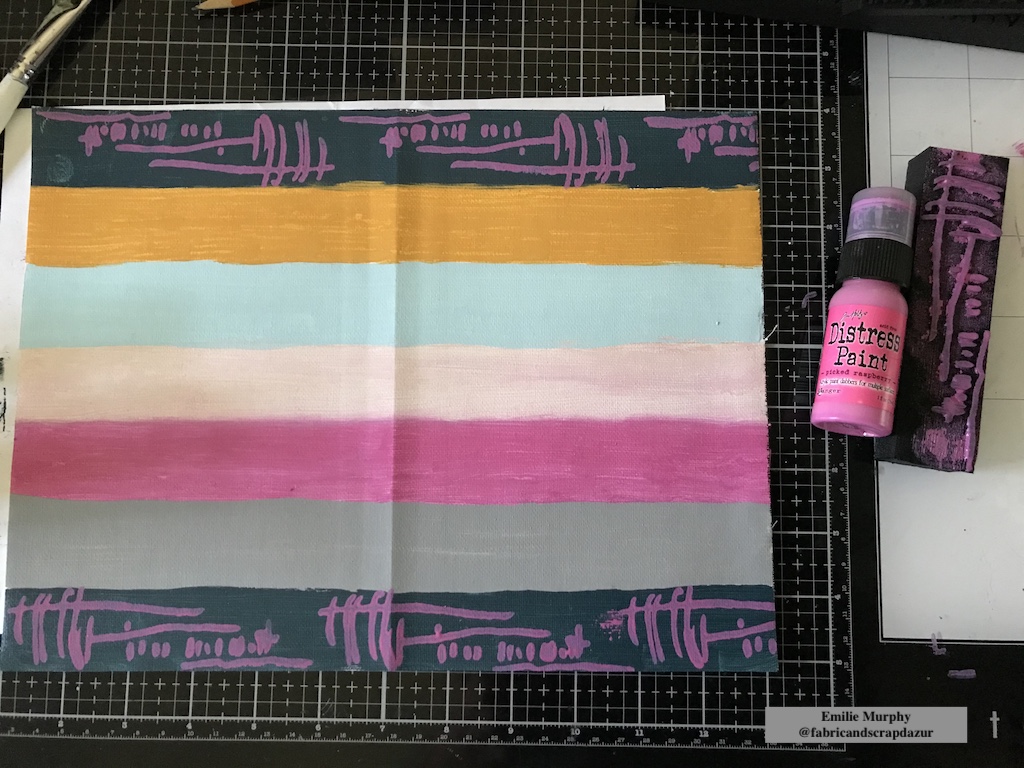
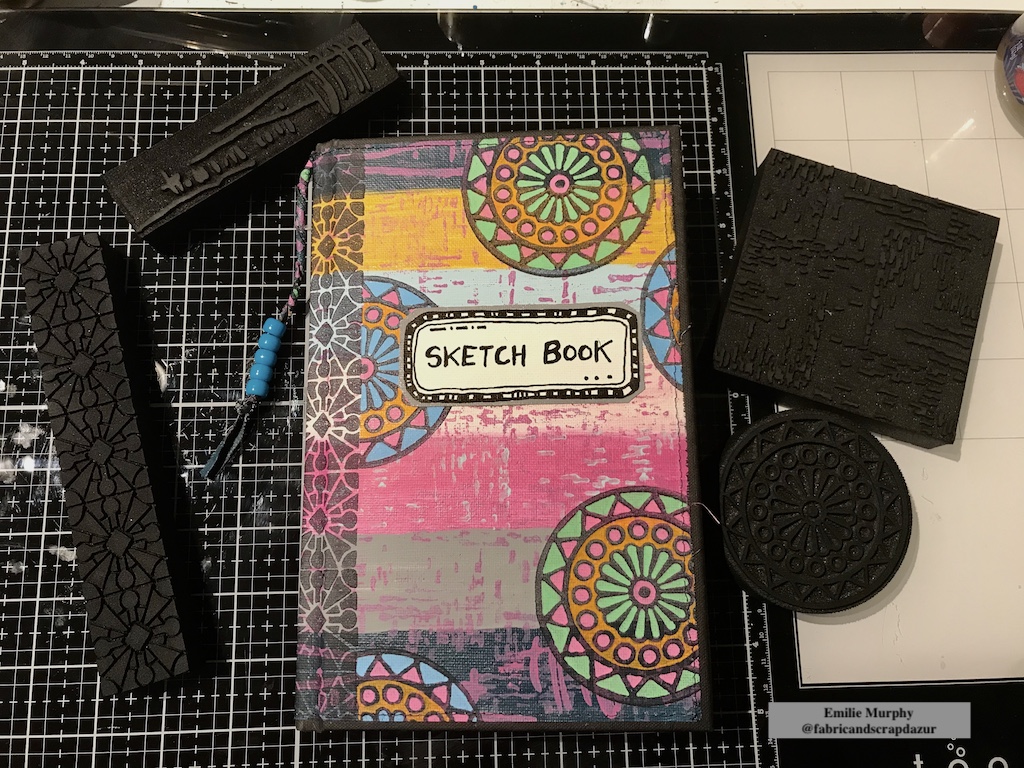
I added some texture with the Gnarly and Signals foam stamps on all the background to unify all the strips together.
As I wanted to show up an hinge of my sketchbook, I stamped the middle part of the cover with the Buenos Aires Border foam stamp. First, I slightly folded my canvas sheet in half to mark the middle. Then, I used a ruler to be able to stamp straight. I didn’t mind to have an imperfect impression for the background texture but for the hinge part I wanted to get a crisp impression so I used a “stamp buddy” (that can be purchased on the ArtFoamies website) that allows you to apply paint uniformly and smoothly on the stamp.
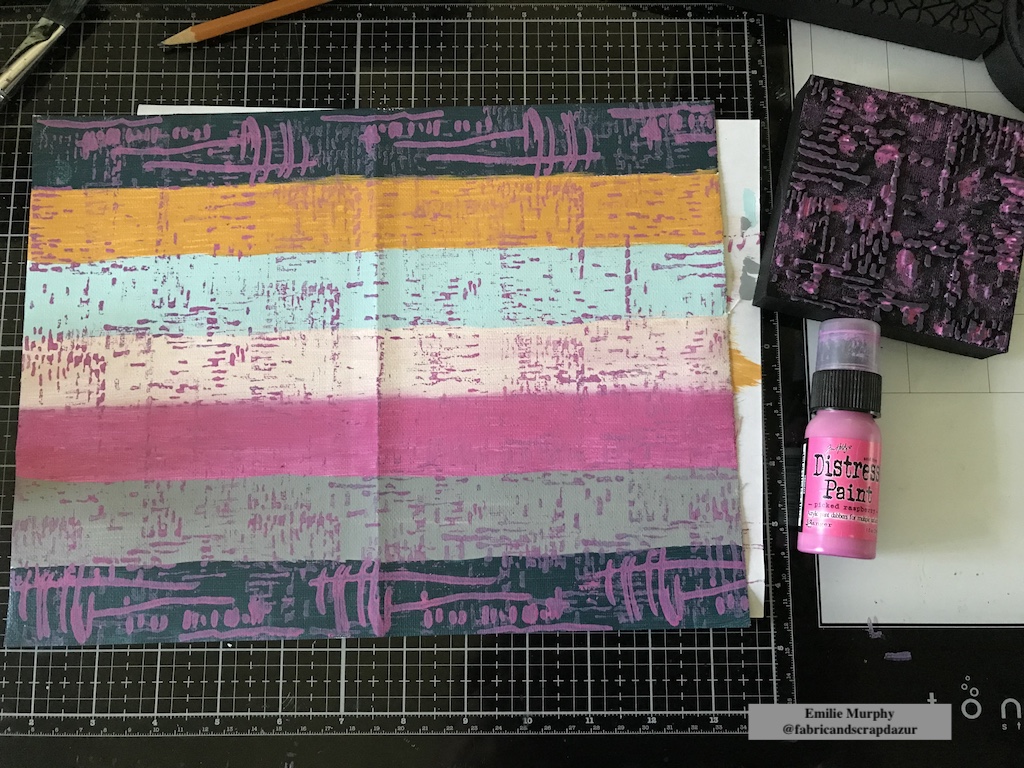
I could have used a brayer instead but, as none of my brayers are brand new, it leaves some marks than I didn’t like for this purpose.
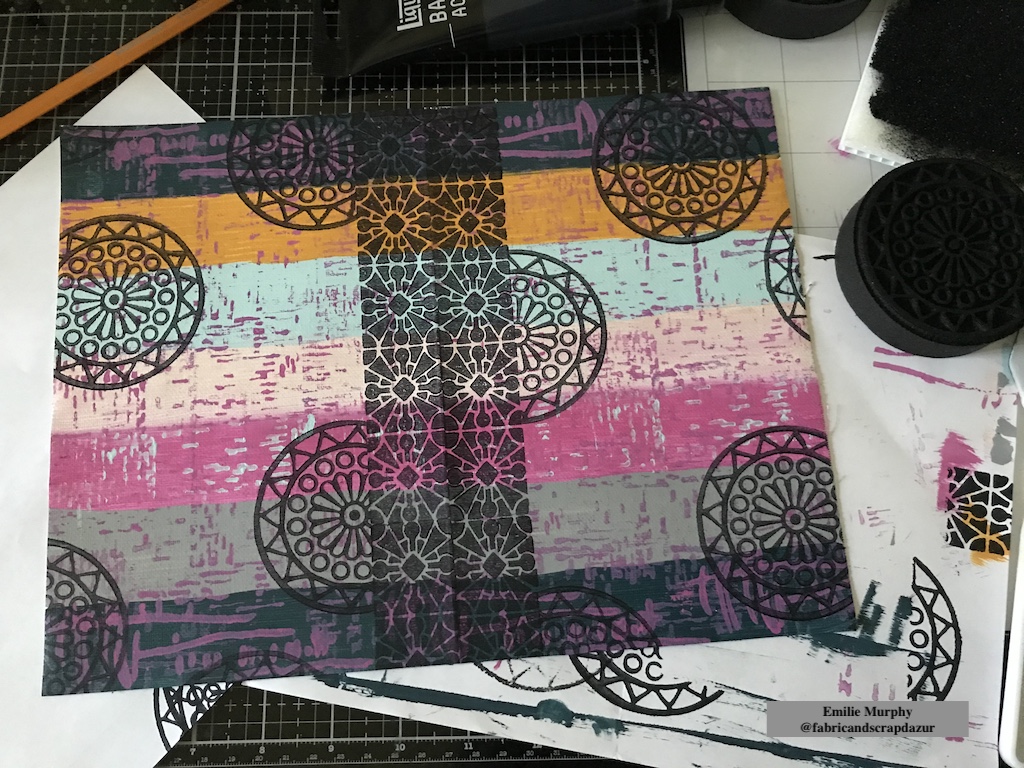
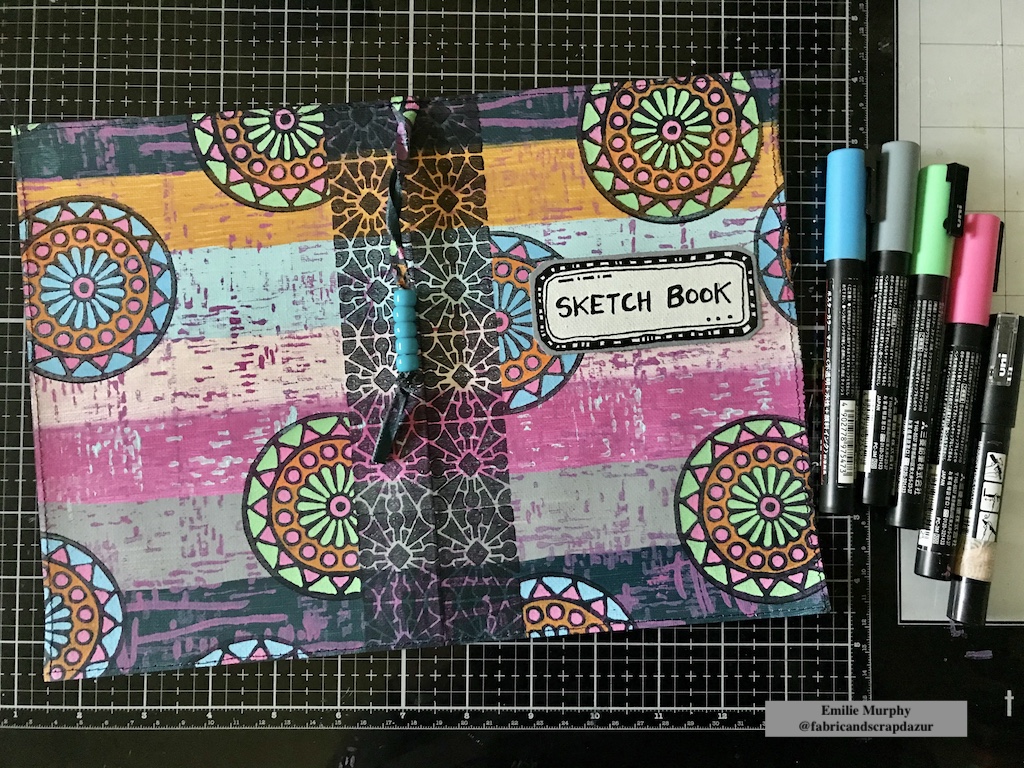
Next, I stamped repeatedly the Valley Road negative stamp to add more interest. Once again, I used my “stamp buddy” because I wanted a crisp impression.
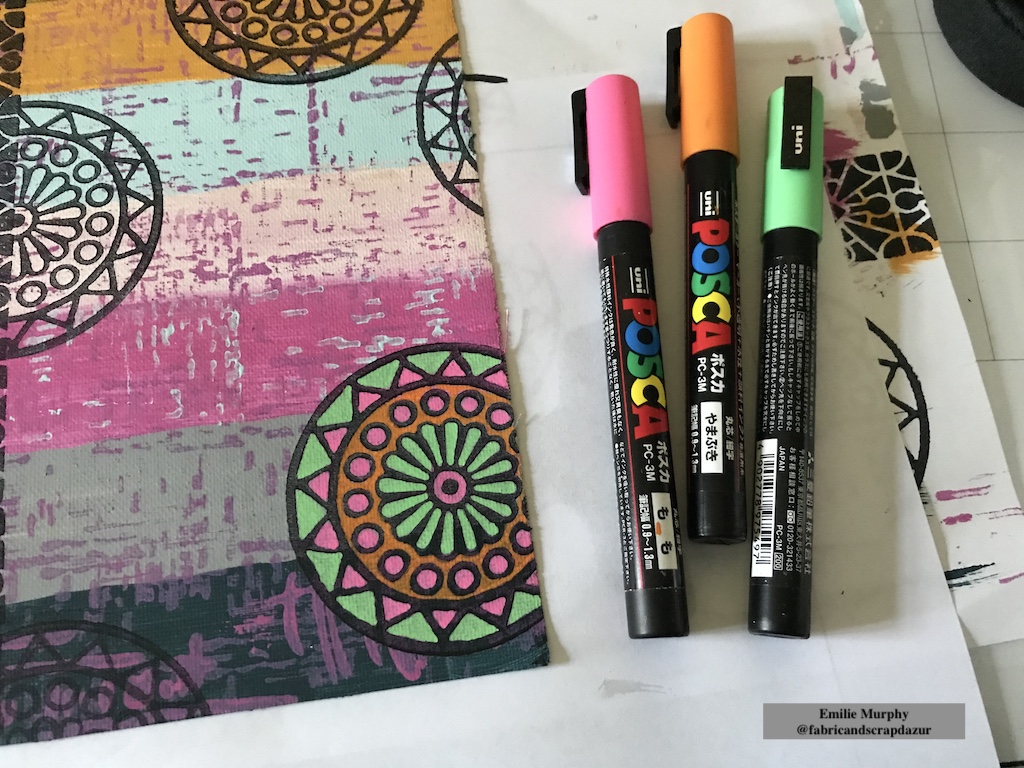
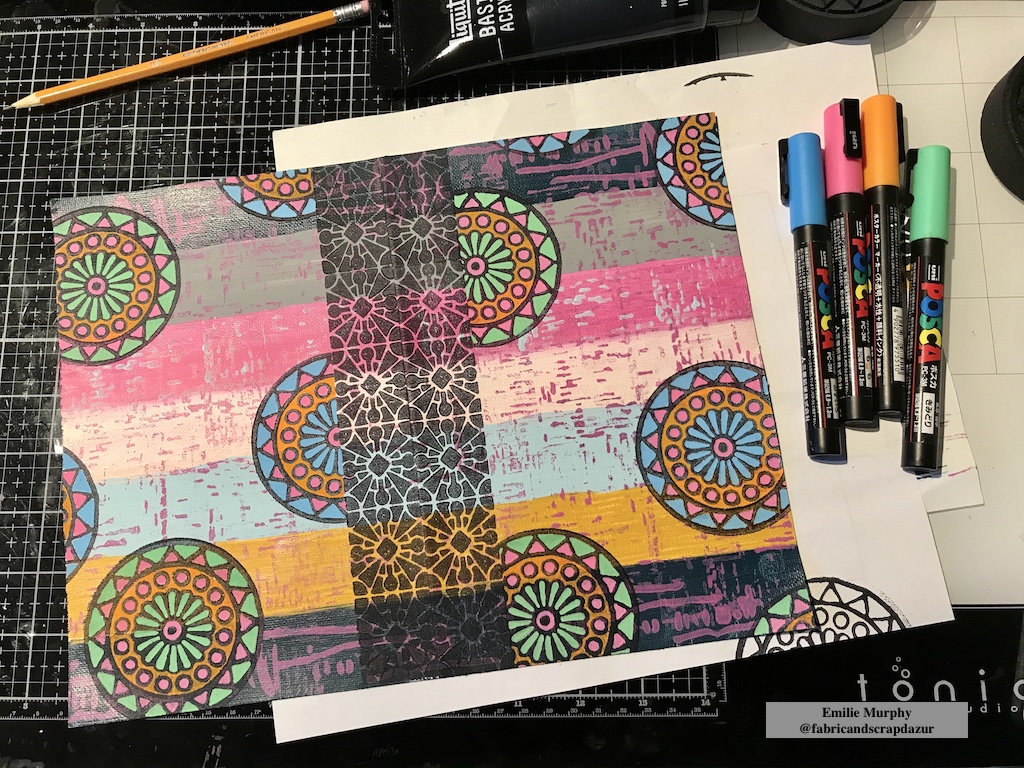
I colored my entire Valley Road motifs with some Posca pens. I just love the way that it allows the Valley Road design to pop out and create some dimension.
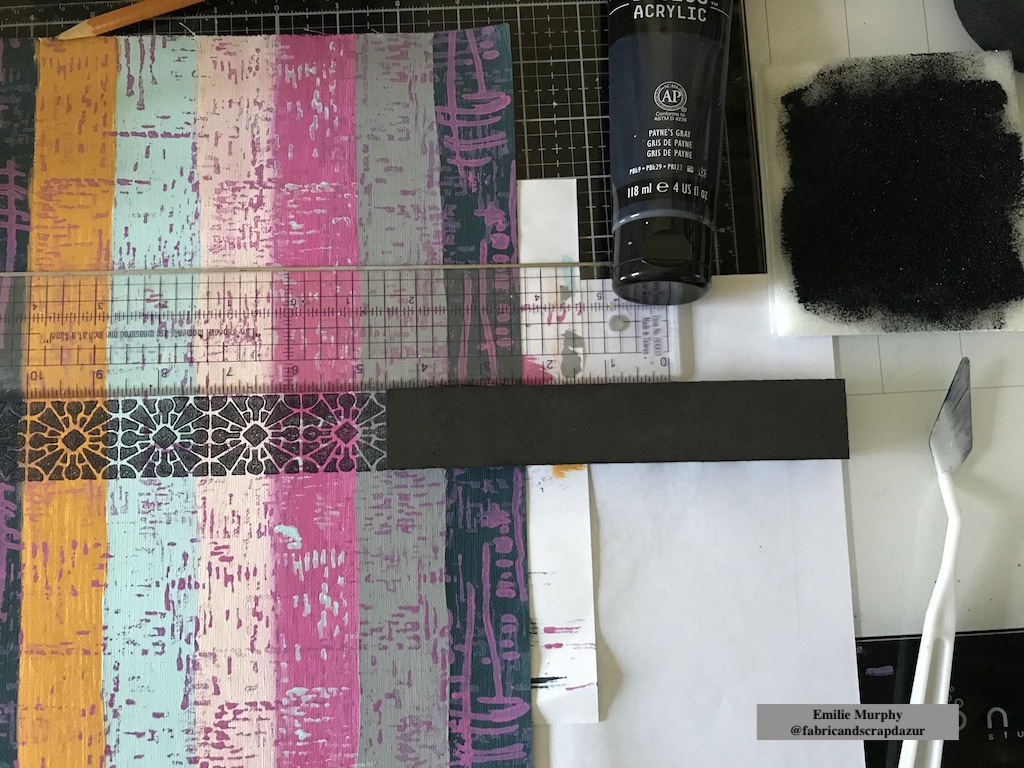
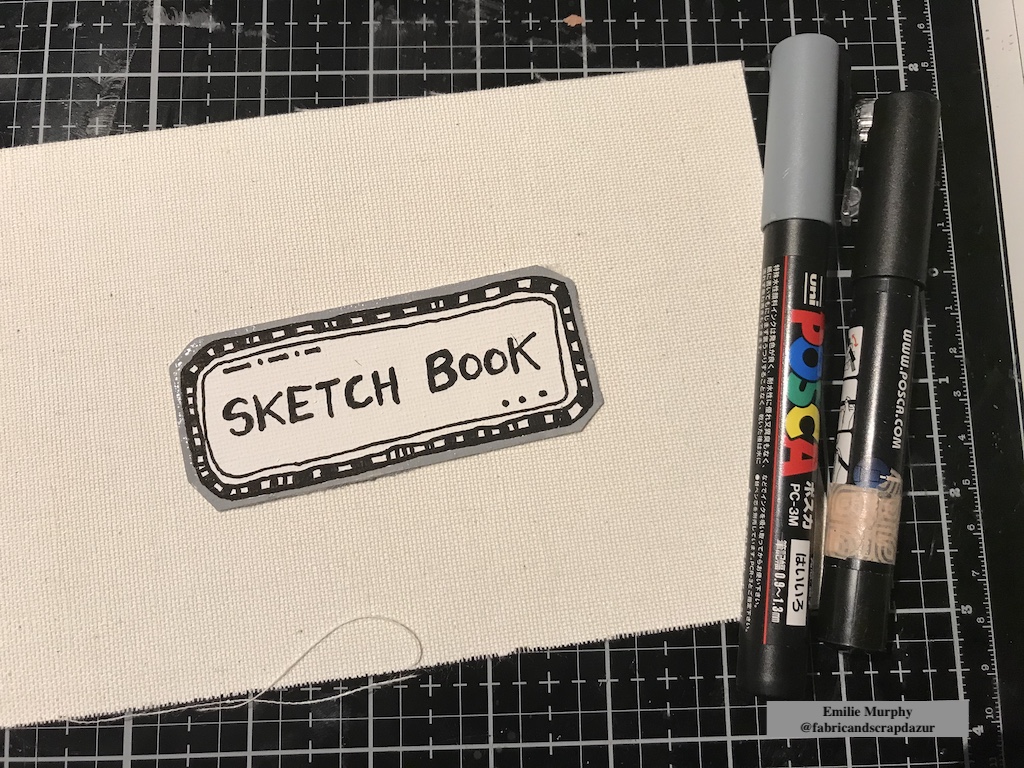
In order to complete my cover, I created a simple label with an extra piece of canvas sheet.
I finished up my cover by machine stitching all around the edges. This step is optional if you don’t like to sew or don’t have any sewing machine.
Tip: You can also simply create a false stitching line with a black maker.
As you can see I also stitched in the middle the remained half-inch strip I got when I cut the canvas sheet to fit the height of my sketchbook.
I embellished the middle strip with some plastic beads. I first twisted the strip and added some dots of glue here and there to keep it in shape. Then I added the beads and tightened a knot to secure it. I think it’s a nice addition to the cover.
Finally I glued down my canvas sheet on my sketchbook. I used PVA glue that I applied uniformly with a brush. I think it is better to use wet glue for this type of project because it allows some time to make adjustments if needed. I first started to apply glue on a half of the cover and burnished it well with a bone folder. Then I glued down the second half. This way the canvas sheet will adhere well. It also removes potential air bubbles and won’t peel off with time.
Personally I enjoyed trying something new this month. Hope you will take the plunge and try something new as well. Foam stamps are so fun to use specially for this kind of project.
Have a great rest of the week! See you next month!
Thank you Emilie – love how those colors make the foam stamp patterns really pop!
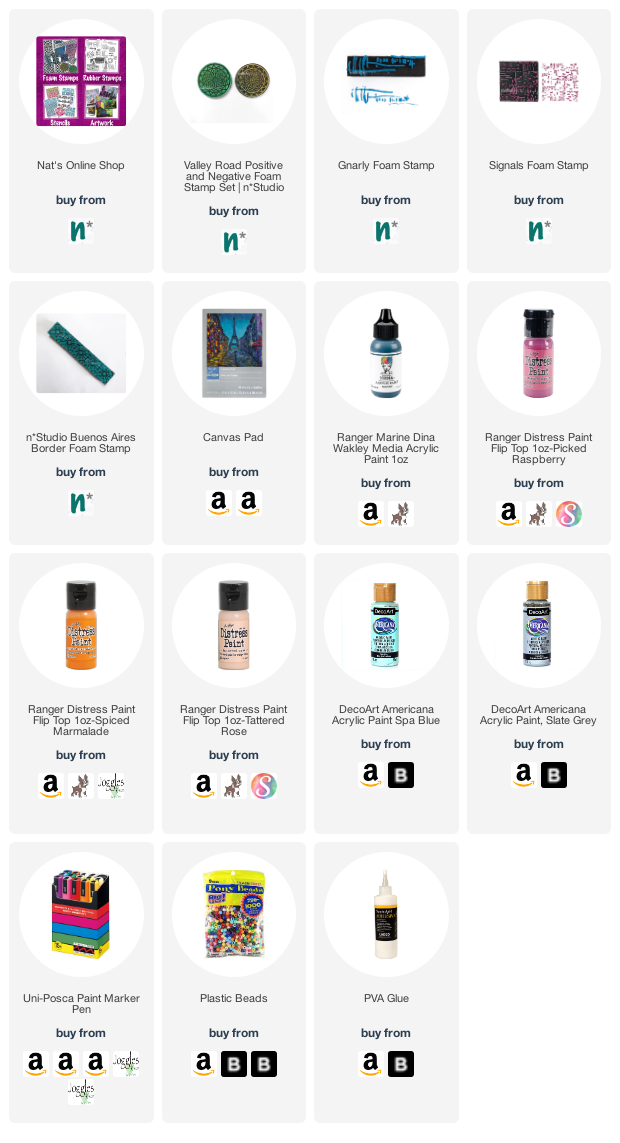
Give it a try: you can find all my Foam Stamps in my Online Shop and here are some of the other supplies Emilie used:
Feel inspired? Working on something yourself that you’d like to share? I love to see how you interpret our monthly themes. Email me how you used my stencils and stamps with the theme and email me an image – I would love to share your projects in my next “n*Spiration From Around the Globe“.


Love the demo. Must see if I can get the building stamps in Australia. I do miss going to the craft shows this year, but with COVID, no shows to go to. However, I may have missed out on an online show!
Reply