Come and join Sarah Matthews and me in our April ArtFoamies Challenge throughout the month of April, 2021. Beginning April 1st, we will explore using our ArtFoamies foam stamps each day with color and pattern and so much more. Sarah and I have been collaborating on several projects this past year and also do a monthly Zoomcast called ArtCollab. We are loving this chance to work together, throw ideas around, and to find inspiration in this new adventure.
Follow me on Instagram HERE and Sarah on Instagram HERE for the daily April ArtFoamies Challenge prompts and to see how we interpret them and let our inspiration flow.
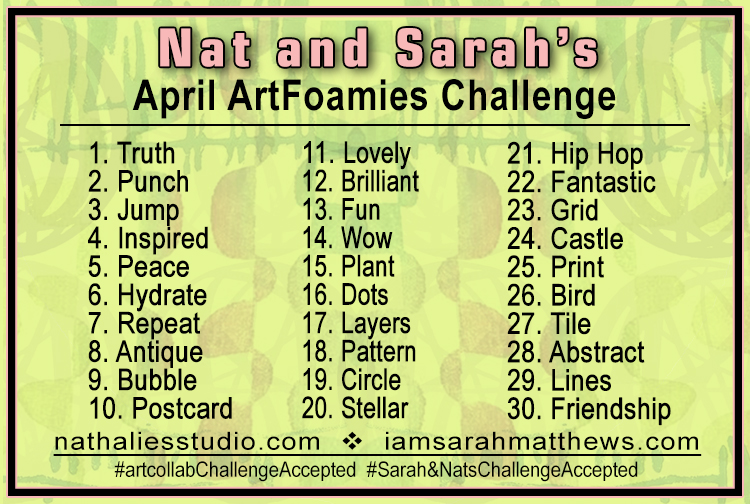
Here is the Prompt List:
Each day beginning April 1 on my Instagram page and on Sarah’s Instagram HERE we will post our take on the prompts along with some little videos too. You can either try the same things or just try and do your own approaches following along with the prompts. I so hope you will share what you do and if you post on instagram, use the hashtags #artcollabChallengeAccepted and #Sarah&NatsChallengeAccepted
I’ll also be posting my take on the prompts right here on the blog too, so you can keep up with us :)
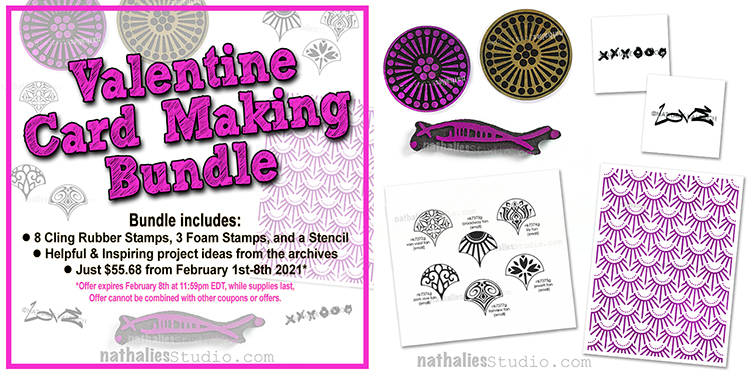
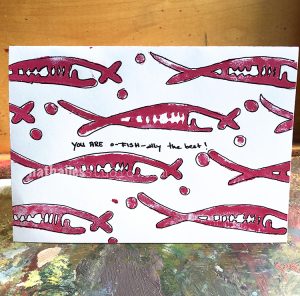
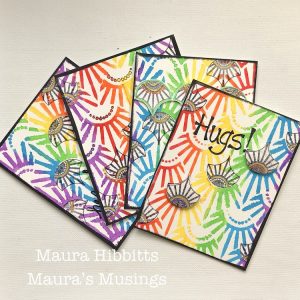
Are you ready for Valentine’s Day? I’ve put together this special product bundle to help you create tons of unique Valentine’s Day cards for all your sweethearts this year.
My Valentine Card Making Bundle includes a selection of foam stamps, rubber stamps, and a stencil, as well as some inspiring card making ideas from our archives to help you on your way.
The bundle is just $55.68, a big savings off the $69.60 regular price, and supplies are limited so hurry in to get your bundle before they run out for good. This offer expires February 8th at 11:59pm EDT, and cannot be combined with other coupons or offers.
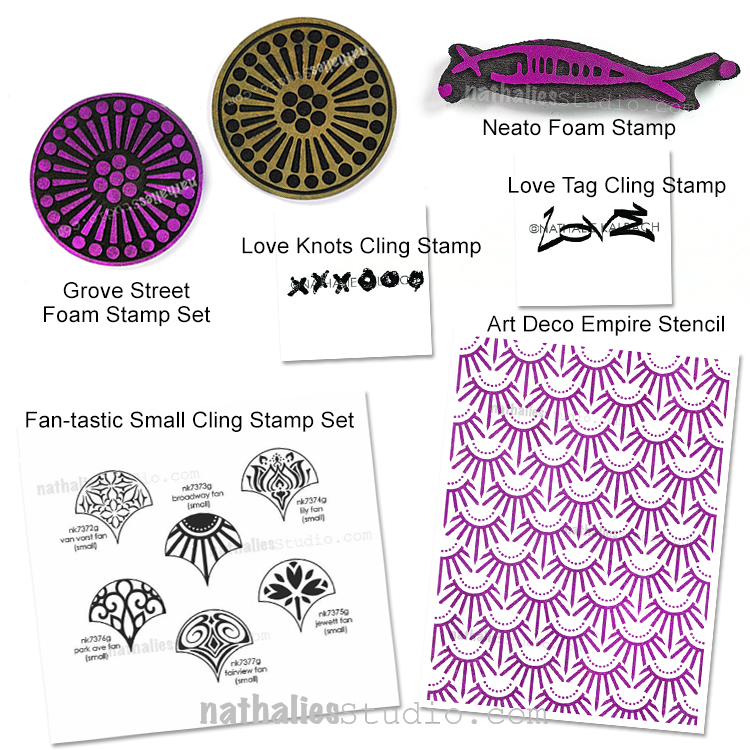
Here are the stamps and stencils that are included in the set*:
Grove Street Positive Negative Foam Stamp Set
Neato Foam Stamp Set
Fan-tastic Cling Rubber Stamp Set
Love Tag Cling Rubber Stamp
Love Knots Cling Rubber Stamp
Art Deco Empire 9×12 Stencil
In total you will receive 3 foam stamps, 8 cling rubber stamps, and a 9×12 stencil. *No product substitutions are permitted.
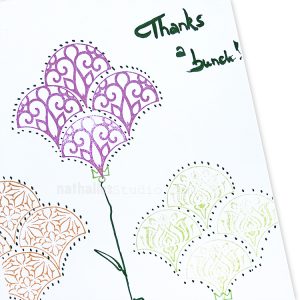
Once you purchase, you will receive an email with links to project ideas from the archives to get you started on your Valentine card making.
Here are some examples:
This bundle offer is only available through February 8th at 11:50pm EDT, while supplies last, no product substitutions are available.
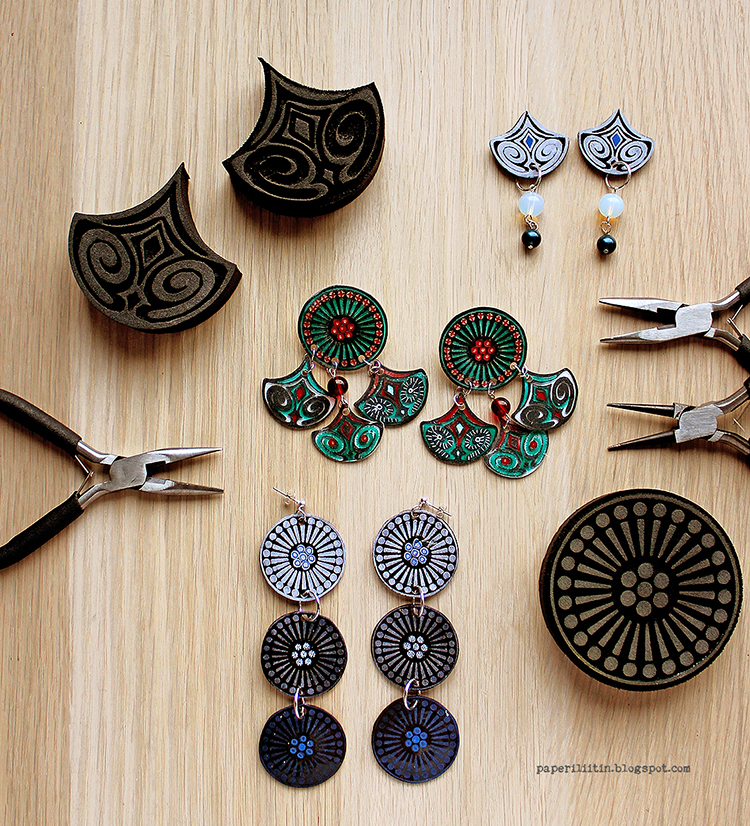
Today we have a very special Guest Post from one of our Creative JumpStart 2021 teachers: Riikka Kovasin! She is bringing us 3 different shrink film earring ideas using my Grove Street and Fairview Fan foam stamp sets. Before we get into it though, let’s hear a bit about Riikka:
“Heippa! My name is Riikka Kovasin and I am a mixed media crafter from Finland. I live in Helsinki with my darling husband and our two sweet daughters. Creating is my passion and a way of self-care. Besides family and crafts, my weeks are filled with a full-time job.
I have been doing all sorts of crafts my whole life. I really got into papercrafts after I found scrapbooking when my older daughter was about 6 months old – that’s over 10 years ago. Since then my style has evolved to more and more mixed media direction and nowadays, I tend to go dimensional and do more altered and mixed media pieces than regular layouts.
I absolutely adore getting my hands into paints and mediums! To me the process of creating is equally as important as the finished project.”
We are so excited to share some projects with you from Riikka, and this is the first of a few that will be coming in the next few weeks so check back for more :)
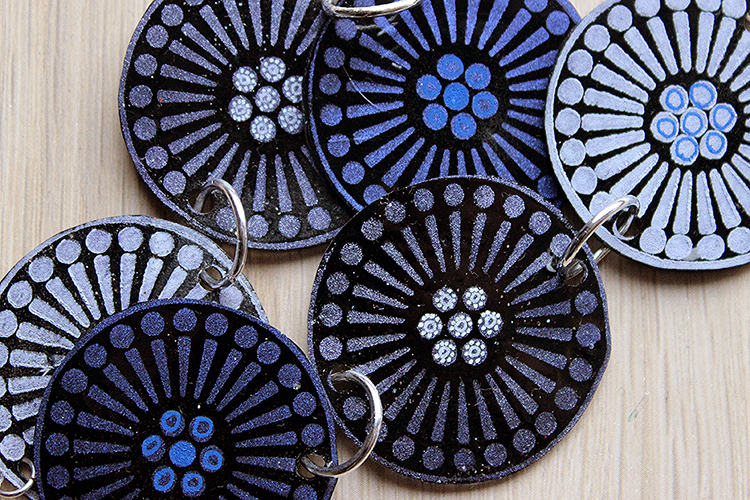
Hi there! It’s Riikka Kovasin here today to share a guest project with you. I actually made a couple projects, so you’ll be seeing me a few times in the course of next weeks.
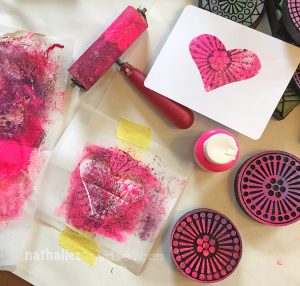
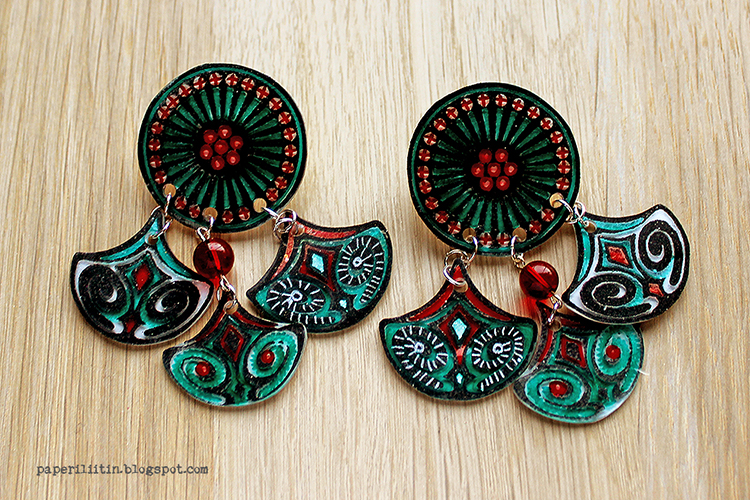
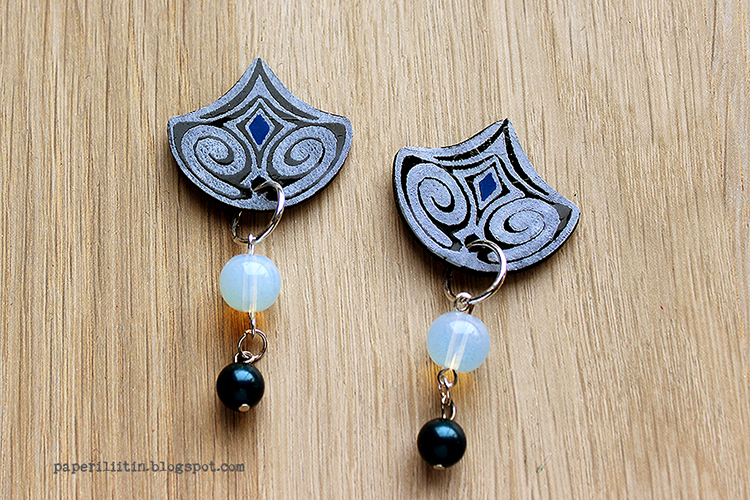
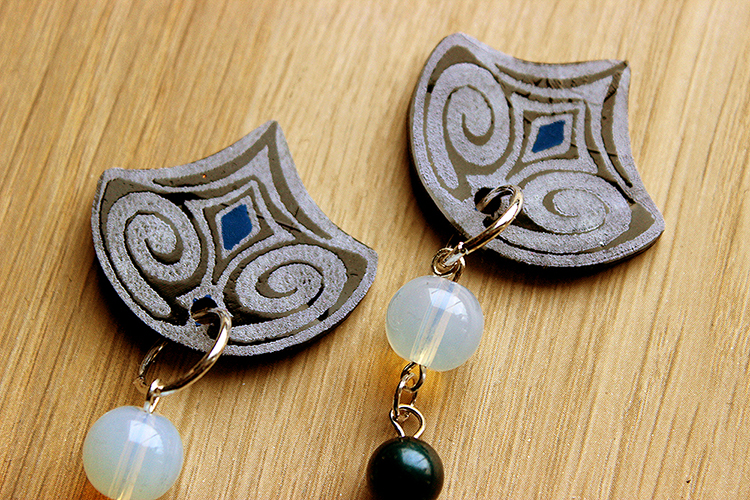
As my first go I made some jewelry pieces. I really love the patterns of the foam stamps and love how satisfying it is to stamp with them, but on their own they are maybe a touch too big to be used as jewelry. As a pendant, maybe, but as I’m more into earrings the images seemed a bit too big. But no worries, I can always use shrink plastic! That way I’m getting the pattern and the feel of the foam stamp, but the finished piece is half the size! So satisfying!
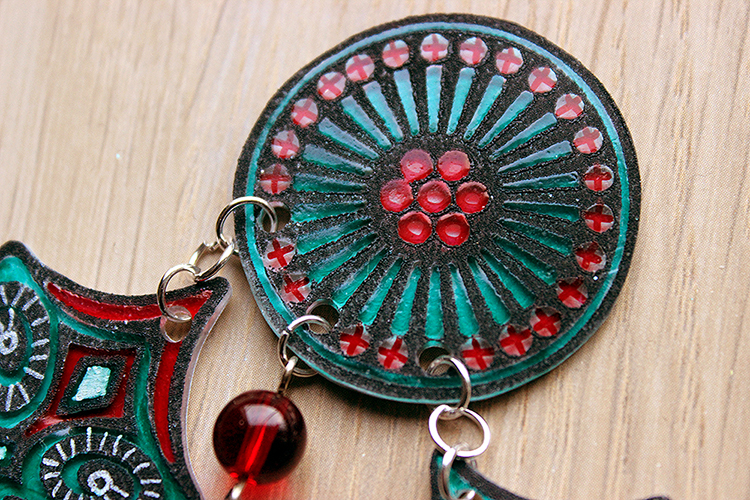
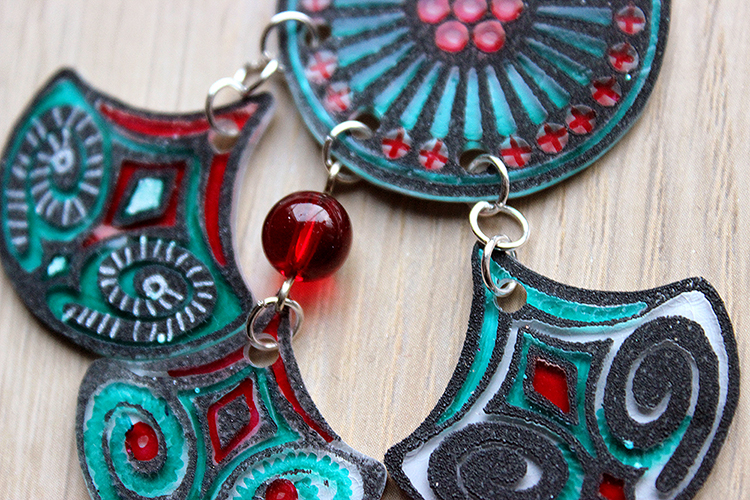
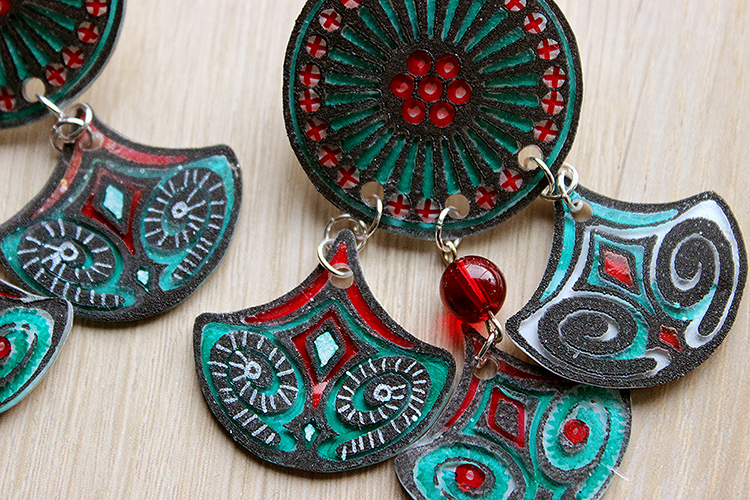
For these three pairs of earrings, I used both white and black shrink plastic. I used acrylic paint to stamp the images and then colored them using alcohol and paint markers. The first pair is made using both the Grove Street and Fairview Fan foam stamp set. The circular piece has an earring stud at the back.
The dangly parts are made using both positive and negative version of the fan stamp set. To make the center fan a little bit longer than the other two I added a red glass bead between the circle and the fan.
The second pair has even more glass beads as there’s just the fans that are stamped. Again, there’s a stud piece at the back.
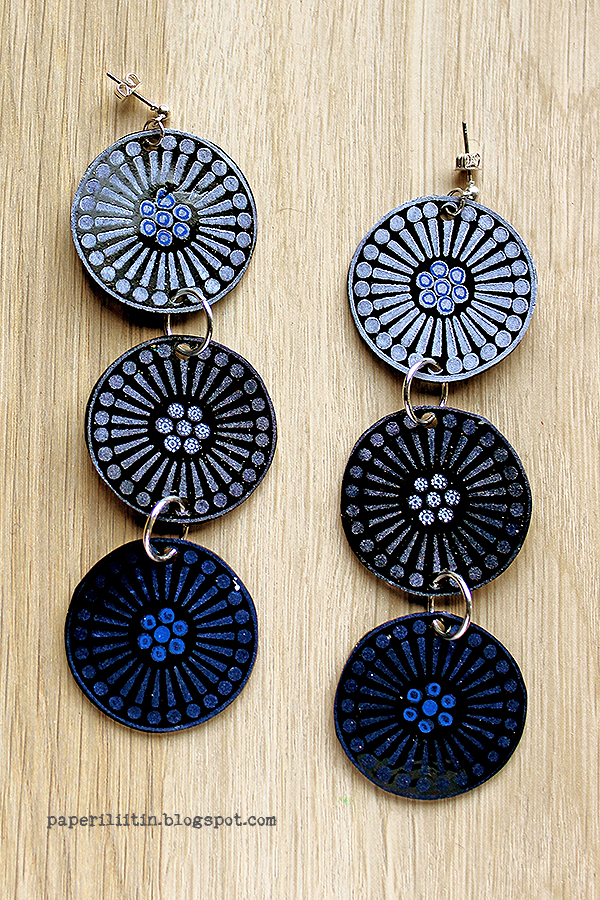
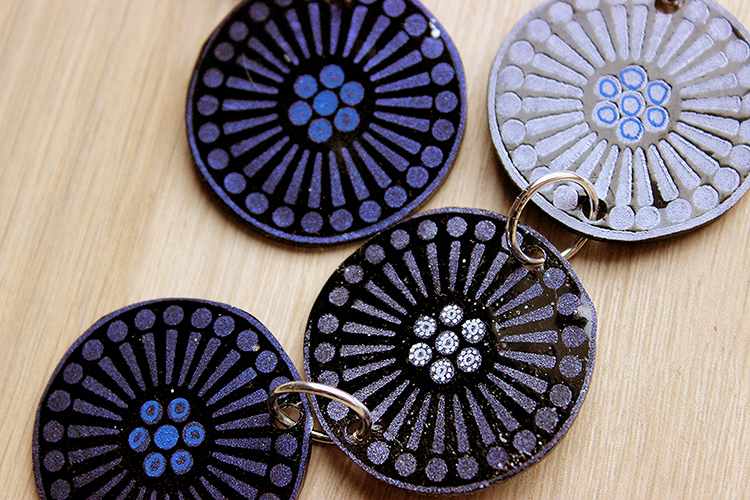
The last, but not least, is maybe my favorite. I made that using the Grove Street stamp, just alternated the color I was using on top of black shrink plastic. The first one is done with inky blue metallic acrylic paint, the second one pale blue metallic acrylic and the one nearest to the ear is then white acrylic paint.
These dangle all the way as I added a stud earring with a little ring on top.
I’m not a jewelry maker but these were so easy to do even I managed them! Now the only trouble is to decide which pair to use!
Stay safe everyone! Xoxo Riikka
Thank you Riikka! Wow who is excited to try foam stamps with shrink film now? I love all three of these possibilities and I love how they could work for a variety of different fashion styles.
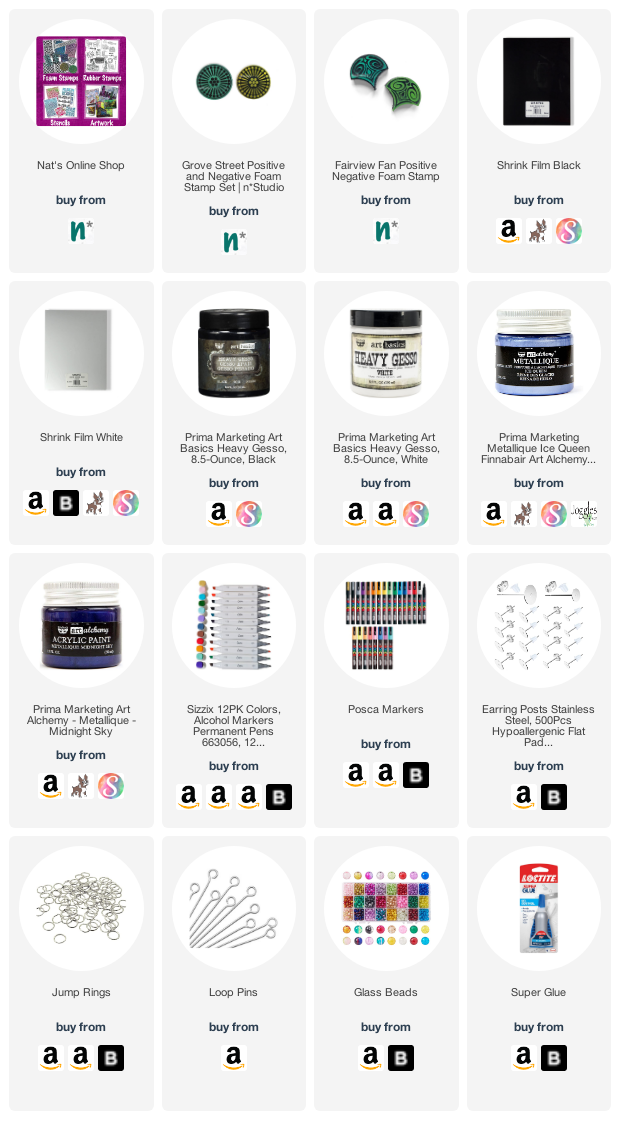
Want to give it a try? You can find all my Foam Stamps here in my Online Shop and here are some of the other supplies Riikka used:
Great lesson. Thanks so much… Who even knew there was black shrink plastic?!!!! I really love the effect you get with that! I’m going to add it to the very long list of things I must try.
Thank you Robin! In my craft store they had this selection of four different kinds of shrink plastic sheets in a pack – black, white, glossy transparent and mat transparent :) That was perfect as I didn’t have to choose which color to pick :D
Awesome post. You read mind. I’ve been wanting to make earrings with shrink plastic for the past few weeks but was struggling with drawing a decent image and coloring so that it wasn’t smudged or looked good. Your stamps and the type of paint solved my roadblocks! Beautiful, beautiful earrings that I think I can actually make. One question, did you sand the plastic first?
Hi Kath! I didn’t sand the plastic first so the earrings are bound to get some wear and tear. Sanding helps the paint to grab the surface better. Or then just add more paint when it seems to wear off :D
Thanks for that input. I just seem to smudge the colors. However, I noticed when I sanded, you could see the marks, which I do not like. I can’t remember what people use to glaze the plastics.
I’ll have to check it out. I just love how the paint you used worked with the stamp and it didn’t look like it smudged at all.
The stamps you used are sold out. I’m gonna wait for restock. That’s how much I liked your earrings!
I’m so happy to hear that you liked these so much Kath!.
As you are stamping on top of a sleek surface with a slippery paint, it may slip and smudge. If you look closely to the other of the white stamped circles (with gesso), it’s a bit thicker than the other. A slight slip or turn caused that.
My tips would be to use a heavy body style paint, more gel-like, use just a little of it, and to use light pressure when you lay down the stamp. Another way is to actually put the stamp to the table, pattern side up with the paint added and carefully place the shrink plastic on top.
Hopefully this helps when the stamps have been restocked and you get to make your jewelry pieces!
Love this idea! Rikka…you are always so clever and original, combined with a dose of practical. Thank you both for this “bonus”! It was a nice surprise.
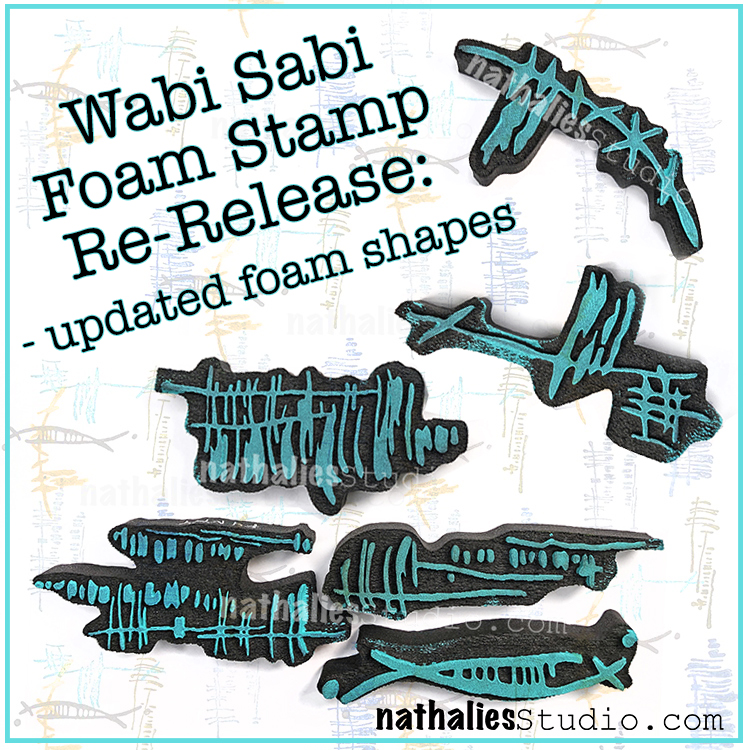
We’ve updated our Wabi Sabi foam stamps and wanted to share the news with you :) You may recall that before the foam surround was just rectangular – well now it’s cut to mirror the design. I find them easier to identify when I’m going through my stamp stash and also – the backsides are now funky abstract shapes that are worthy of stamping too!
Here are some of the stamps in action:
I love to use them for mark making and to add some random line elements to give a background extra interest.
They look great as bold marks too if that is your style…
…or as something more subtle. However you roll today!
Check out all my foam stamps in my online shop – lots have been restocked.
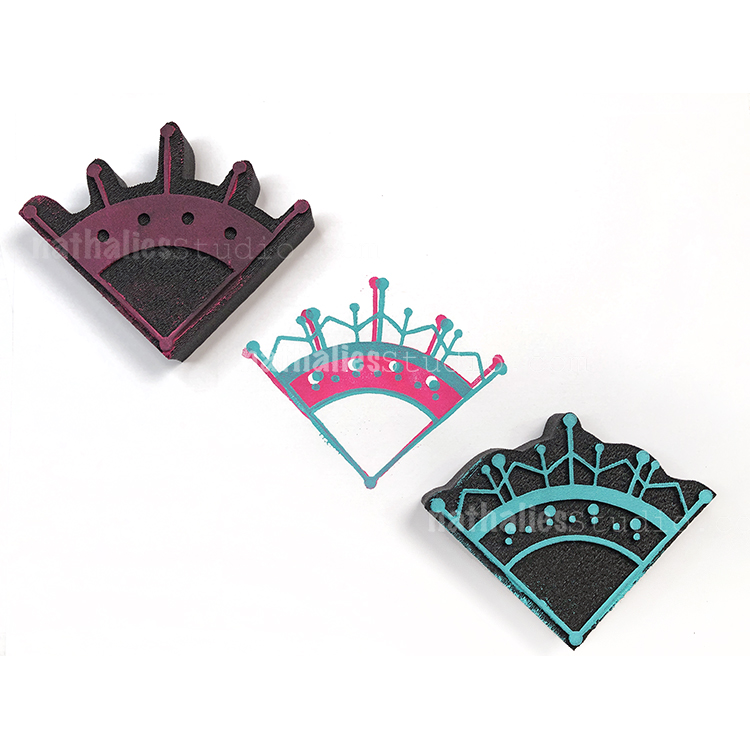
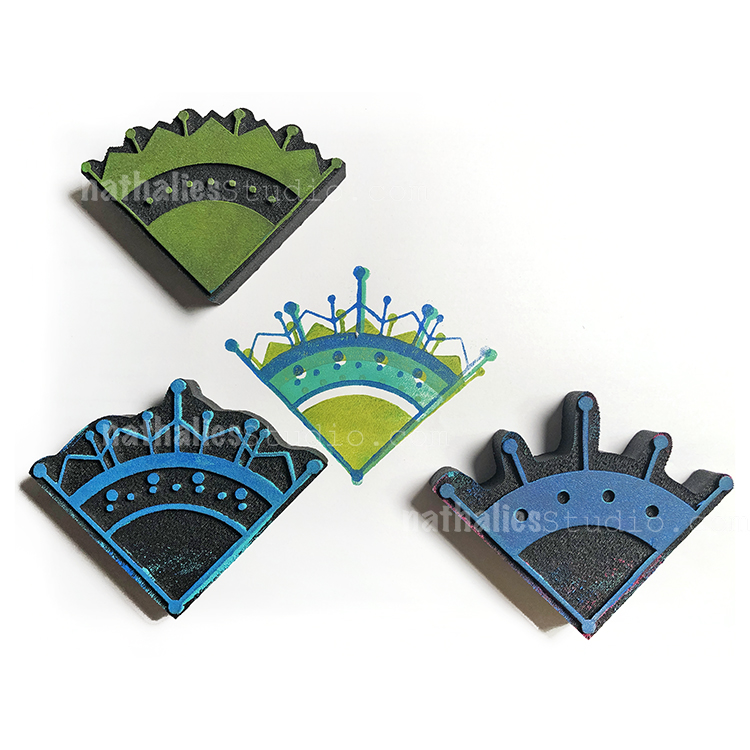
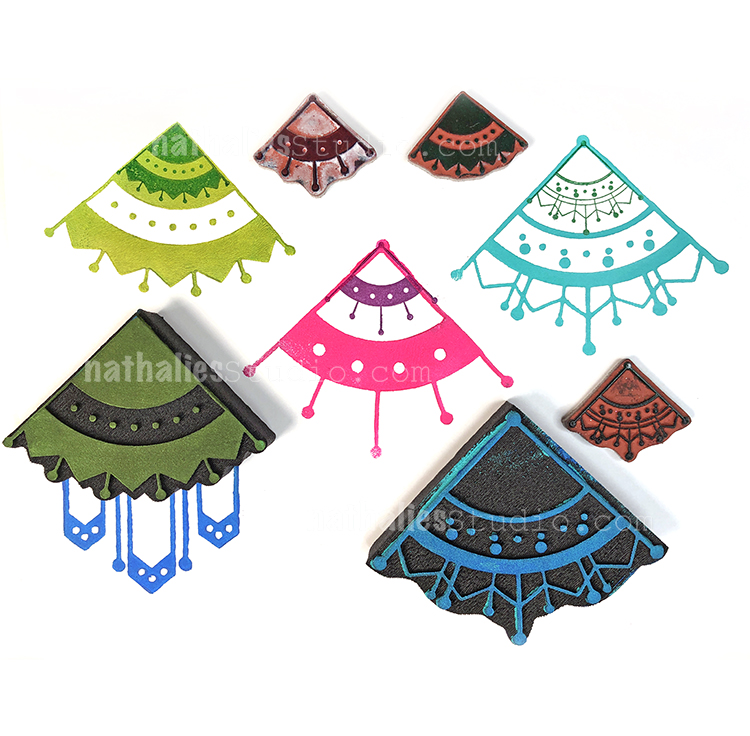
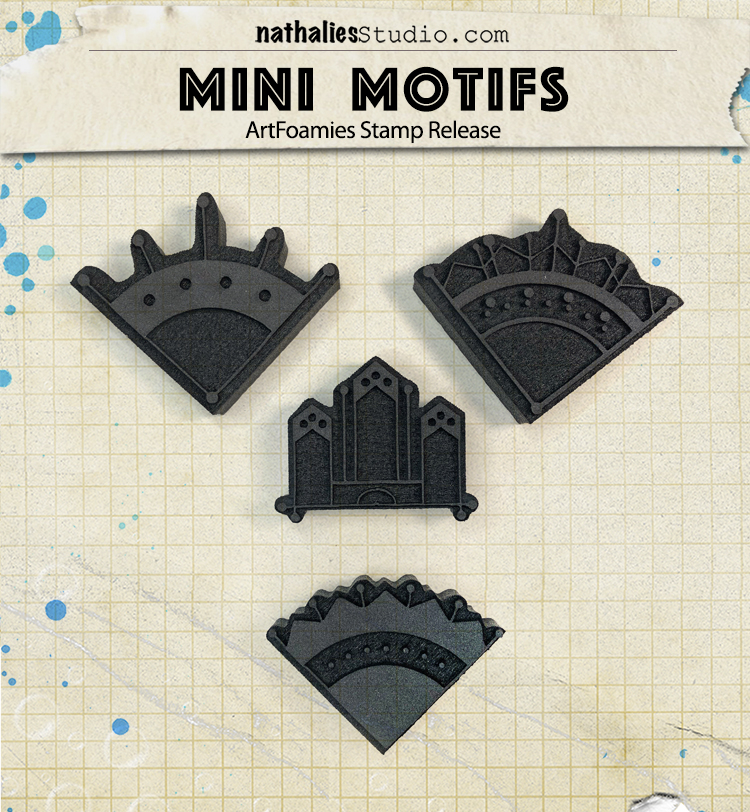
Each of the 4 Mini Motifs stamps in the set is inspired by some of the designs on an old fireplace in my home. I love the idea of drawing inspiration from this bit of history and thinking about the craftsman who carved the designs so long ago.
The triangle shaped ones are fantastic for layering up. I also discovered that they work great with the Mini Motifs Rubber Stamp Set!
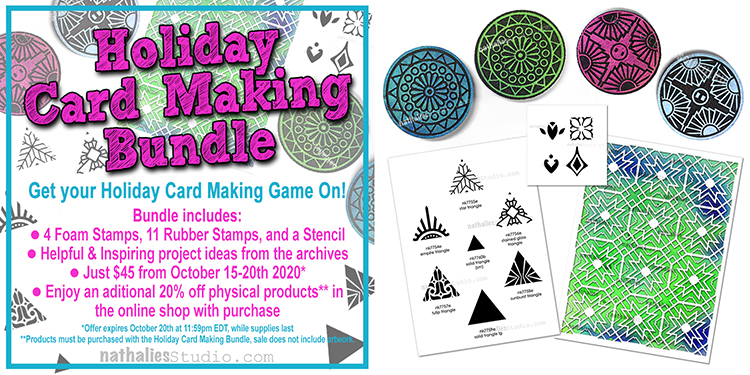
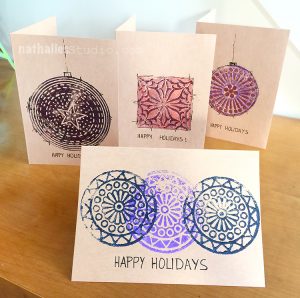
Are you ready to get your Holiday Card Making Game on??? I’ve put together this special product bundle to help you create tons of unique holiday cards for everyone on your list this year.
My Holiday Card Making Bundle includes a selection of foam stamps, rubber stamps, and a stencil, as well as some inspiring card making ideas from our archives to help you on your way.
The bundle is just $45, a big savings off the $71.60 regular price, and supplies are limited so hurry in to get your bundle before they run out for good. This offer expires October 20th at 11:59pm EDT.
Special 20% Off Deal: Also, during this offer, if you purchase the Holiday Card Making Bundle you may receive an additional 20% off any other physical products (foam stamps, rubber stamps, stencils, ink pads) that you order at the same time. Just use the coupon code holidaycard20 when you check out. Artwork is not included in this offer.
Here are the stamps and stencils that are included in the set:
Valley Road Positive Negative Foam Stamp Set
Broadway Positive Negative Foam Stamp Set
Triangle Love Cling Rubber Stamp Set
Fan-Fare Cling Rubber Stamp Set
Toledo 9×12 Stencil
In total you will receive 4 foam stamps, 11 cling rubber stamps, and a 9×12 stencil.
Once you purchase, you will receive an email with links to project ideas from the archives to get you started on your holiday card making.
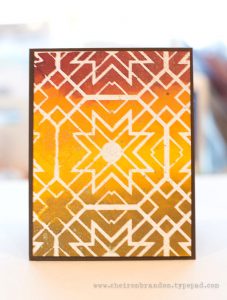
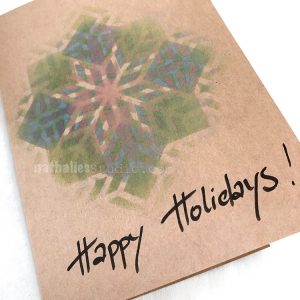
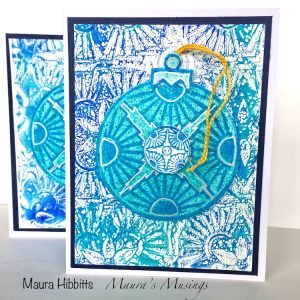
Here are some of the tutorials from our archives that will come with the Holiday Card Making Bundle once purchased:
This bundle offer is only available through October 20th at 11:50pm EDT. And don’t forget to use the coupon code holidaycard20 to receive 20% off any additional physical items in your order.
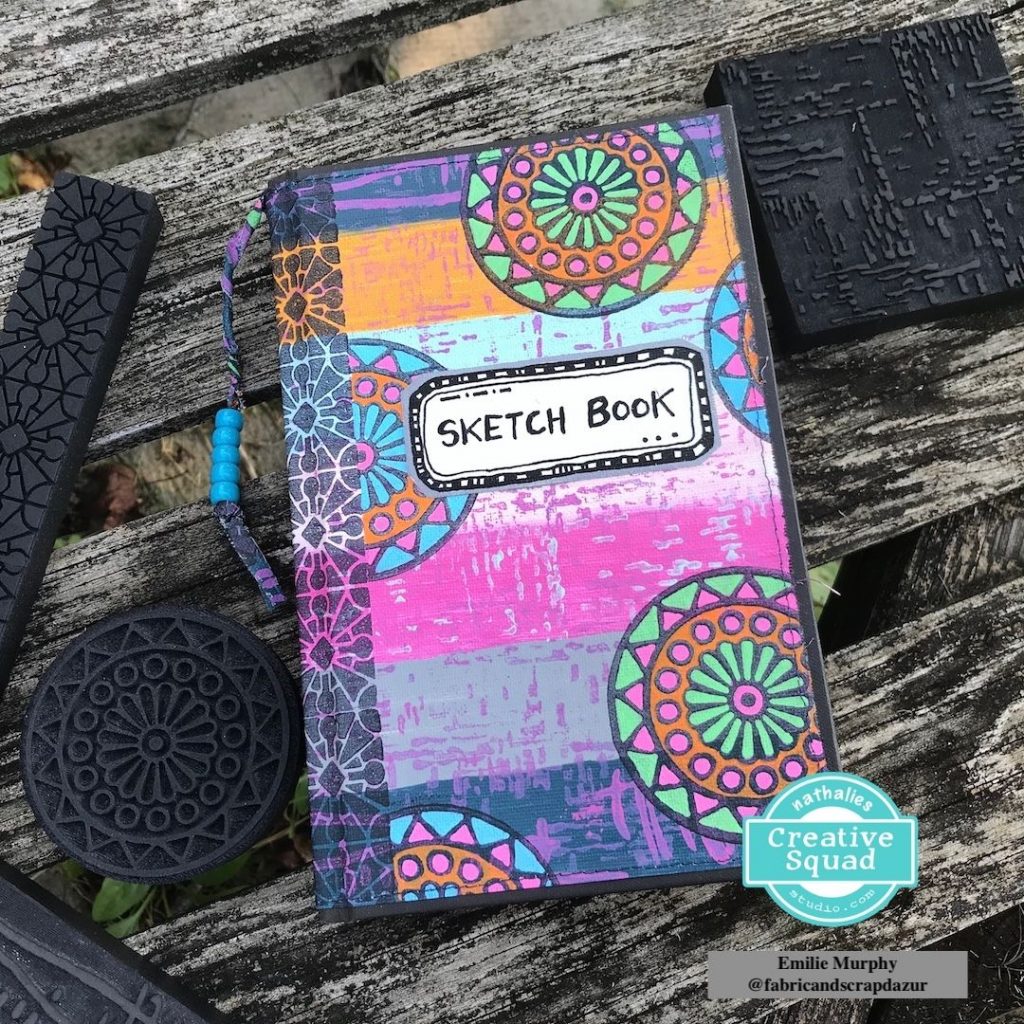
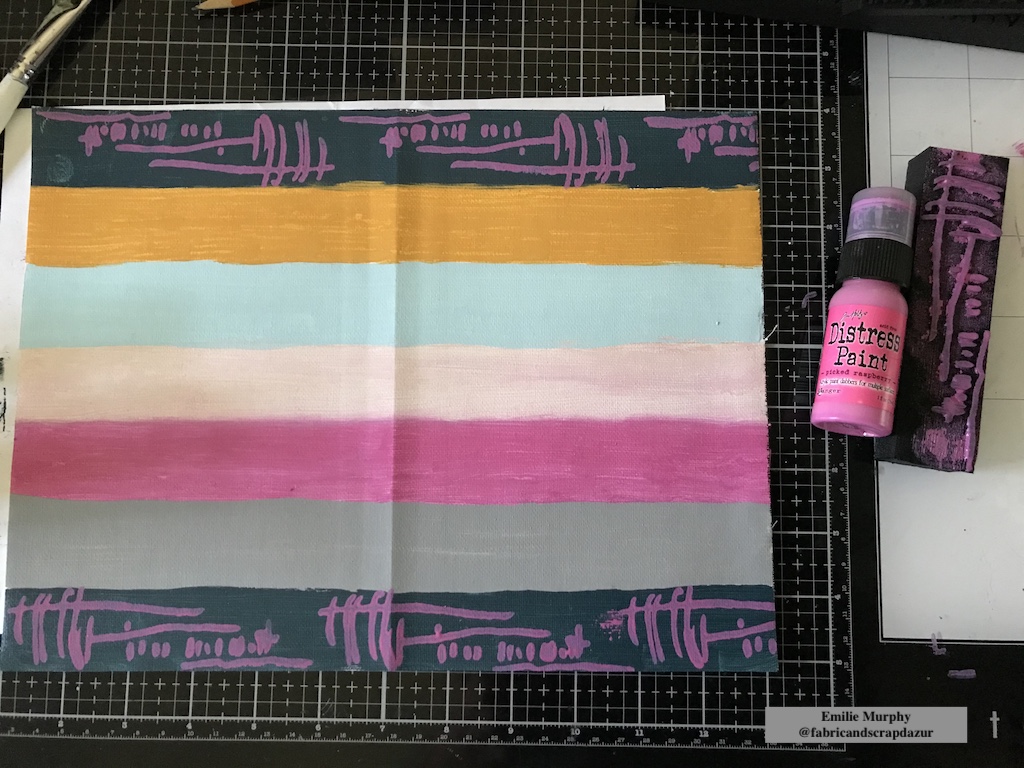
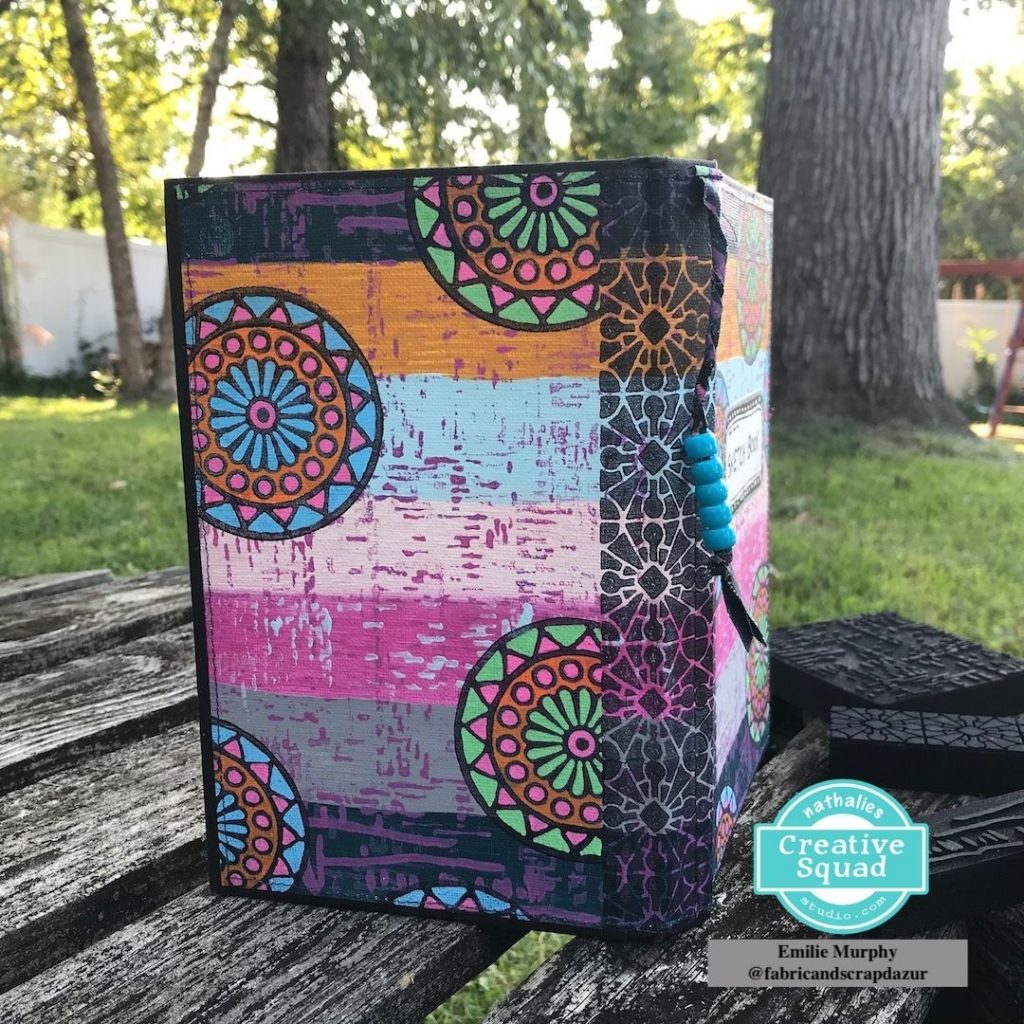
Hello from my Creative Squad! Today we have a project from Emilie Murphy that will transform the outside of your art journal. Emilie is using my Buenos Aires Border, Valley Road, Gnarly, and Signals foam stamps and this month’s theme: A New Day – Let’s try something new today :) Although these are tumultuous times and we never know what each new day will bring, it also seems like the perfect time to throw caution to the wind and just jump into something new with both feet. Try a new material or technique or approach. Why not? Today is a new day… and tomorrow is too!
Hi there! Hope you are doing well.
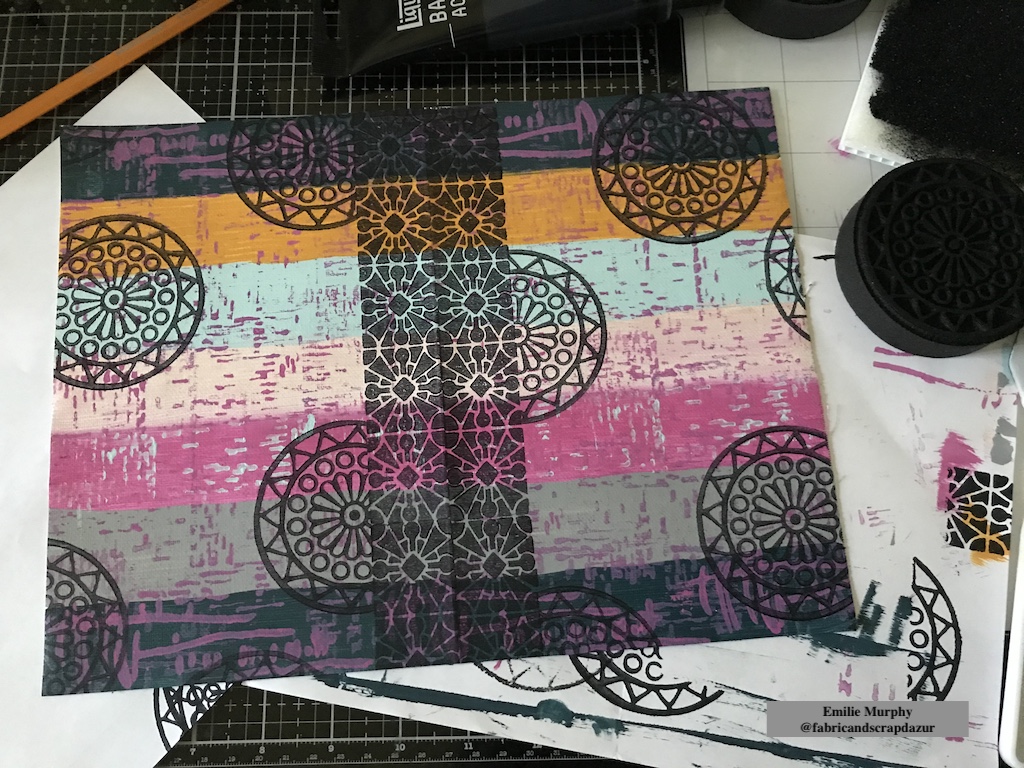
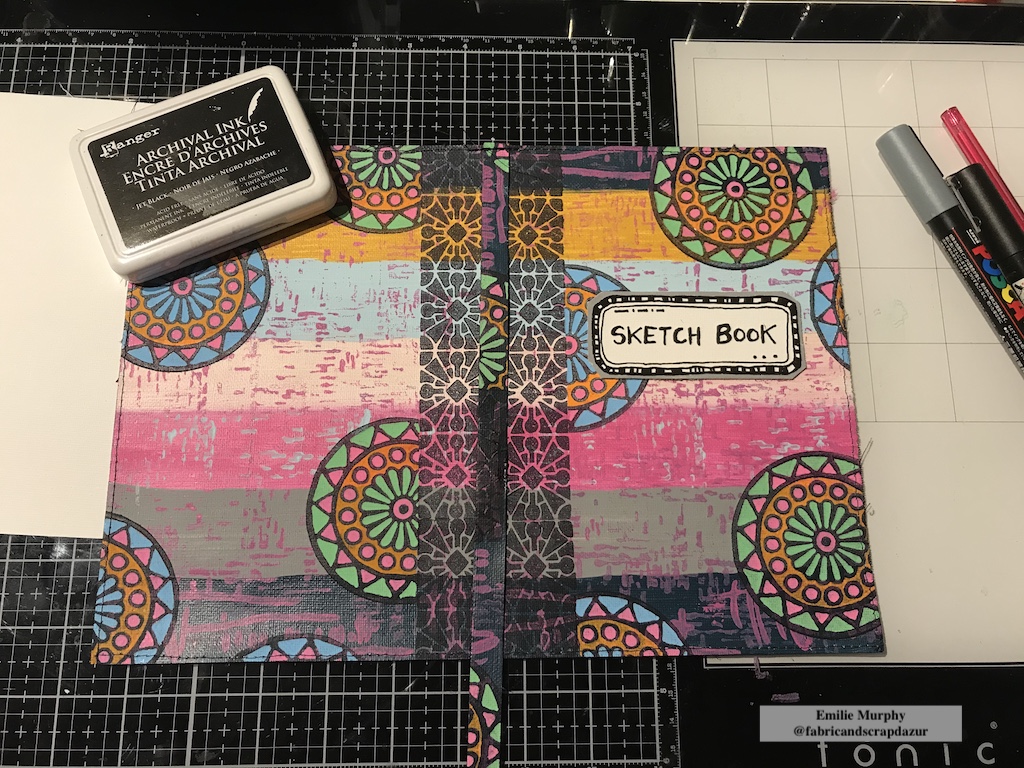
As we have to try something new this month, I decided to make a cover for my sketchbook with a sheet of Canvas. It’s not what I usually do when I make a cover for an art journal or embellish the cover of a notebook that I purchased. Therefore it’s a new technique for me, and I tried using only foam stamps and a single canvas sheet.
Let me show you how quick and easy this technique is. Foam stamps are such great tools for that purpose.
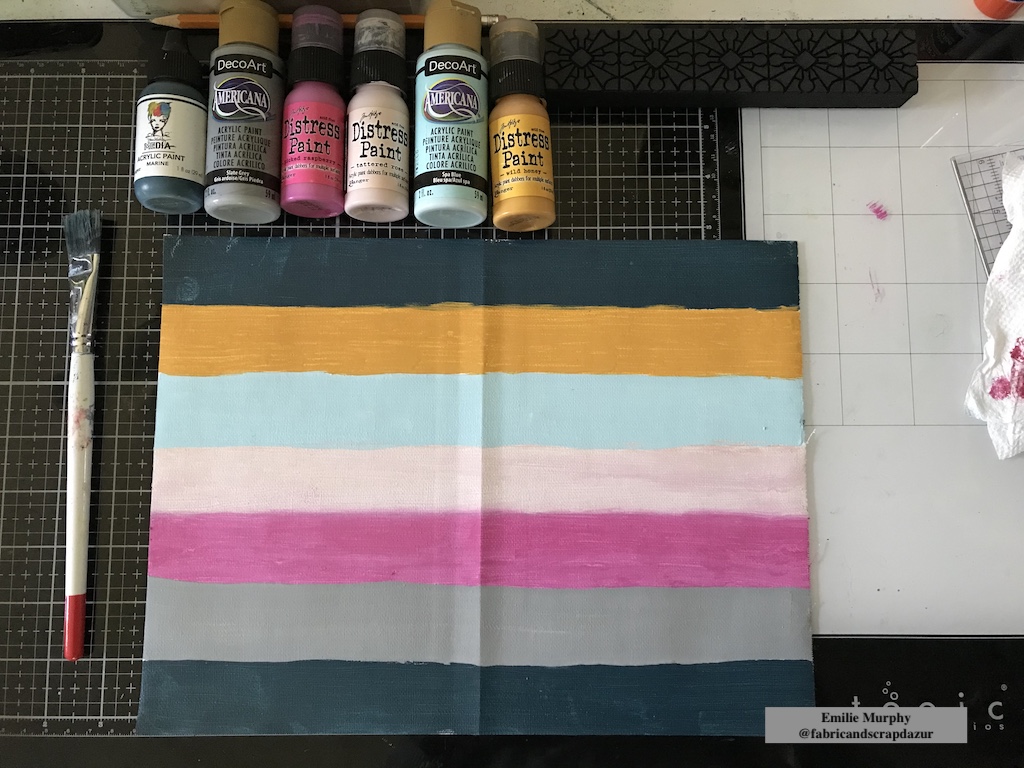
I started to trace lines to get equal strips on a 9×12 canvas sheet. I used the side pre-coated with gesso.
Then, I applied different acrylic paints I have in my stash to color the strips.
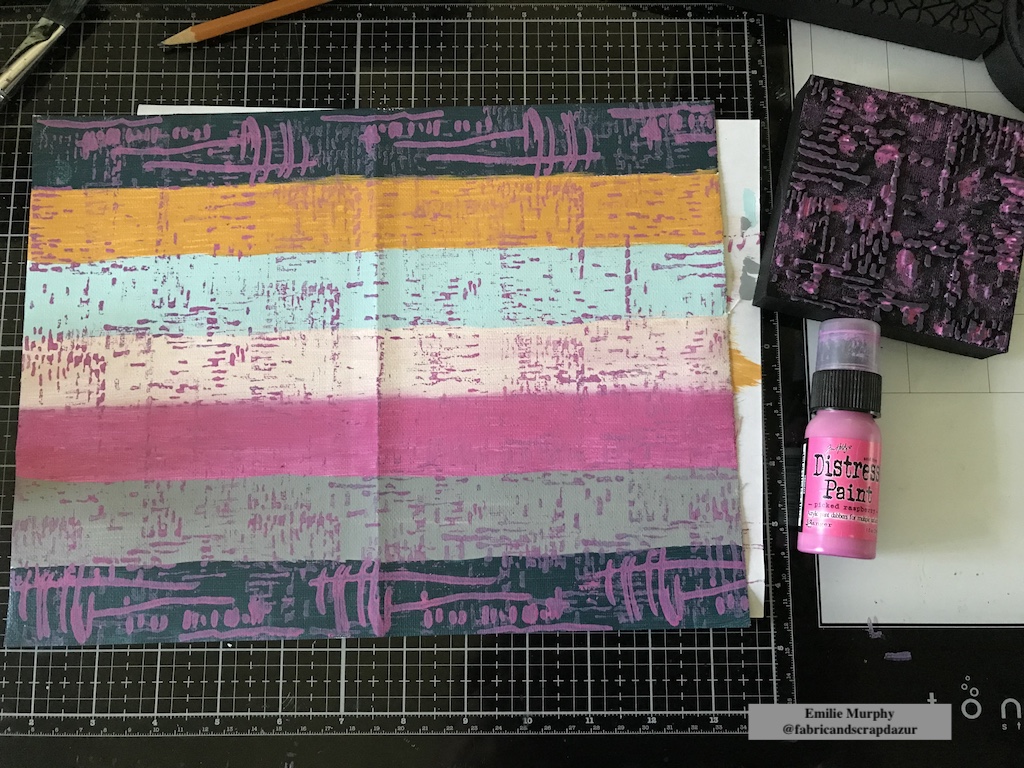
I added some texture with the Gnarly and Signals foam stamps on all the background to unify all the strips together.
As I wanted to show up an hinge of my sketchbook, I stamped the middle part of the cover with the Buenos Aires Border foam stamp. First, I slightly folded my canvas sheet in half to mark the middle. Then, I used a ruler to be able to stamp straight. I didn’t mind to have an imperfect impression for the background texture but for the hinge part I wanted to get a crisp impression so I used a “stamp buddy” (that can be purchased on the ArtFoamies website) that allows you to apply paint uniformly and smoothly on the stamp.
I could have used a brayer instead but, as none of my brayers are brand new, it leaves some marks than I didn’t like for this purpose.
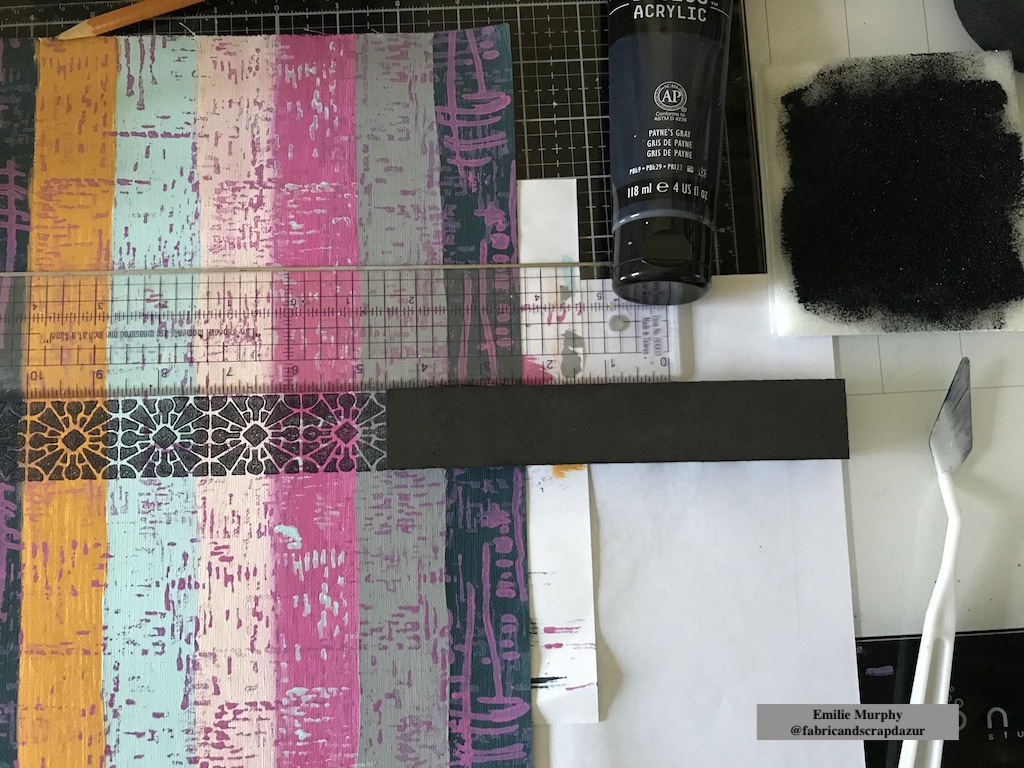
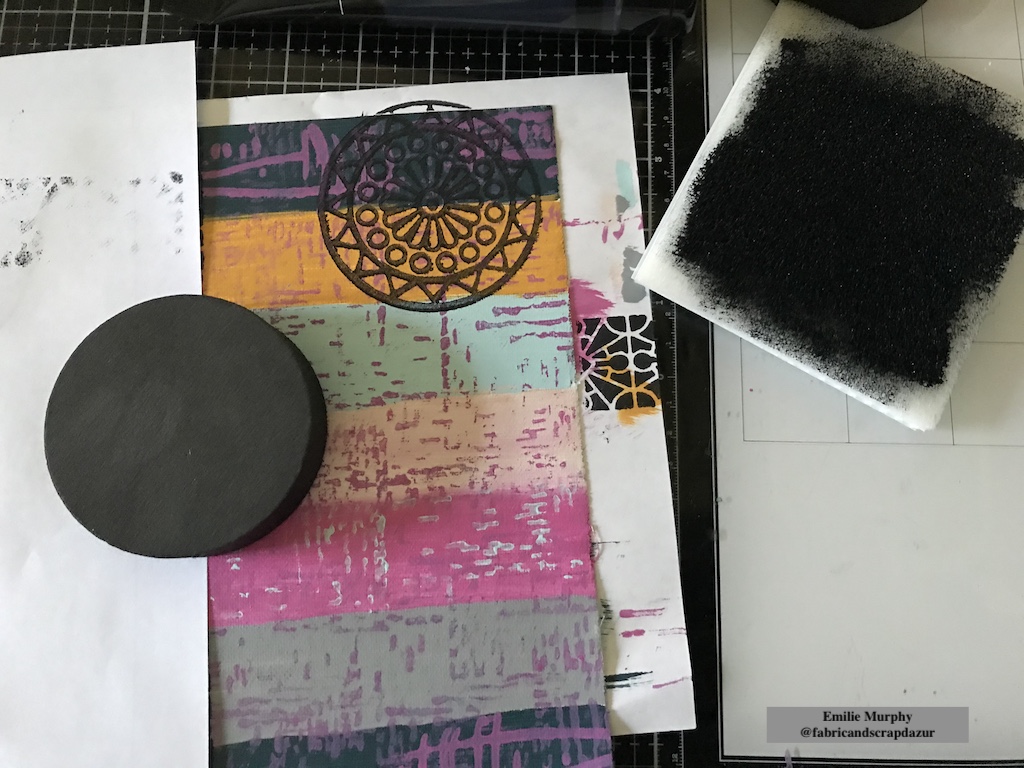
Next, I stamped repeatedly the Valley Road negative stamp to add more interest. Once again, I used my “stamp buddy” because I wanted a crisp impression.
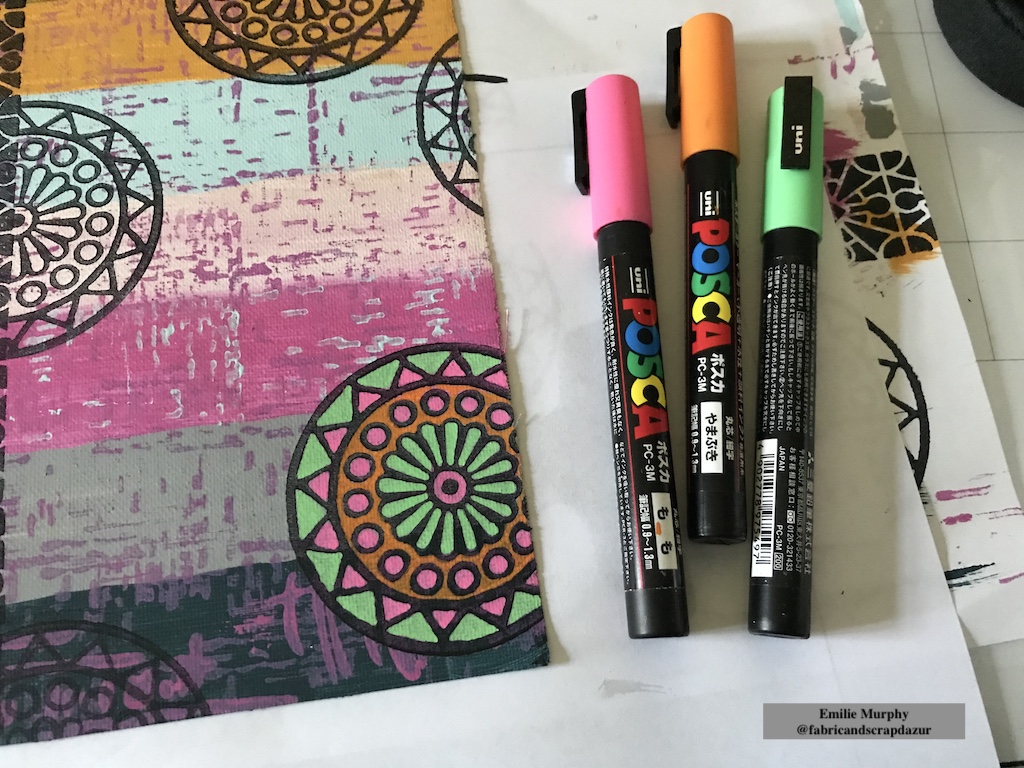
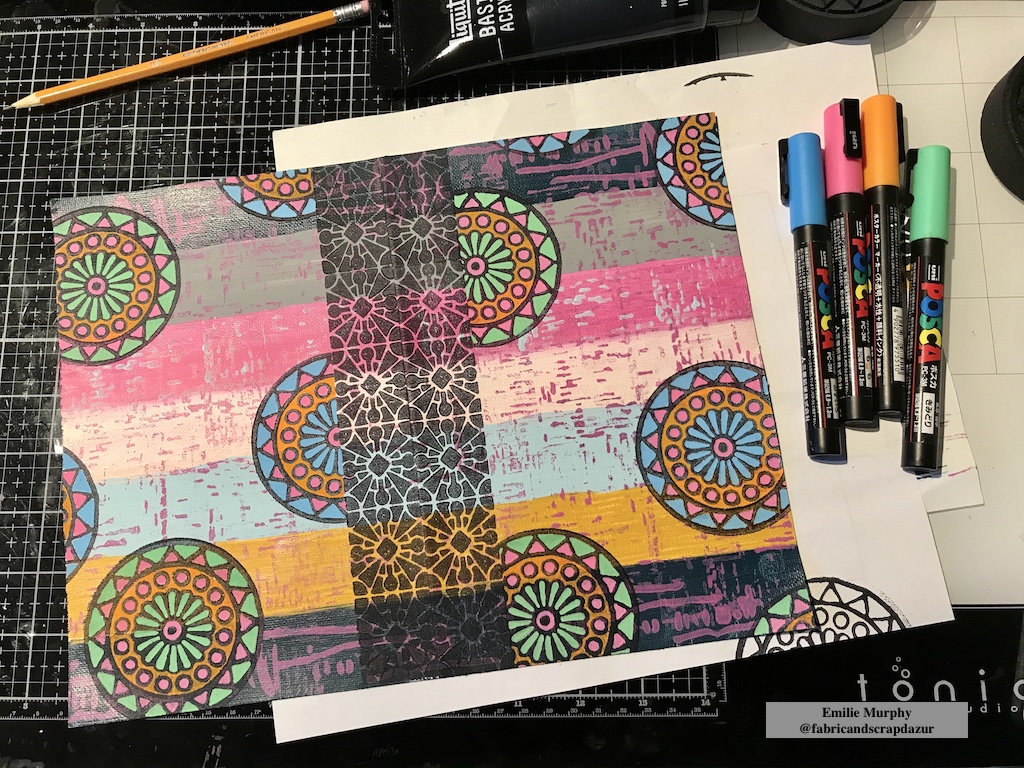
I colored my entire Valley Road motifs with some Posca pens. I just love the way that it allows the Valley Road design to pop out and create some dimension.
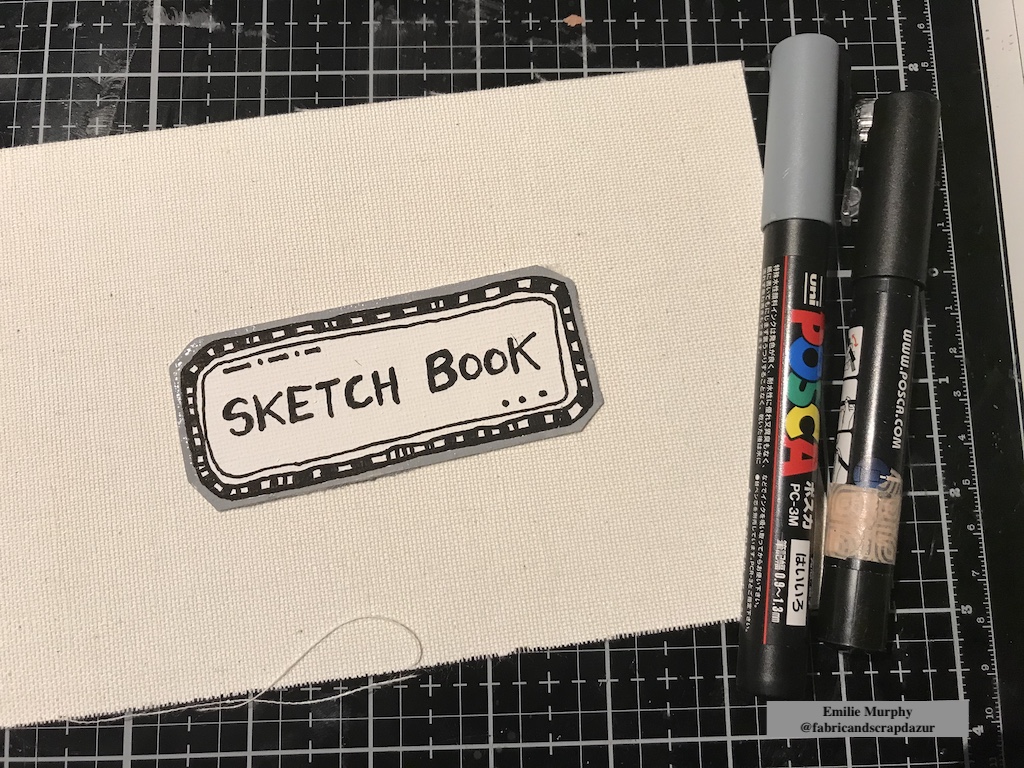
In order to complete my cover, I created a simple label with an extra piece of canvas sheet.
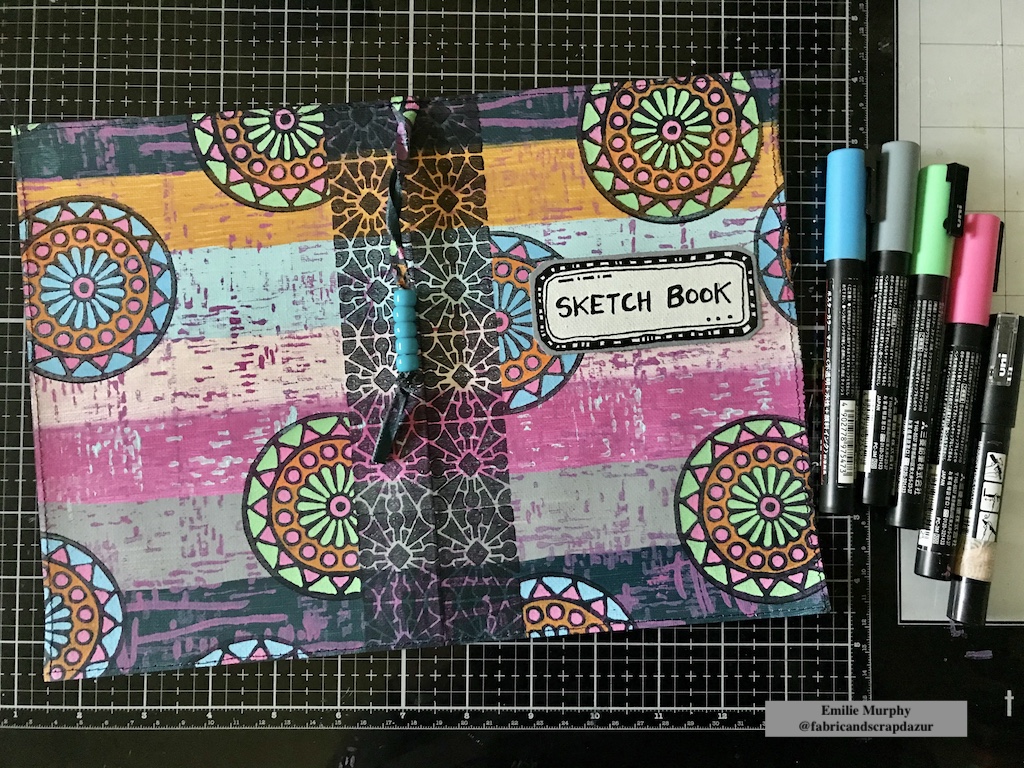
I finished up my cover by machine stitching all around the edges. This step is optional if you don’t like to sew or don’t have any sewing machine.
Tip: You can also simply create a false stitching line with a black maker.
As you can see I also stitched in the middle the remained half-inch strip I got when I cut the canvas sheet to fit the height of my sketchbook.
I embellished the middle strip with some plastic beads. I first twisted the strip and added some dots of glue here and there to keep it in shape. Then I added the beads and tightened a knot to secure it. I think it’s a nice addition to the cover.
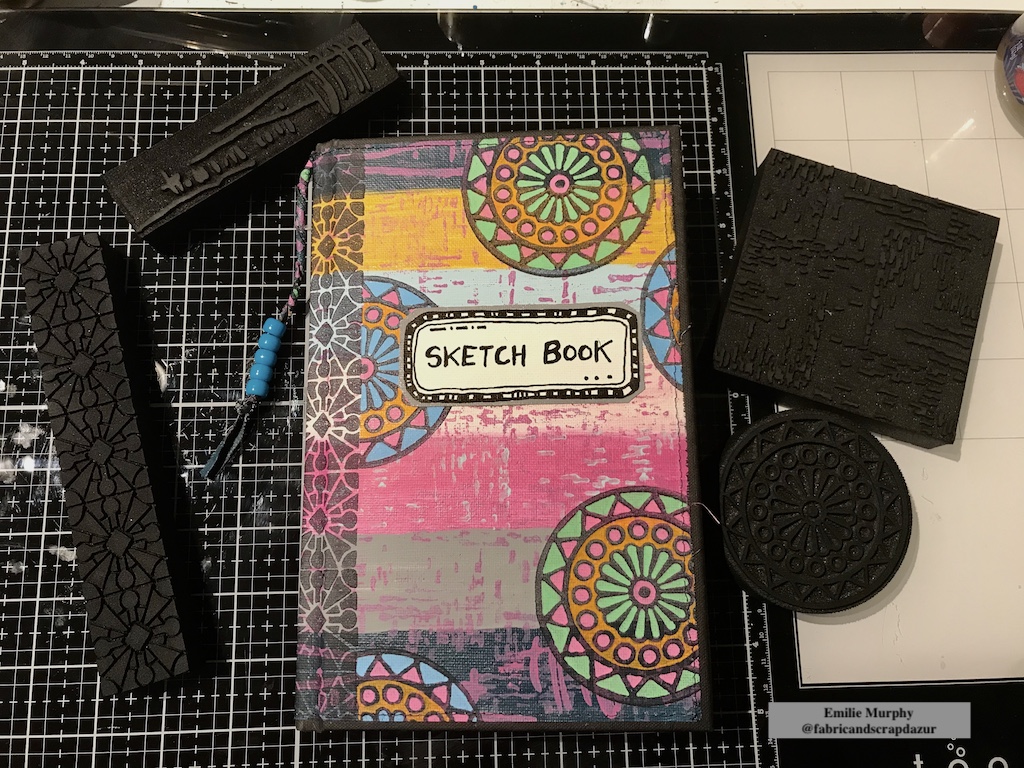
Finally I glued down my canvas sheet on my sketchbook. I used PVA glue that I applied uniformly with a brush. I think it is better to use wet glue for this type of project because it allows some time to make adjustments if needed. I first started to apply glue on a half of the cover and burnished it well with a bone folder. Then I glued down the second half. This way the canvas sheet will adhere well. It also removes potential air bubbles and won’t peel off with time.
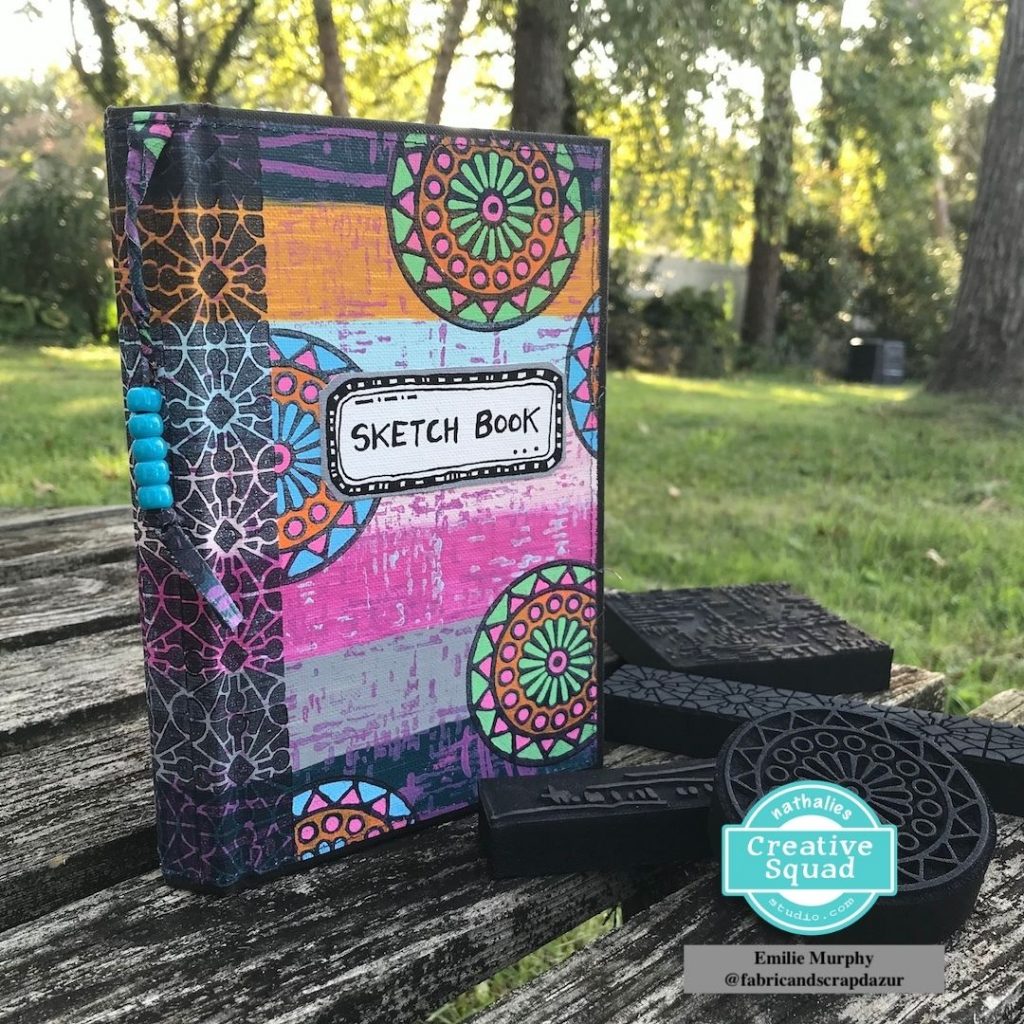
Personally I enjoyed trying something new this month. Hope you will take the plunge and try something new as well. Foam stamps are so fun to use specially for this kind of project.
Have a great rest of the week! See you next month!
Thank you Emilie – love how those colors make the foam stamp patterns really pop!
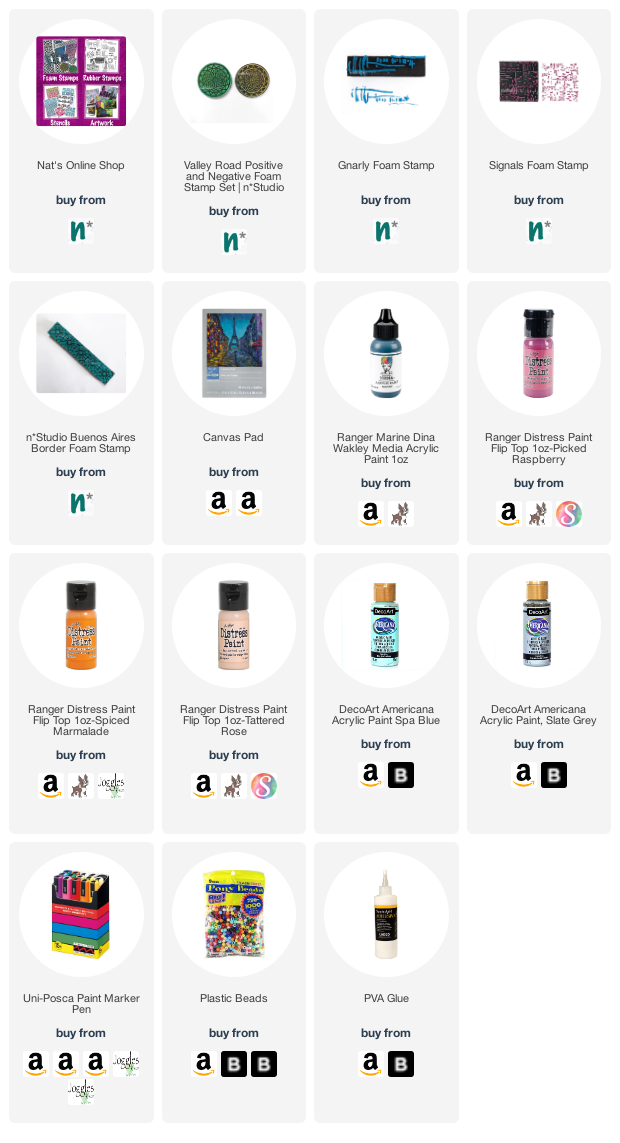
Give it a try: you can find all my Foam Stamps in my Online Shop and here are some of the other supplies Emilie used:
Feel inspired? Working on something yourself that you’d like to share? I love to see how you interpret our monthly themes. Email me how you used my stencils and stamps with the theme and email me an image – I would love to share your projects in my next “n*Spiration From Around the Globe“.
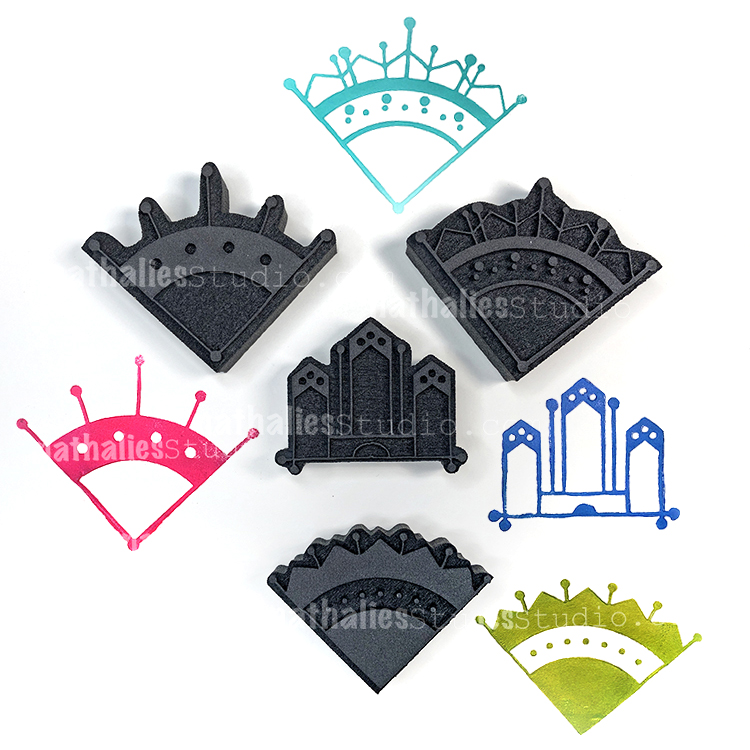
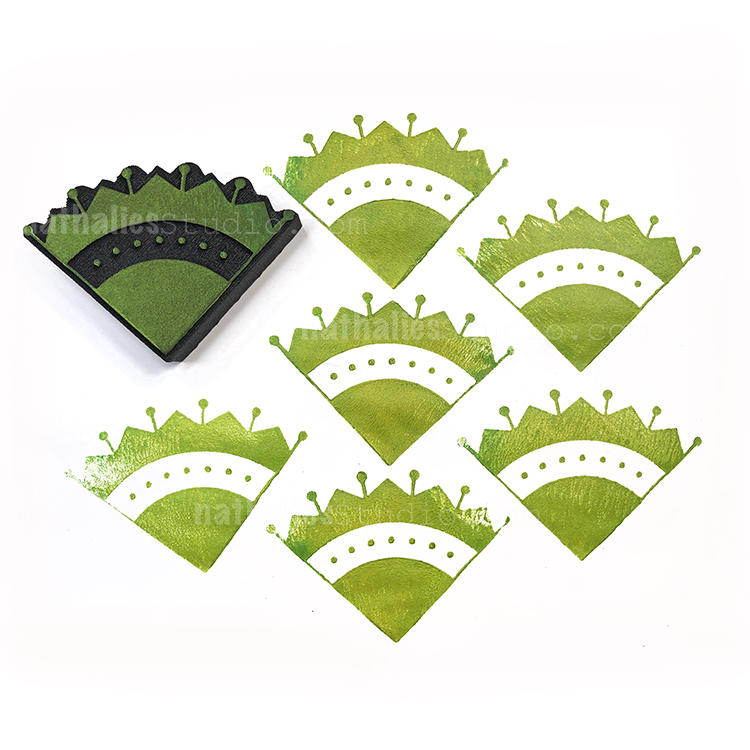
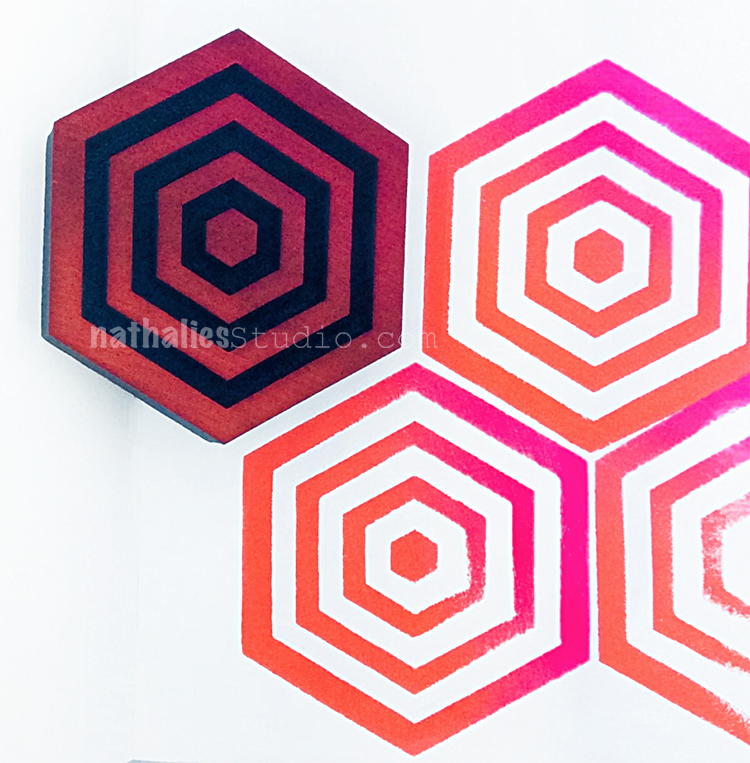
Space Oddity – a hex shape that pulses with energy…
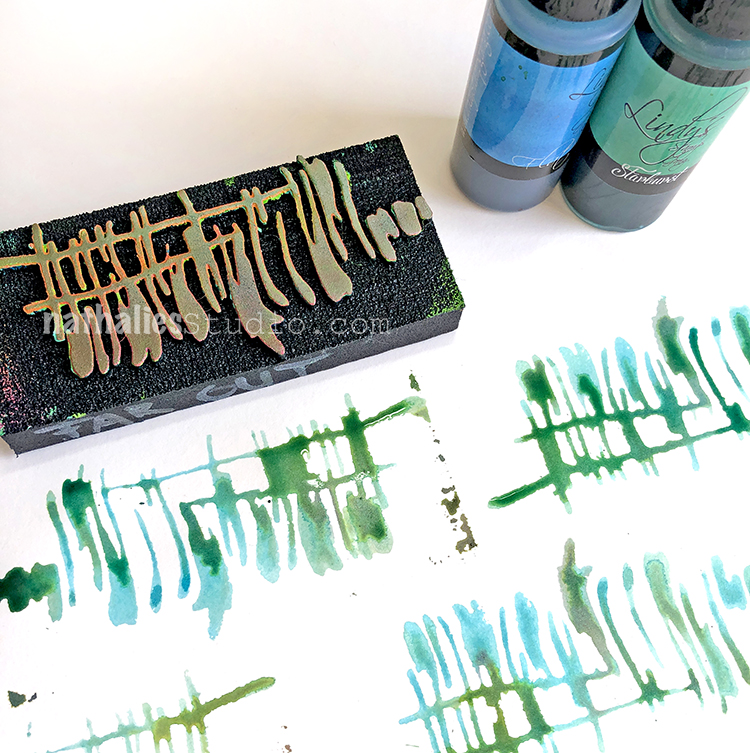
…and Far Out – your new favorite stamp for mark making or visual texture!
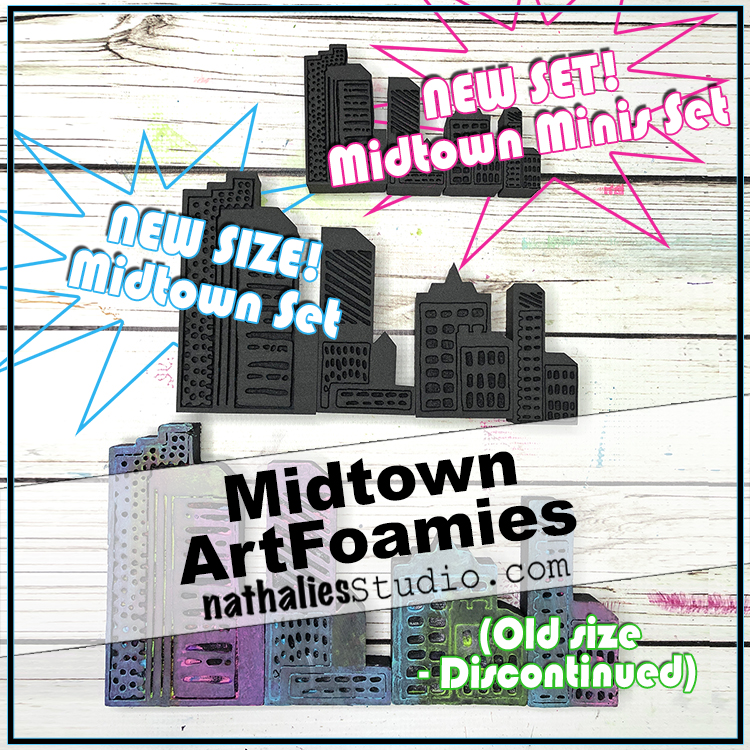
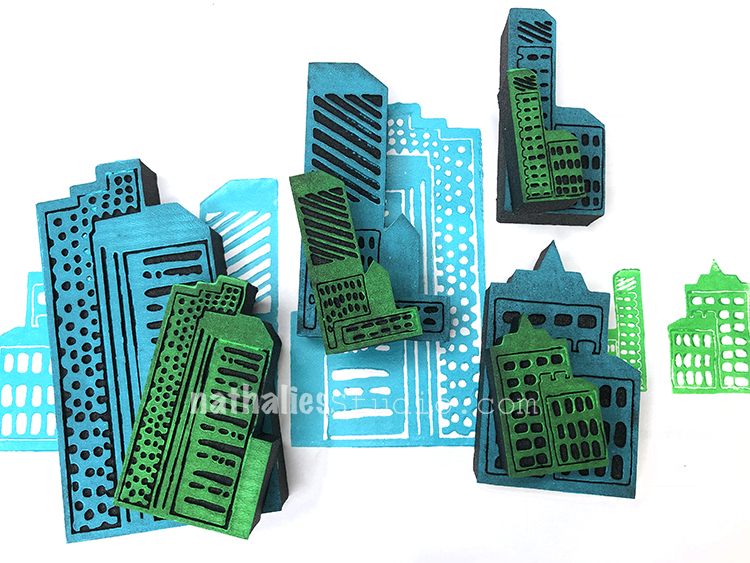
Also in there are 2 NEW sizes for my Midtown stamp set. This 4 piece set of buildings is my go to for a funky cityscape. The Midtown Set is now in a new size and I’m happy to also announce there is now a Midtown Mini set too!!! Super cute little buildings. Check it out below:
Both sizes are going to be a lot of fun to play with.
Hurry into the Online Shop and use the coupon code FOAM20 to save 20% off your foam stamp order. Sale ends tonight, June 14th at 11:59pm EST.
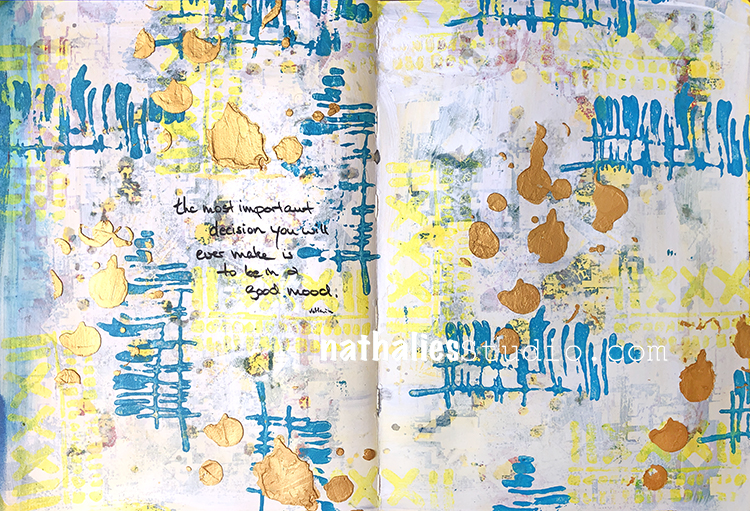
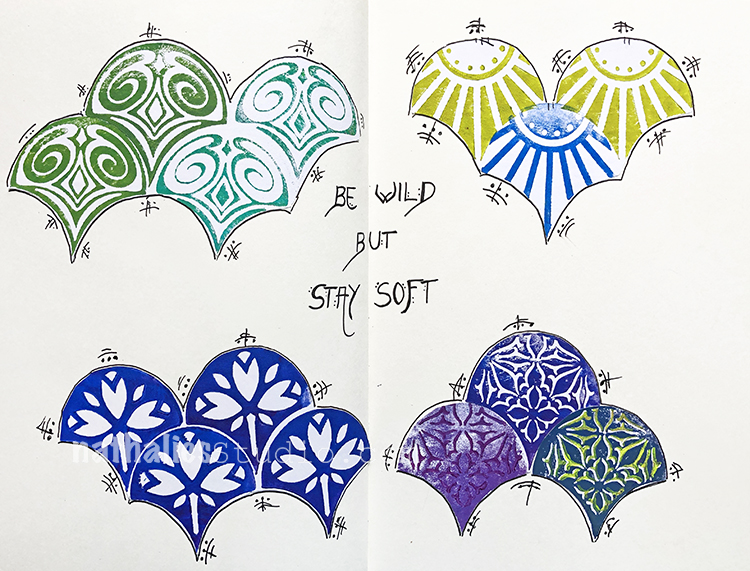
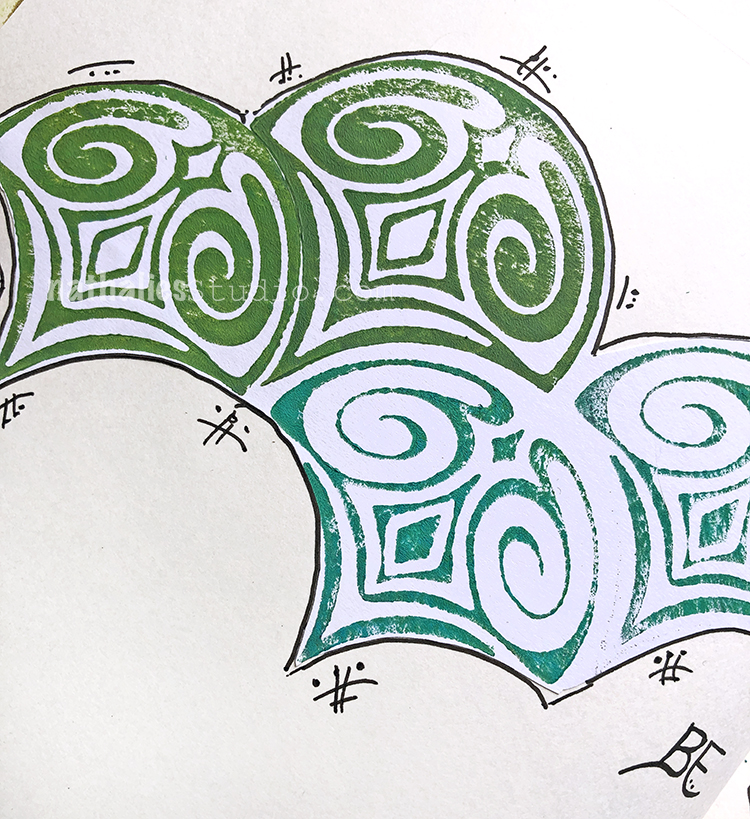
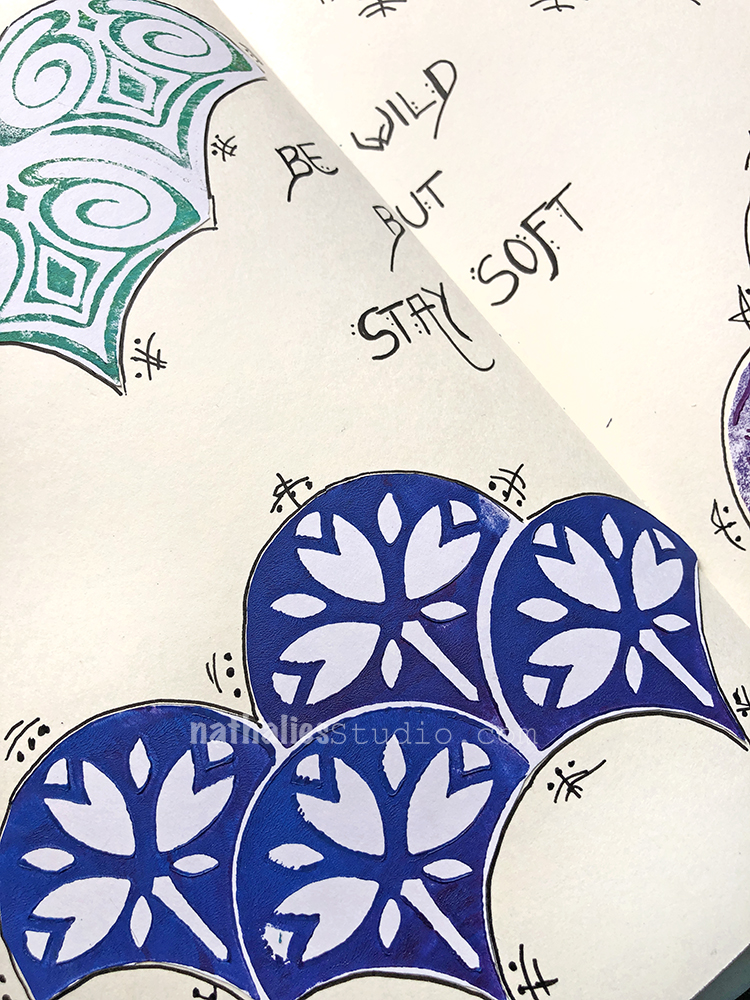
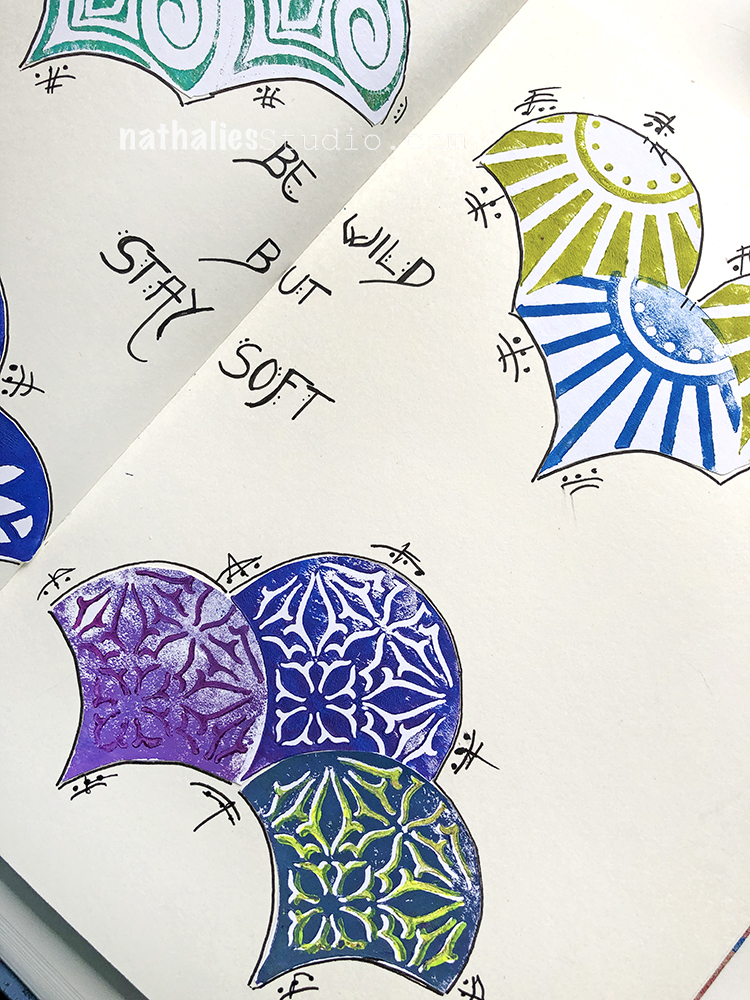
For this spread I stamped out my new fan foam stamps with acrylic paint onto some white paper, cut them out, and collaged them into my art journal. Here is my Fairview Fan Positive Negative stamps.
And here is one of the stamps from the Jewett Fan Positive Negative pair. I went back into these elements with a bit of dots and marks using the new Winsor Newton fineliner pens – which I am super impressed with btw and links are below for them if you are also a fan of good fineliners :)


Great lesson. Thanks so much… Who even knew there was black shrink plastic?!!!! I really love the effect you get with that! I’m going to add it to the very long list of things I must try.
Reply