Blog: RubberMoon

When in Doubt – Art Journal

When in doubt…add flowers!

I was just playing around with my new RubberMoon Circle Jumble Sets. Oh my …I am so in Love with them …

I did those little mandalas using the small and the big set and also incorporating the “topper stamp” which can be used to to turn the circles into ornaments, but also as borders or like here into part of the mandalas.

I used the RubberMoon Moonlight Duo black – I love that you can create black and grey tones with the black and white divided ink pad. I need a lighter hand then stamping – hahahah ;)

Fun fun fun – I could have also colored the mandalas in …but I will do that another time- I really liked the black and white effect.

Here are some the supplies I used


Leave a comment

NEW Rubber Stamps and Mini Foam Stamps!!!

Are you ready for some new releases and samples? – There is a lot fun stuff in this post -but first- the designs :)

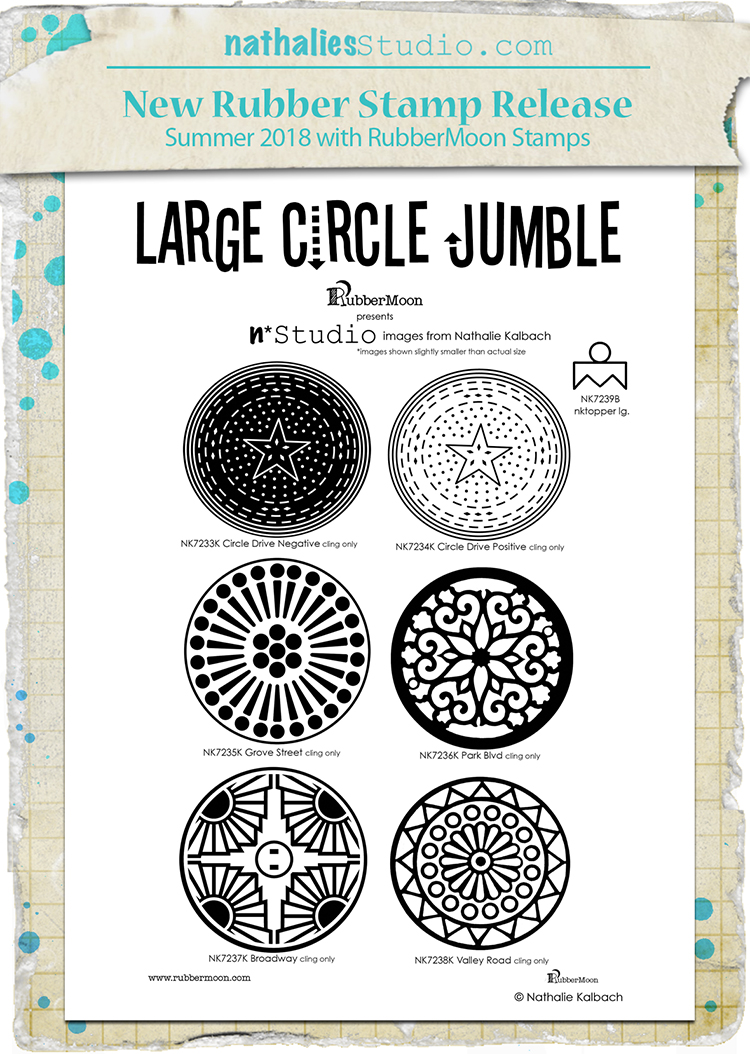
This new RubberMoon cling rubber stamp set includes 6 large circular stamps along with one ornament topper stamp. Circle stamps measure approx. 3″x3″.

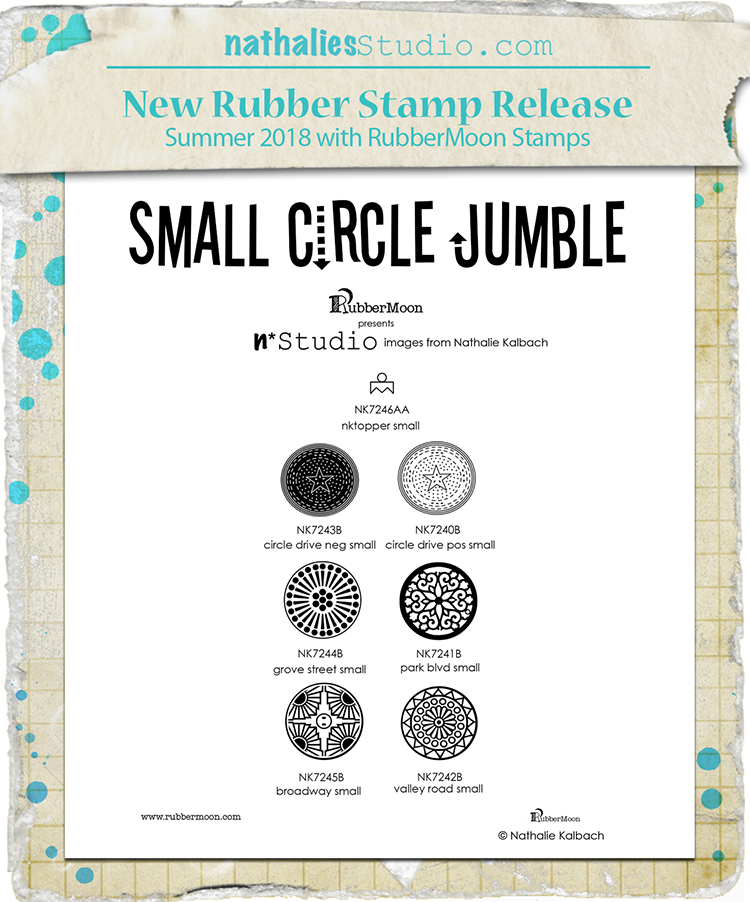
AND …we have those in a smaller size as well  with the circle stamps measuring approx.1″x1″ :)

But wait there is more …we also have some new Mini ArtFoamies Sets in the house. A Mini Hex Set with all of my four hexagon stamps in sizes which are between 2.125″x2.5″ and 2.5″x2.75″.

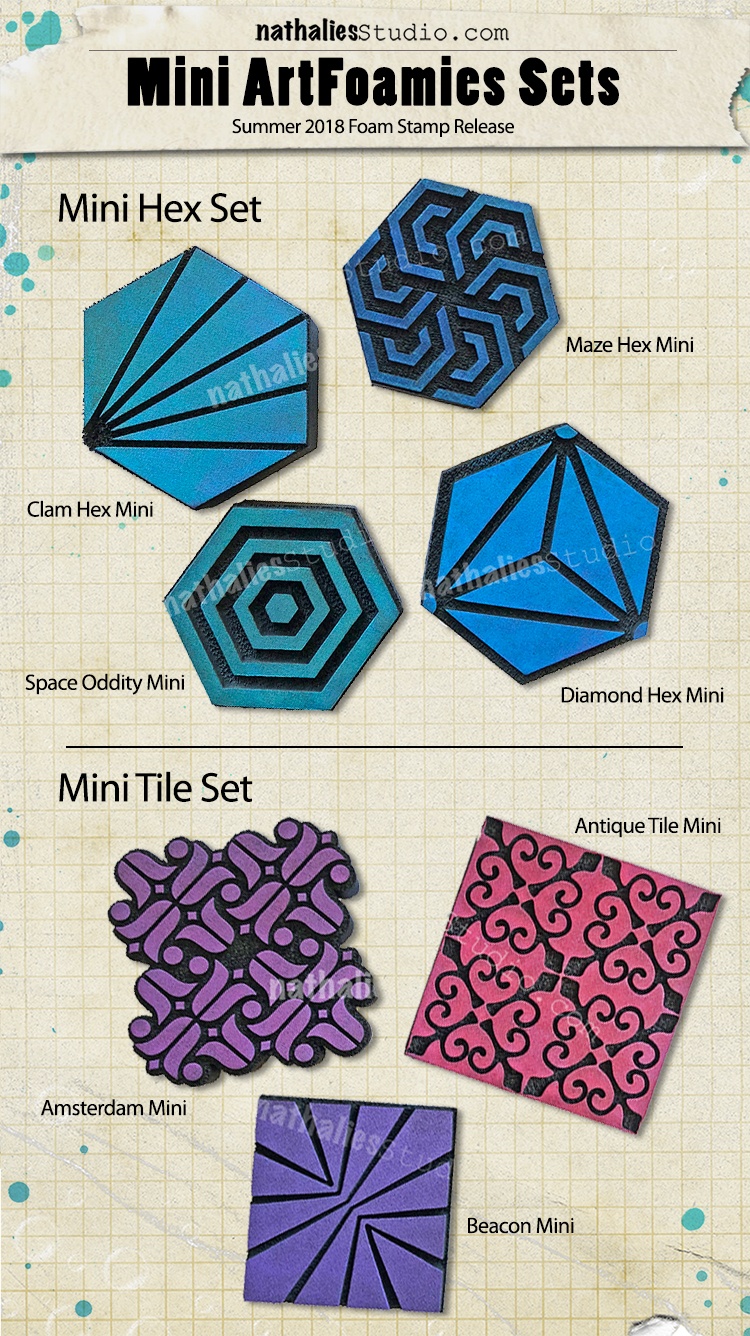
And a Mini Tile Set– with sizes between 2.25″x2.25″ and 2.875″x2.875″.

Let me show you some samples our Creative Squad and I made with the new RubberMoon Stamps :)

So the fun thing I added to the Circle Jumble Sets is a little topper which gives you the possibility to turn the circles into ornaments or use the topper as a fun little stamp for borders and patterns.

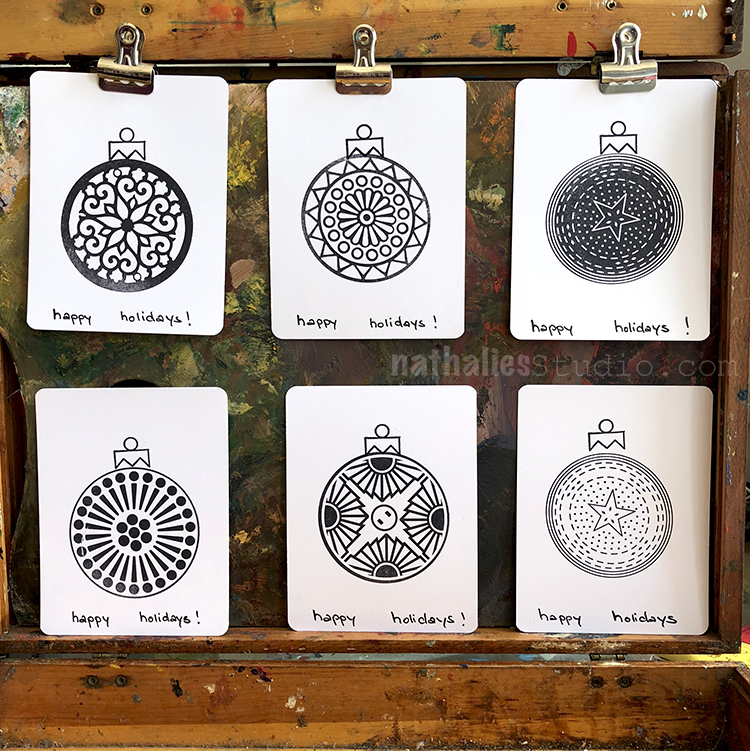
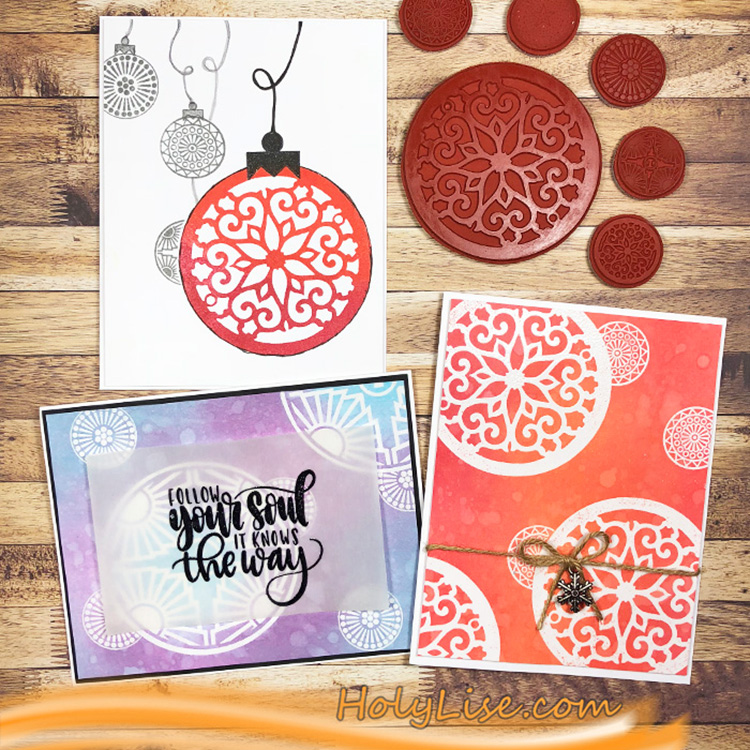
Here I created some super simple Holiday Cards with the Large Circle Jumble Set.

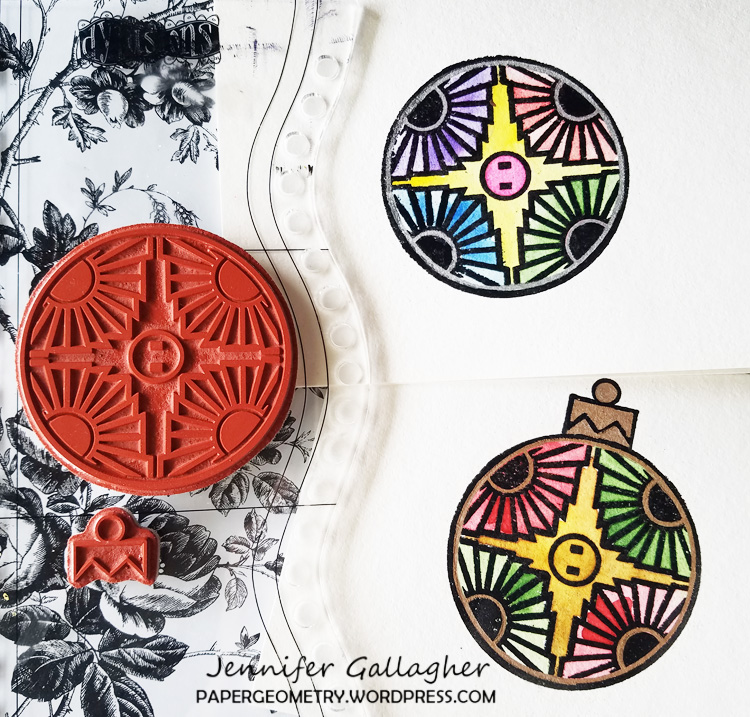
Jennifer created this super cute stained glass ornament using the Broadway Circle and the Topper from the Large Circle Jumble Set as well.

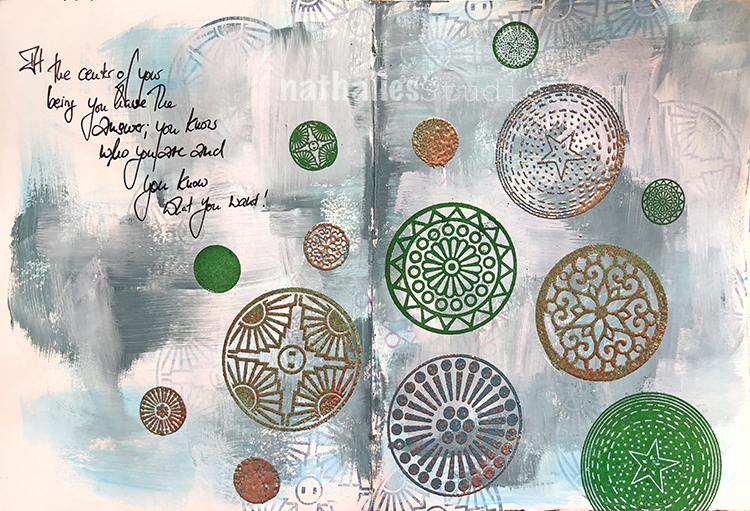
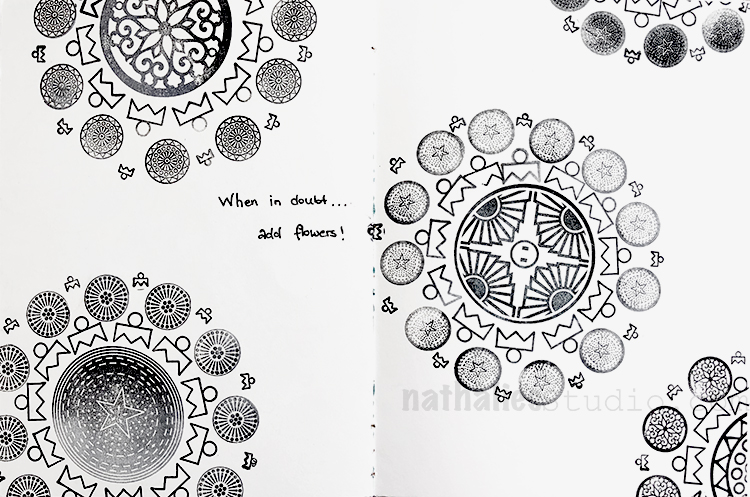
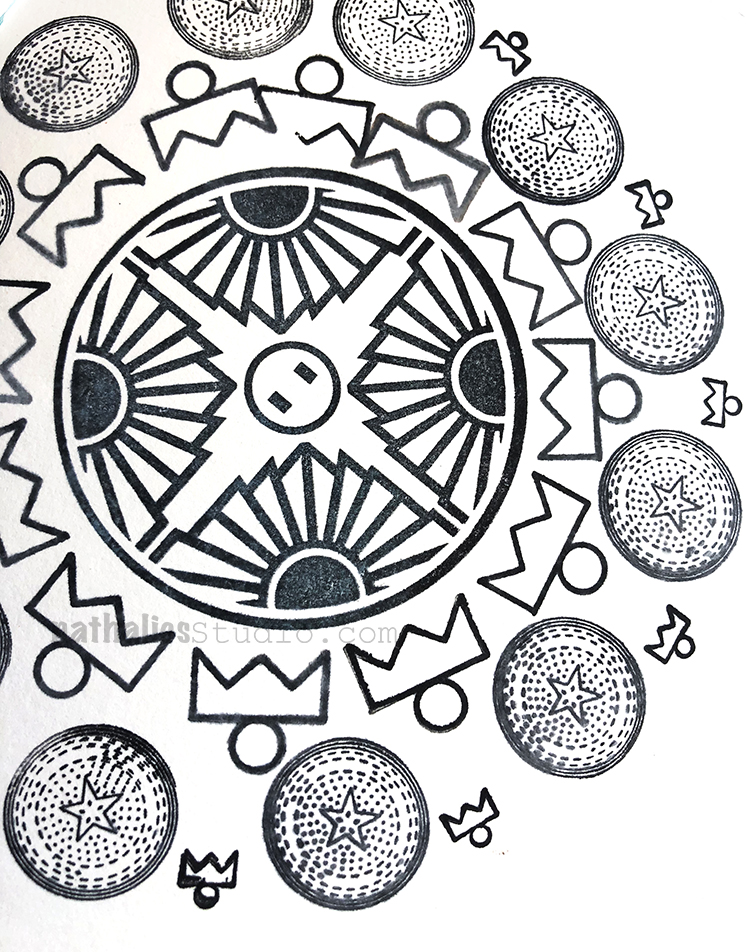
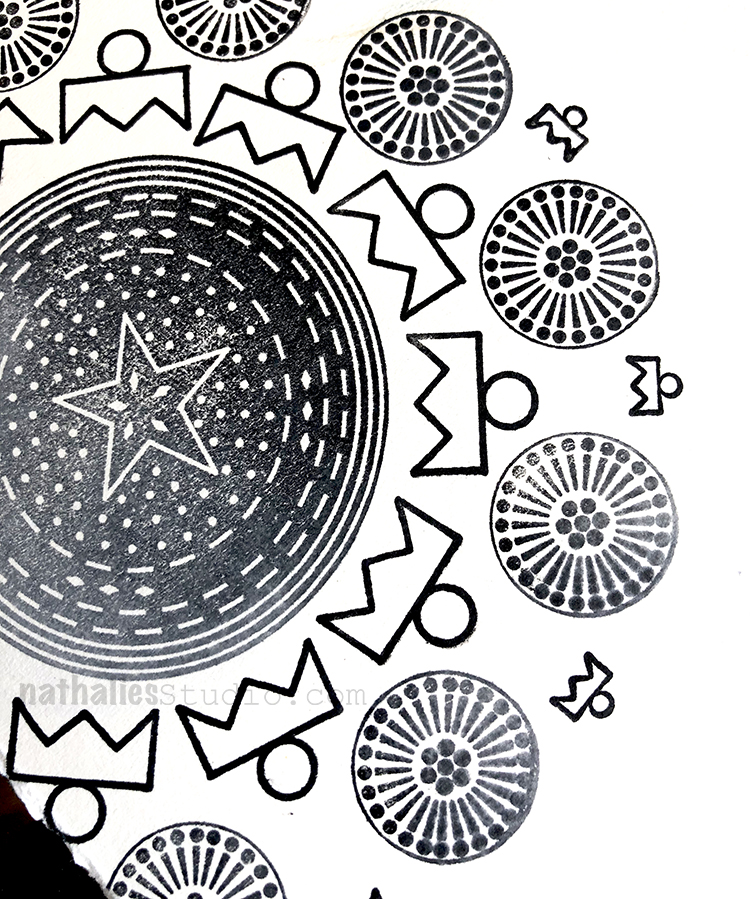
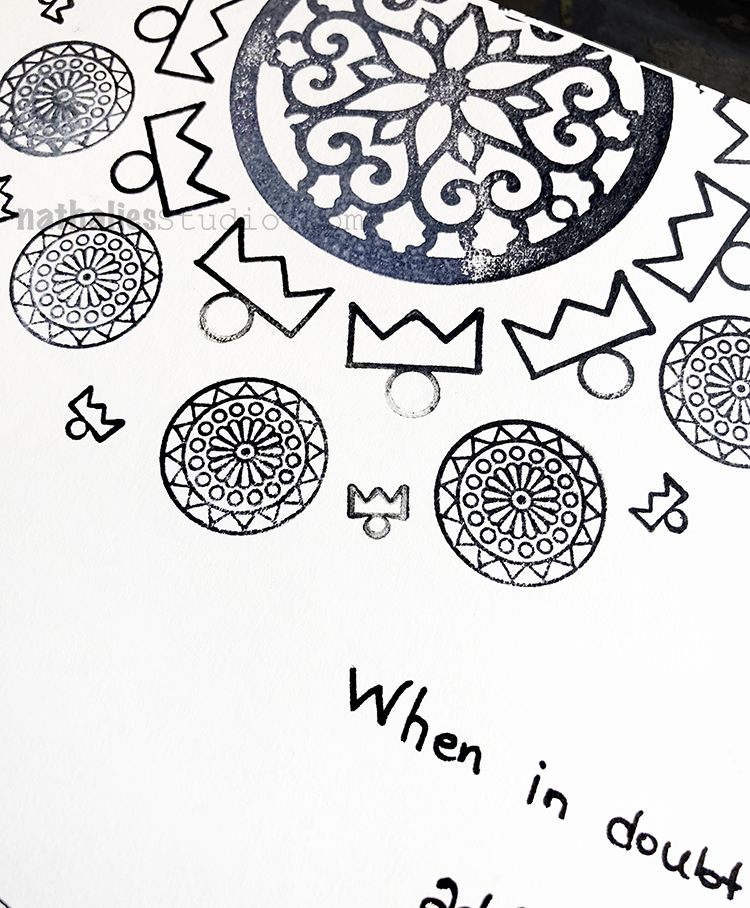
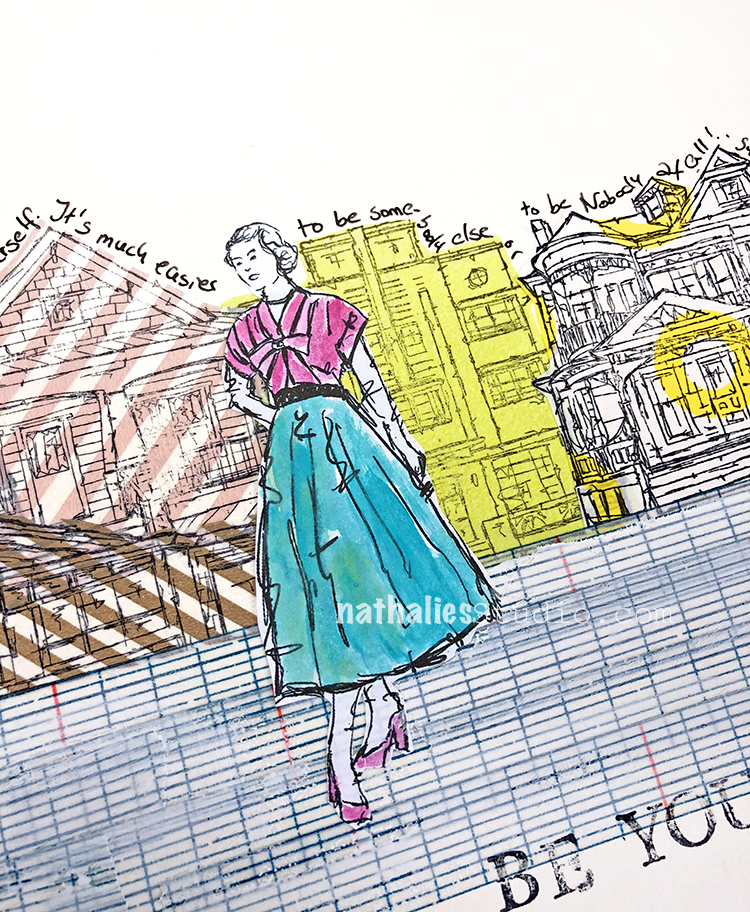
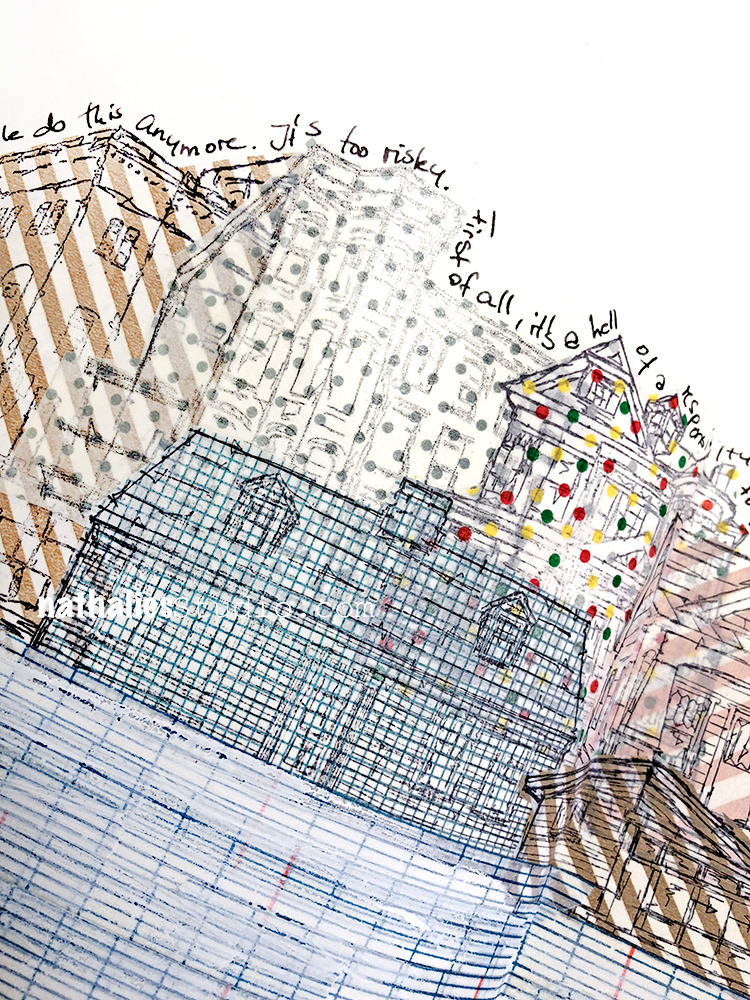
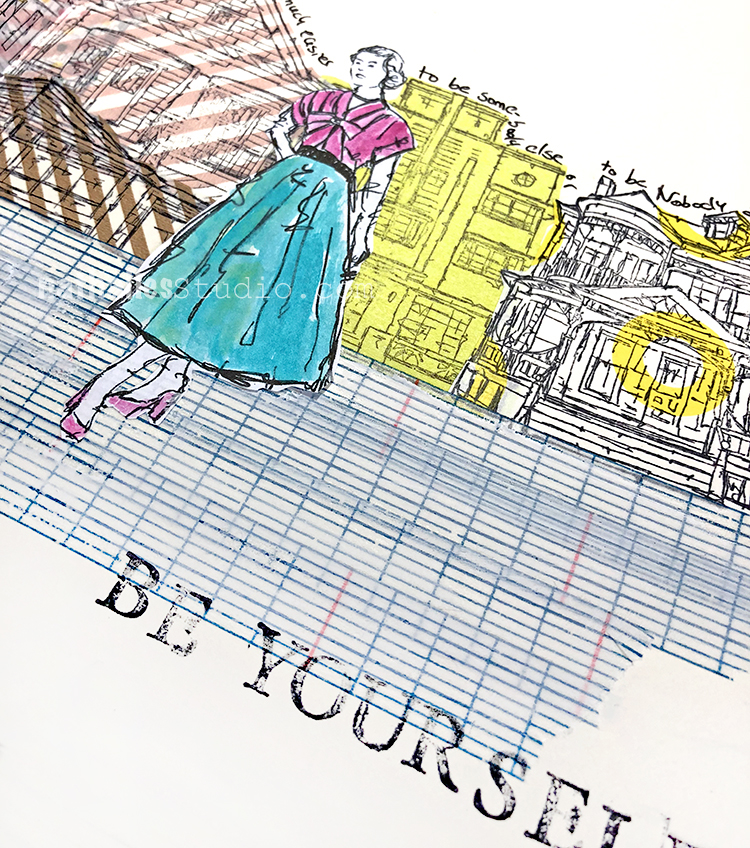
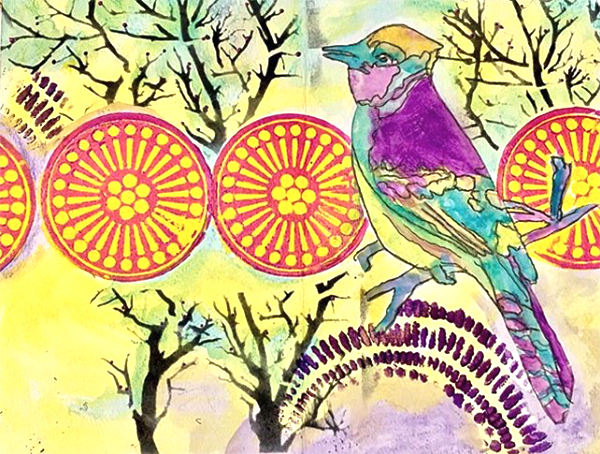
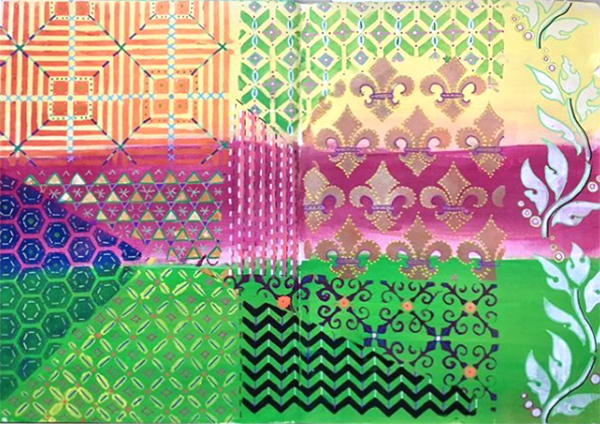
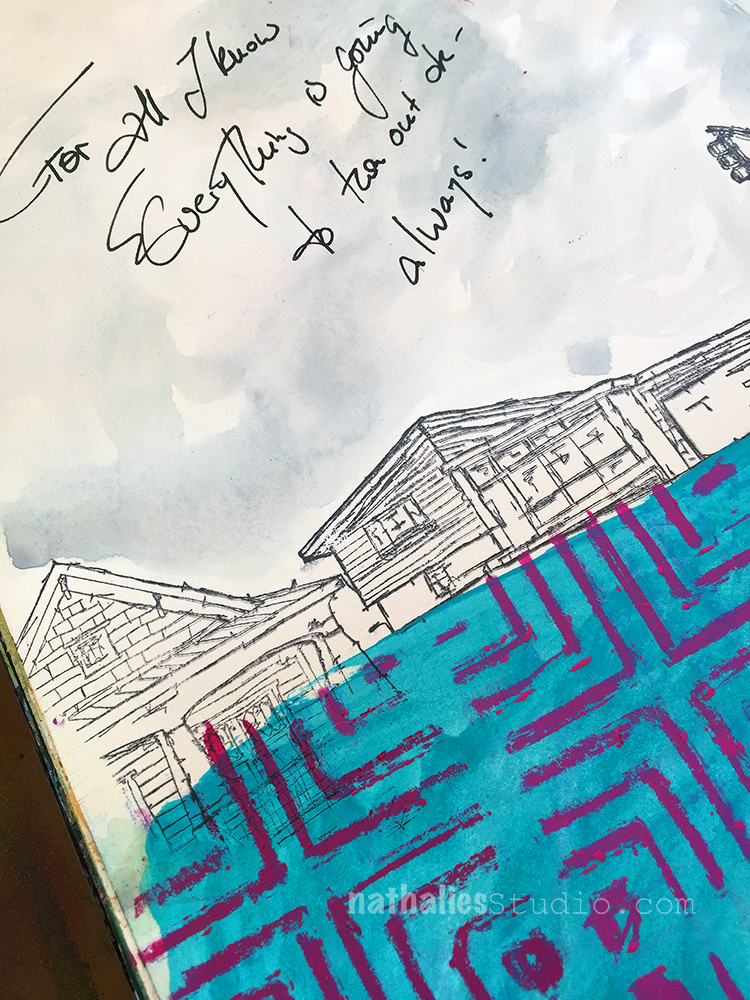
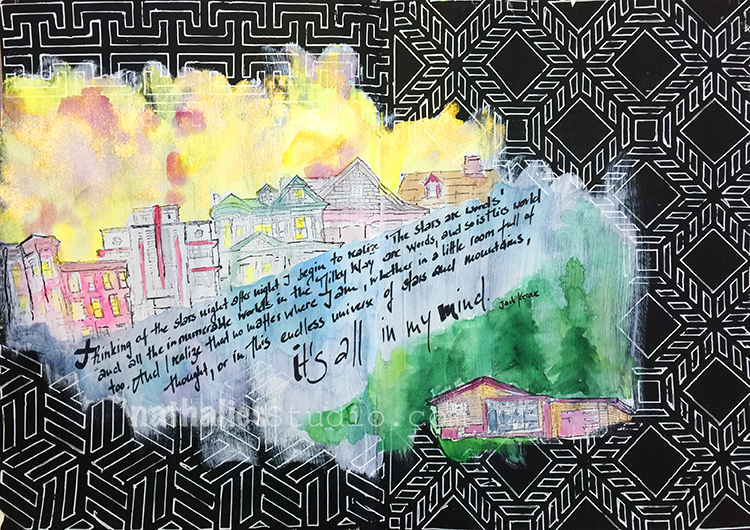
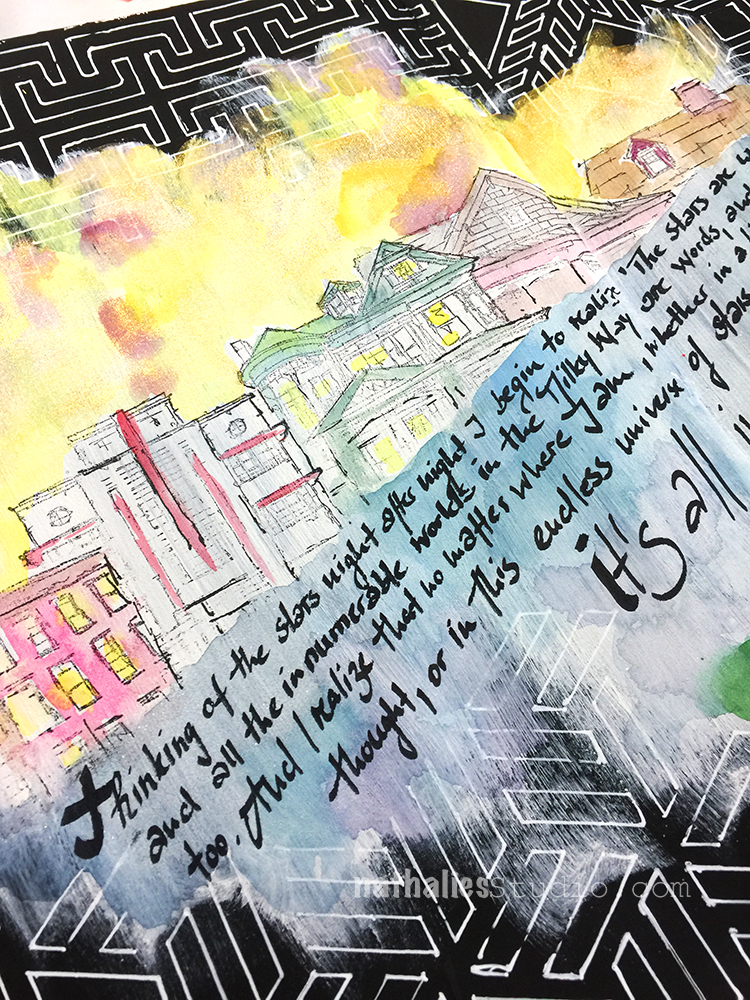
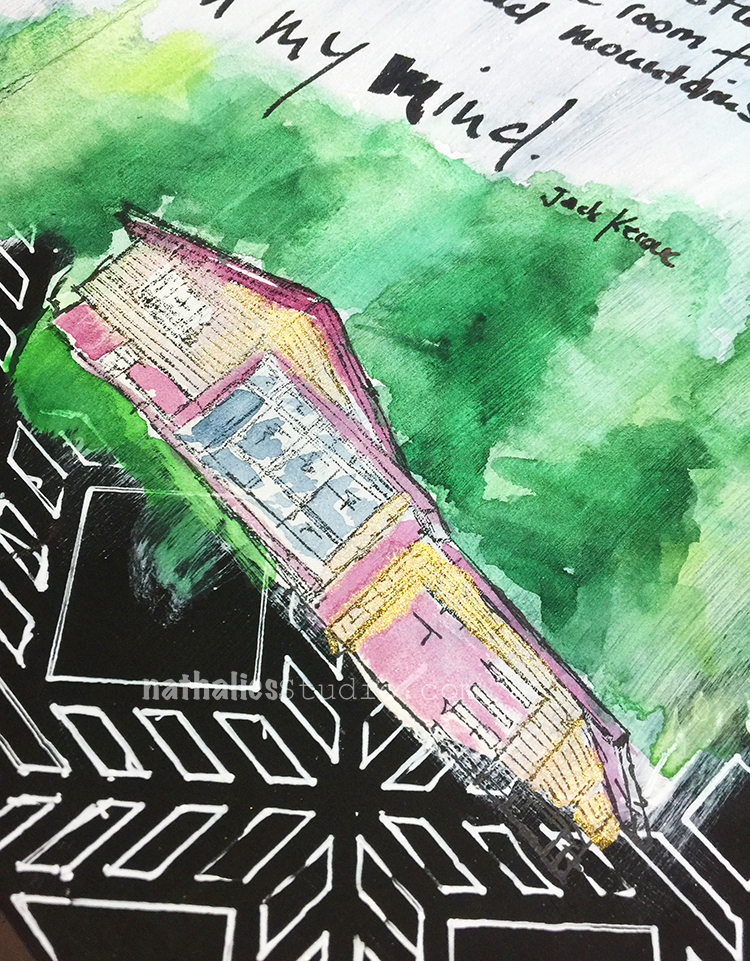
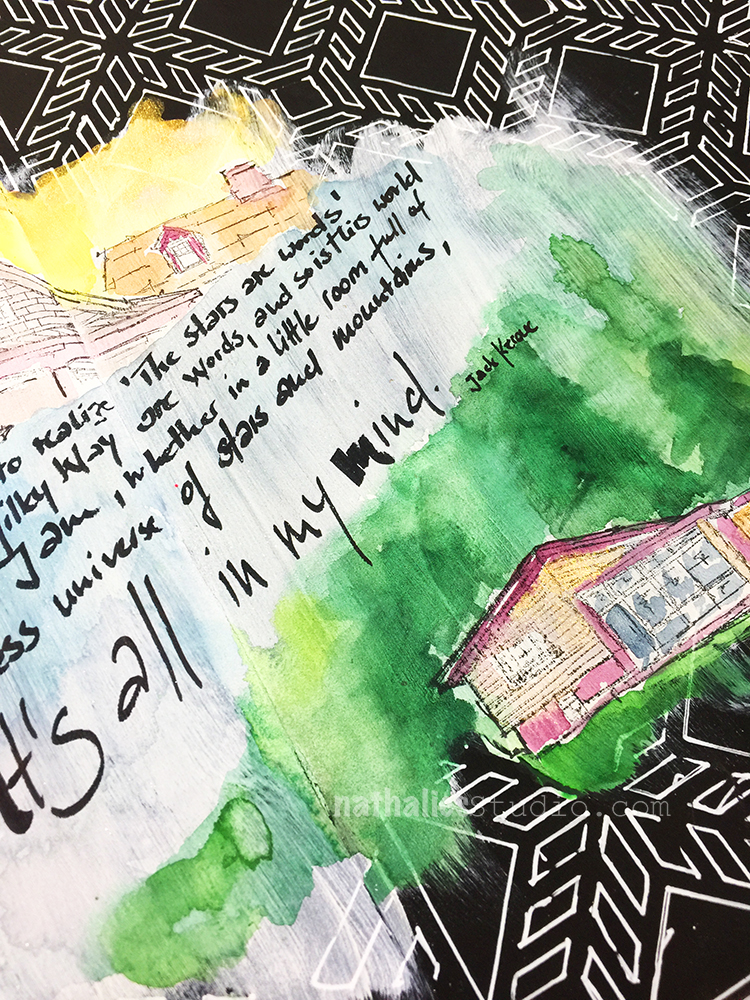
In this art journal spread I am using the Large Circle Jumble Set set as well as the Small Circle Jumble Set with embossing powders.

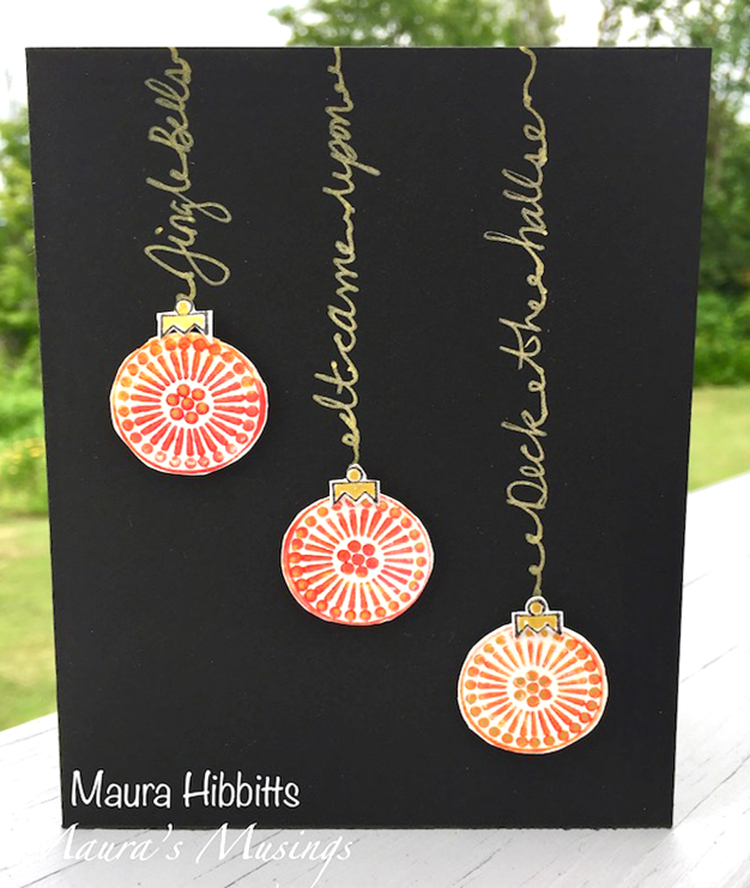
Maura used the Small Circle Jumble Set  for this pretty holiday card and added some pretty writing with a gold pen to “hang them” .

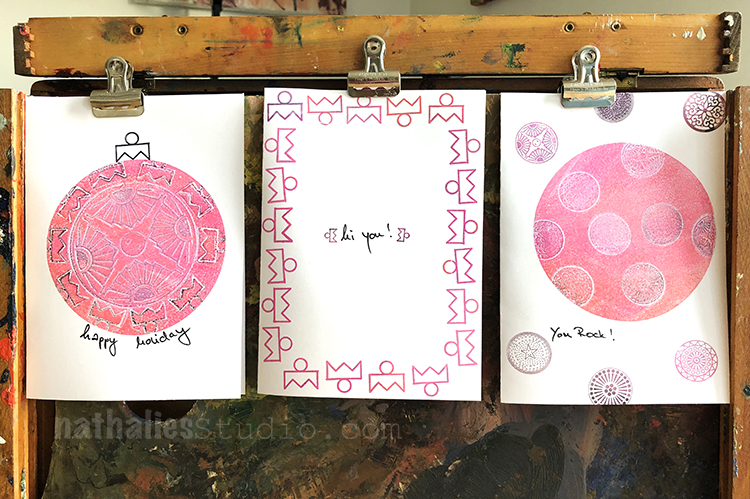
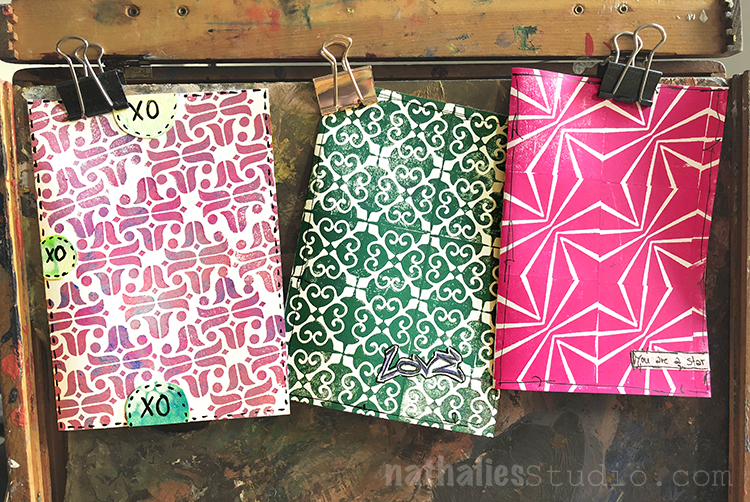
For this mix of cards I used both sets- for the left and middle one creating borders with the topper but also mixing up both sets once again.

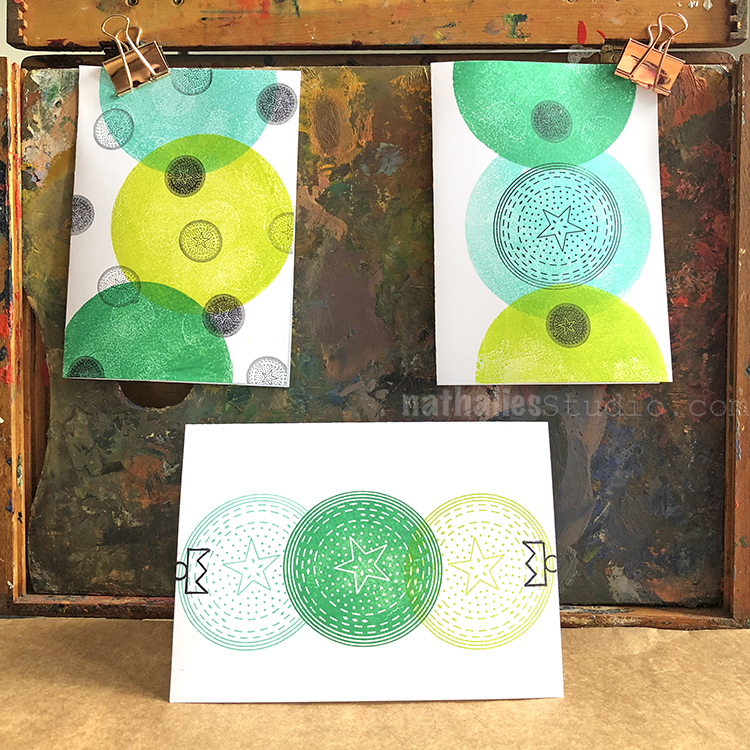
For the cards above I played around with both sets and created a cohesive note card sets, which I can use for various occasions.

Tania created this gorgeous Small Circle Jumble card overlaying the circles in different colors.

Josefine made a bunch of cards mixing up both the Large and Small Circle Jumble sets for some added dimension.

For the art journal spread above i played with both sets and made some Mandalas. I could have colored them in as well -but I loved the black and white look at the moment more :)

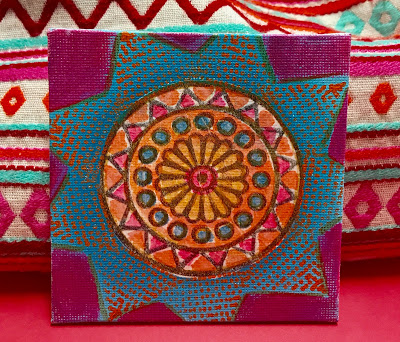
And Kae Pea the owner of RubberMoon made this gorgeous Bohemian Star on a canvas!

Let’s show some samples with the new ArtFoamies Mini Sets

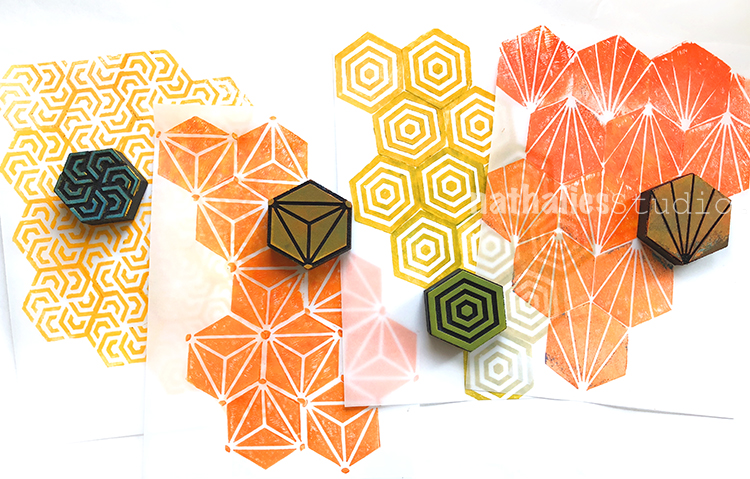
The Mini Hex Set is just super adorable!!! You can mix it with the regular sized Hexes as well.

Here is an art journal page where I just used all of them- but of course you can use them individually to create patterns- just like their big sisters :)

And some cards with the new Mini Tile Set.

Which of the new stamps makes you the most excited? Any favorites?

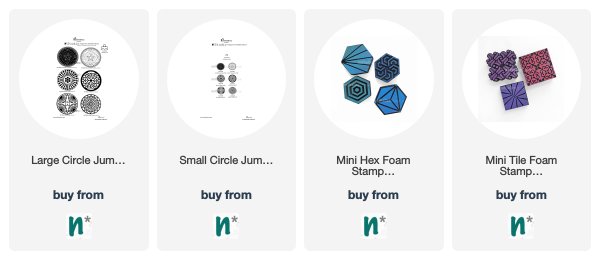
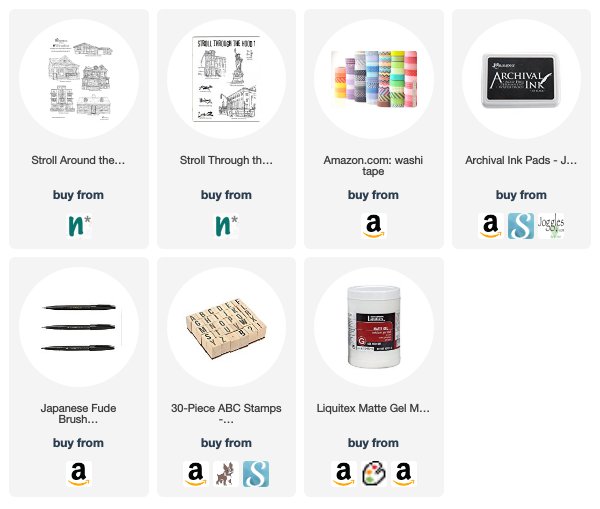
Pick up the new stamps here:


SaveSave

SaveSave

SaveSave

Comments (6)

  • Maxi Moon

    |

    LOVE how your team used these! They are so versatile and creative!!

    Reply

  • stephanie

    |

    ohhh the possibilities. Can’t wait to get these!

    Reply

    • nathalie-kalbach

      |

      Thank Stephanie , yeah they are really crazy versatile :)

      Reply

  • Sue Clarke

    |

    Love Maura’s card with the words as strings for the ornaments!
    What versatile sets.

    Reply

    • nathalie-kalbach

      |

      I love Maura’s handwriting as a string for the ornaments too – so clever and beautiful :)

      Reply

Leave a comment

Be Yourself – Art Journal Spread

“Very few people do this anymore. It’s risky. First of all it’s a hell of a responsibility to be yourself. It’s much easier to be someone else or to be Nobody at all!” Sylvia Plath

Loved using up some washi tape and washi paper which I “collected” for a while. the lady is from a sketch I did and I cut it out of a paper and then colored the image in and adhered it on top with Gel Medium.

I stamped the building stamps onto the different patterned washi paper and cut them out. I adhered them as well as the washi tape with Gel Medium. Even thought the washi tape has adhesive the adhesive won’t hold to long, so better just glue it down.

Some journaling and some stamping – love how the pattern and color mostly comes from the Washi.

Here are some of the supplies I used


Comments (2)

  • Sue Clarke

    |

    Glad to read about using the gel medium with washi tape as it doesn’t hold very well on canvas or over paint.
    Nice page and quote Nat.

    Reply

    • nathalie-kalbach

      |

      Thank you Sue! Yes – gel medium is the way to make sure that the low adhesive will keep on sticking. Washi tape will eventually even come loose from plain paper if not reinforced.

      Reply

Leave a comment

Be Kind – Art Journal

“In a world where you can be anything…Be Kind! ”

For this art journal spread I once again used some prints of my painting which featured the Liberty State Park train station.

I stamped some buildings in between as well as the Statue of liberty and colored the images in with acrylic paint.

The family was sketched with sumi ink. I like how this came together. I really love using parts of my paintings with the the stamped areas – still exploring this a bit more.

Here are some of the supplies I used


Leave a comment

The Wild and Tame – Art Journal

“The Wild and the Tame wrestle in me, neither win, neither want to.” Tyler Knott Gregson

Love this poem – so true!

I used some of my old calendar pages with my prints as collage material – and then stamped with some of my buildings stamps. I am trying to make an effort to use more of the stuff I have been collecting for some time …what is the point to wait for the “perfect” moment- just make it the perfect moment and get some space back- LOL

I love how the prints of my painting blend in with the Stroll stamps. The yellow stripe on the bottom is washi tape – I just thought I needed to pick up the yellow of the painting again and I love the effect. Since it is washi tape with really low and bad adhesive I applied some Gel Medium underneath to make sure it sticks.

I added some Viarco Graphite for color inside the buildings- I love using those- the colors are just o beautiful.

Here are some of the supplies I used for this spread


Comments (4)

  • Sue Clarke

    |

    I have started to give any craft supply away that I haven’t used in over 3 years. That includes some of the “saving for the perfect” project items. Silly when I think about it. My washi tape does not stick in my art journal (over paint) so thanks for the suggestion of the gel medium.

    Reply

    • nathalie-kalbach

      |

      I hear you :) It is funny how we are all little magpies collecting shiny objects – but here is to using them :)

      Reply

  • Janene

    |

    I know what you mean about using/using up stuff you already have. I was thrilled to use up 2 glue sticks over the weekend. It’s the little things that make all the difference in my life. :-)

    Reply

    • nathalie-kalbach

      |

      Wow- Janene, that is a lot of glue sticks you used up!!! Go Go Go!!!!

      Reply

Leave a comment

Inspiration from Around the Globe

Ready for some inspiration? Today we have some projects from around the globe. It’s always fun to see how you’re using my stamps and stencils and I am so happy to share some examples today. So let me know if you’re doing something cool with my products, and you might see yours on the next Inspiration from Around the Globe!


First up is a super lovely and colorful art journal spread from Barbaree King in Florida. Her Creative JumpStart inspired page uses my circular Grove Street ArtFoamies stamps for an unexpected background.

Next we have an art journal spread from Jeannine Stein at Cloth Paper Scissors Magazine in Massachusetts. She’s created a lush background and stamped over it with my Brownstone and Lady Liberty stamps. Love it!!!

Here we have some awesome tissue paper stamping action by Sue Sharp from Canada! She drew inspiration from a lesson in Creative JumpStart and used the stamps from my Marks stamp set.

From the UK we have a gorgeous art journal spread from Frieda Oxenham with one of my favorite icons of the NYC skyline :) and 2 cool ways to use my Chicago stencil for the background and border.

And finally, a celebration of pattern in her art journal by Valerie Teele in California. She was playing along with Creative JumpStart and used my Manhattan and New Orleans stencils :)


I hope you enjoyed these projects and feel inspired to do some creative play yourself! Here are the stamps and stencils that were used:


SaveSave

SaveSaveSaveSave

Leave a comment

For All I Know – Art Journal

I have been working on a big assignment and some personal tasks lately which have me stressed out a bit …so a little art journaling mantra is keeping me sane ;)

some stamping with my RubberMoon stamp sets and I used Neopastels to paint inside the ink transferred figure. I also traced with a pink Neopastel inside the opening of my Manhattan stencil and while I like the outcome, there was a lot of the Neopastel sticking to the stencil which wasn’t easily to get off or transfer to a different spot – so this was probably a one time adventure LOL.

Here are the supplies I used for this spread.


Comments (4)

  • Lois Moore

    |

    I read somewhere that a soak in water with dishwasher “liquid” soap would remove dried on paint from stencils. Maybe it will work with your neopastels too.

    Reply

    • nathalie-kalbach

      |

      I will try that Lois. My best experience so far is with Murphy’s Oil- but I usually do not remove paint as long as it is acrylic paint. I will give it a try :)Thank you

      Reply

  • Sue Clarke

    |

    Do you put something over the neopastels so that they don’t smudge on the opposite page when the journal is closed?

    Reply

    • nathalie-kalbach

      |

      Sue, if the layer of neopastels is not too thick it is not a problem, but in this case where it is very thick I put half a sheet of delipaper in between the pages to keep it from transferring to the other side.

      Reply

Leave a comment

Burning Bright: Stamped Candles

Kim and I had so much fun again at our monthly Craft Play Date. This time we made some candles and it was so easy and ohhhh I love them !

All you need are some stamps, some ink pads (try different ones as some might bleed) some tissue paper, wax candles and a craft heat tool.

We used my new RubberMoon Stroll Around the Block and My Home is My Castle Stamp Set.

We just stamped along on the tissue paper with different colors and brands

the less juicy the ink pad the less it was bleeding into the tissue but I also liked the bit of a painterly look a little ink bleed would give.

Then we just cut out the stamped images very close to the edges

and smoothed it out on the candle.

With a heat tool place on some deli paper(or non stick paper) we placed the candle and carefully heated it up – once the wax is molten the stamped tissue paper fuses right into the wax.

I used the deli paper while the wax was still warm and smoothed out any wrinkles. Make sure to be careful and not burn yourself !

I love this so much

We just couldn’t stop

but there were only so many candles- LOL

I love them with different houses and different sizes like below

I love Kim’ Number Candle as well

And the Adirondack chair candle on the right makes me want to gather some sand dollars and sea shells and set up a beach themed plate for the candle in the center.

And …I still want the Mid Century House that would host the candle below … I mean…for myself- LOL- One can dream, right?

Hope you liked it and give it a try- guess what everyone is getting for next birthdays- LOL.

Here are some supplies we used  – of course you do not need a huge amount of ink pads


Can’t wait for our next play date- always love getting creative with Kim :)

Comments (4)

  • Karen Bearse

    |

    What a great idea! Love this, thanks for the tutorial.

    Reply

    • nathalie-kalbach

      |

      Hope you will give it a try, it was super easy and fun!

      Reply

  • Sue Clarke

    |

    Nice presents and they can even be personalized with the number of the house.

    Reply

    • nathalie-kalbach

      |

      Such a great idea to add the number of the house! Thanks, Sue!

      Reply

Leave a comment

It’s All in My Mind – Art Journal

I love how this page turned out. I had seen a page by my sweet friend Birgit Koopsen where she had used a black art journal and then doodled in white on top of it and that set off this page. I painted my art journal page with black gesso, let it dry and then added some white watercolor ground into the the middle area.

I then used different stencils of mine and used a white Signo Pen to outline some patterns on the black gesso

I stamped the different houses from my Stroll Around The Block Set with archival ink and then added watercolor and the journaling.

The watercolor ground gives a lot of tooth- so the watercolor looks a bit different on it when on normal watercolor paper- but I love the texture.

It was fun playing with different media and a different ground

Here are some of the supplies I used for this spread:


Comments (2)

  • Sue Clarke

    |

    I love how the white pattern on black sets the background for the rest of the page.
    I must try this soon in my new art journal!

    Reply

Leave a comment