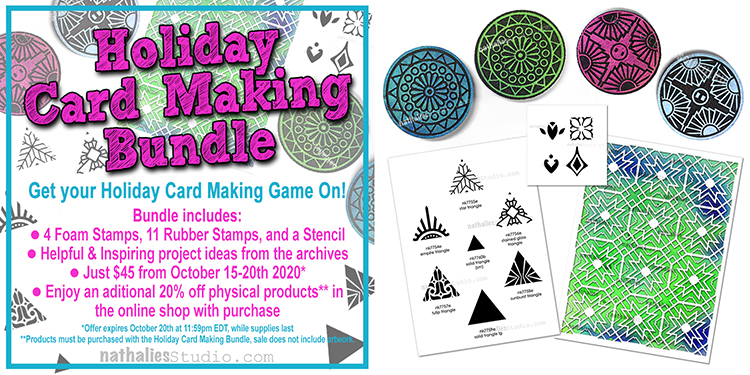
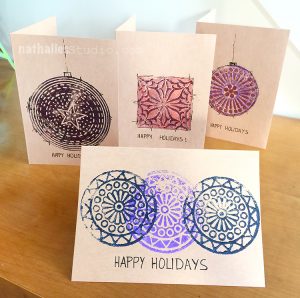
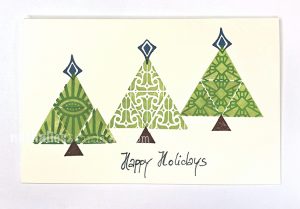
Are you ready to get your Holiday Card Making Game on??? I’ve put together this special product bundle to help you create tons of unique holiday cards for everyone on your list this year.
My Holiday Card Making Bundle includes a selection of foam stamps, rubber stamps, and a stencil, as well as some inspiring card making ideas from our archives to help you on your way.
The bundle is just $45, a big savings off the $71.60 regular price, and supplies are limited so hurry in to get your bundle before they run out for good. This offer expires October 20th at 11:59pm EDT.
Special 20% Off Deal: Also, during this offer, if you purchase the Holiday Card Making Bundle you may receive an additional 20% off any other physical products (foam stamps, rubber stamps, stencils, ink pads) that you order at the same time. Just use the coupon code holidaycard20 when you check out. Artwork is not included in this offer.
Here are the stamps and stencils that are included in the set:
Valley Road Positive Negative Foam Stamp Set
Broadway Positive Negative Foam Stamp Set
Triangle Love Cling Rubber Stamp Set
Fan-Fare Cling Rubber Stamp Set
Toledo 9×12 Stencil
In total you will receive 4 foam stamps, 11 cling rubber stamps, and a 9×12 stencil.
Once you purchase, you will receive an email with links to project ideas from the archives to get you started on your holiday card making.
Here are some of the tutorials from our archives that will come with the Holiday Card Making Bundle once purchased:
This bundle offer is only available through October 20th at 11:50pm EDT. And don’t forget to use the coupon code holidaycard20 to receive 20% off any additional physical items in your order.
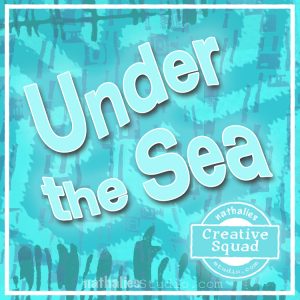
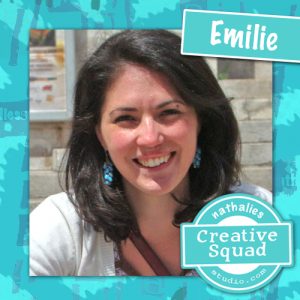
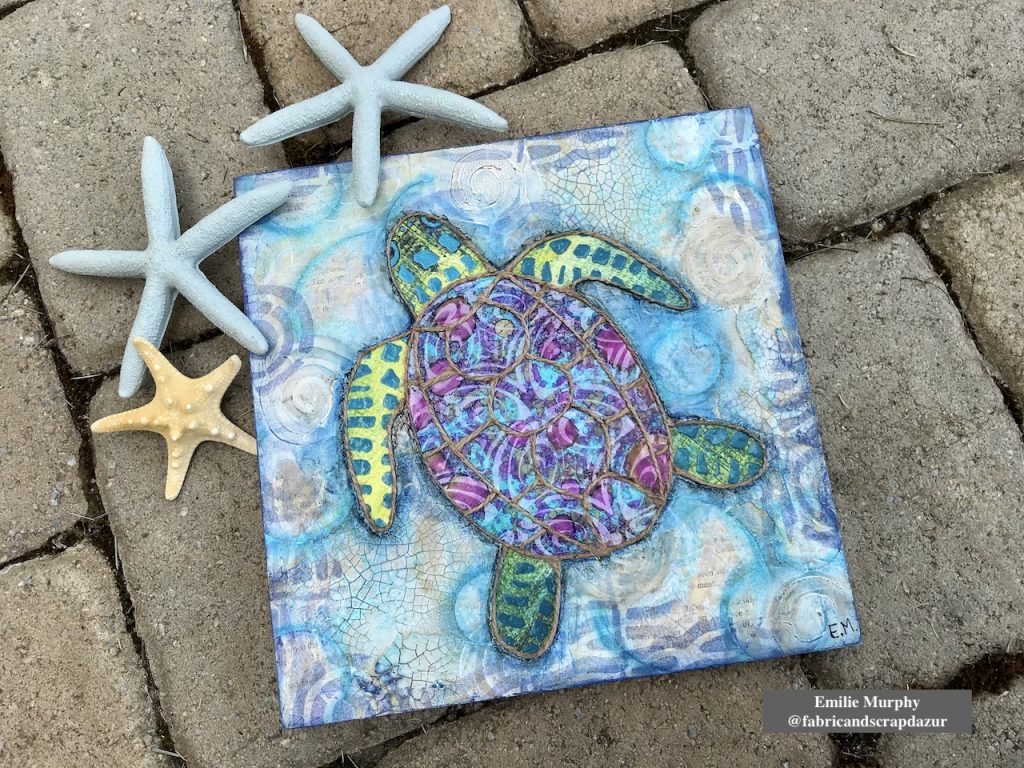
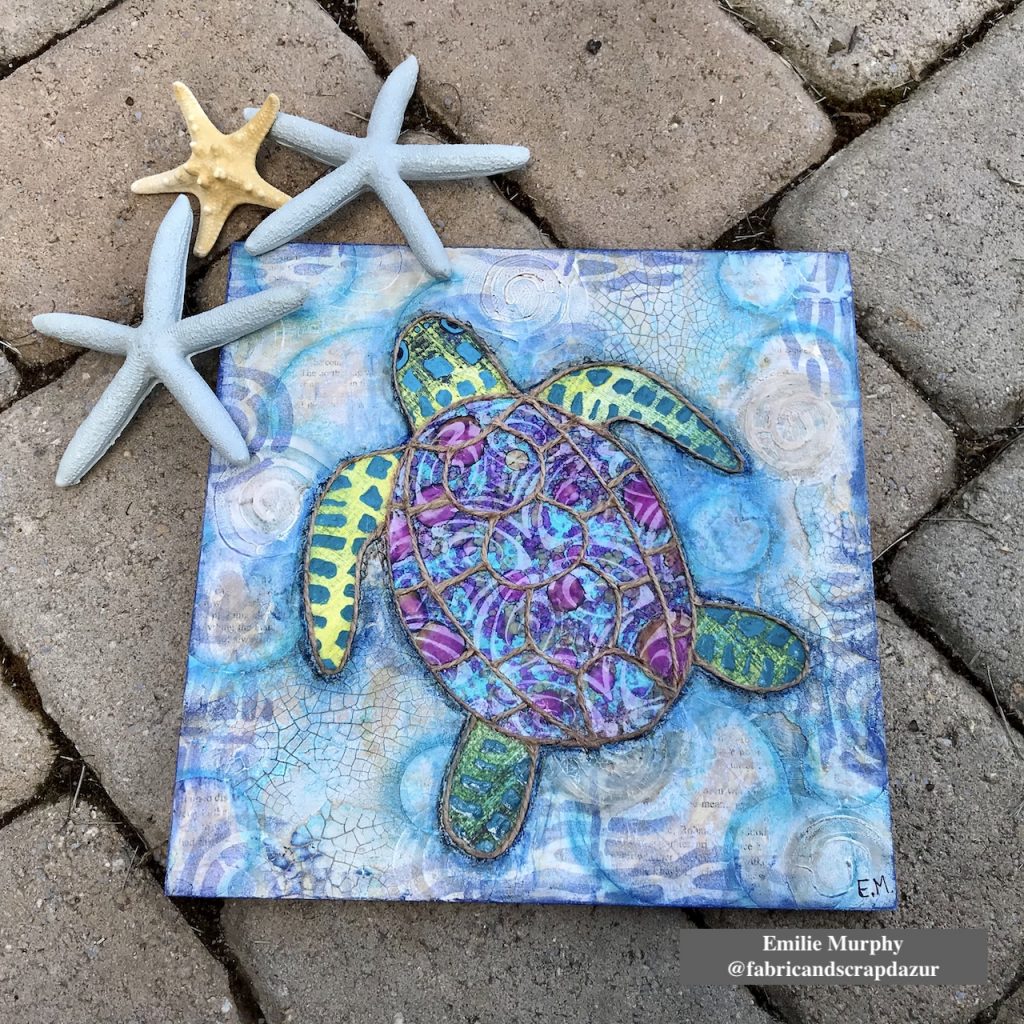
Hello from my Creative Squad! Today we have a wonderful wood panel piece by Emilie Murphy demonstrating some cool techniques and using my Fairview Fan, Mini Batik 1 and Mini Batik 2 foam stamps. The theme this month is: Under the Sea – There is something so fascinating about water. We love being in it, floating on it, relaxing next to it, and it remains one of the last frontiers here on the planet. Create something that is an ode to the sea.
Hi there! Hope you are doing well.
The Sea theme always inspires me. The first thing that came to my mind was “fish”, of course! Meanwhile I was thinking of what project to make, I went to visit my in-laws and saw this pillow with a beautiful sea turtle on it that my mother-in-law had just got. So that’s how I got the idea to make a sea turtle on a cradled wood panel.
Let me guide you how I made it.
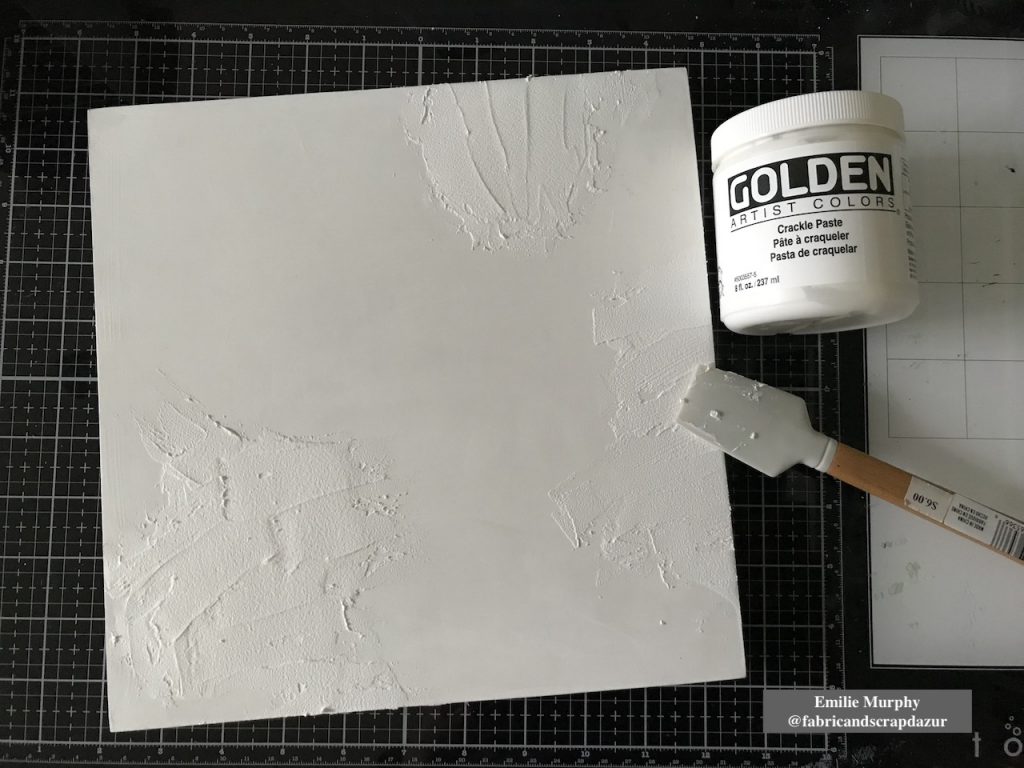
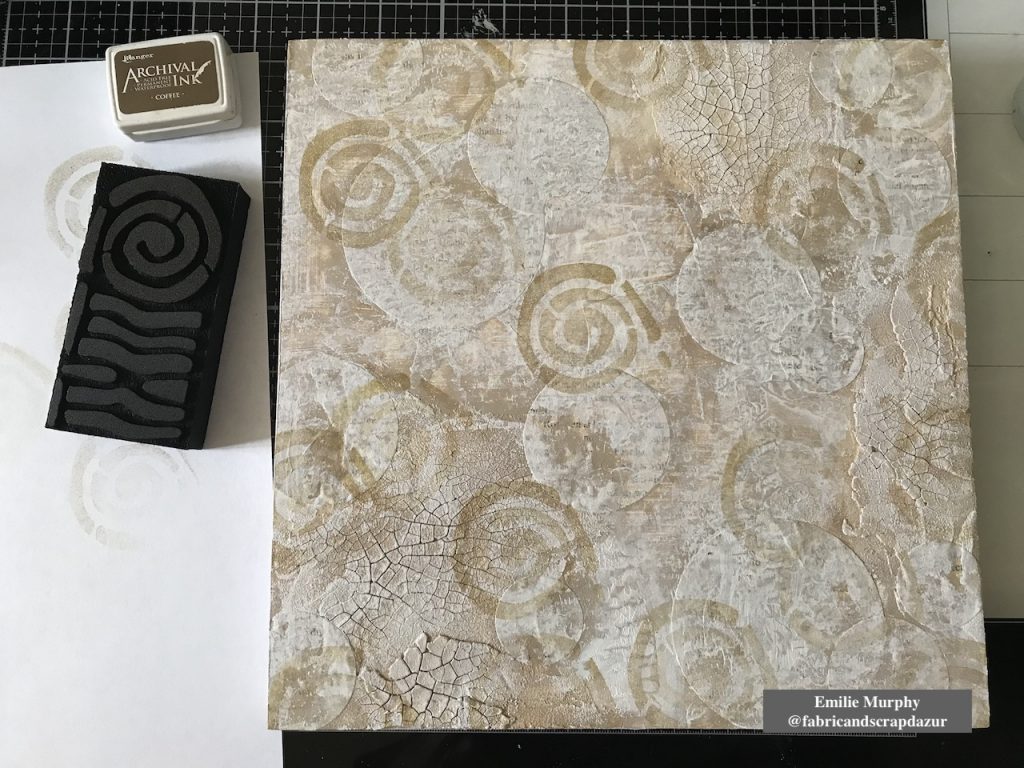
I started to apply some crackle paste on a 10×10 wood panel coated with white gesso. I let it dry overnight.
Tip: The coat of crackle paste has to be thick enough to be able to get some significant crackles.
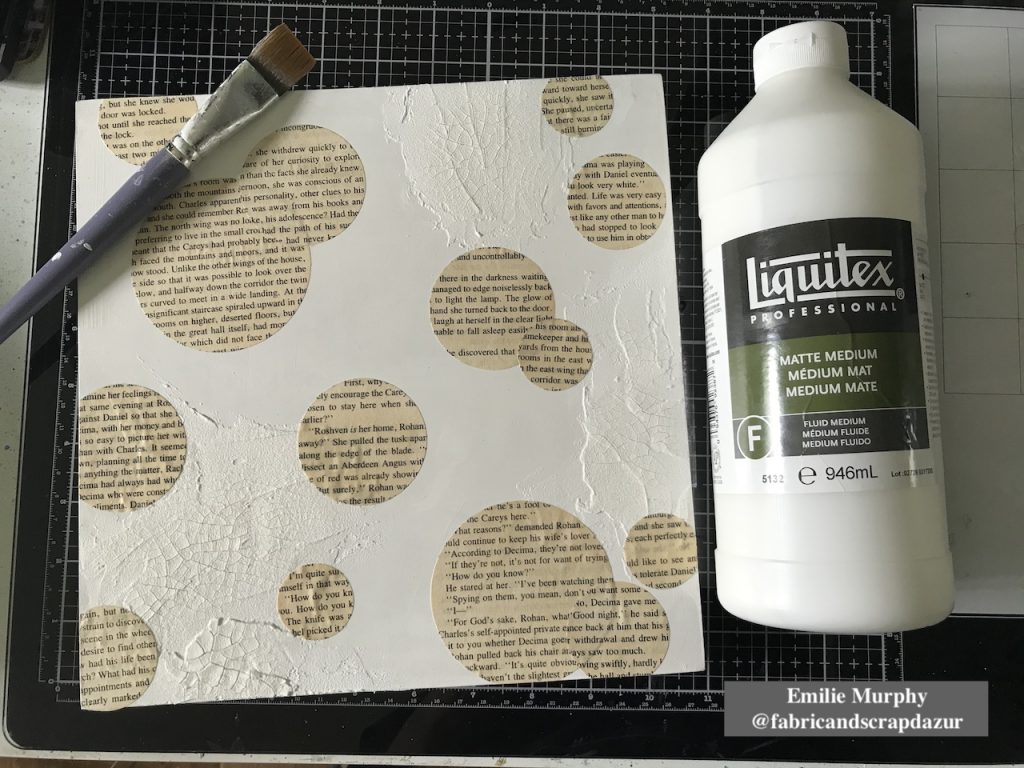
Then I glued down with matte medium some circles cut from old book paper to bring some interest to the background.
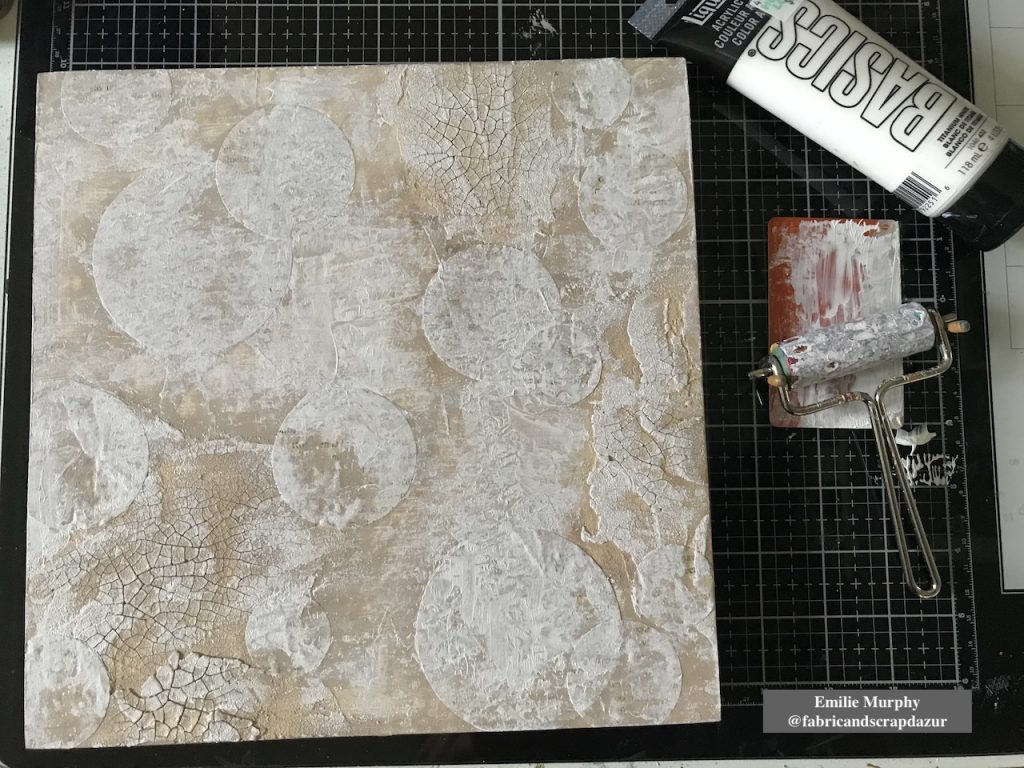
As I didn’t have any “sand” color acrylic paint ready to use, I mixed some “Burnt Umber” acrylic paint with some white that I applied on my panel with a brush and plastic card.
I toned down the color I mixed with some white acrylic paint because it was a little too dark than expected. I applied it with a brayer. The purpose of the brayer is just a preference to add texture.
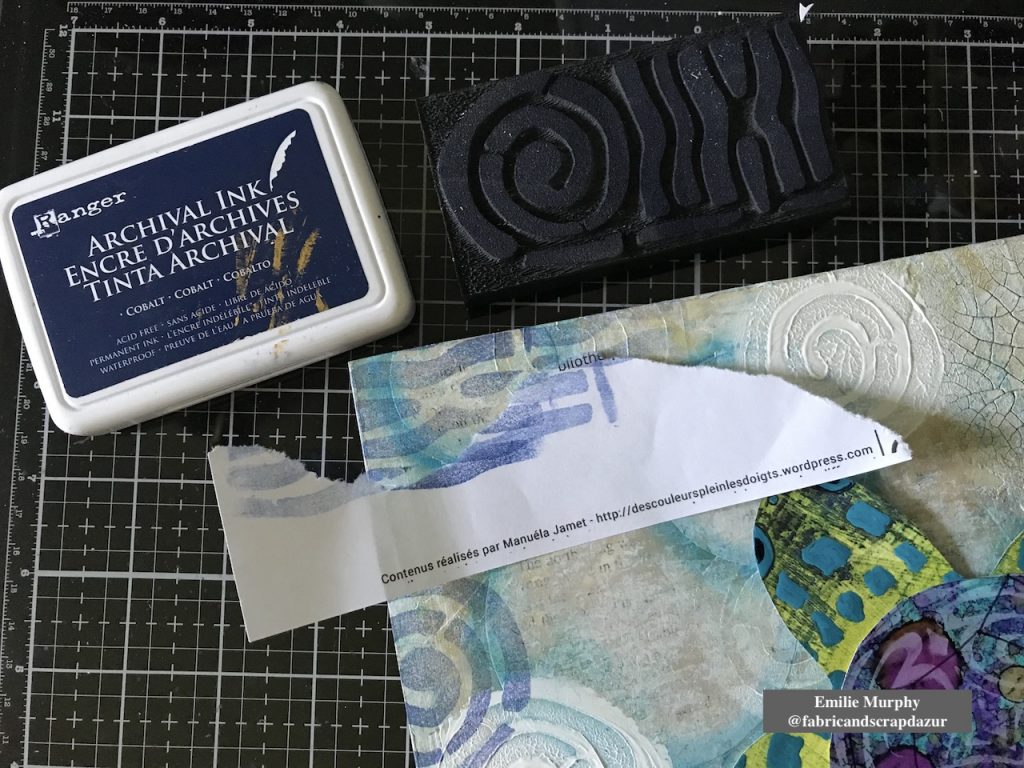
Then I stamped the circular part of “Mini Batik Pattern 2” foam stamp with “coffee” archival ink to evoke shells. I wanted here a tone-on-tone effect.
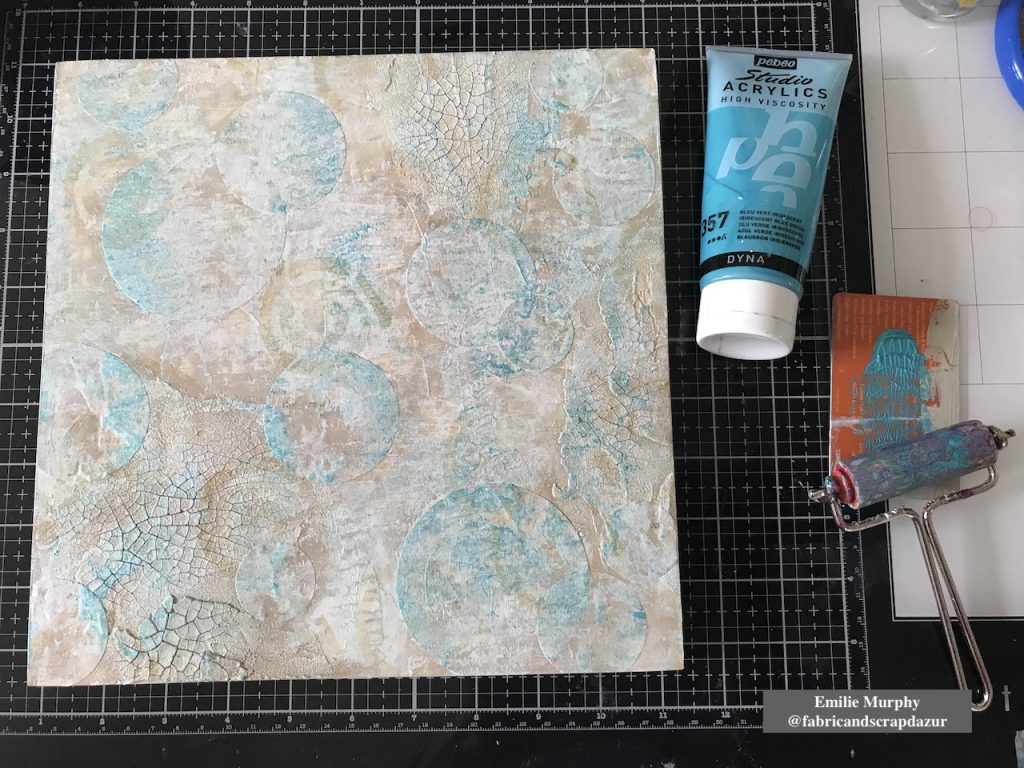
To add some brightness and not have something too uniform, I applied some iridescent blue acrylic paint again with my brayer.
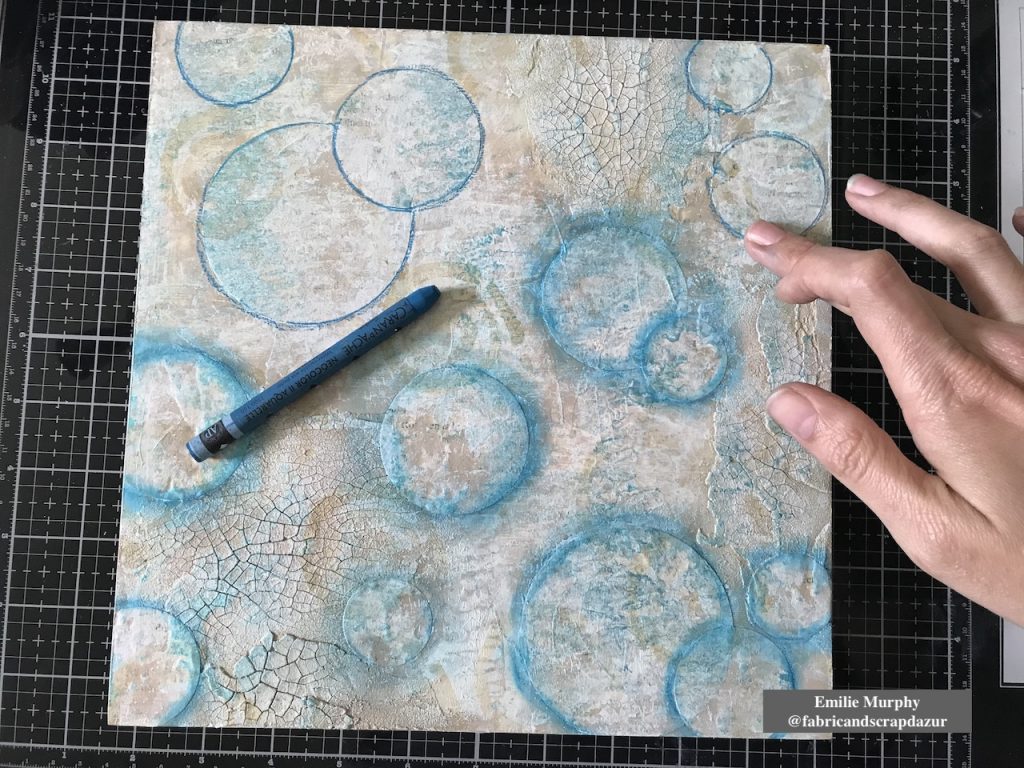
In order to build layers, I darkened the edges of my circles with a Neocolor II crayon “Blue Cobalt”. I think it gives the illusion of bubbles.
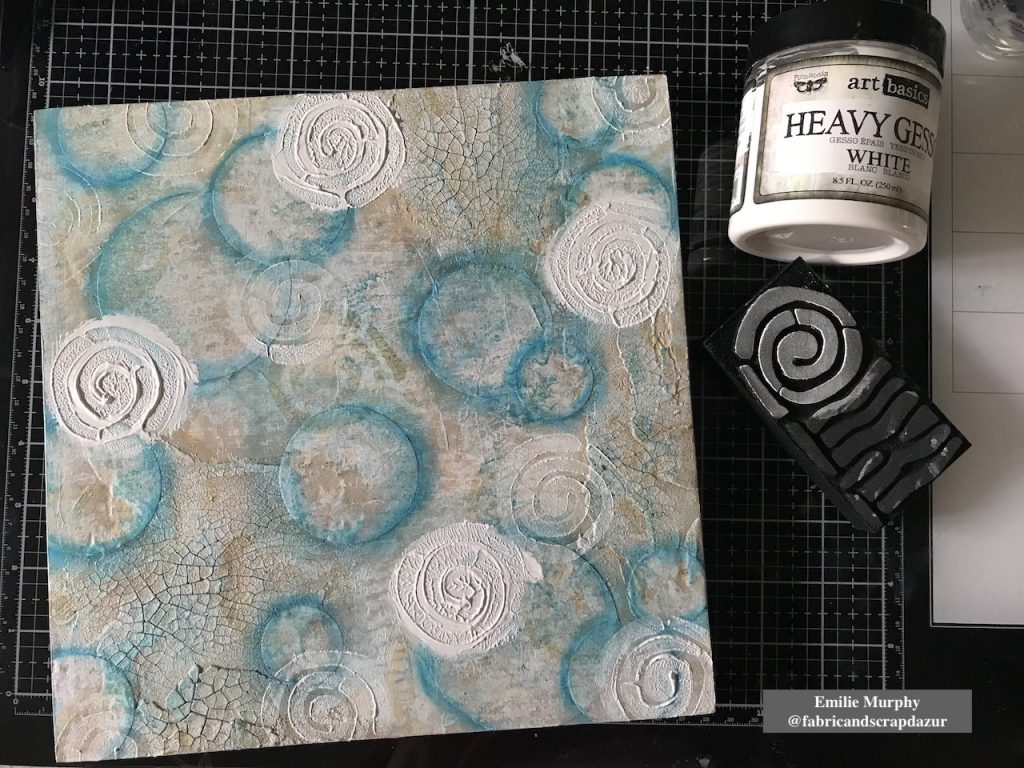
For the next layer, my intention was to add some dimension. Therefore I applied with my finger some pretty thick “puddles” of heavy gesso and stamped on it using again the “Mini Batik Pattern 2” foam stamp. Isn’t it cool! This is such an easy way to add dimension. I kept stamping around here and there to clean up the gesso left on my stamp.
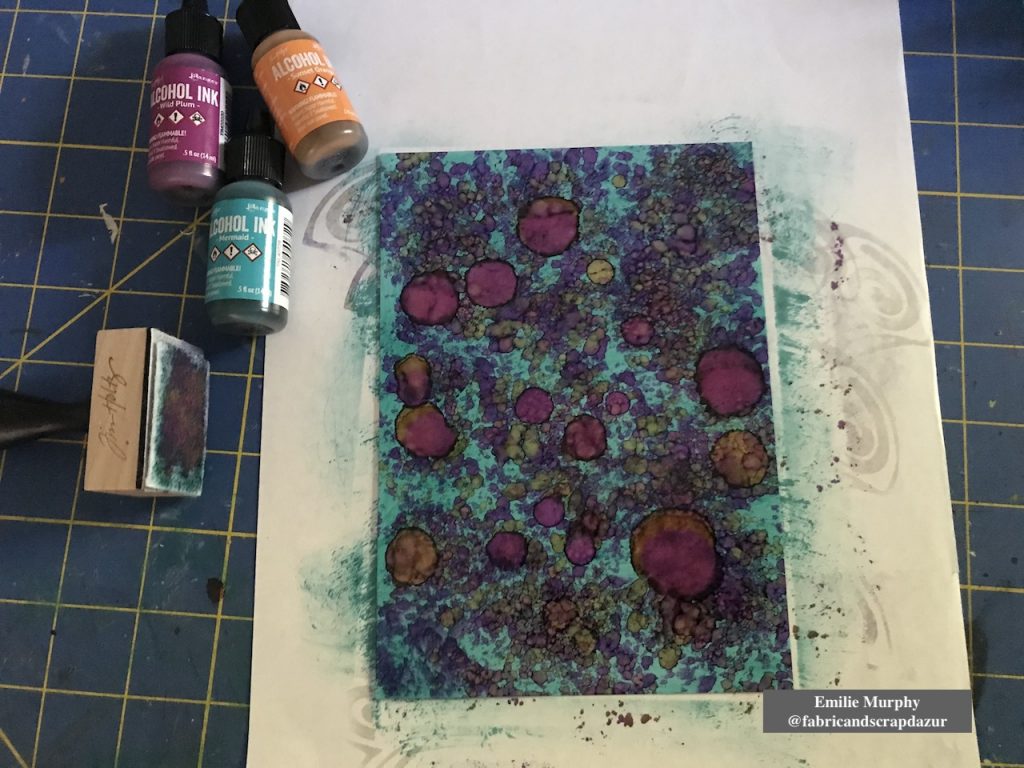
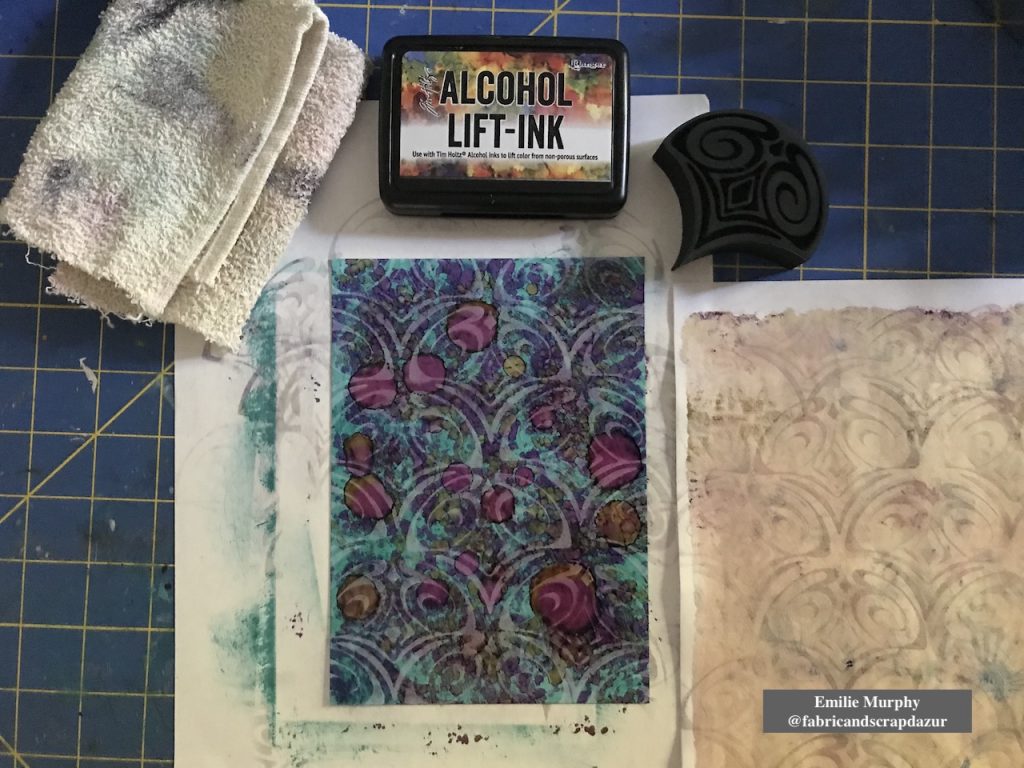
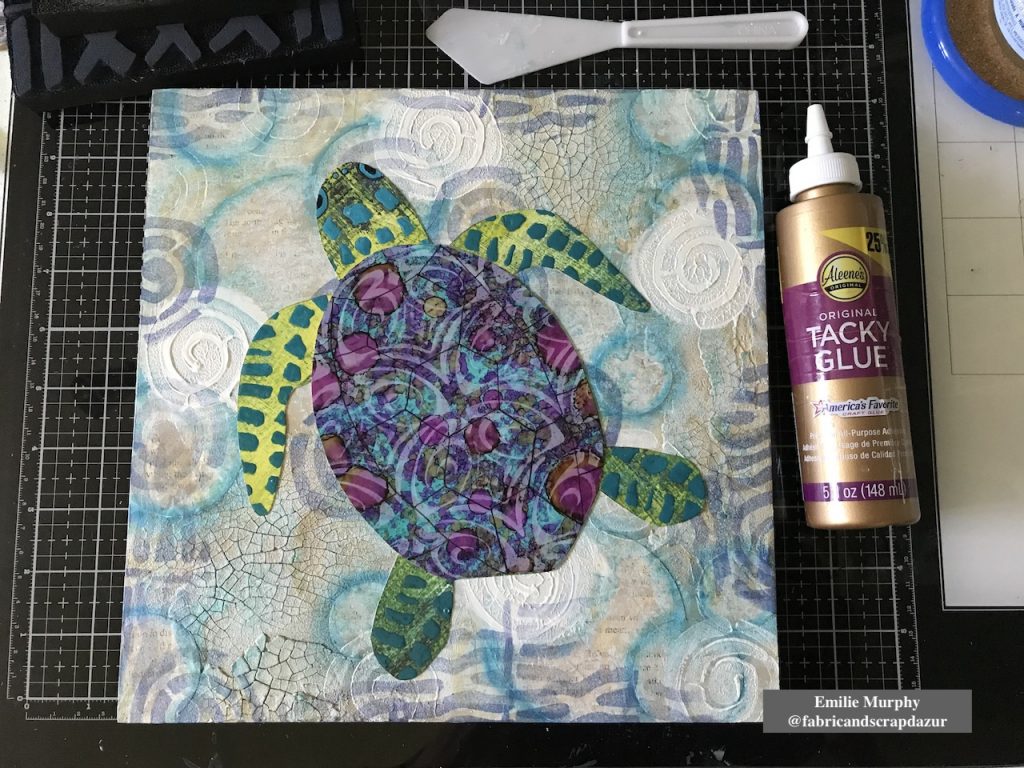
Next, I played with some alcohol inks on yupo paper to use for the turtle shell. I wanted something bright and vivid.
Using the “Fairview Fan” (positive) foam stamp, I lifted off some alcohol inks and got this beautiful pattern.
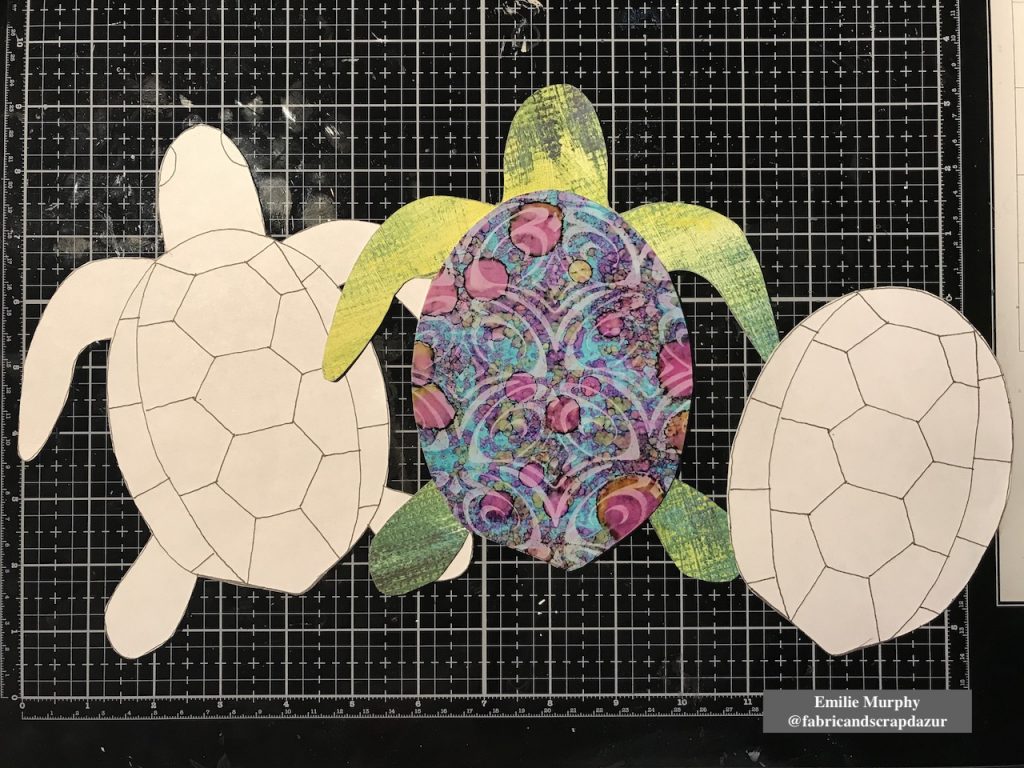
Then I drew a turtle on printer paper to use as template. I made two copies; one copy for making the turtle body and the second one for the turtle shell. I used the Yupo paper, previously made, for cutting out the turtle shell and I choose a scrapbook paper for the turtle body.
Let me tell you why I choose this particular scrapbook paper.
Few weeks ago, I received my stencils order from Nathalie. She had wrapped the stencils with this scrapbook paper sheet. When I look at it, I saw that she designed this paper few years ago. Yes!!! Isn’t it awesome! So it was a perfect opportunity to use it for my turtle body.
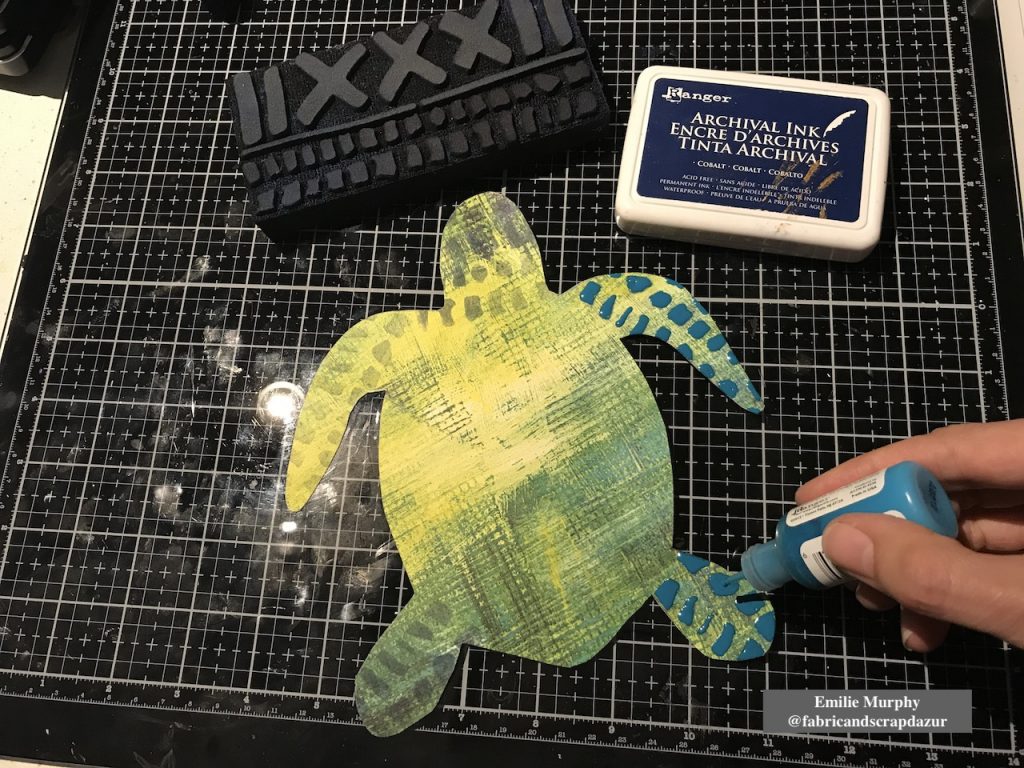
Then, to embellish my turtle, I used the “Mini Batik Pattern 1” foam stamp for the head and legs and covered the stamped pattern with enamel accents to create the skin.
With the same foam stamp, I stamped the edges of my cradled wood panel.
Before gluing down my turtle, I used again the “Batik Pattern 2” foam stamp to stamp only the “strips” part of the stamp, just to add more interest and introduce a different pattern than having just circles on my background.
I finally glued down my sea turtle with tacky glue and traced the pattern of the turtle shell. At that point, something was missing and I was not satisfied with my turtle shell like it was.
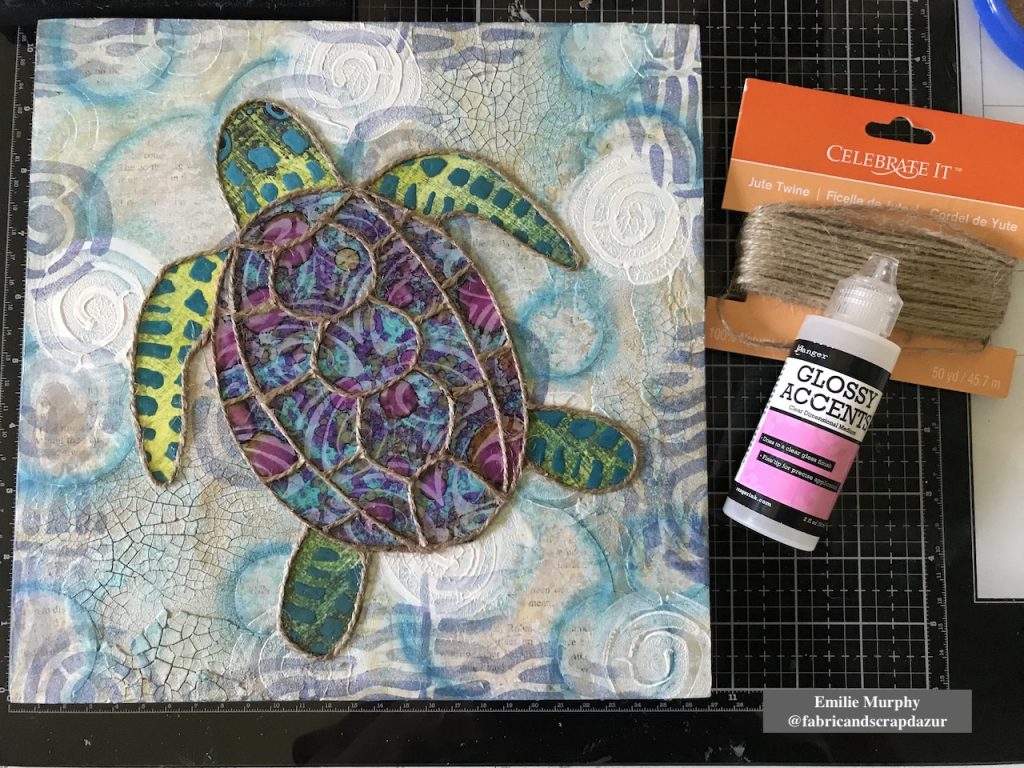
After reflection, I had the idea to glue some jute twine on the turtle shell and all around the turtle. I used some Glossy Accent as preference because it dries clear and shiny. I really love the look of it and think it was the perfect thing to do to make my turtle as the centered piece.
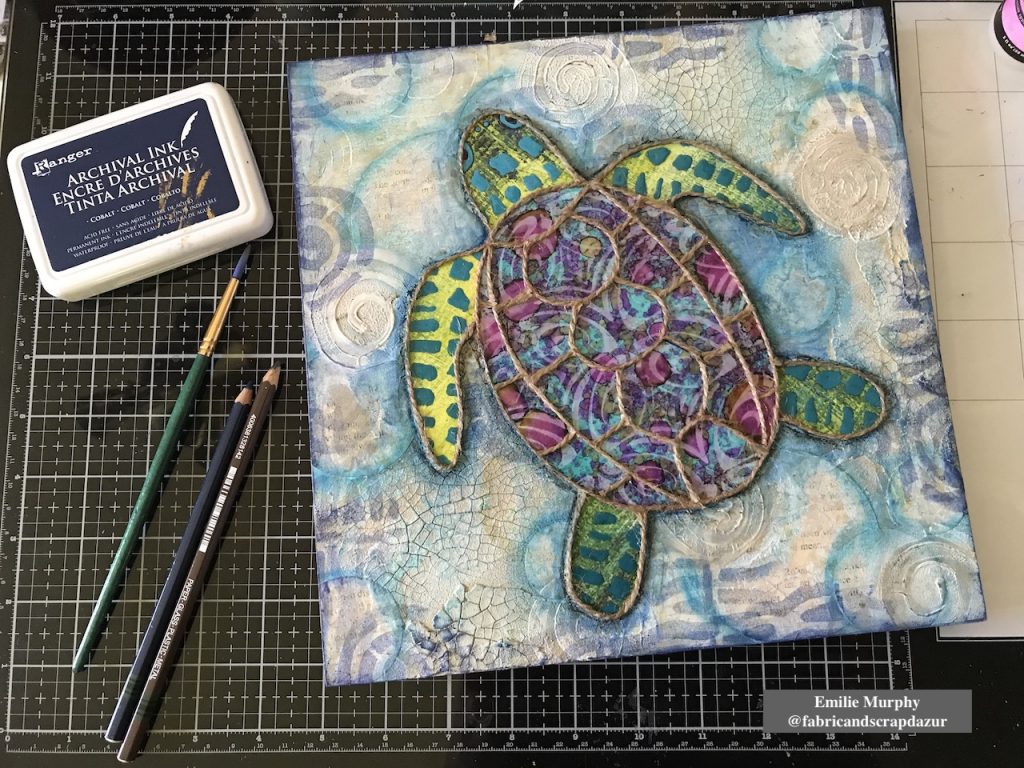
At last, I used some blue and brown Stabilo pencils to darken the edges of my turtle. And I finished off the edges of my cradled wood panel rubbing my “cobalt” archival ink pad all around.
Hope I got you inspired. Personally, I have so much fun doing this project that I’m thinking of making a series of smaller panels with other shapes like fishes and shells. This project can easily be made also on canvas or even in your art journal…
Have a good rest of the week and see you next month!
Thank you Emilie! I love how this turned out and that yummy texture is great!
Give it a try: you can find all my Foam Stamps in my Online Shop and in addition to some yupo and old book paper, here are some of the other supplies Emilie used:
Feel inspired? Working on something yourself that you’d like to share? I love to see how you interpret our monthly themes. Email me how you used my stencils and stamps with the theme and email me an image – I would love to share your projects in my next “n*Spiration From Around the Globe“.
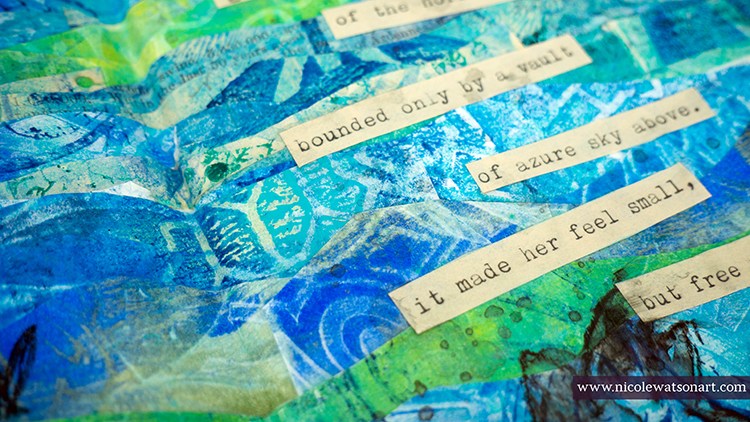
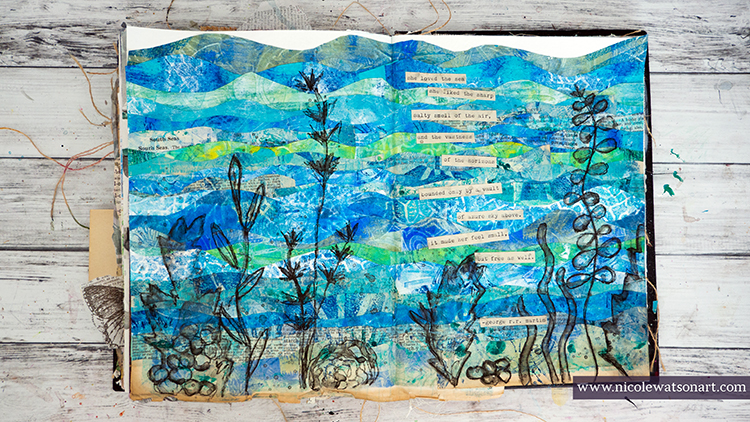
Hello from my Creative Squad! Today Nicole Watson is sharing her longing for the sea with us, with a beautiful art journal spread using a bunch of my foam stamps and this month’s theme: Under the Sea – There is something so fascinating about water. We love being in it, floating on it, relaxing next to it, and it remains one of the last frontiers here on the planet. Create something that is an ode to the sea.
Traditionally, my husband and I have taken a fall vacation to the beach in Florida. It’s one of our favorite vacation spots, right on the panhandle with white sands and emerald green water. I love to spend hours watching the ocean and its waves, walking the shore, hunting for shells while spotting a dolphin or two. I spend afternoons water coloring in my beach chair and exploring all the neat shops full of beach art. Unless something changes, this will be the third year in a row that we are not going to make it to Florida. A hurricane, moving, and now the pandemic.
I am so longing for our beach vacation, and these journal pages play homage to my love for the sea.
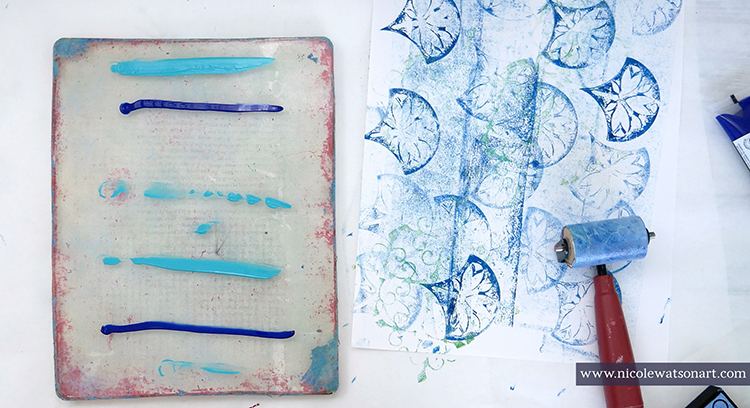
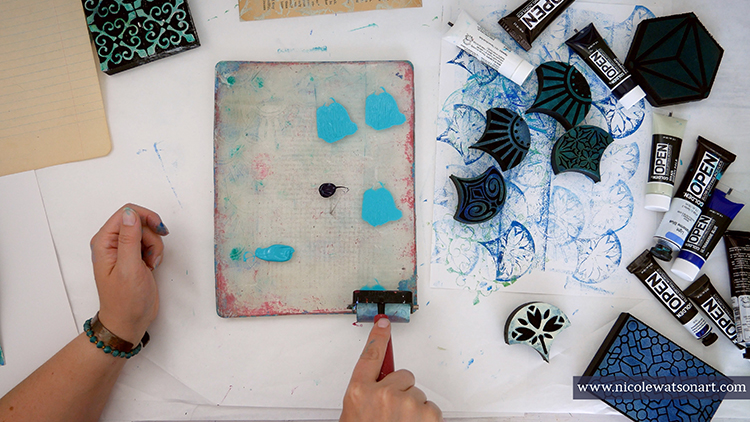
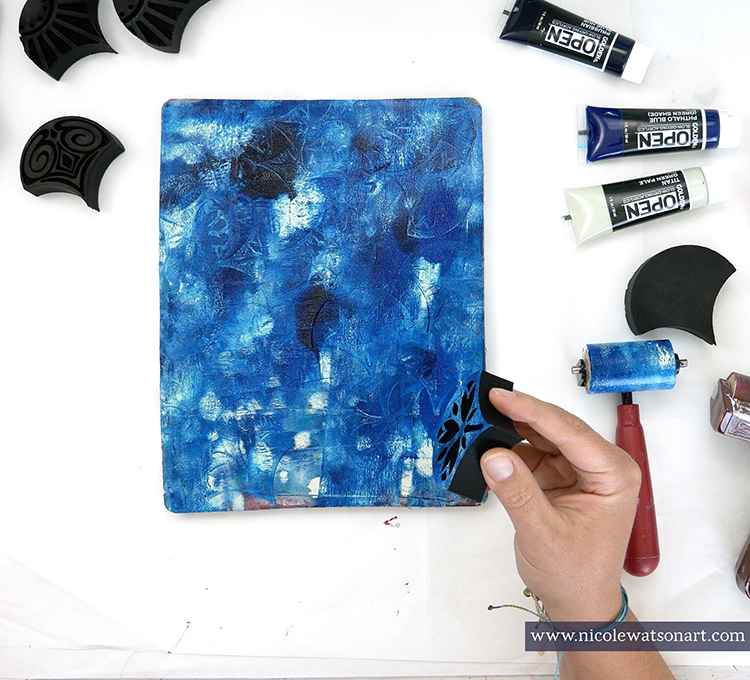
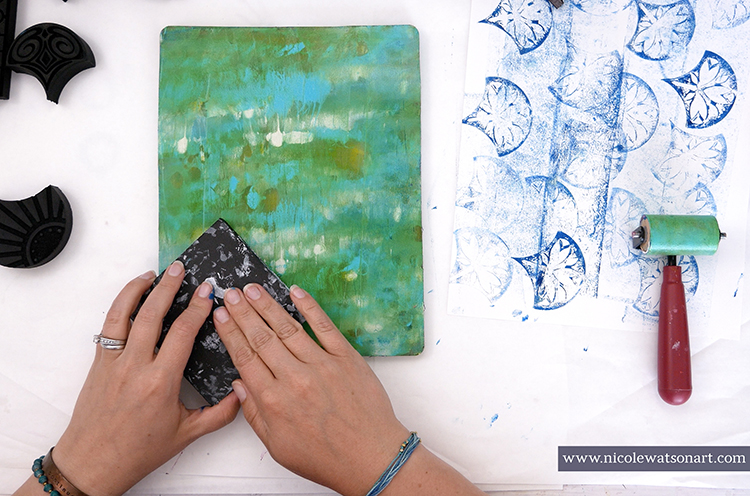
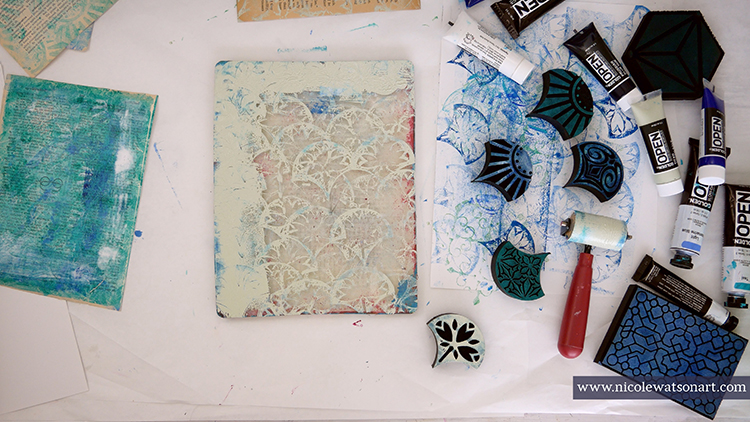
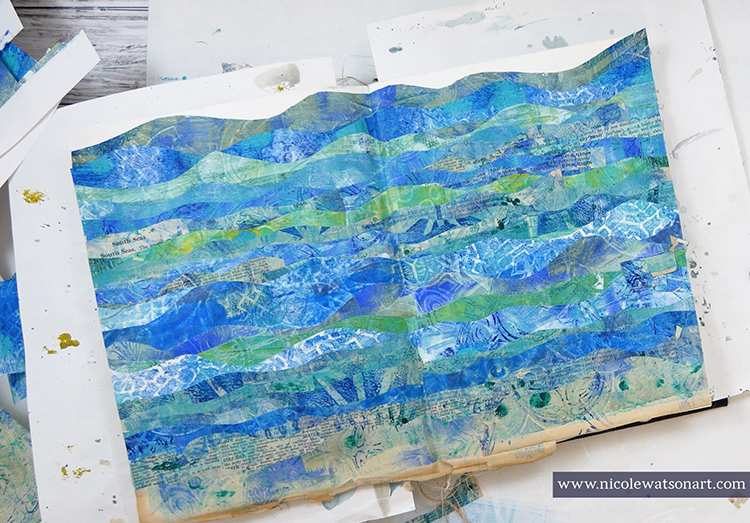
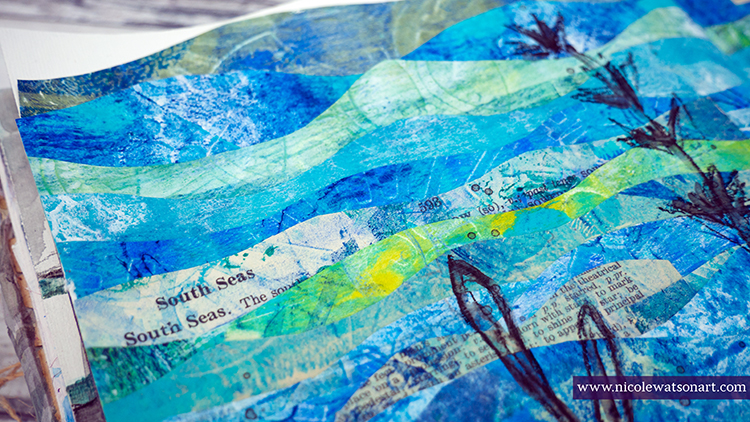
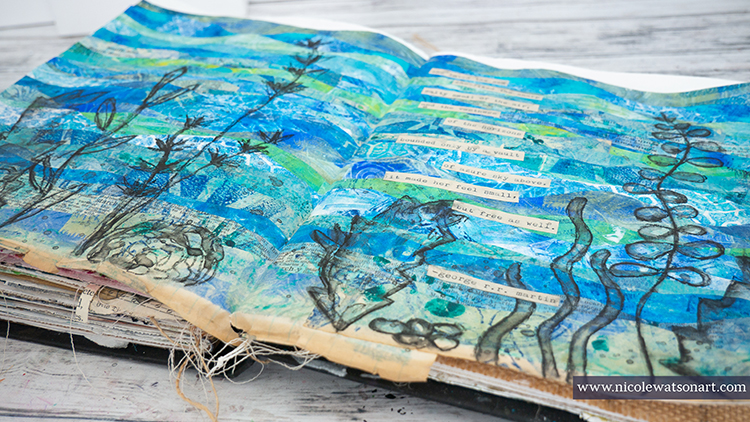
First, I spent an hour gel printing papers using Nat’s ArtFoamies. I layered ocean colored paint on my plate, stamped the foamies, and pulled prints. The magic happened when I added layers to each pull creating depth in the prints.
One simple recipe I used a lot: Layer paint on the gel plate, stamp with art foamies, pull a print and a ghost print or two.
Then, once dry, create a small puddle of contrasting paint in the corner of the gel plate as a palette and stamp another foamie all over. Use the original prints to add this second layer of interest. You can see in the video how I layered the texture of different ArtFoamies with contrasting paint to create beautiful, gel printed pages.
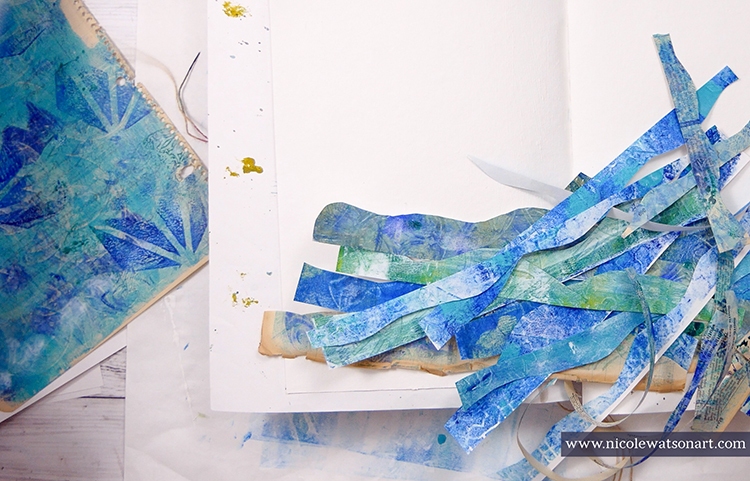
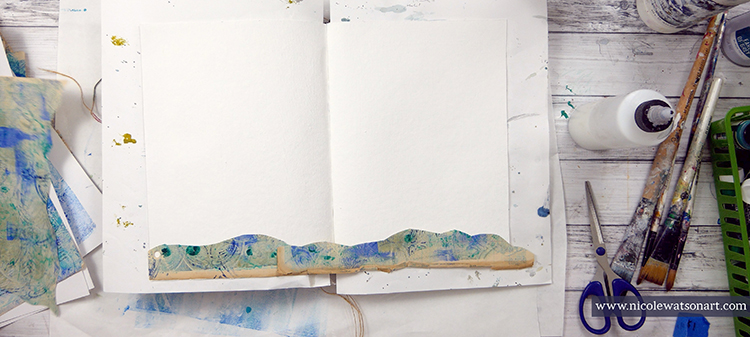
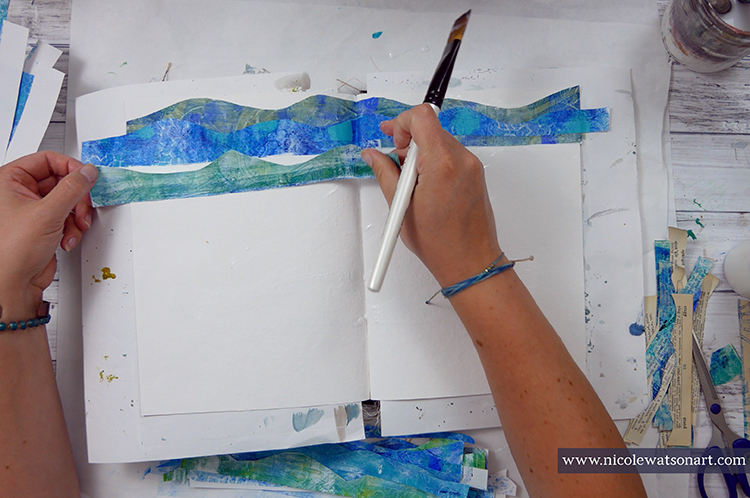
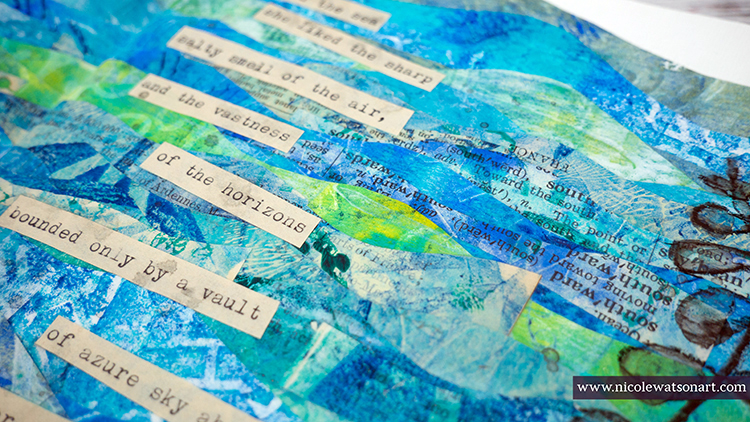
Next, I needed to decide what I was going to do with these prints! I had in mind that I wanted to create an ocean, so I just went with it. I cut strips of paper in wavy lines from the gel prints, then I layered them on my journal pages with matte medium.
I picked a specific page that looked more like the ocean floor or beach shore for the bottom layer and kept in mind to vary the colors as I layered the papers. I let my ocean dry overnight, which was also my excuse to think about what to do next.
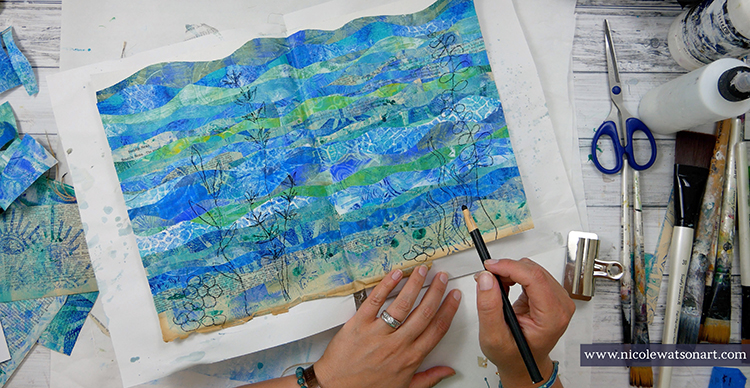
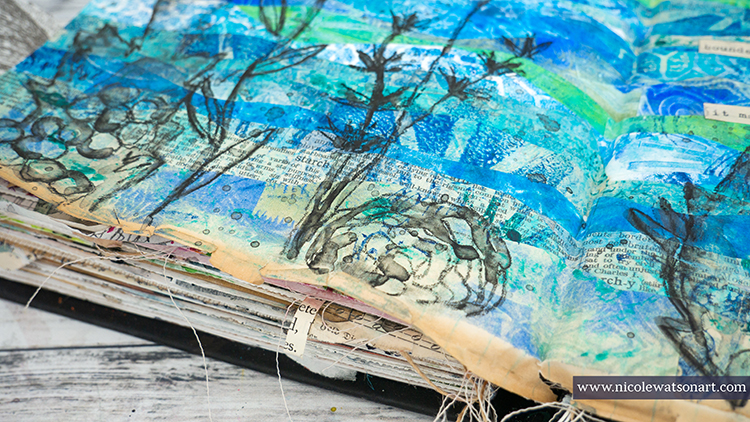
I honestly had no idea on what the next layer should be. I wanted to keep the pages simple and just add a quote or poem until my husband inspired me. The screen saver was playing on the TV and he suggested I look at it to get an idea for my journal pages. On the screen were layers of seaweed in the ocean.
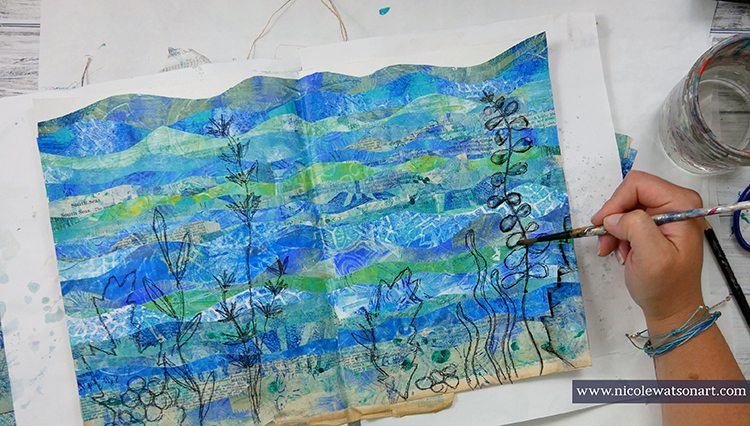
The next day I trimmed the edges of my pages and then sketched some seaweed (I looked online for some seaweed pictures as inspiration.) with a charcoal pencil and then with a stabilo-all pencil. I wanted it to not stand out too much and have a watercolor feel, so I activated the stabilo with water. Then, I flicked some of the stabilo to look like water bubbles.
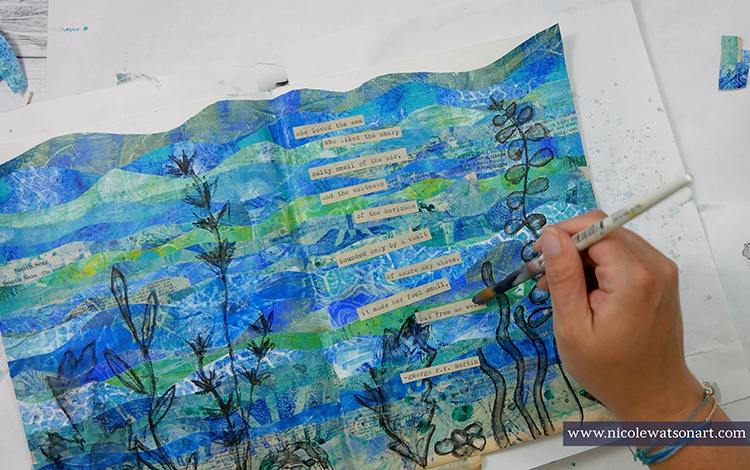
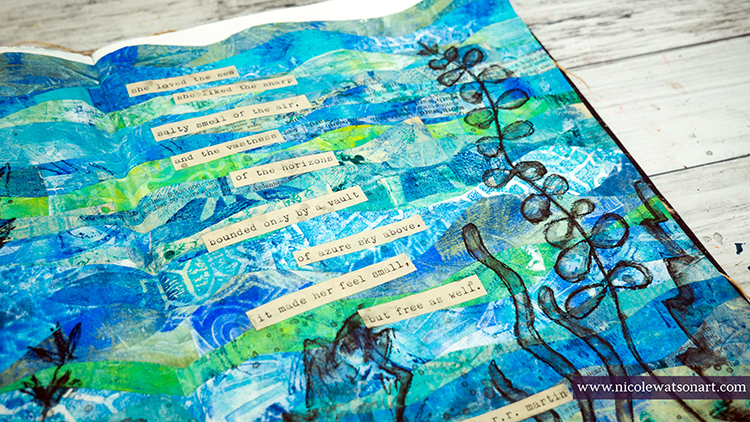
I topped my pages off with the perfect quote that touches on my love for the sea. I typed it out on some aged paper, cut it apart, and adhered it with matte medium.
I love how my faux ocean turned out with the ArtFoamie prints, and now I have several beautiful pages of prints to use in other projects as well. In fact, I already have one in mind. You’ll have to watch my Instagram to see what I create next.
Thank you Nicole! Love hearing how this project came together even though you didn’t necessarily have a clear plan at first… What beautiful results in the end!
Give it a try: you can find all my Foam Stamps in my Online Shop and in addition to her typewriter and a selection of printer, book, and scrap paper, here are some of the other supplies Nicole used:
Feel inspired? Working on something yourself that you’d like to share? I love to see how you interpret our monthly themes. Email me how you used my stencils and stamps with the theme and email me an image – I would love to share your projects in my next “n*Spiration From Around the Globe“.
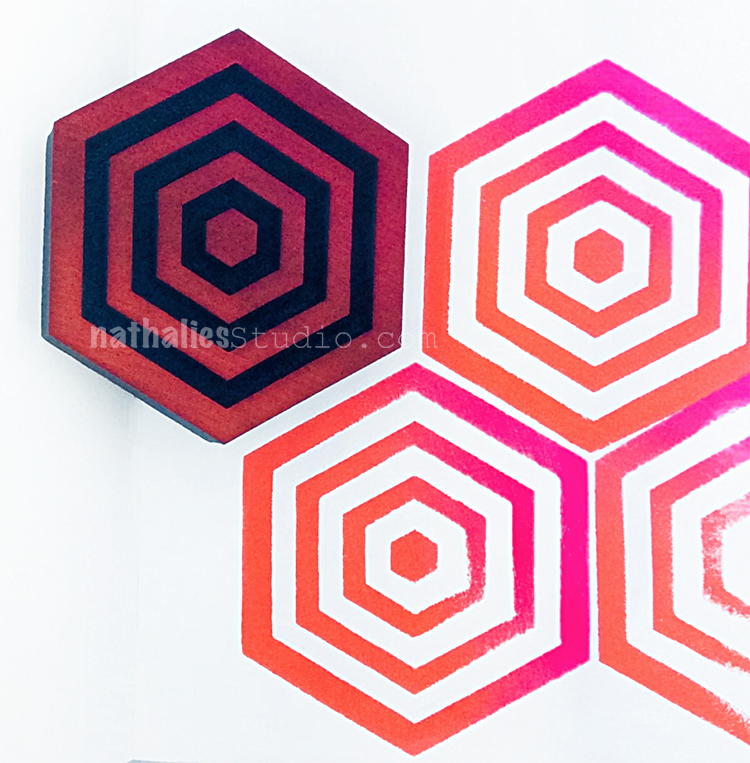
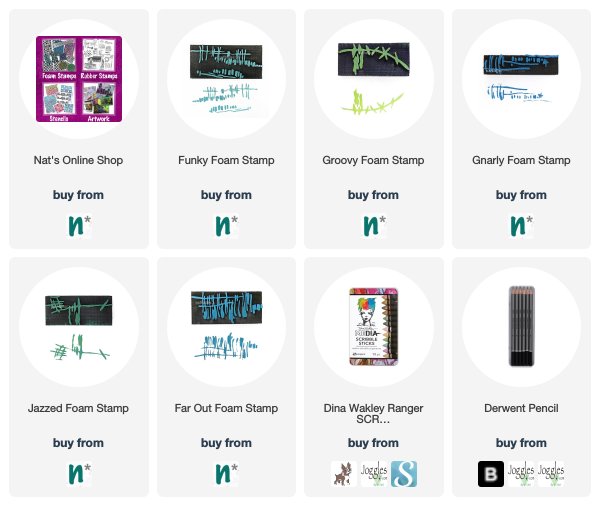
Space Oddity – a hex shape that pulses with energy…
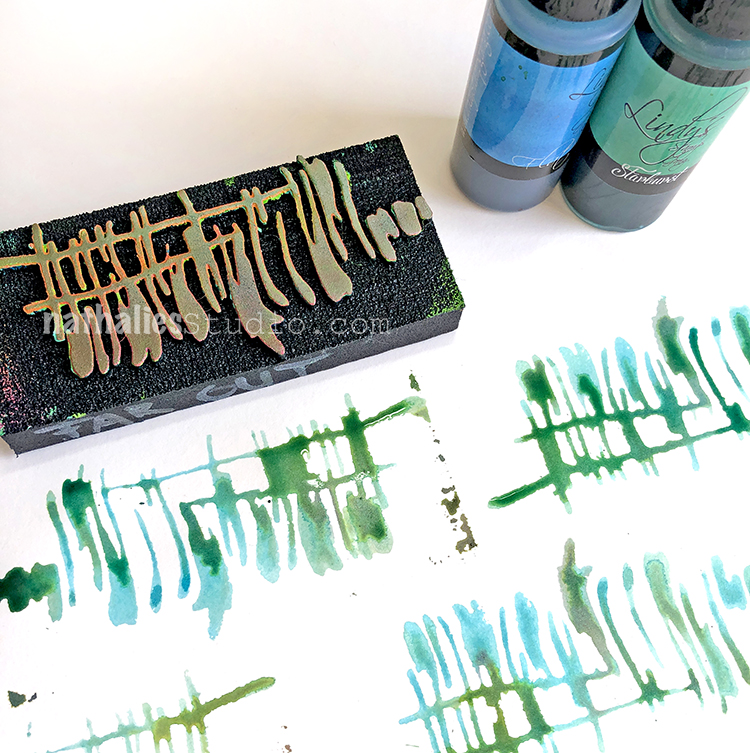
…and Far Out – your new favorite stamp for mark making or visual texture!
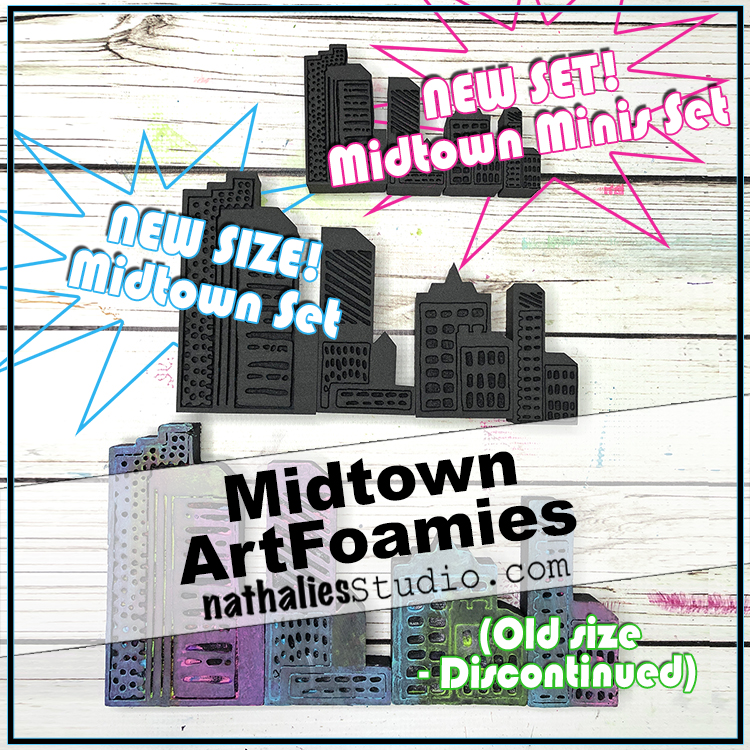
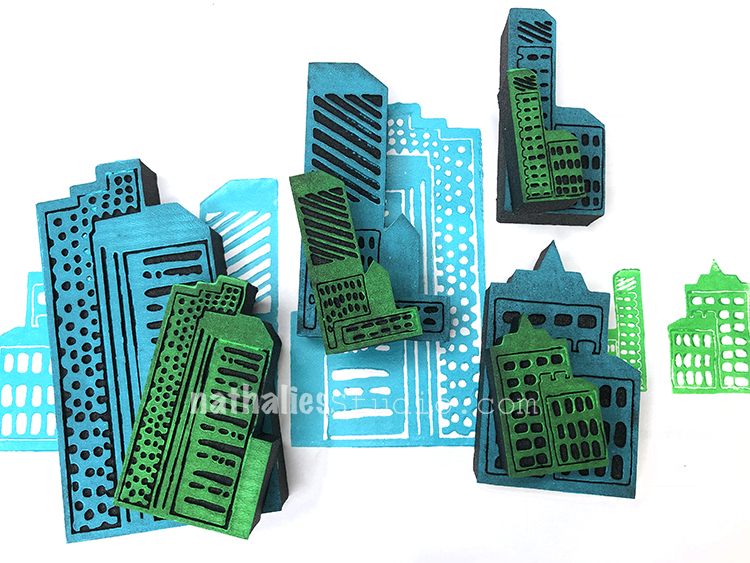
Also in there are 2 NEW sizes for my Midtown stamp set. This 4 piece set of buildings is my go to for a funky cityscape. The Midtown Set is now in a new size and I’m happy to also announce there is now a Midtown Mini set too!!! Super cute little buildings. Check it out below:
Both sizes are going to be a lot of fun to play with.
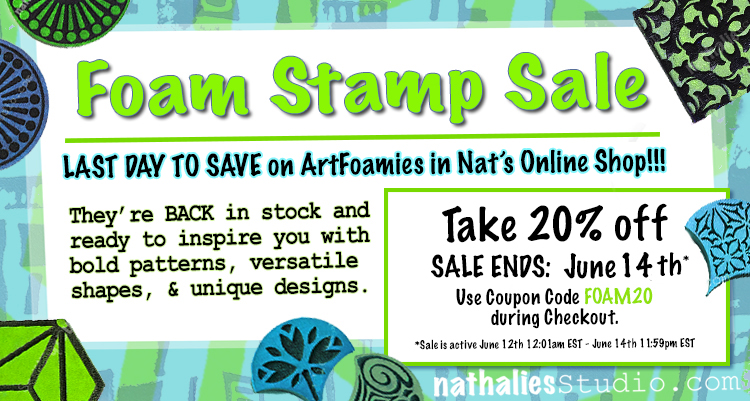
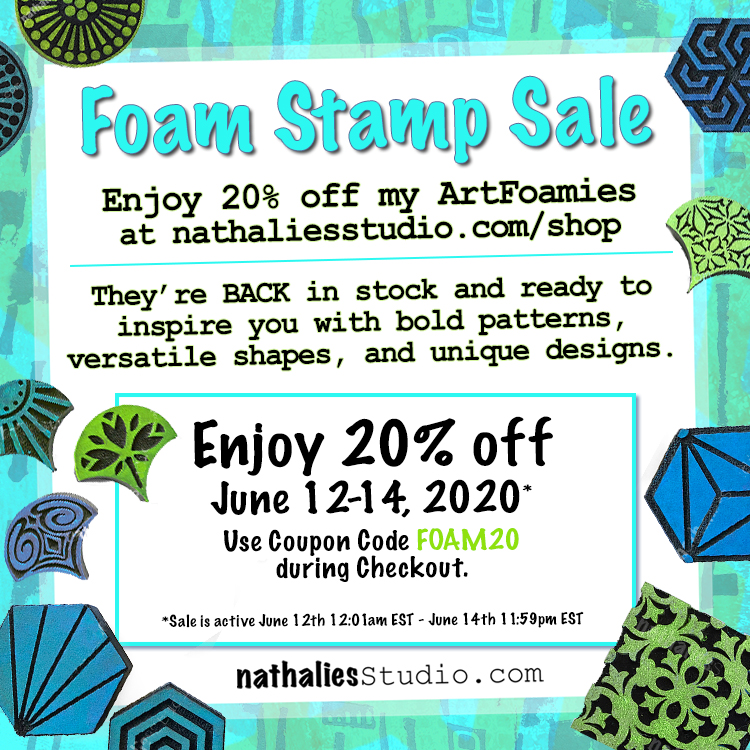
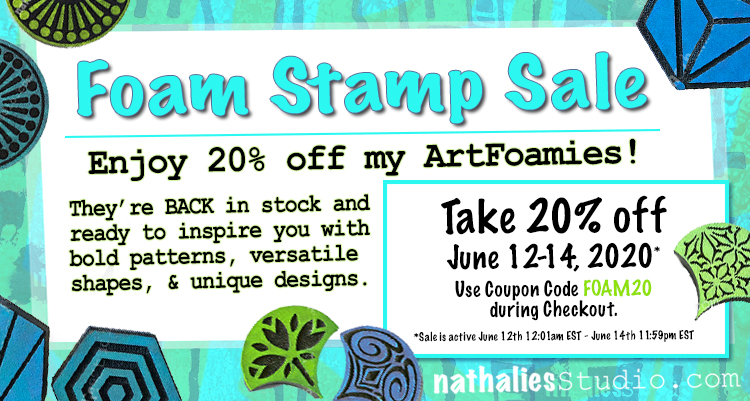
Hurry into the Online Shop and use the coupon code FOAM20 to save 20% off your foam stamp order. Sale ends tonight, June 14th at 11:59pm EST.
ArtFoamies are Back and I’m having a big sale in my Online Shop! All my foam stamps are 20% off now through June 14th at 11:59pm EST.
Just use the coupon code FOAM20 when you check out to save.
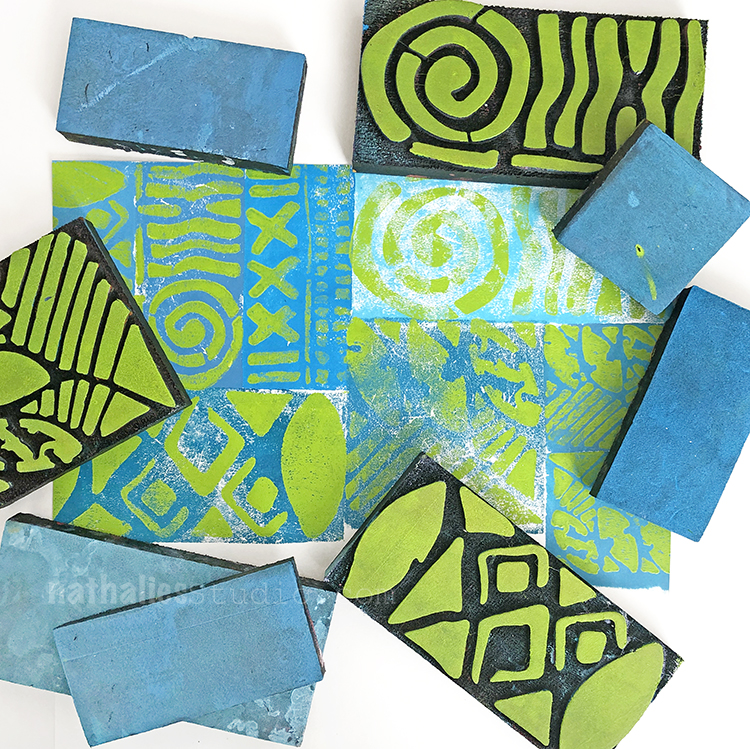
Besides using them in my Art Journal, I love artfoamies for all kinds of projects and with so many techniques. Check out some fun inspiration for how to use them here in my Foam Stamplifier challenge.
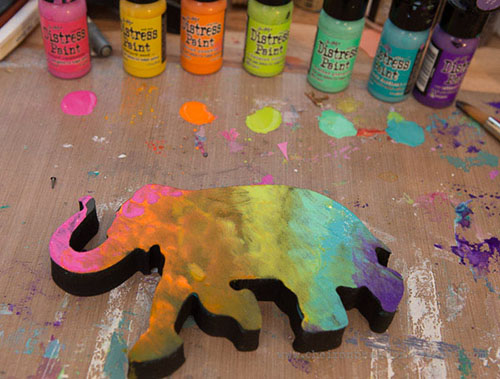
Here are some of my favorite foam stamps:
I love my Batik foam stamps (shown here using acrylic paint) – don’t forget you can stamp the back side for a solid block of color too! These are nice for fabric projects like clothing or kitchen linens.
Foam stamps look pretty awesome used with embossing powder – here’s my Park Blvd positive and negative set. Great for cards or maybe even a paper garland.
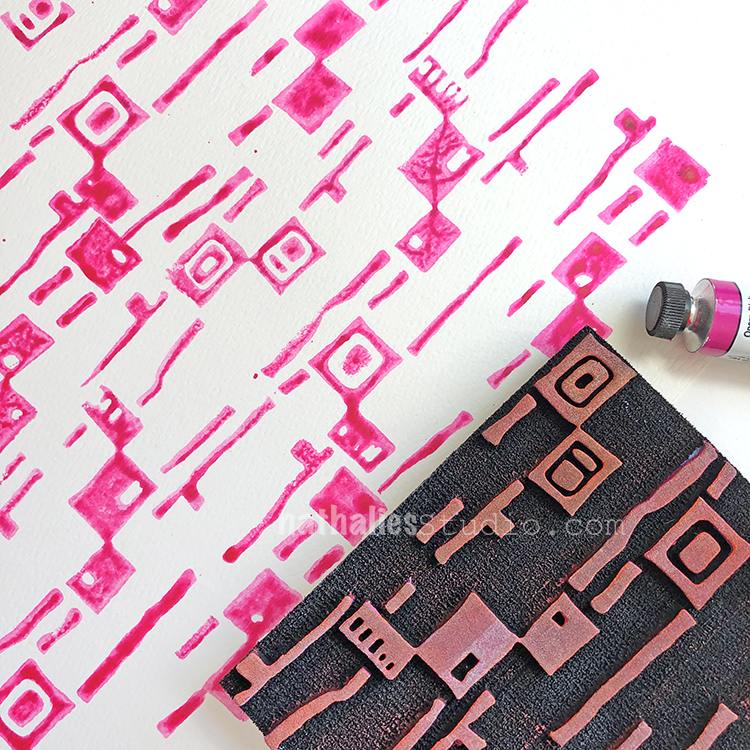
Foam stamps and watercolor paint? You bet! This is some hot pink with my Mid Century Squared foam stamp. Pretty juicy.
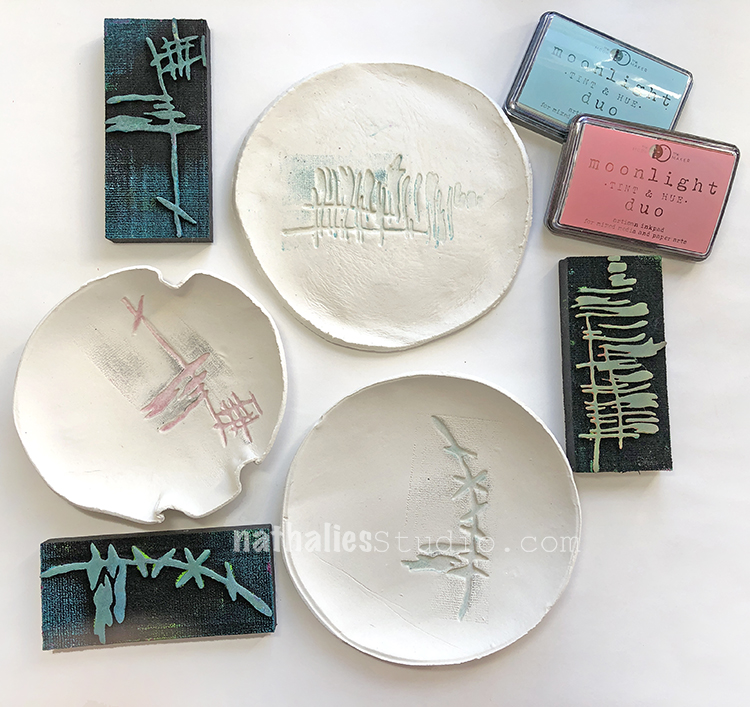
Here I pressed my Jazzed, Far Out, and Groovy foam stamps into paper clay with Moonlight Duo ink for some sweet decorative bowls.
Head over to the Online Shop and get stamping on some fun Summer projects of your own. Hurry hurry, stock is limited and the sale ends June 14th at 11:59pm.
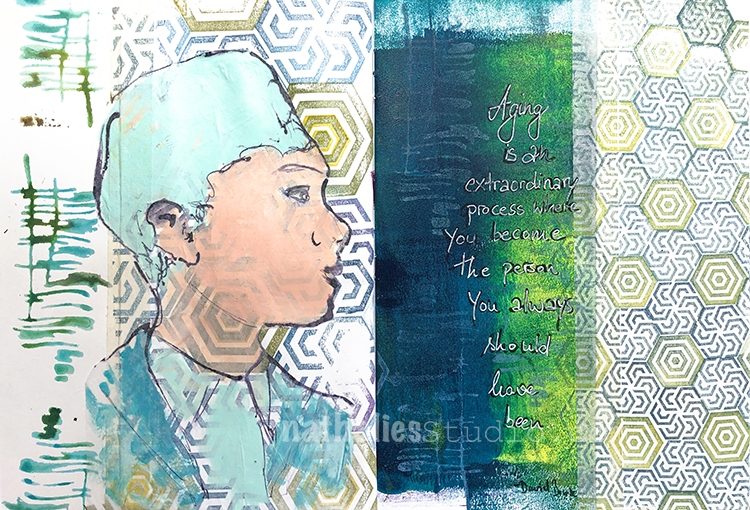
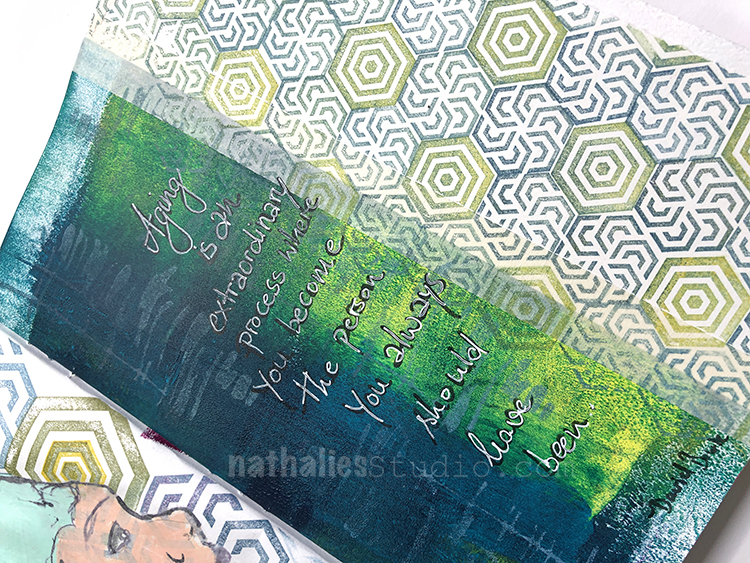
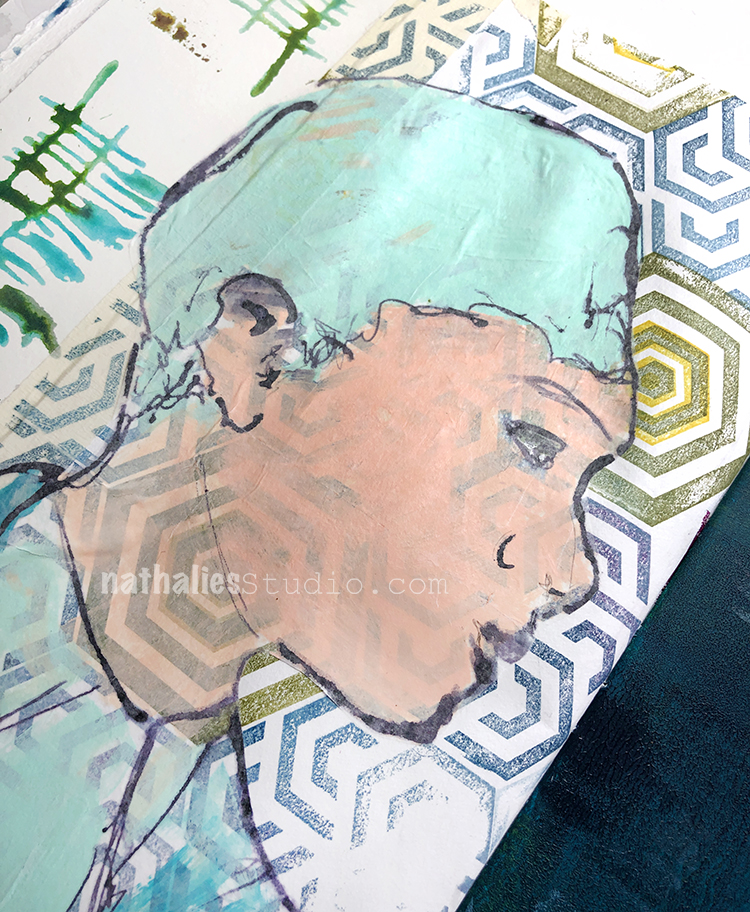
“Aging is an extraordinary process where you become the person you always should have been” David Bowie
This spread was tons of fun. I used dye spray paints on the left to stamp with my Far Out Stamp, then I used the Large and small Hex Rubber stamps with an inkpad to create a pattern. The area that is painted in acrylic and green was over stamped with white ink and the Far Out stamp- it is very subtle but I like the repetition of the pattern.
Some ink and acrylic paint for the lady and voila ..another very mixed media spread.
I received the Scribble Sticks set 3 as a thank you for playing along in the Ranger Designer Challenge in January. I wanted to test them out with my foam stamps. Here is my Funky foam stamp getting a bit of blue…
I wet the foam stamp back and applied the scribble stick and then stamped for the blocks of color. I did the same with the front for the designs.
A Look Back – a blog series to show you some projects and posts that you may have missed – sometimes going WAY back in the archive. I think it will be fun to revisit a few ideas that we haven’t seen for a while. I’m excited to see how a little look back might inspire something new in the future :)
This time I’m looking at foam stamps and some ideas for using them in ways you maybe didn’t think about, even with the help of my March Foam Stamplifier Challenge. Here is A Look Back. Enjoy!
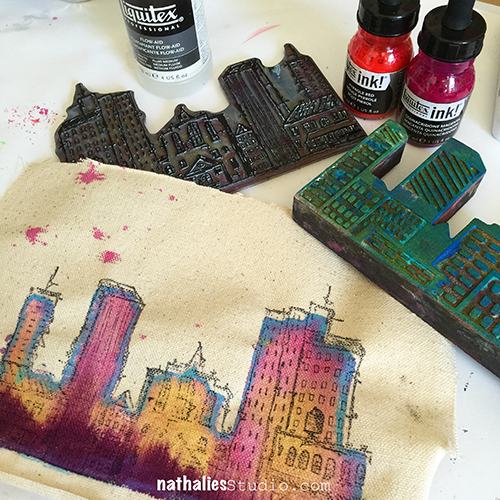
You can use foam stamps in the canvas staining technique – just prepare your canvas staining solution (I used Flow Aid by Liquitex in this 2016 blog post) and use with acrylic inks. The canvas readily absorbs the color in a soft, washy way.
You can also paint directly onto a foam stamp with high flow paints as Cheiron Brandon did in 2016 for my Creative Squad. She spritzed the stamp with water and then got multiple colorful impressions from it on watercolor paper. Each was unique and super fun!
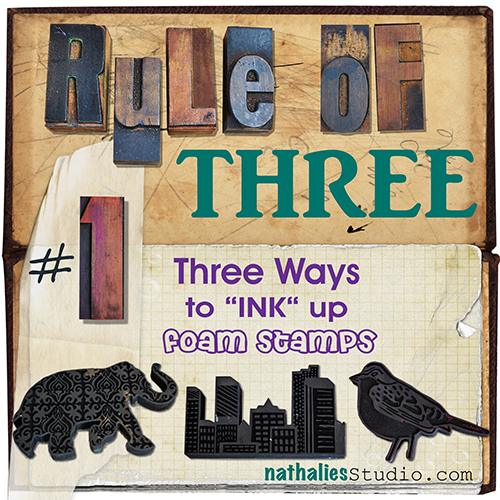
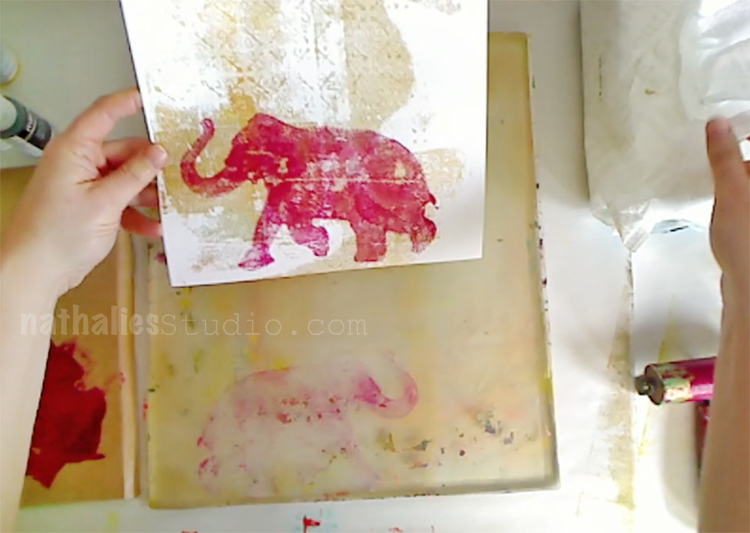
I made a little video here that may inspire you to try some different methods of “inking” your foam stamps. It’s nice to find the way that you are comfortable using foam stamps and in the video I show 3 easy methods.
In another helpful video I made back in 2016 I show how to reverse a foam stamp image using a gelli plate. This is an easy technique that you can use to create mirror images or patterns with a reverse.
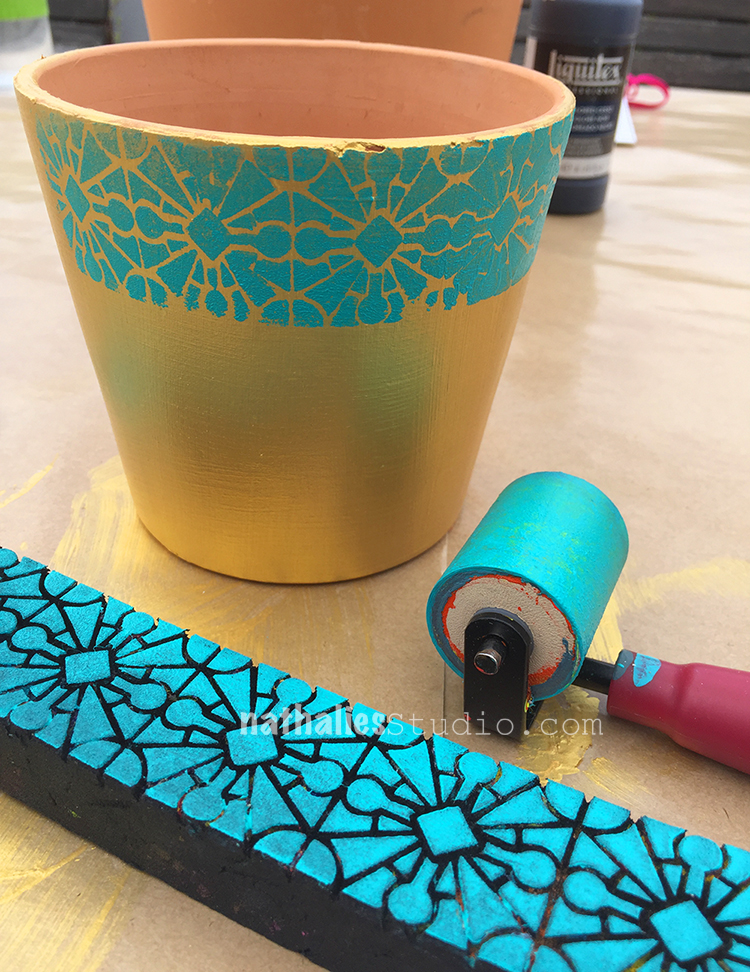
If you are looking for a summer project with your foam stamps, here is a flower pot decorating tutorial I made. I used standard clay pots and acrylic paint to give my herb pots that summer a bit more personality.
I hope you enjoyed A Look Back through my archive and maybe you are inspired to try some new things with foam stamps.
Here are some of the supplies that were used in these pieces:
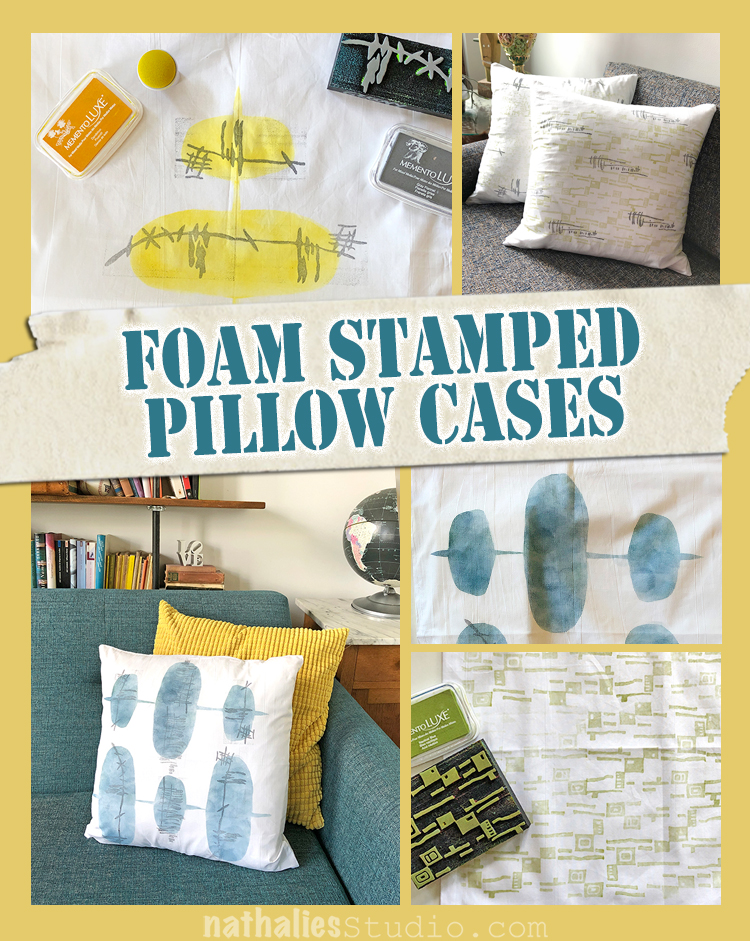
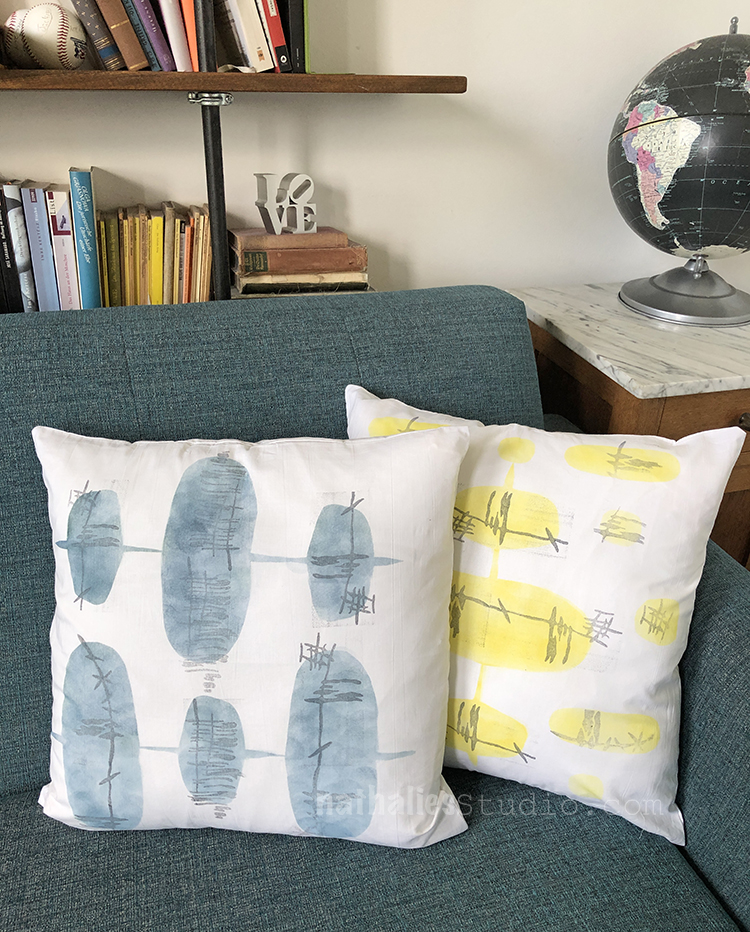
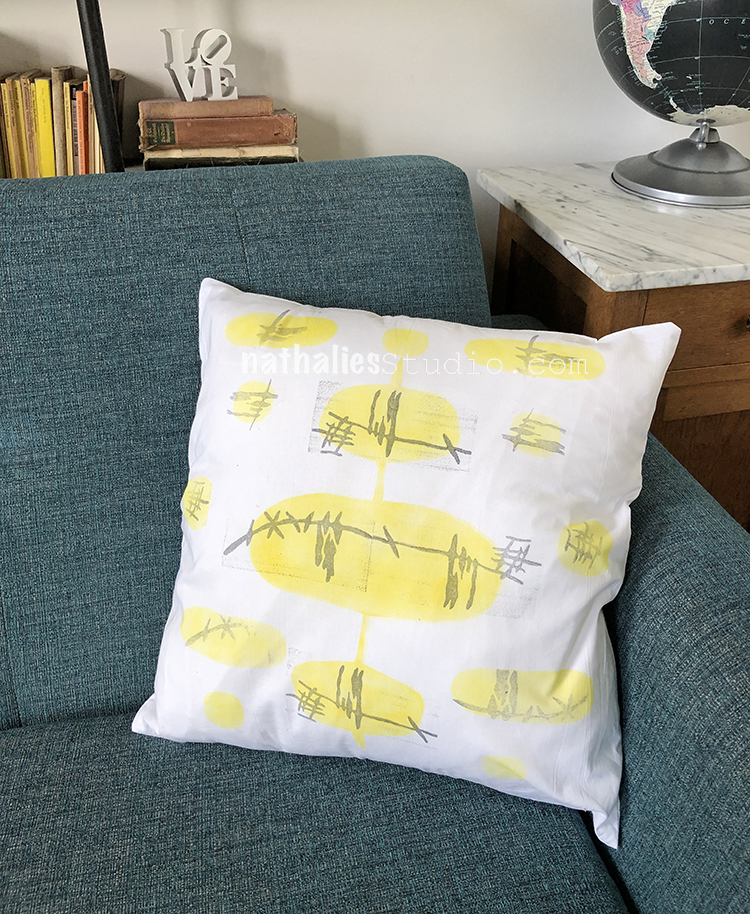
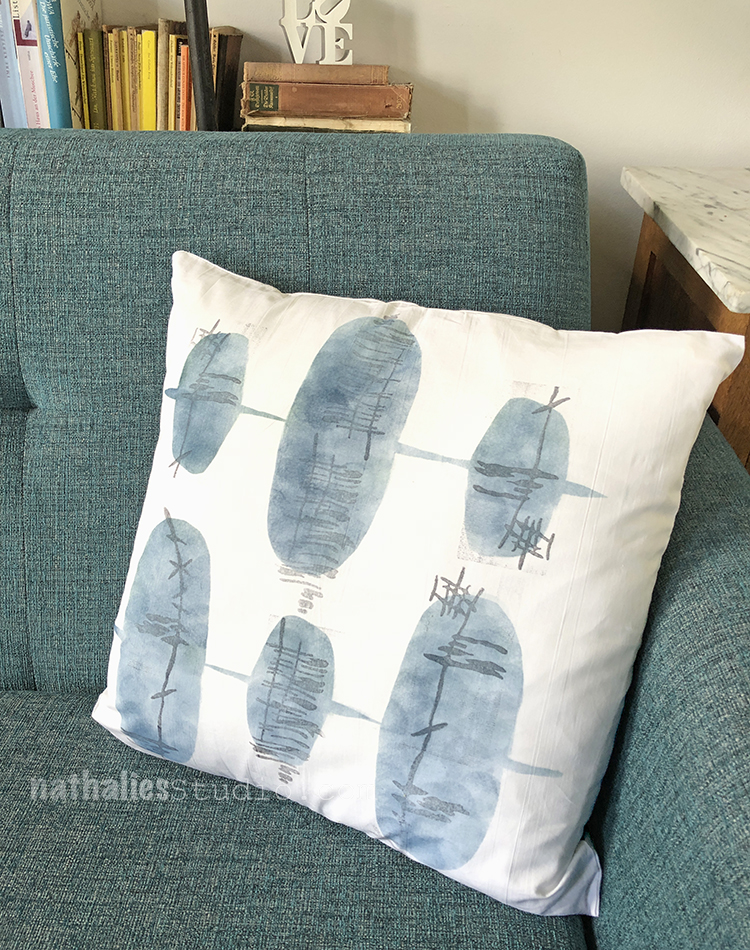
A couple weeks ago Kim and I got together for a little home decor play date – stamped pillows. We used my newest foam stamps, some fabric ink pads, and white cotton pillow cases (we already had inserts). This was a pretty quick and easy way to refresh the living room.
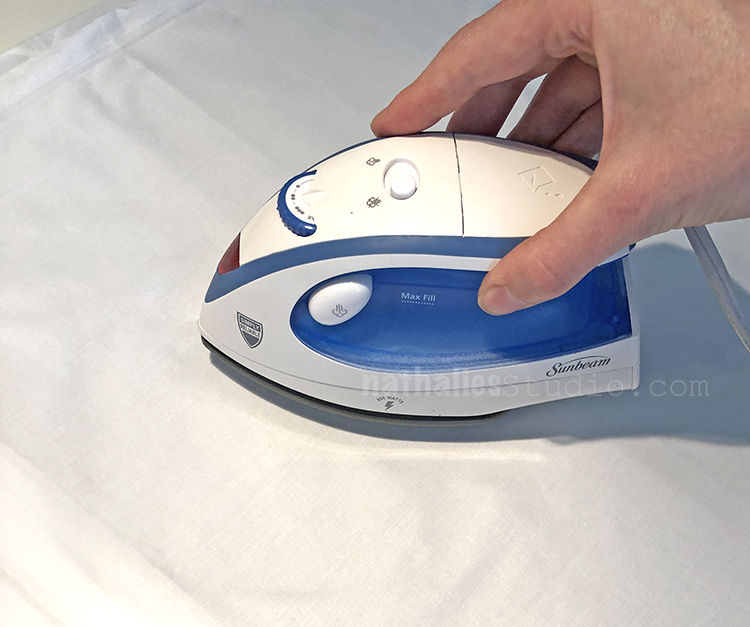
Take the time to iron your pillow cases first. The stamping will look better if you’re working on a smooth fabric.
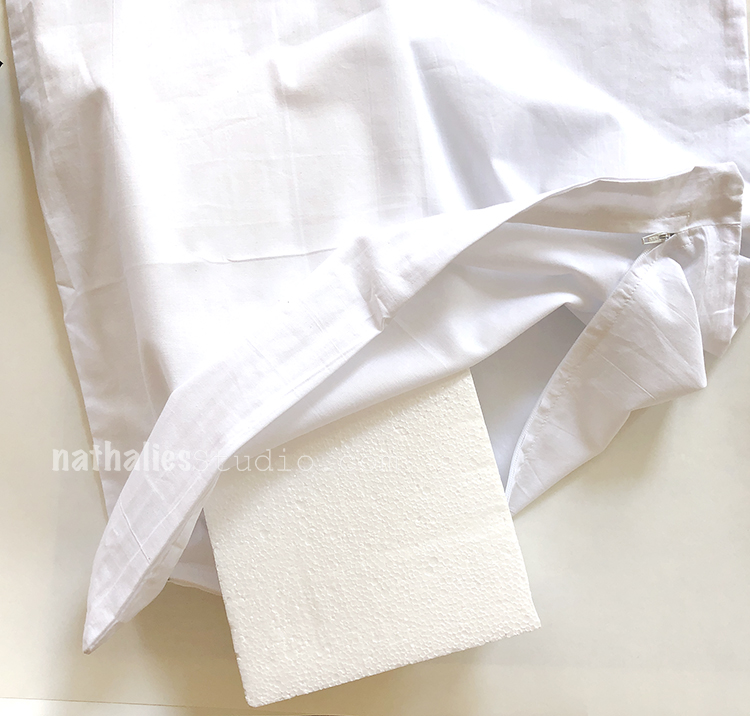
Slip something sturdy and smooth into the case before you stamp to prevent the ink from bleeding through to the other side. We used some styrofoam pieces I had laying around.
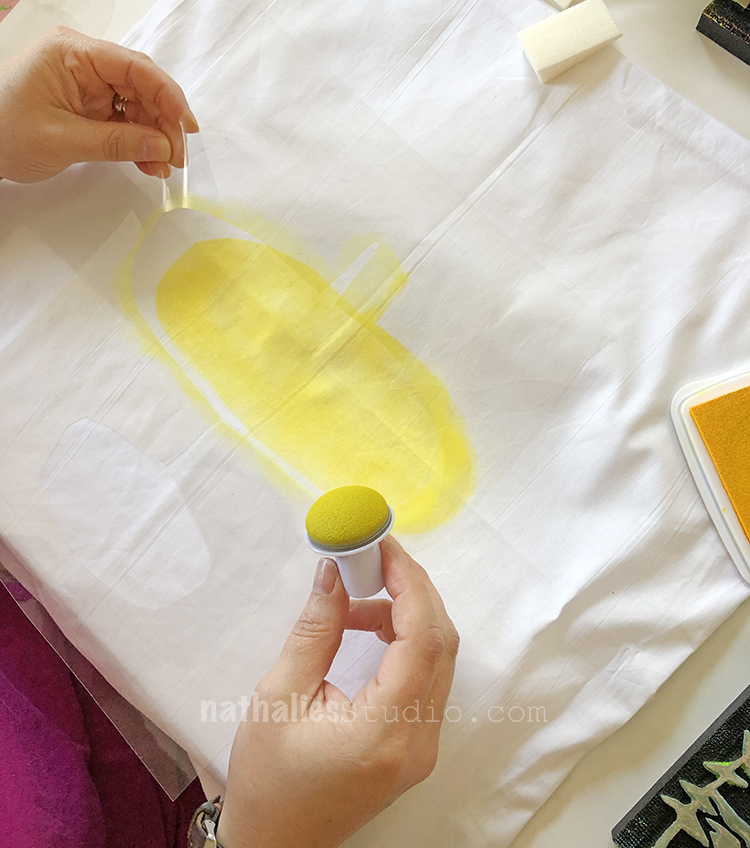
I made my own stencil out of transparency sheets for a sponged background. It’s hard to see in this photo, but it is a shape that is sort of classic mid century.
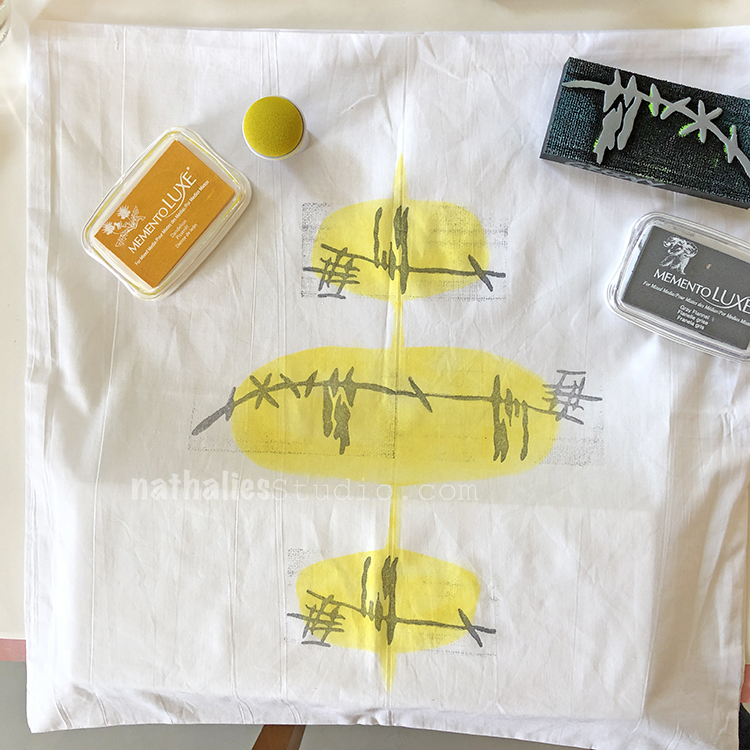
I filled in the shape with yellow ink, slowly building up the density of the color on the pillow case.
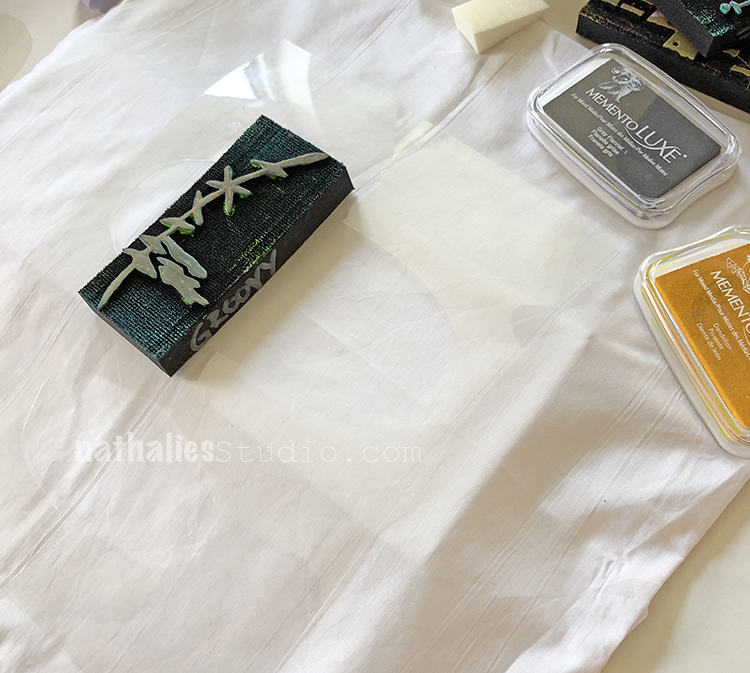
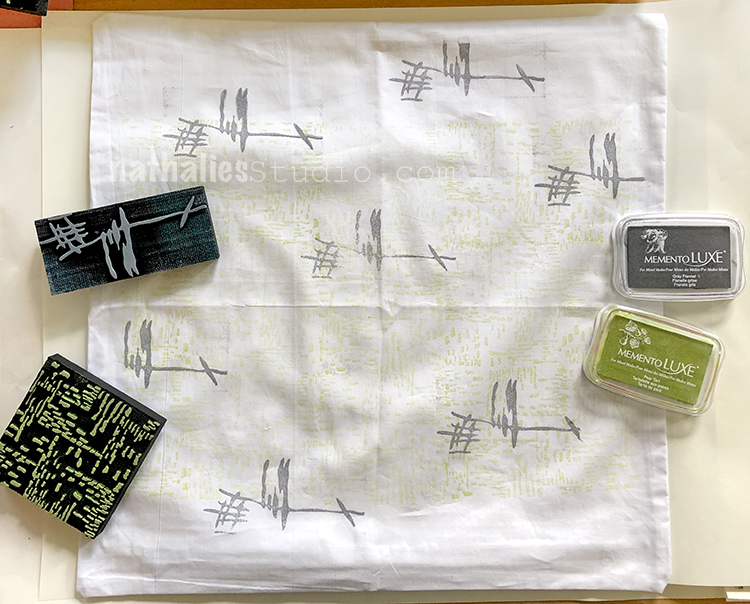
Then I went back in with gray ink and my Jazzed foam stamp. If you don’t want the edges of the foam stamp to print, press more lightly on the stamp. I like the added visual texture here and the authentic block print look.
I also stamped with my Groovy foam stamp – it connects really well with the Jazzed one to make a longer, continuous design.
I filled in some of the other areas with additional yellow shapes.
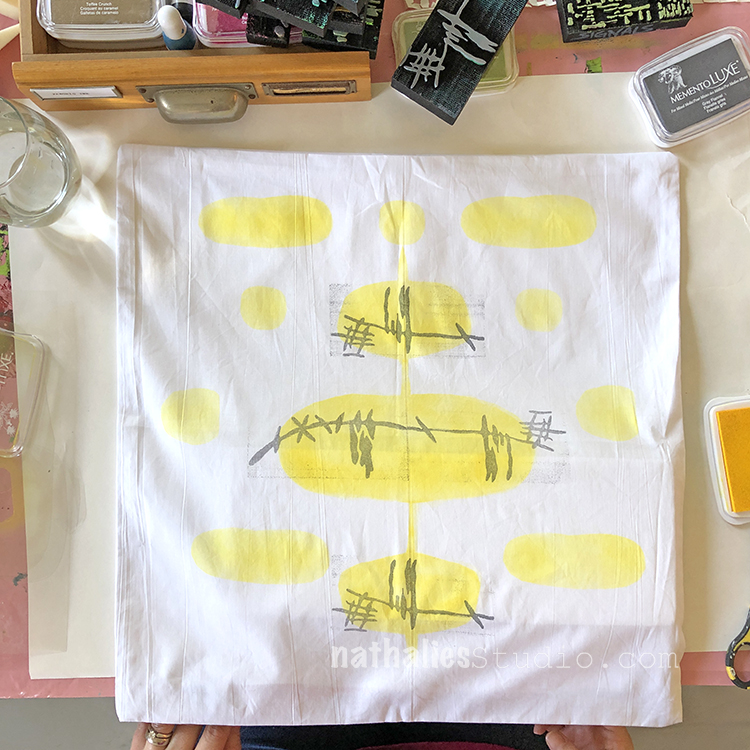
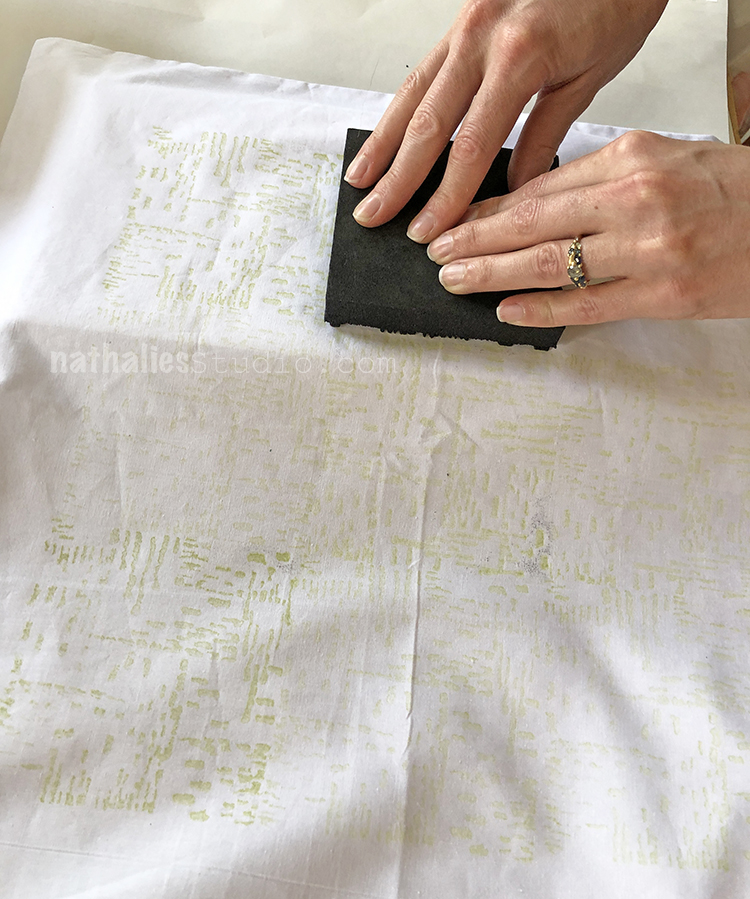
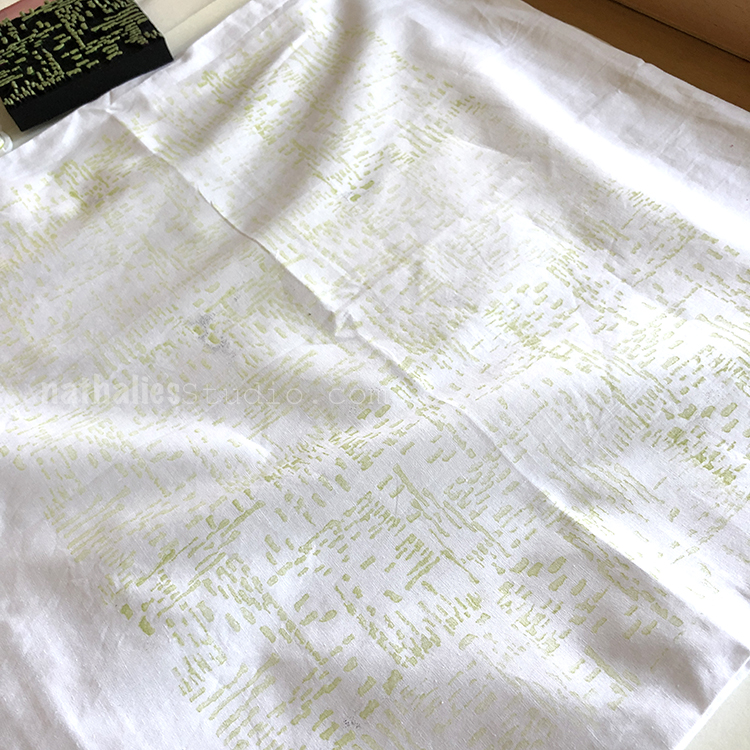
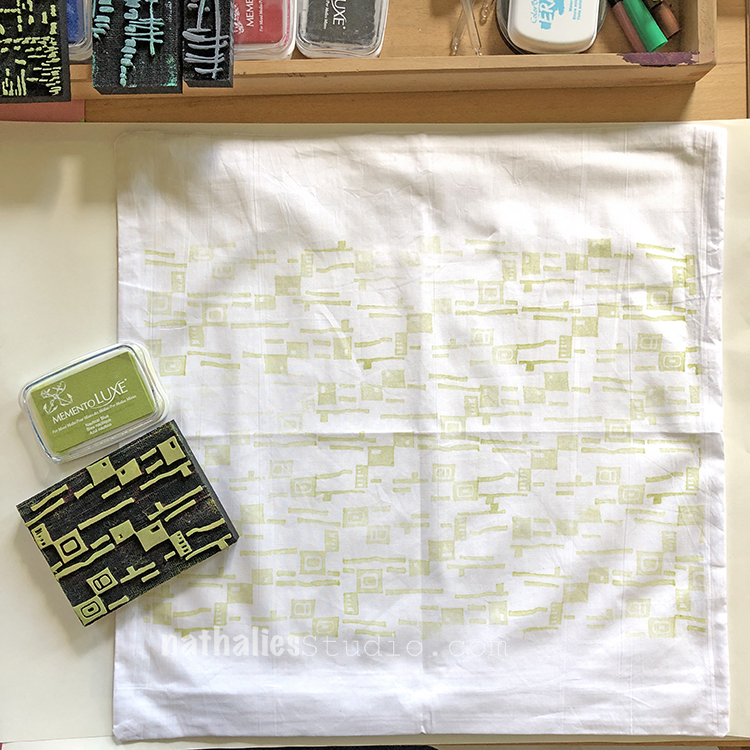
Kim stamped a subtle background pattern using a pale green ink and my Signals foam stamp.
Here’s the complete background.
Then she came back and stamped my Jazzed stamp over it using gray ink.
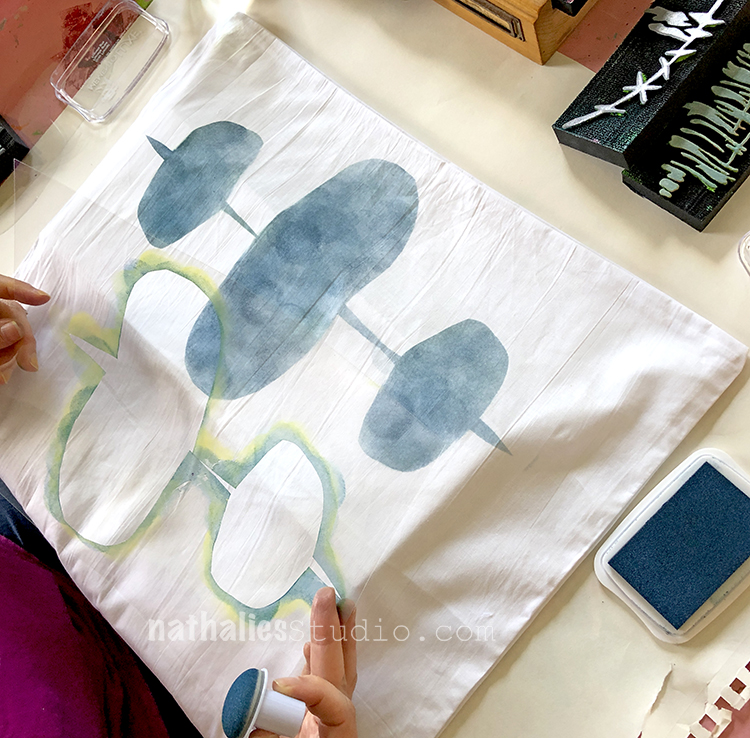
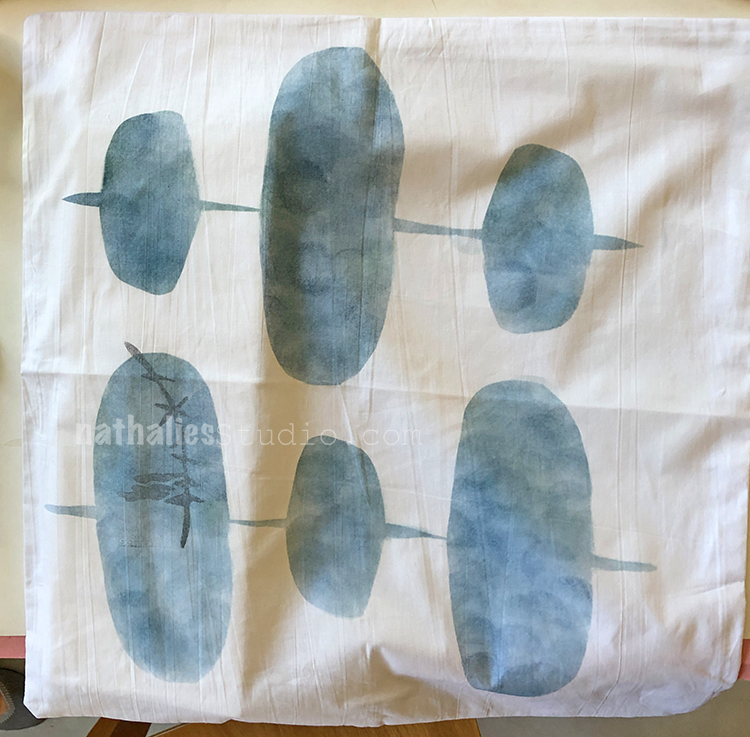
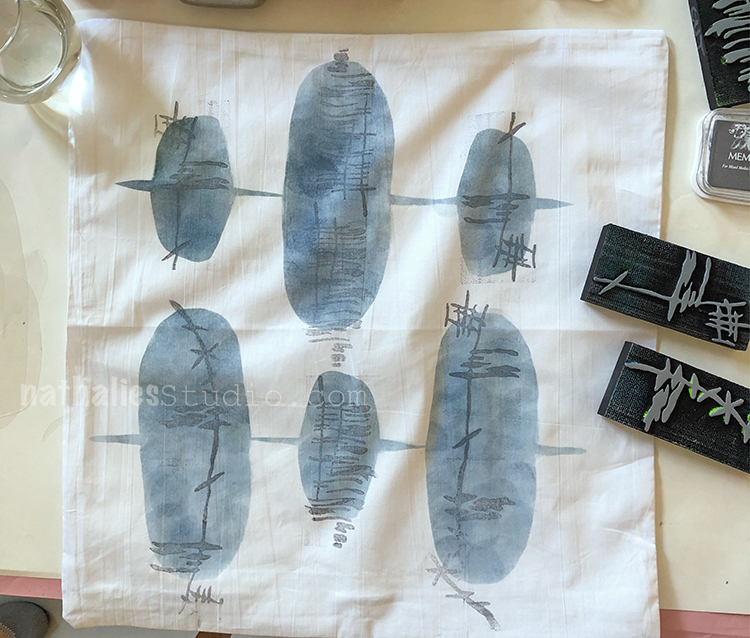
I began a second case using blue ink and the same hand made stencil.
I sponged in the abstract shapes.
And then I added the Far Out, Jazzed and Groovy stamps over the shapes.
Kim’s second case began with a background using my Mid Century Squared stamp.
She finished her second pillow with my Gnarly stamp again in gray. After the cases dry, follow your ink manufacturer’s instructions for setting the ink, end enjoy your new home decor!
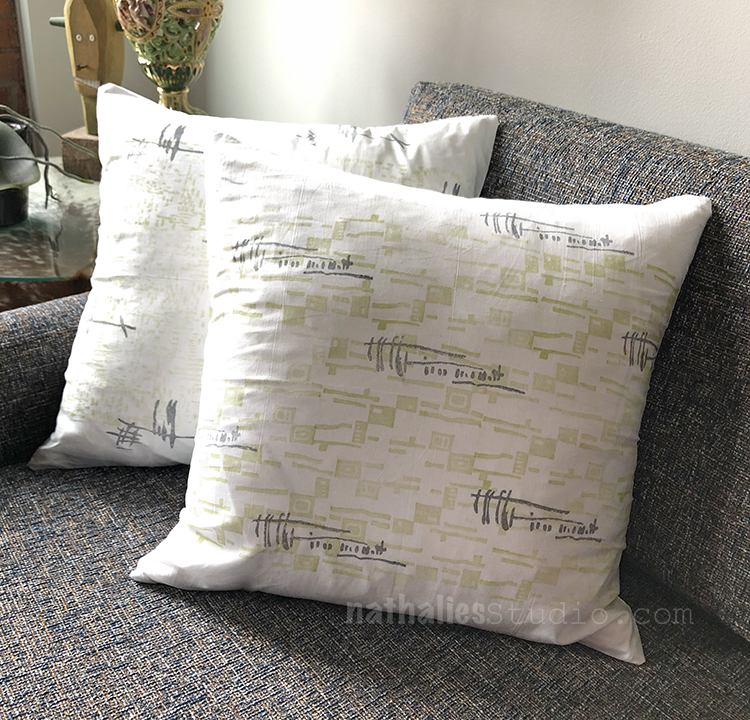
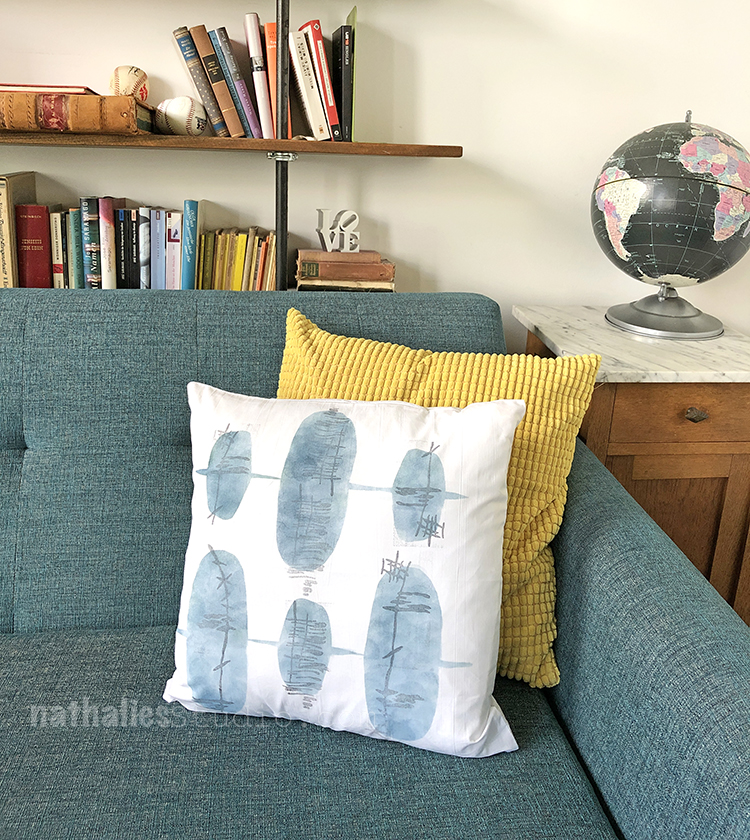
Stamped pillow cases are a very quick way to spruce up your sofa.
My cases look great on our teal sofa.
I love how the yellow one compliments some of the books in the background.
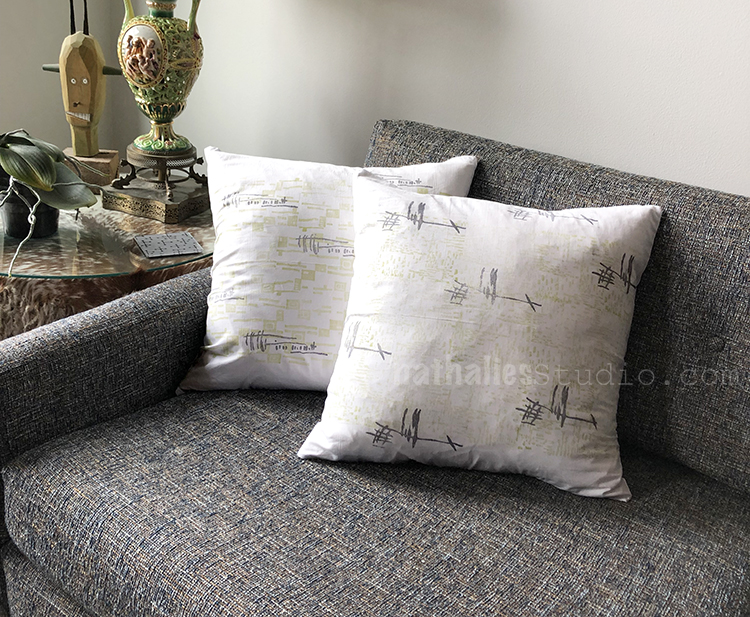
And the blue one is definitely my favorite – I might make a second one in this color.
I planned it so they also work with some of my existing pillows.
I hope you try this project – just another way to use foam stamps and fabric inks. Here are the supplies we used:
oh, Nat, these are adorable! (i have used your elephant stamps to do pillows for a friend.) i love the block print look you got from the foam stamp mounts. now i know my next project!


Emilie, delightful colors and TEXTURE!
Reply