A Look Back – a blog series to show you some projects and posts that you may have missed – sometimes going WAY back in the archive. I think it will be fun to revisit a few ideas that we haven’t seen for a while. I’m excited to see how a little look back might inspire something new in the future :)
This time I’m looking at some stenciling ideas from my blog archives – projects and techniques that make the most of your beloved stencils. Here’s a look back. Enjoy!
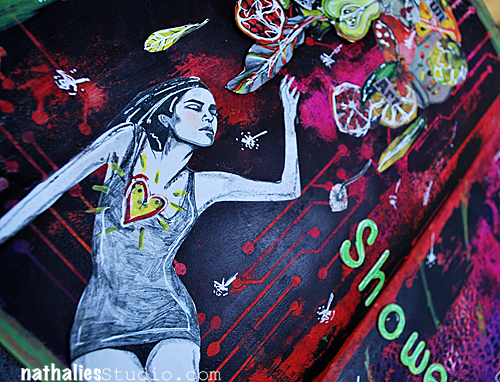
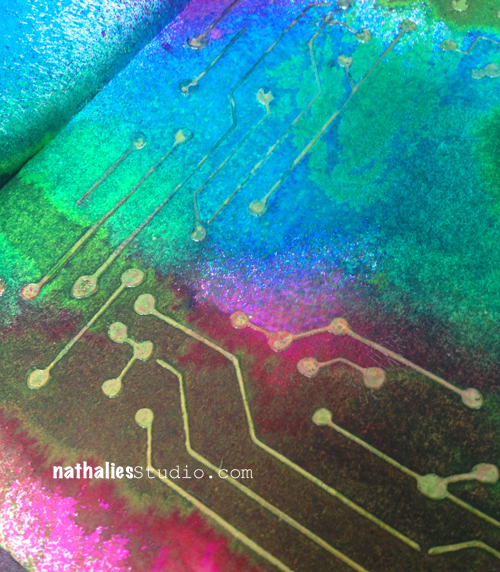
This was a cool page I did back in 2013 with my Circuit stencil. I sprayed my stencil with black spraypaint and while it was still wet I flipped it over and rolled it with a brayer. Voila! Reverse printed stencil magic :)
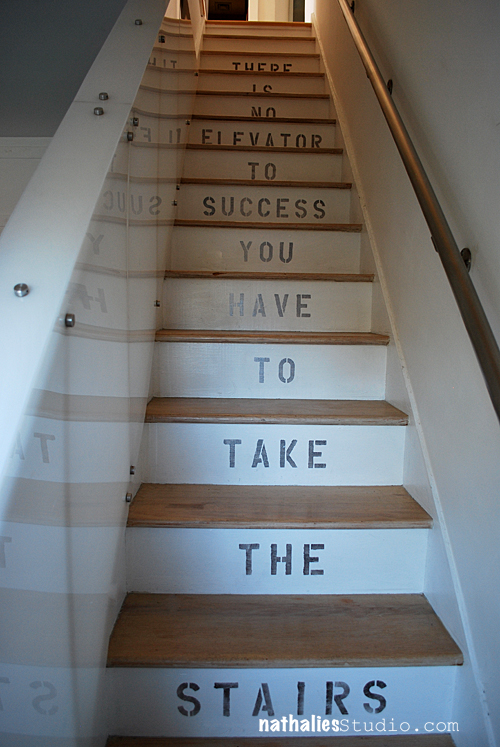
This was a stencil project I did on my staircase when we moved into our apartment in 2013 – and funny enough, now we need to paint over white again as we are moving to our new home soon :) It was a neat idea to personalize the risers of the stairs with a message, but it could be also nice to do a pattern stencil like my Amsterdam or maybe Van Vorst…. Hmmm thinking about decorating ideas lol
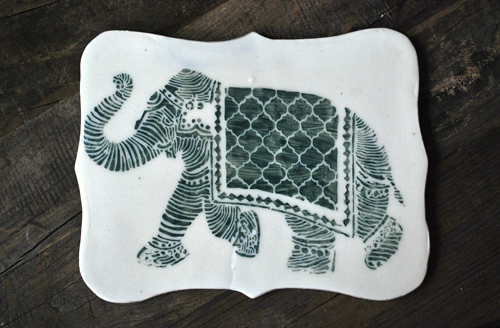
Back in this 2014 post a friend surprised me with a piece of handmade pottery, glazed with my Elephant March stencil on it! I am still thrilled with this and love how many different types of artists can use my stencils for amazingly creative things.
In this 2016 art journal page I used a stencil and a baby wipe to remove paint and create a pattern. This is so easy to do and it lets you use your stencils in yet another way.
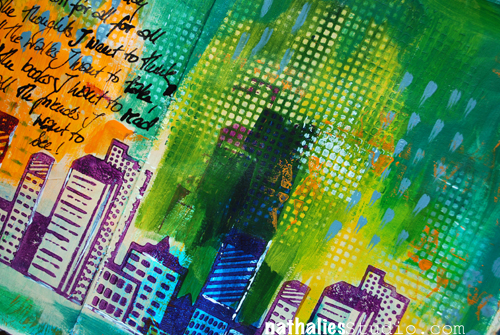
And finally when you have a really crazy colorful background that needs some toning down and unification, I go for a stencil. Here I used my Art Deco Wallpaper stencil and some gray and white paint to bring this 2014 art journal page together.
I hope you enjoyed A Look Back through my archive and maybe you are inspired to try some different things with stencils.
Here are some of the supplies that were used in these pieces:
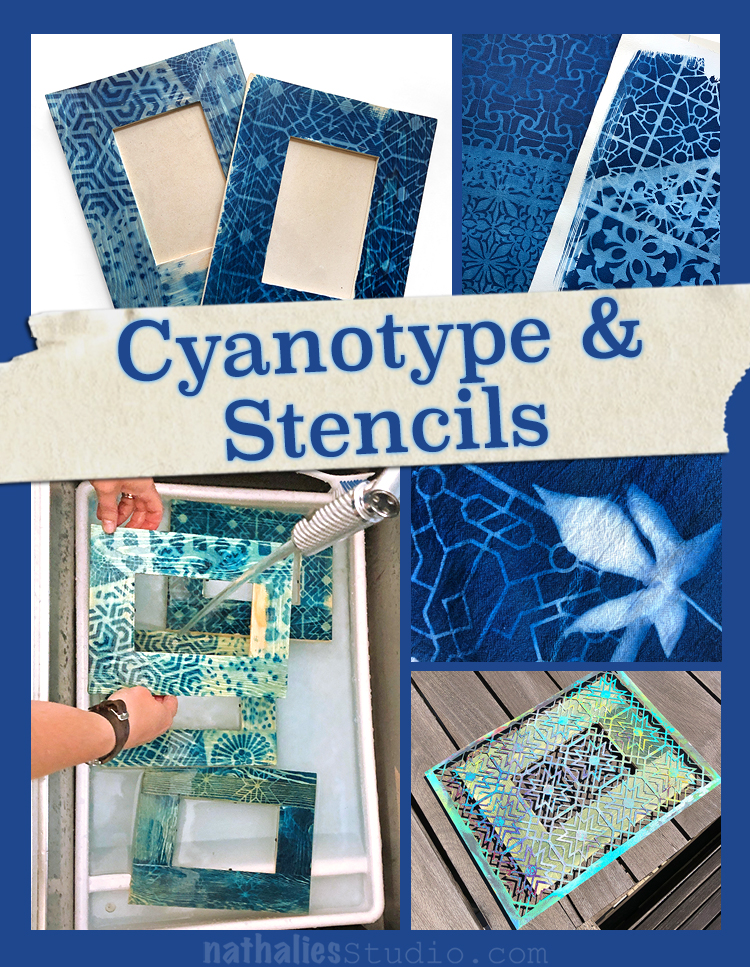
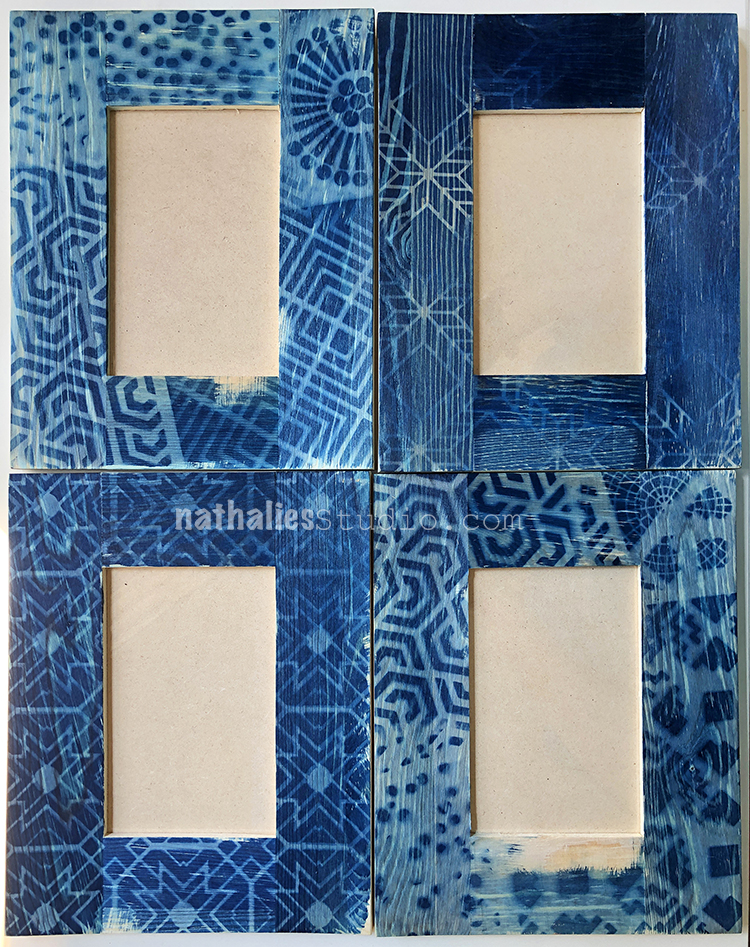
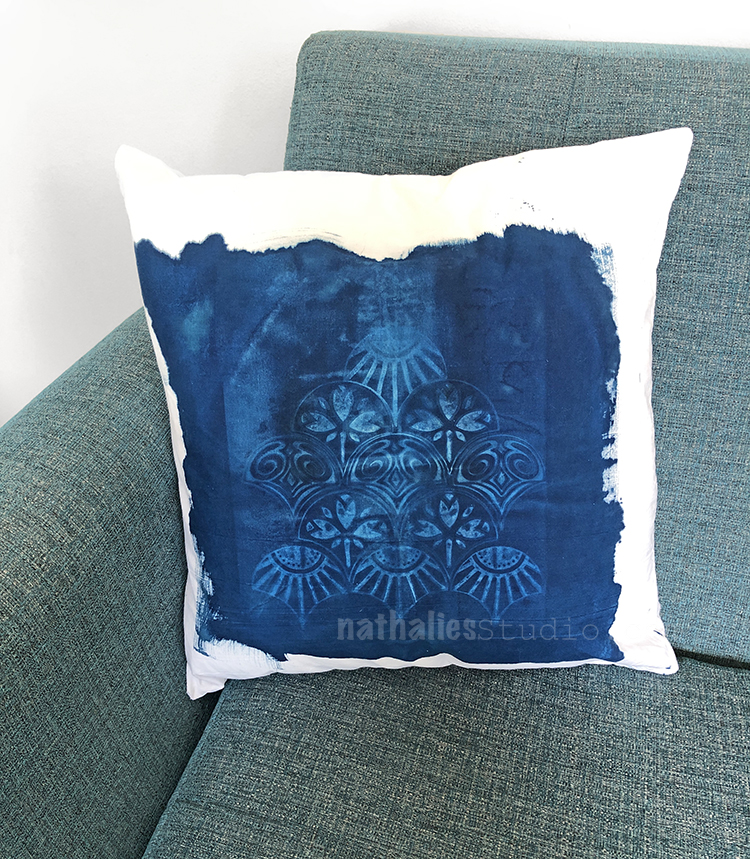
This was such an interesting and exciting play date with Kim – so excited to share it with you today! I have wanted to try cyanotype (aka Sun Printing) for a long time and we finally did. Now this did require some prep ahead of time, and it definitely is an active process, but the results are very cool.
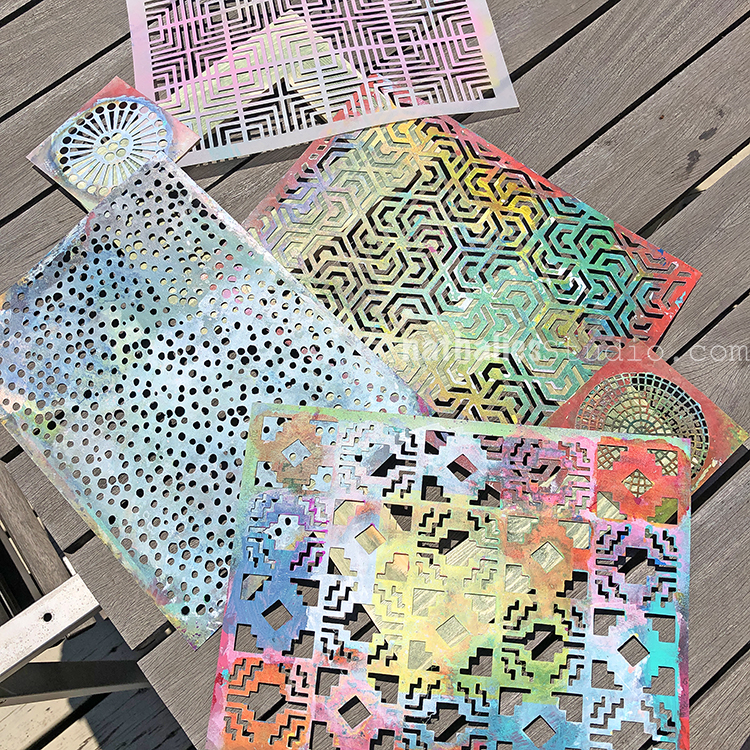
I purchased a cyanotype kit on amazon (link below) that was a 2 part mixture. You can find the chemicals a lot of places, just be sure to follow the directions on the packaging. My kit required some prep 24 hours before we did the actual “printing”. As for supplies, we used the cyanotype kit, large paddle brushes, gunked up stencils (YES – this is one argument for not cleaning them lol), and a surface to print on. We chose wood frames, some fabric, and watercolor paper. Following the directions of our kit, we painted the surface with the mixture in a dimly lit room and let them dry. Ours worked best when we allowed them to fully dry.
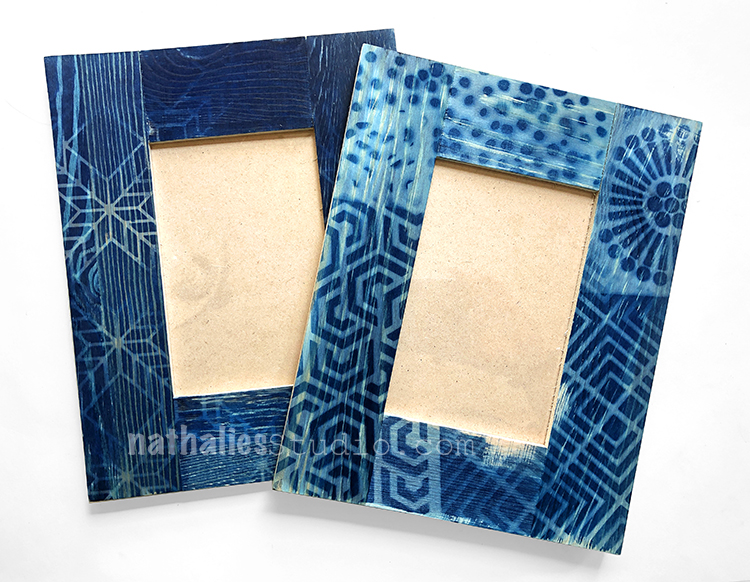
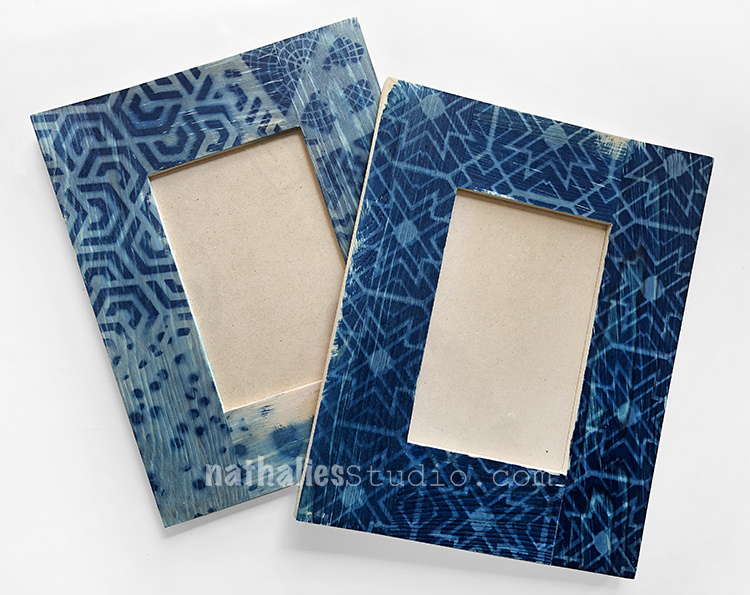
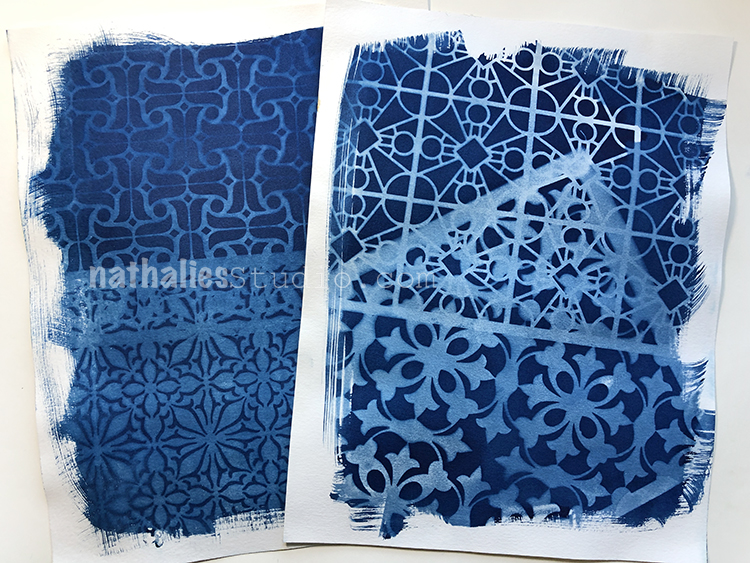
Then it is time to head outside on a nice sunny day. We first did the frames. Here you can see 2 frames covered with an array of stencils. If it is windy you will need to weigh the stencils down.
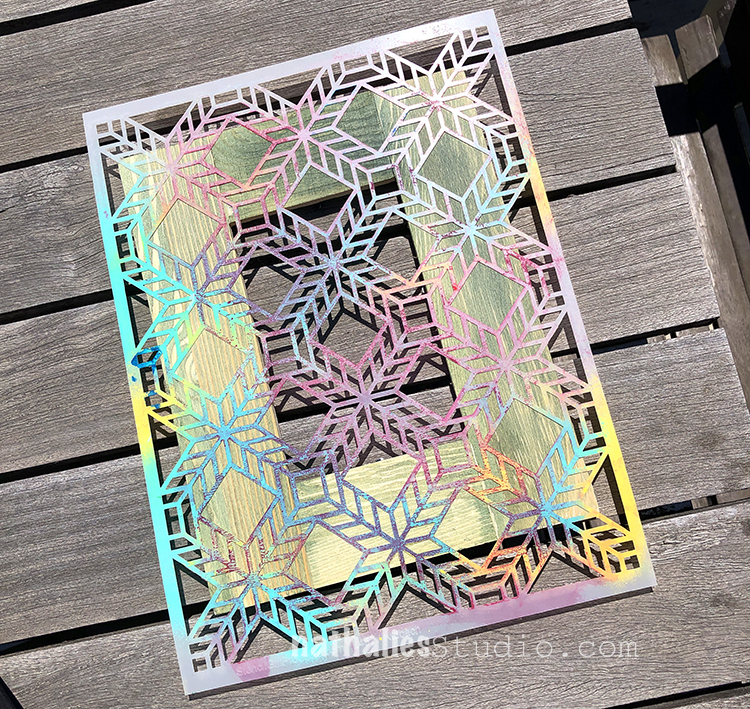
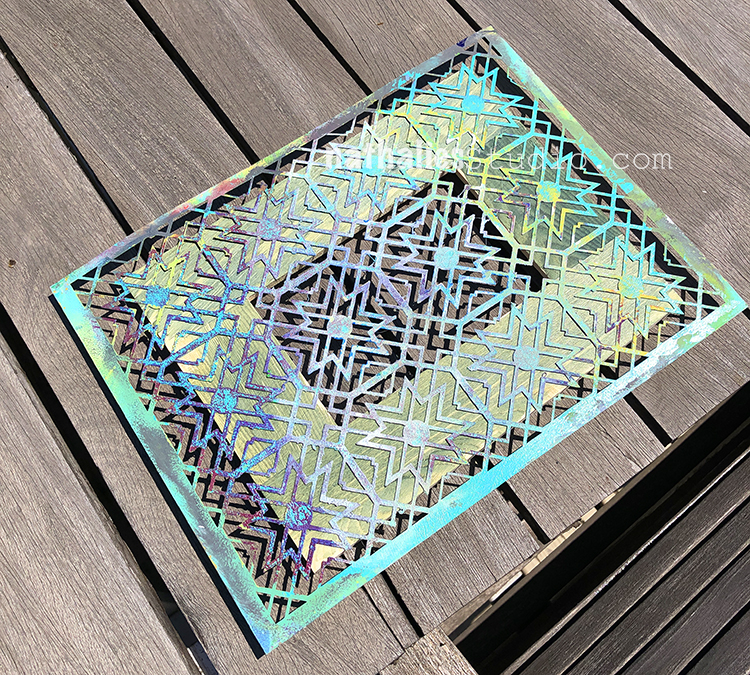
Here is my Santiago stencil on the frame, catching the sunlight. Our mixture was a greenish yellow when it went on and slowly turned to a bronze color when it had been exposed to enough light.
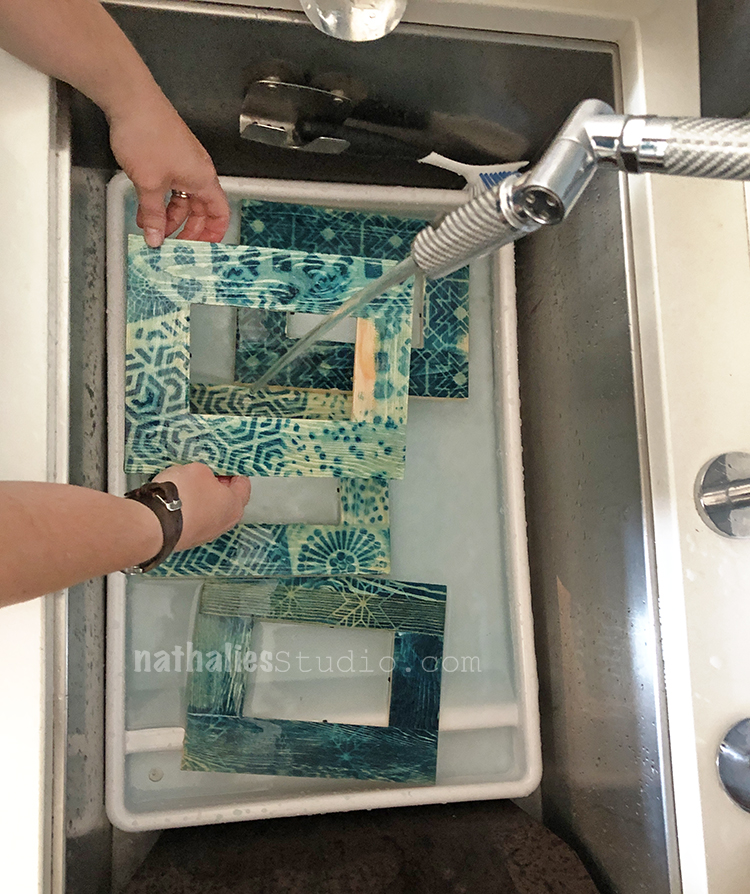
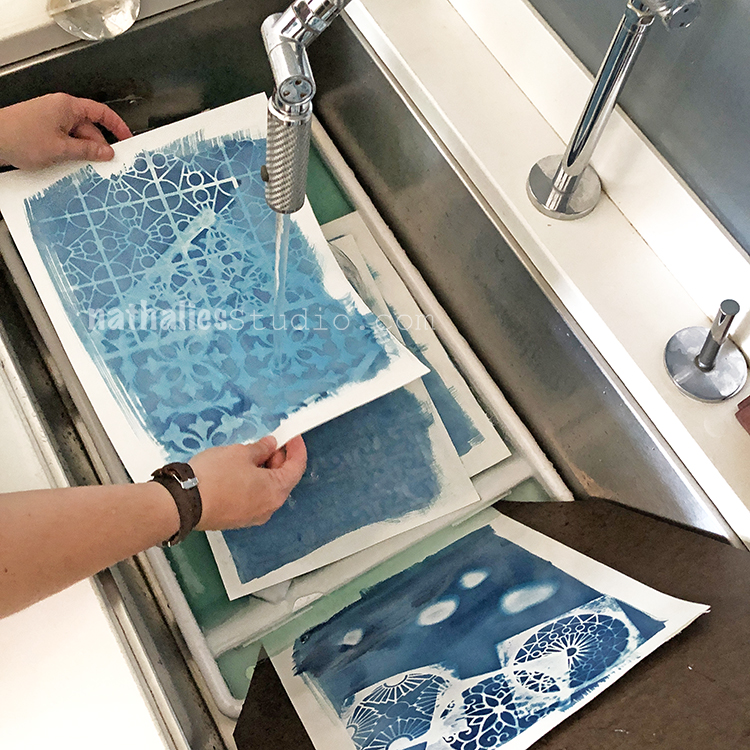
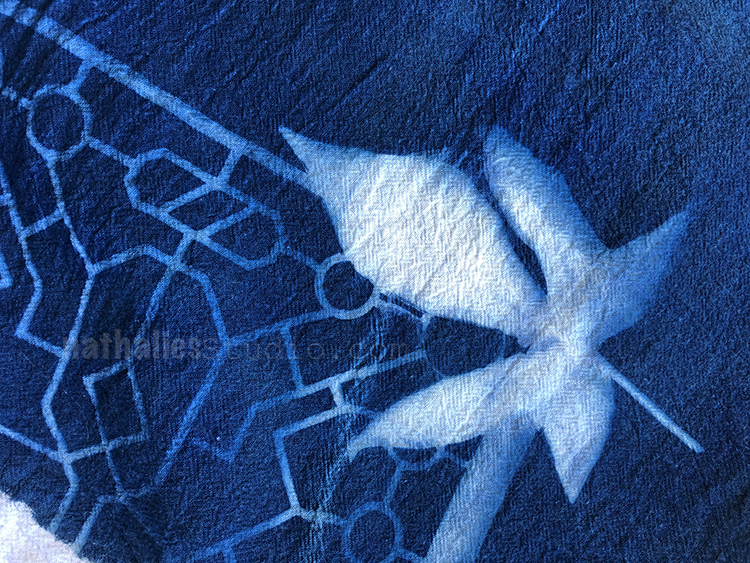
When they have exposed enough, you race them inside and rinse them until the water turns clear. The covered areas will wash away to reveal the wood color and the areas exposed to sunlight will begin to turn a beautiful blue.
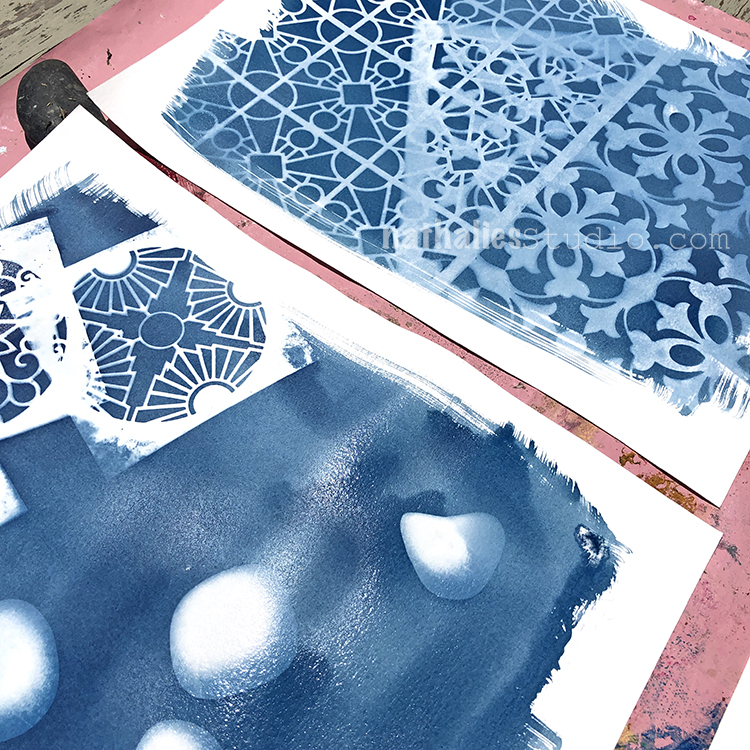
Over the next few hours they will cure to full color and look just gorgeous!
Stencils with thicker lines worked a bit better and we learned that it is safer to weigh the stencil down in case wind picks up.
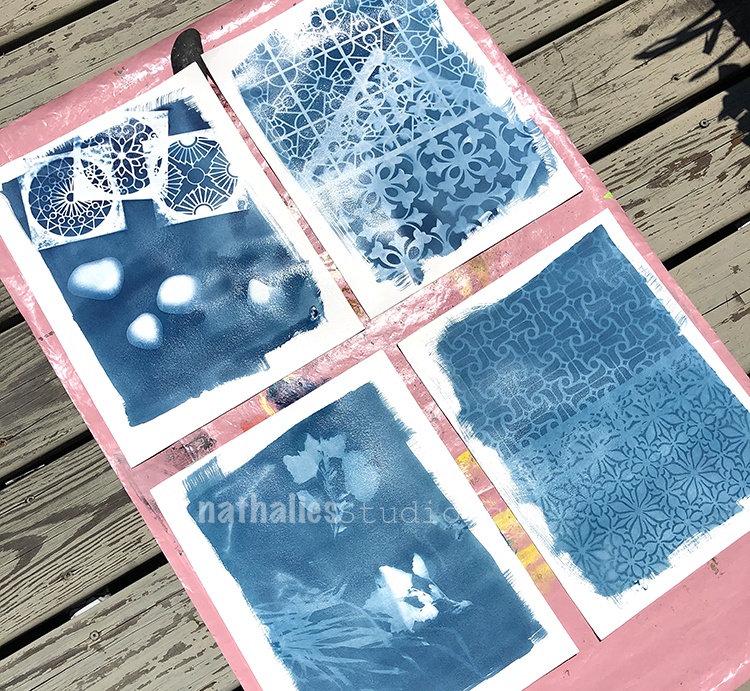
I just love the variety you can get and it all just works together because of that wonderful blue.
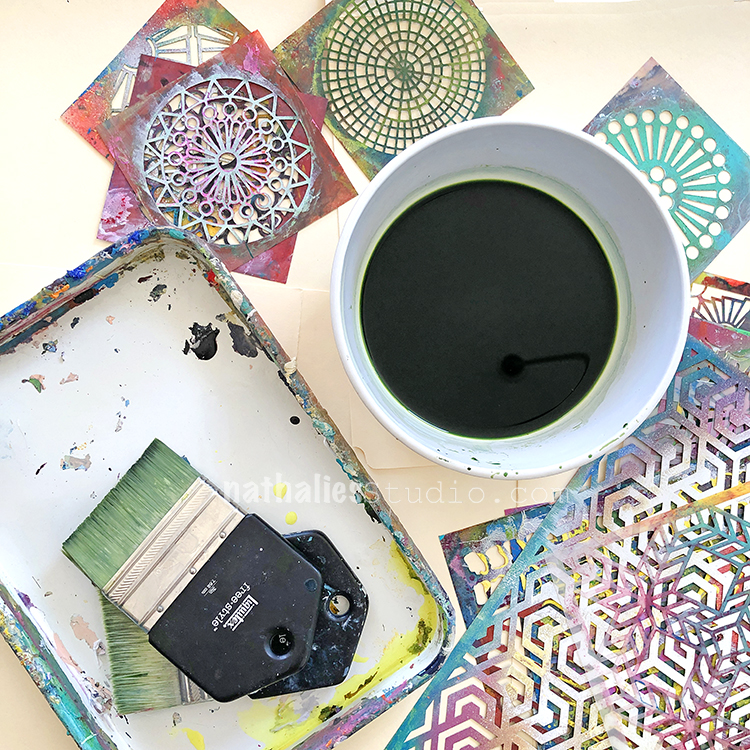
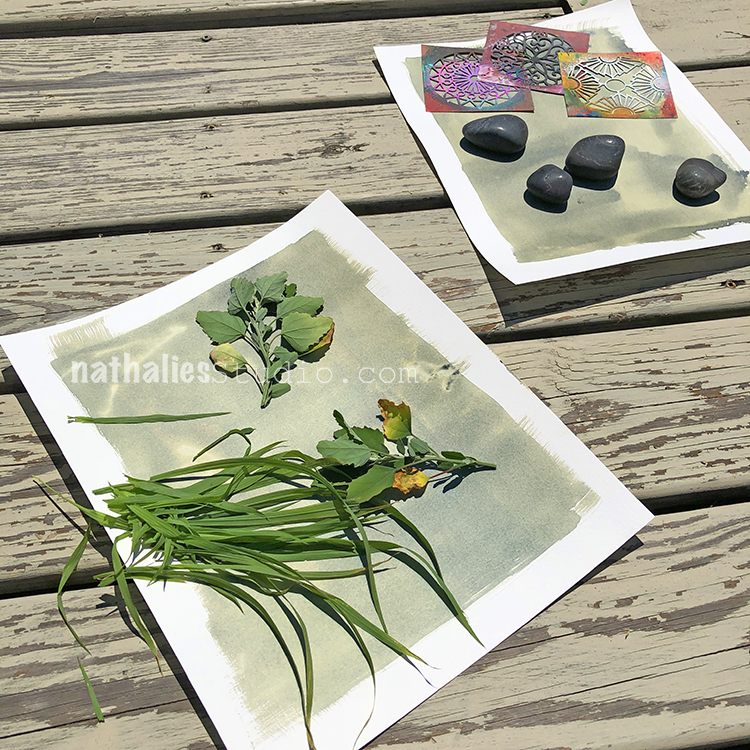
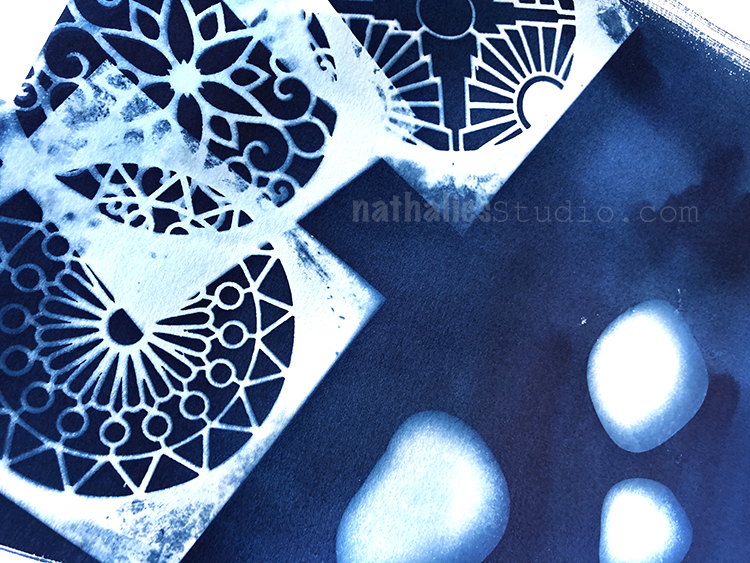
We also tried fabric with stencils (Hamilton and Star Struck here) and leaves. Weigh everything down and try to find flat leaves so you get defined edges. The fabric and paper exposure was really quick – so have a plan and all your stencils and objects ready to immediately put down on the fabric when you bring it outside.
Here is some paper with leaves and grass – all of these blew in the wind very easily so we did not get a good print here. I would put rocks on them next time. The top paper had some stencils and rocks. Setting up multiple papers at once was a bit hectic as they started changing very fast. Make a plan, have plenty of extra material (stencils, leaves, rocks, etc) and expect to just roll with it.
The paper process was the same – rinse immediately after bringing inside. Here you see a print I made with my Buenos Aires and Versailles stencils getting a rinse.
We let them dry in the sun and you can see some interesting results.
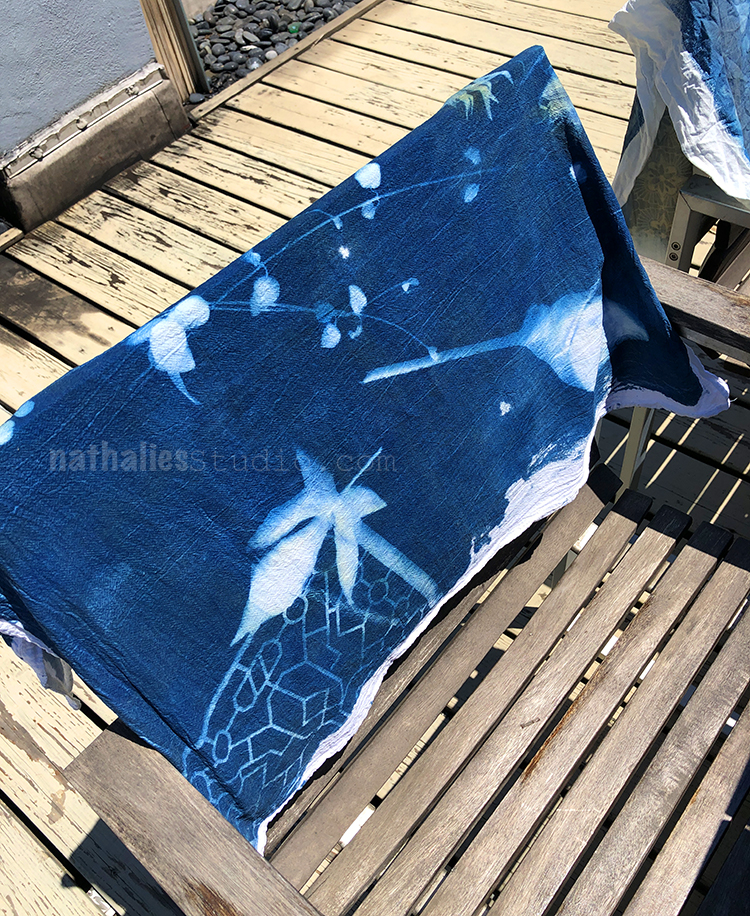
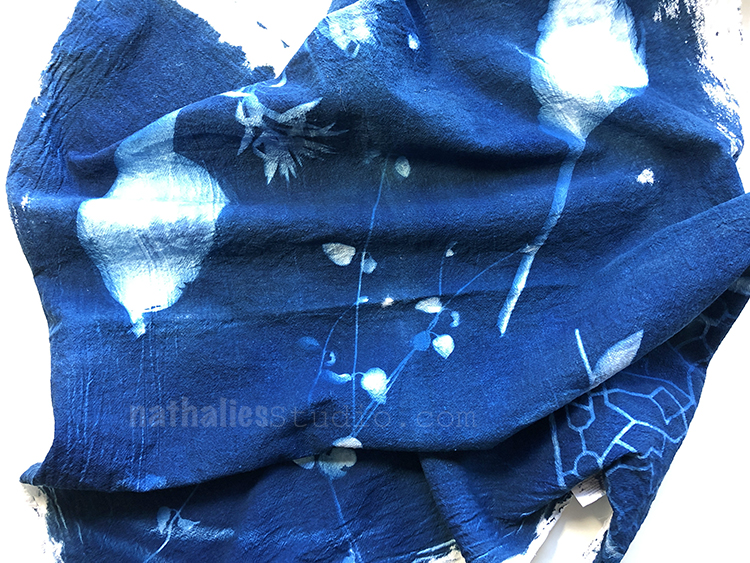
We rinsed and dried the fabric as well. Here you see some leaves, vines, and a peek of my Exchange Place stencil in the corner.
These were pretty unplanned compositions. It is worth getting familiar with the process and just playing at first. Kim and I are planning a second play date now that we know how it works and then we can better prepare for what we make in the end.
Regardless, it was really awesome to see the potential and beauty of cyanotype printing.
We are imagining all sorts of fabric and clothing projects :)
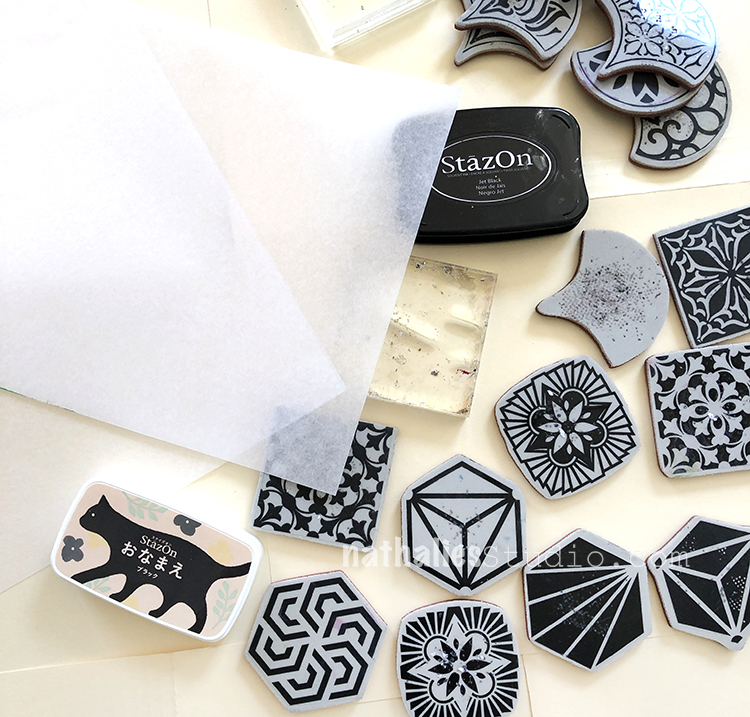
Another variation we did: stamping with my new rubber stamp sets and black stazon ink onto transparency film.
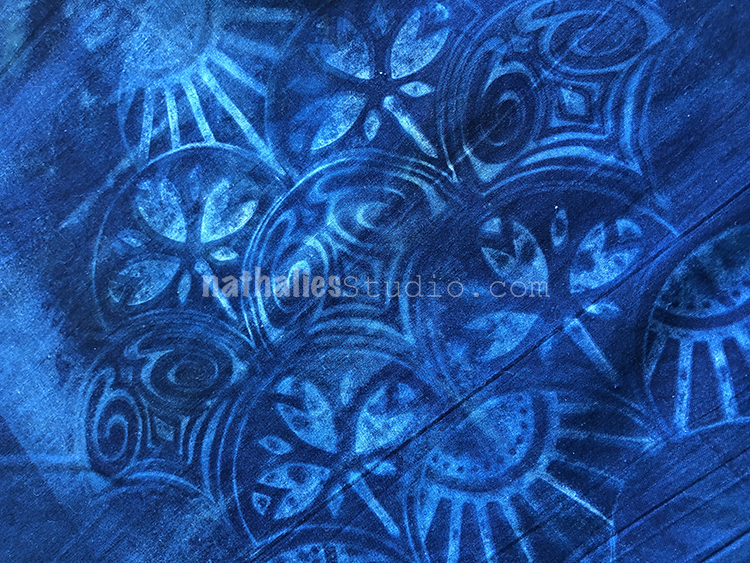
I stamped the film with my Fantastic Large stamps and then put it on top of a treated pillowcase… It blew off several times in the breeze hence the “double vision” look to the print.
But still a really cool idea for future cyano projects!
So as you can see there is so much potential to using this medium with your stamps and stencils. We are just getting started and will definitely share future adventures with you as well. Don’t be intimidated by the process – it isn’t that hard and the results can be sooooooo nice and surprising some times. I hope you give it a try!
StencilGirl Products is having a Summer Solstice SALEstarting tomorrow, June 20th and my stencil designs are 21% off! Just use the coupon code SOL21 while shopping at their site.
Here are the official details:
My stencils are on sale for the Summer Solstice!
Thursday, Friday, and Saturday
Save 21% off all* stencils
Use code: sol21
Coupon code expires June 22, 2019, at 11:59 p.m. CST (Central Standard Time) USA
PLUS The 10% discount when you buy 6 stencils of the same size still applies!
Choose 1 FREE large stencil for every $100 spent (after discounts are applied). You MUST specify your choice(s) by L### (such as L048) in the comments section of the cart when you check out or it will be StencilGirl’s choice. Sorry, no exceptions.
*Stencils only. Does not apply to DVDs, books, tools, wholesale orders, StencilClub, or gift certificates. The StencilClub exclusive monthly member discount does not apply.
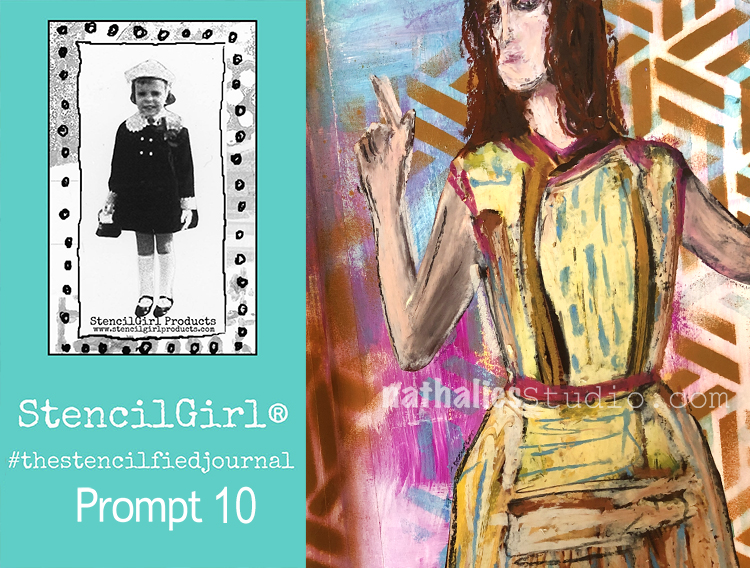
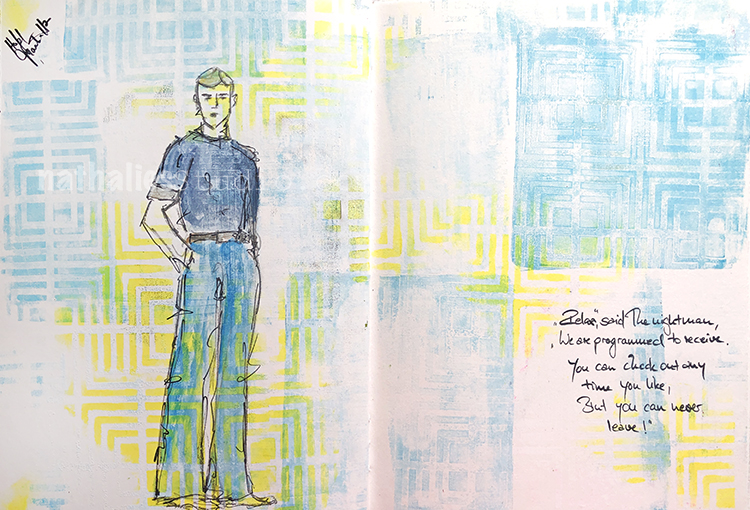
My wonderful friend Tina Walker is at it again – she invited several people to join her Stencilfied Prompts. The prompts are music related and each week she is posting a song. You can be inspired by the lyrics, the video, the album cover or anything related and the only restriction is that you have to use StencilGirl Product Stencils. Here is my take on Prompt 10:
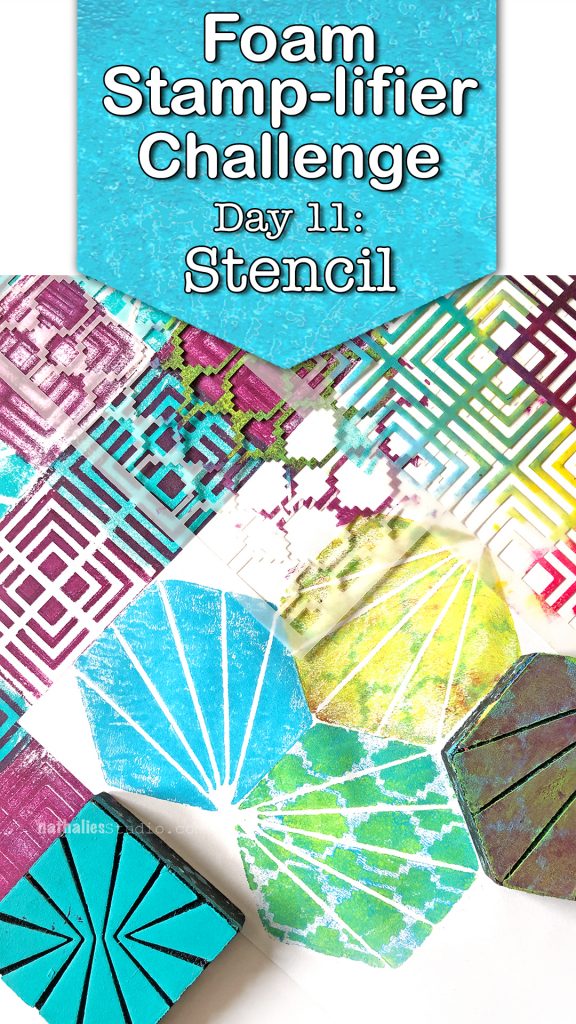
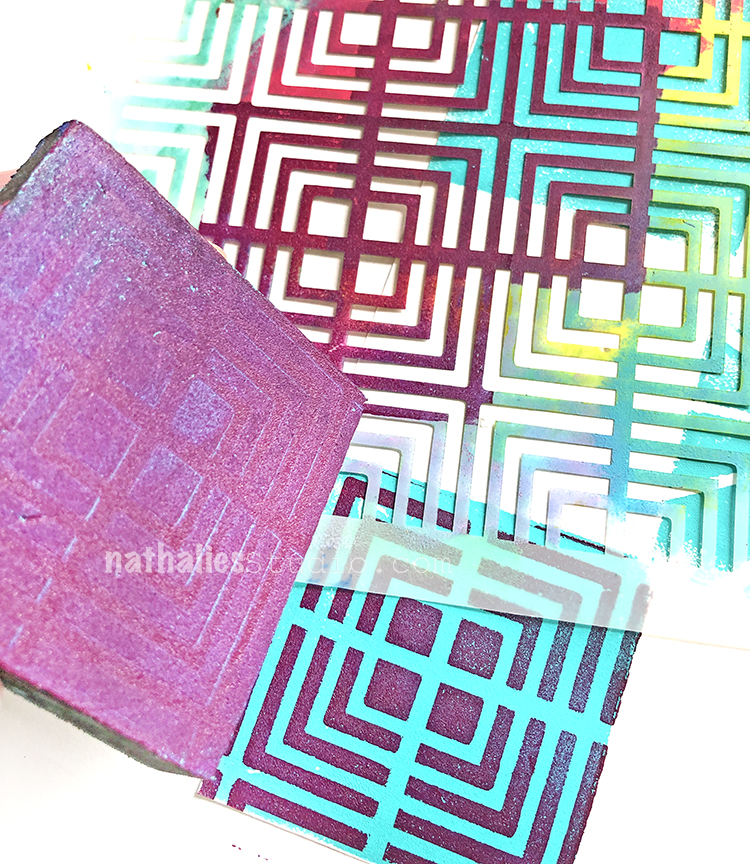
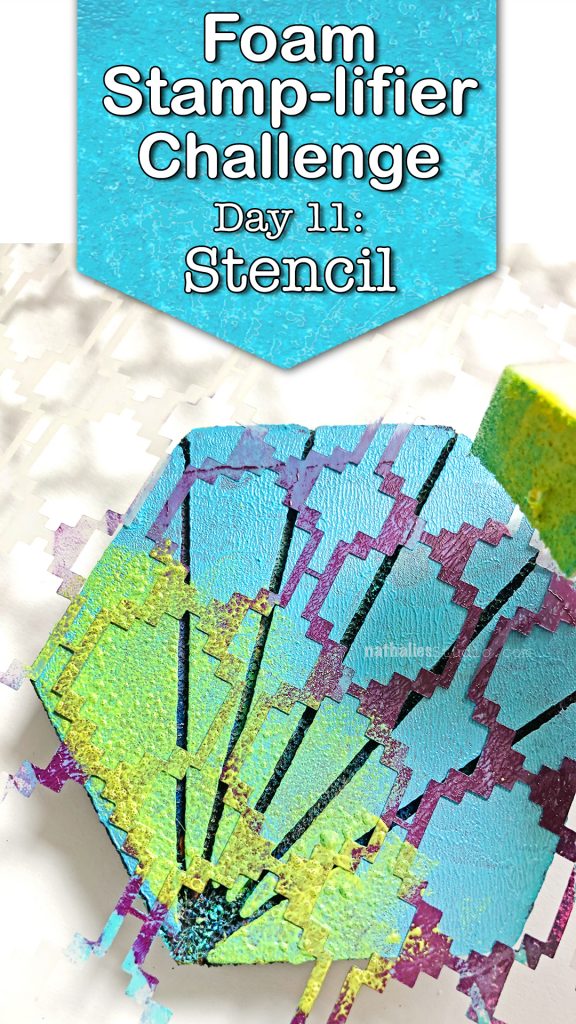
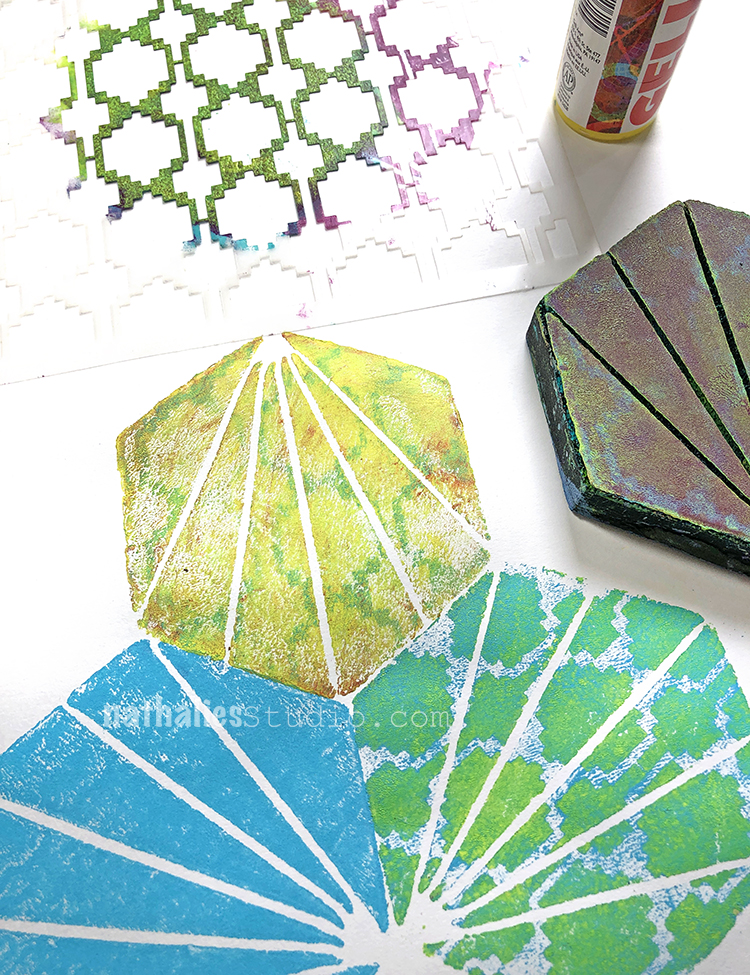
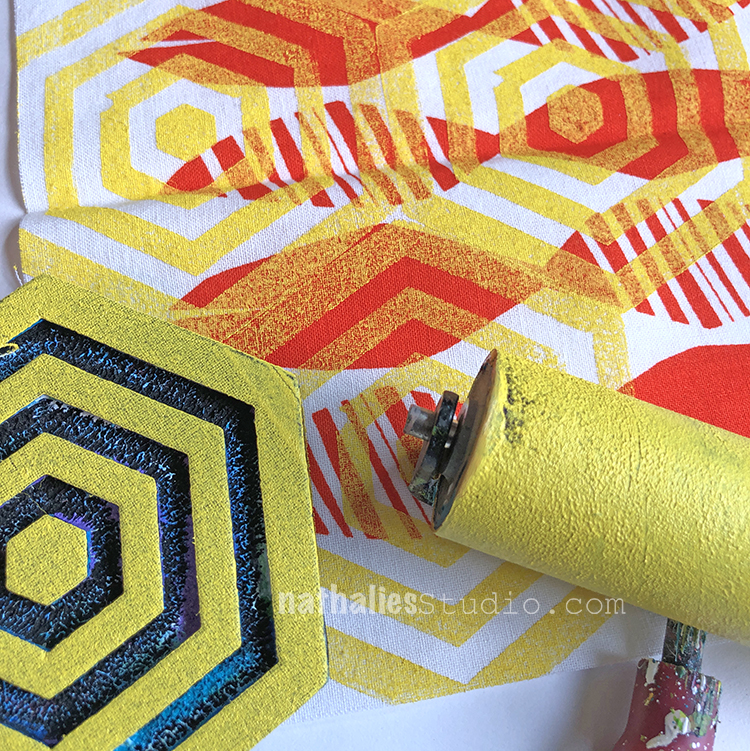
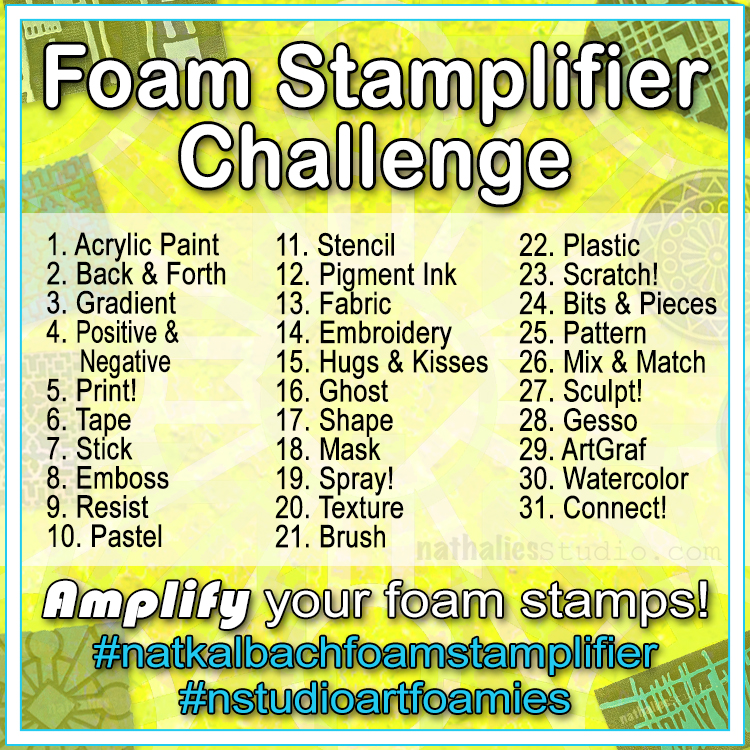
No surprise if you know me…I also love stencils and stencils are perfect amplifying tools for your foam stamps.
You can add paint to the solid back side of your foam stamps and then stamp through a stencil.
Lift the stencil and stamp right away again to receive a second but inverted print. You can also use foamstamps which have a more solid pattern – and stamp with the pattern side through the stencil. Another favorite of mine is to roll out a color onto the foam stamp with a more solid design and then put the stencil on top and add a different color with a cosmetic sponge on top of it.
It gives you so many more and unique possibilities with your foam stamps and for that matter also for your stencil.
Now that’s what I called amplified.
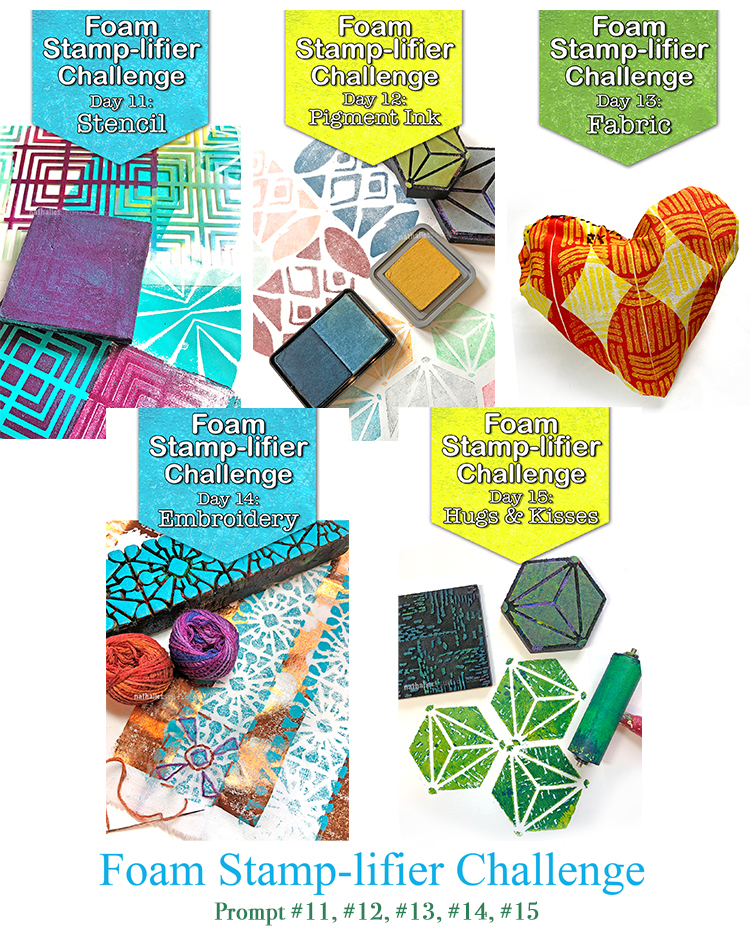
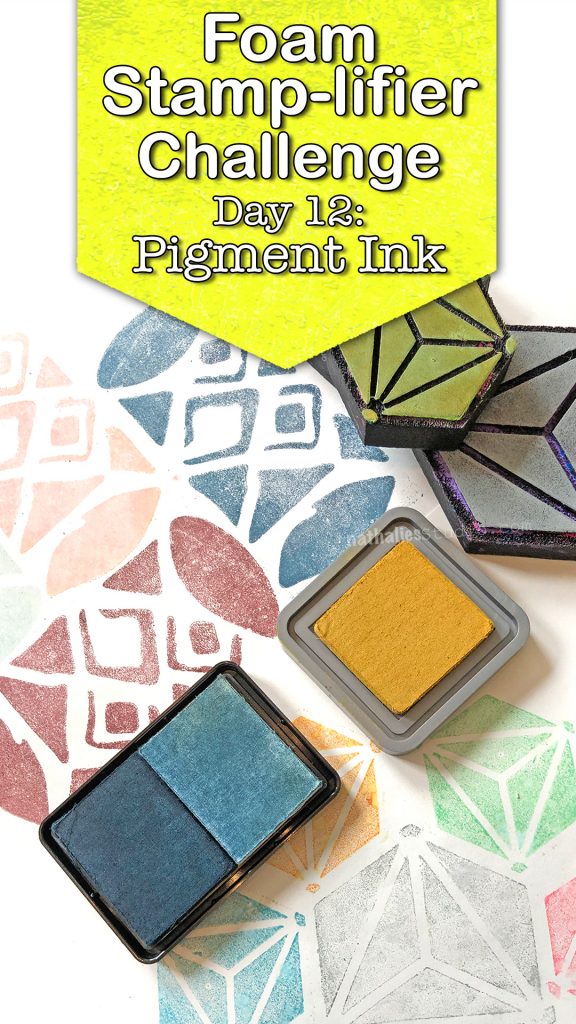
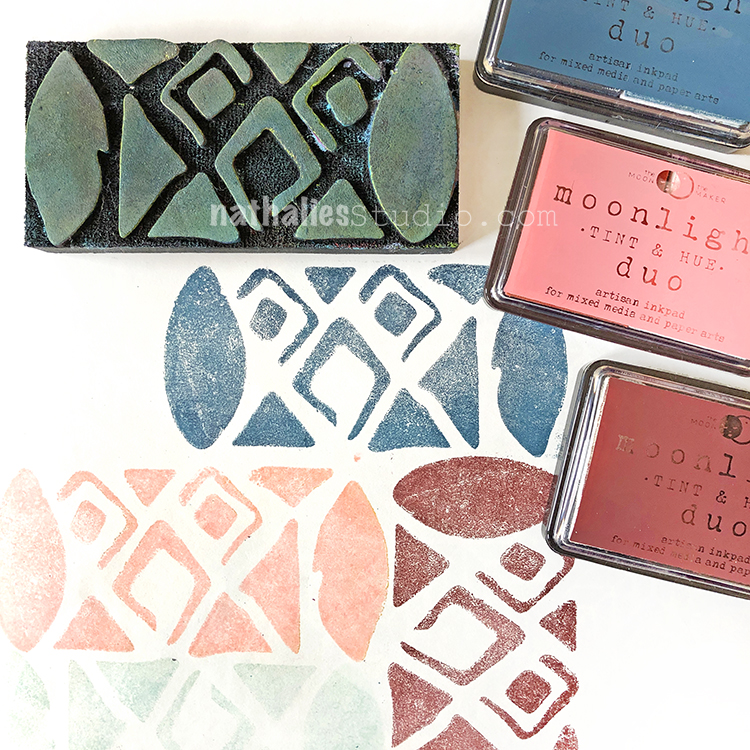
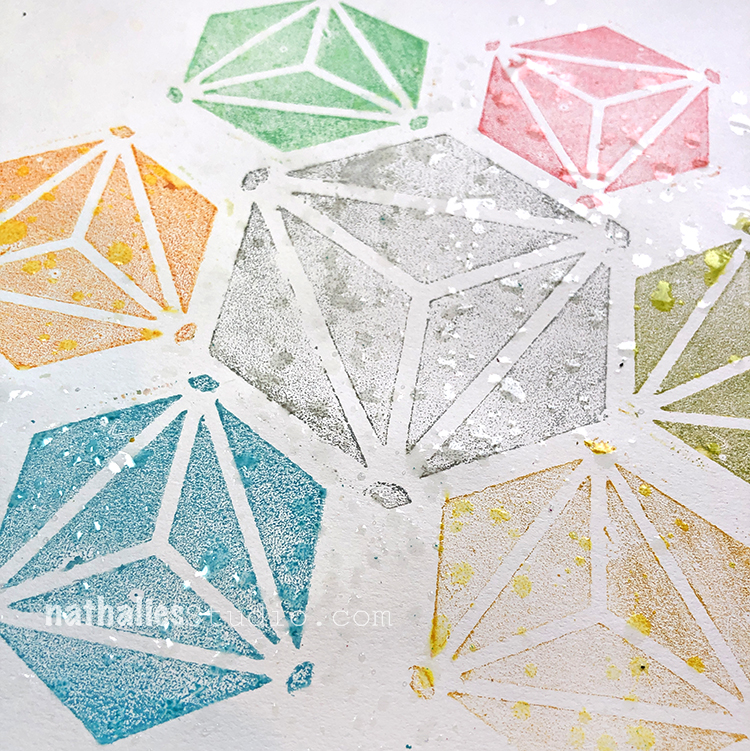
Day 12 – Pigment Ink
Love love love using my foam stamps also with pigment inks. I love how the foam creates some soft texture in combination with the inks and you can easily clean them after use with some water and a rag or a baby wipe.
Moonlight Duos by RubberMoon are a great hybrid ink and their colors are just sooo amazing. I also love using Distress Oxides and sprinkle the stamped image with water drops to lift off some of the ink with a paper towel and create even more visual texture.
So much fun and another medium you can easily use with your foam stamps.
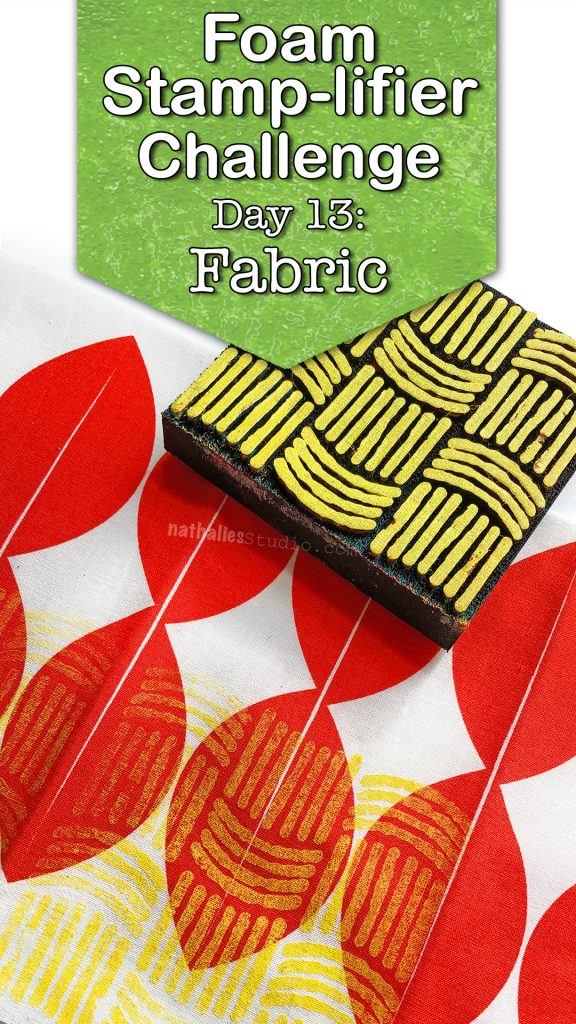
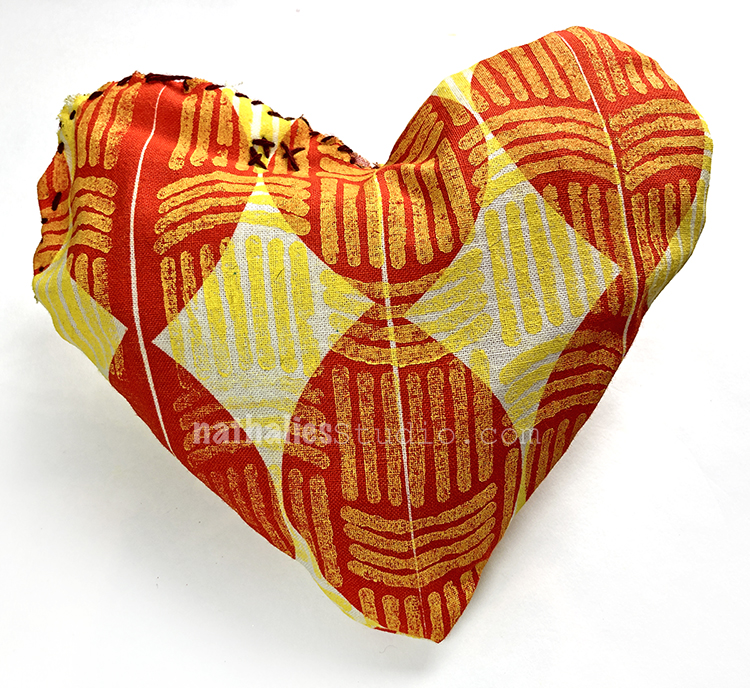
Day 13 – Fabric
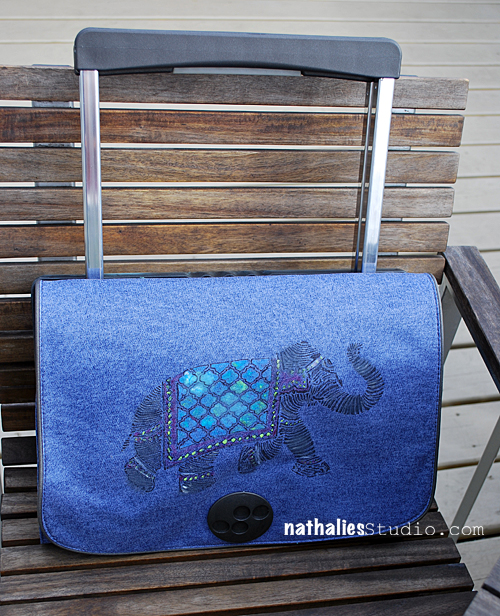
Can you say perfect relationship? Foam Stamps and Fabric love each other.
You can use acrylic paint but for fabric I want to wear or when I want to keep the fabric soft I use fabric paint. Besides using the foam stamps on a solid colored piece of fabric using it on a piece that already has a pattern is my total geek out fun.
You can use the fabric many many ways- but here…I give you my heart :)
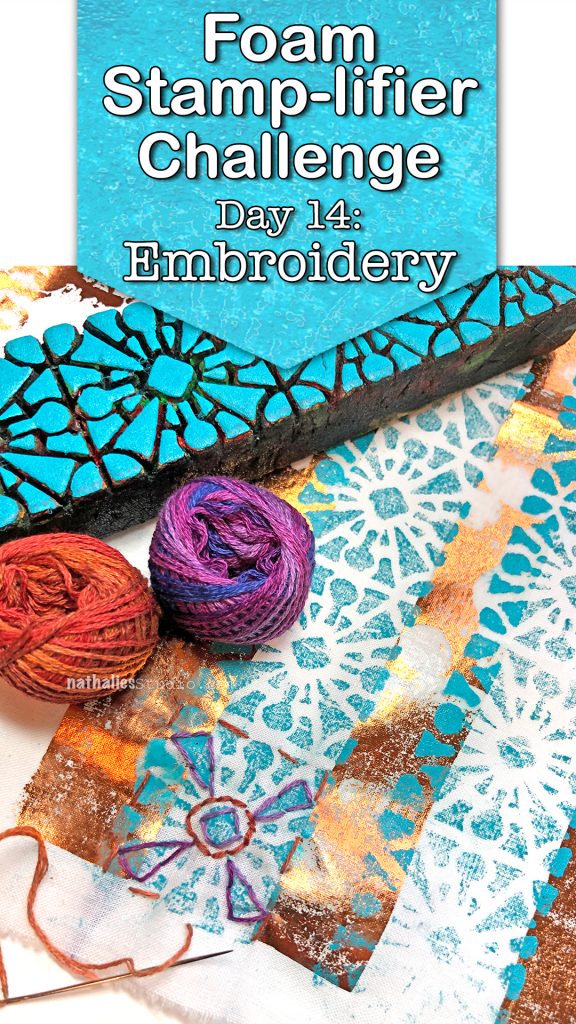
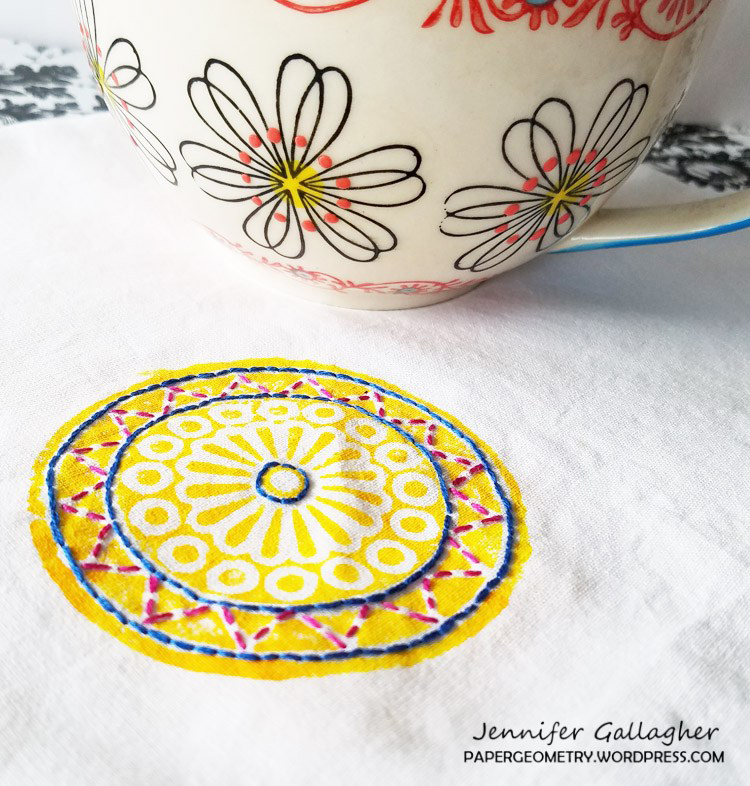
Day 14 – Embroidery
Oomphing up your foam stamped image by adding some embroidery on top of the image is super fun! You can either just add some accents with certain embroidery stitches or fill in the actually design with satin stitches.
My Creative Squad Member Jennifer did a wonderful job creating some napkins with embroidered foam stamping and they are so beautiful. So many possibilities by combining foam stamping and embroidery.
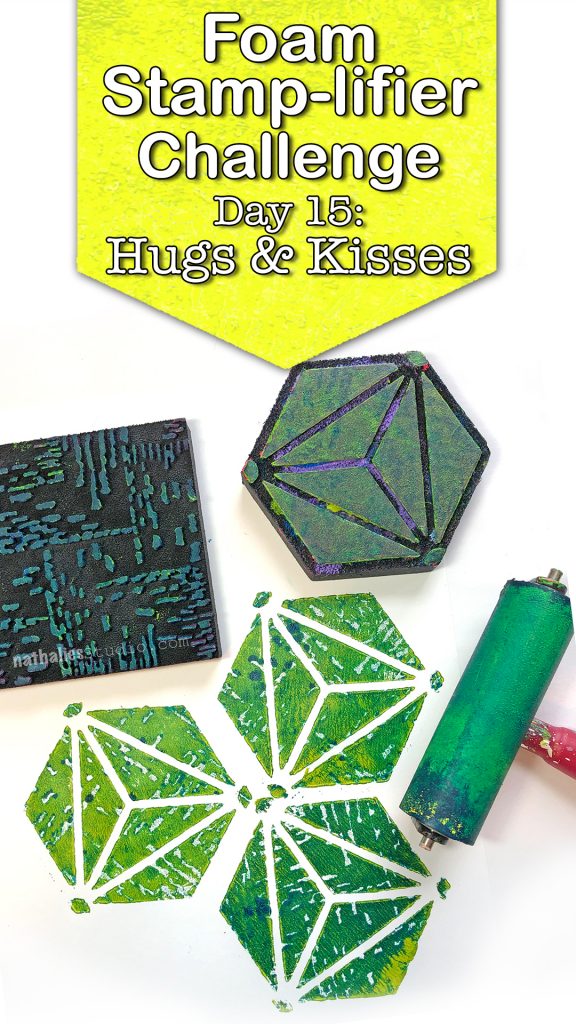
Day 15 – Hugs & Kisses
I think the right term is stampkissing but I think Hugs & Kissing is perfectly adequate for this foam stamplifier technique. Use two different foam stamps- one that is more solid and one with a small pattern, apply different colors to each of them and then stamp them on top of each other – lift and stamp the more solid patterned foam stamp.
You can stamp off the other stamp on a different paper and get a nice color scheme. Make sure to use colors that mix well together.
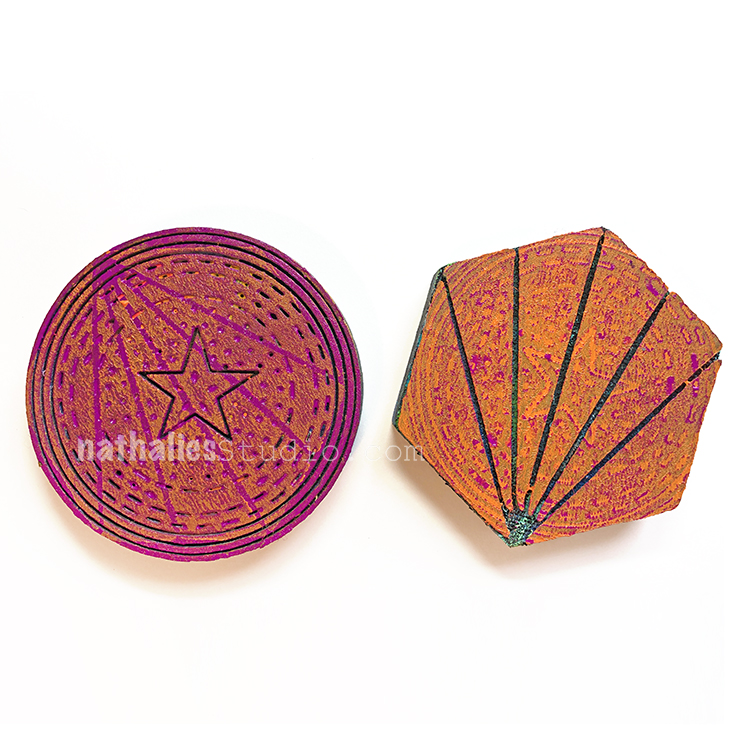
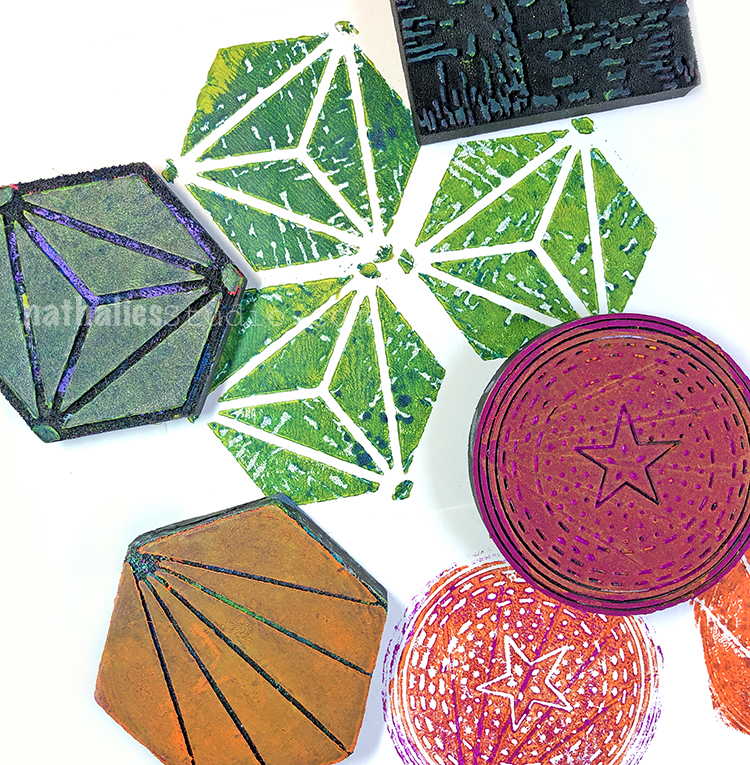
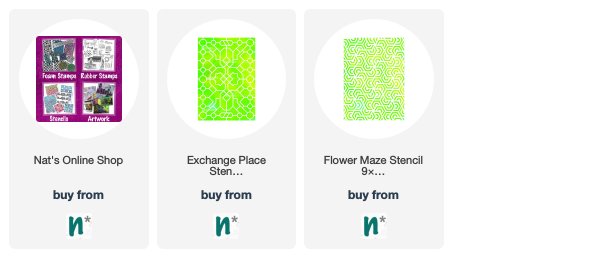
I hope you enjoyed these prompts- here are the foam stamps I used for them:
In case you missed the prompt list and want to follow along – here you go:
A Look Back – a blog series to show you some projects and posts that you may have missed – sometimes going WAY back in the archive. I think it will be fun to revisit a few ideas that we haven’t seen for a while. I’m excited to see how a little look back might inspire something new in the future :)
This time I’m going to show posts and projects using one of my favorite tools – stencils! Here is A Look Back at some ideas. Enjoy!
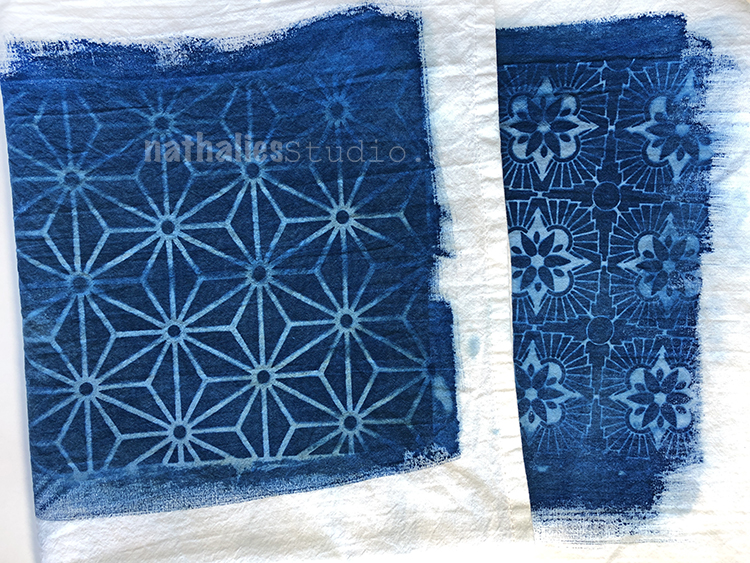
First up is a classic – use your stencils with acrylic paint! But wait, there’s more: in this Art Journal spread I chose to use 2 different stencils that have the same pattern but in different scales: my Amsterdam 9×12 and my Amsterdam 6×6 stencils for an all over background. It is a subtle variation that gives more push and pull in the background.
How about taking your stencils and using them on fabric items? I did that here (in 2013 wow) with my Elephant March stencil, some acrylic markers, and acrylic spray paint on what we Germans call a “Heel Porsche.” Stencils are a great way to personalize everyday items.
Embossing paste is another fun medium to use with stencils. In this art journal spread again from way back, I used my Circuit stencil and some shimmery gold embossing paste to start the page and then added and subtracted inks overtop. You can gently wipe away the inks on top and reveal the embossing paste. And it has nice texture. Win win.
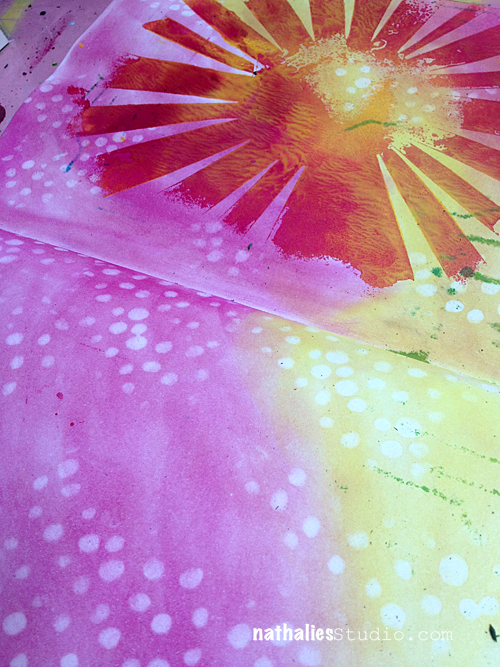
How about a little subtraction? Here I created a pan pastel background and then used my What’s the Point stencil and erased through it for some nice dots here and there. I love the softness of this technique.
And then I took the same What’s the Point stencil and embellished onto it with some acrylic markers for this art journal spread. Once you have the stencil pattern down you can jazz it up in all sorts of ways. So many options!!!
I hope you enjoyed A Look Back through my archive and maybe you are inspired to try some of the stenciling techniques I shared.
Here are some of the supplies that were used in these pieces:
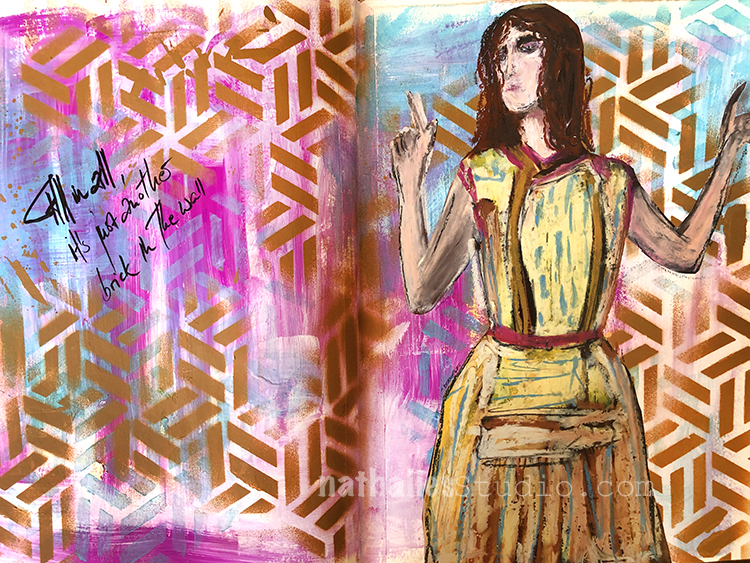
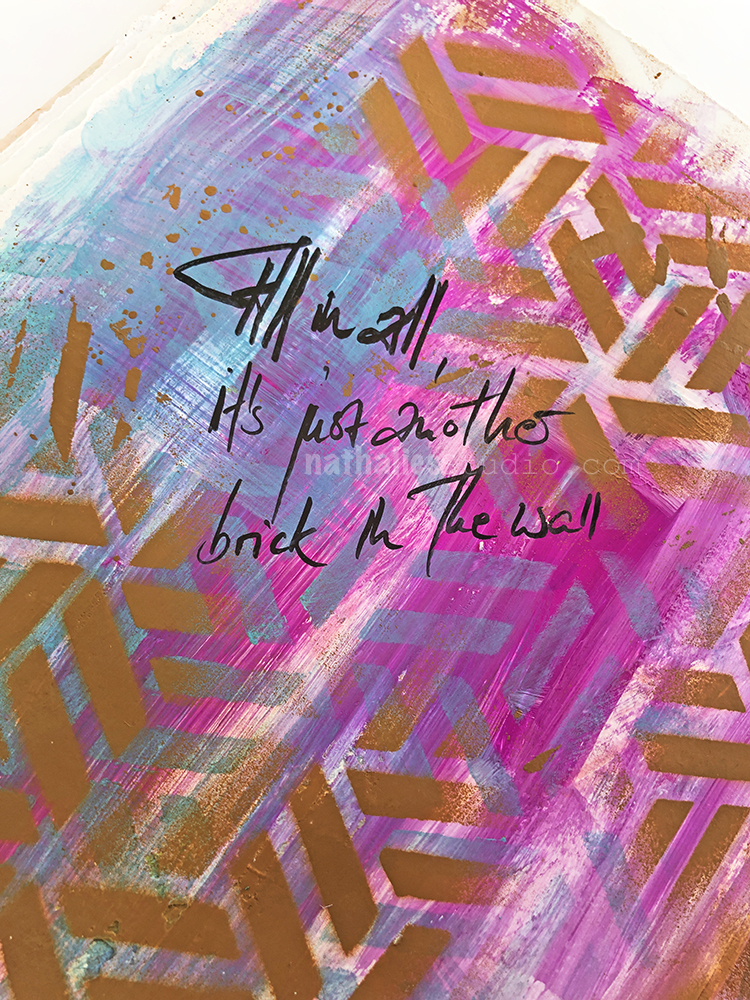
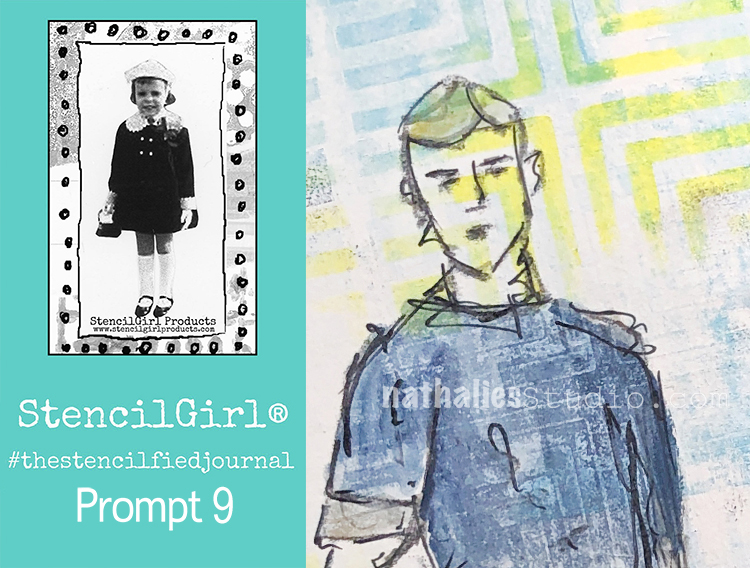
My wonderful friend Tina Walker is at it again – she invited several people to join her Stencilfied Prompts. The prompts are music related and each week she is posting a song. You can be inspired by the lyrics, the video, the album cover or anything related and the only restriction is that you have to use StencilGirl Product Stencils. Here is my take on Prompt 9:
This week’s prompt was Hotel California by The Eagles. I had fun playing with my Manhattan Stencil on a small gelli plate – using the plate to stamp into the art journal.
I sketched the figure over the background and then painted him partly in with Inktense Blocks- I love how the stenciled areas areas creating a pattern and texture for the clothes.
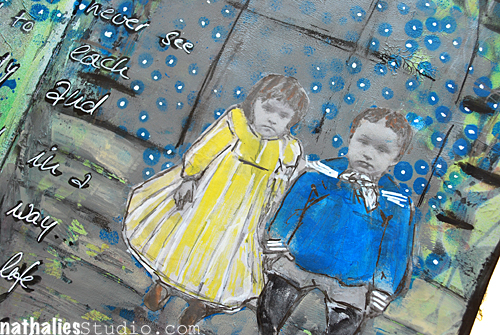
My wonderful friend Tina Walker is at it again – she invited several people to join her Stencilfied Prompts. The prompts are music related and each week she is posting a song. You can be inspired by the lyrics, the video, the album cover or anything related and the only restriction is that you have to use StencilGirl Product Stencils. Here is my take on Prompt 8:
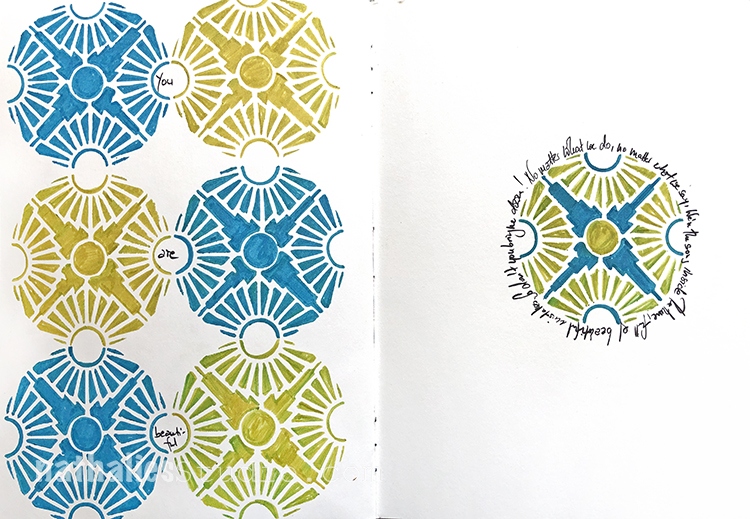
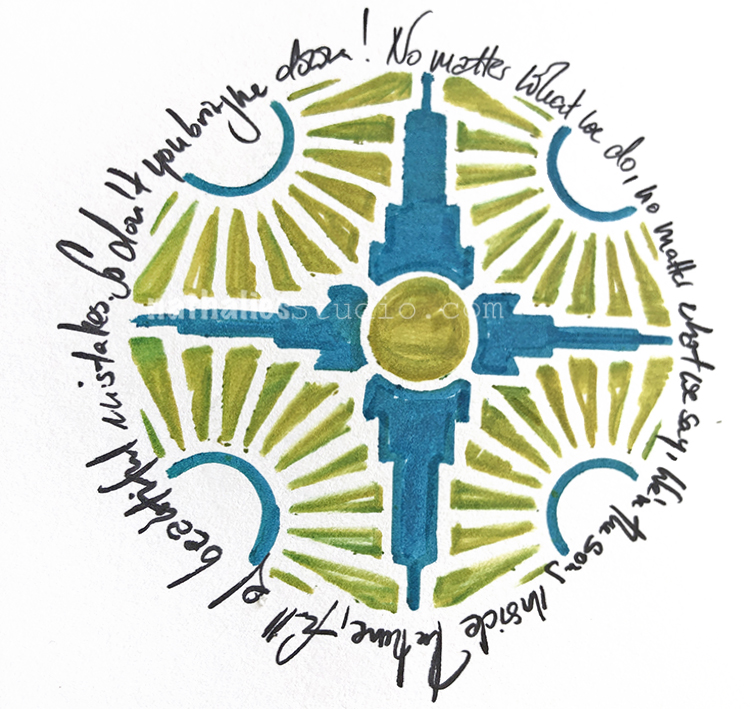
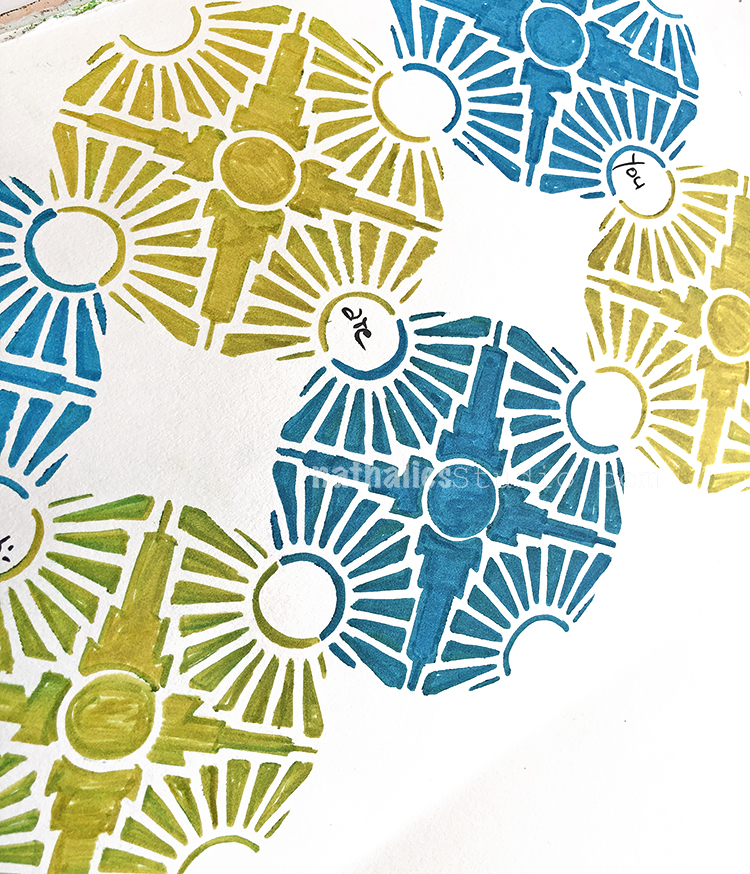
This week’s prompt was Beautiful – Christina Aguilera . The lyrics are awesome- as to the music…well by now you might have guessed I am a total grunge-rock-alternative kinda girl. LOL …but hey …I am in here ;)
I used my Broadway Stencil with some ink pens – I was in our new house waiting for a contractor and this was what I stuffed in my bag and thought “make the most of this, a journal, a 4×4 stencil and three pens” and there you go:
I actually plan on doing this more often – just pack a really limited amount of stuff and see what happens. It was really fun to do – easy but occupying and as you can tell since it was finished – the contractor was late. All in all better than a coloring book ;)
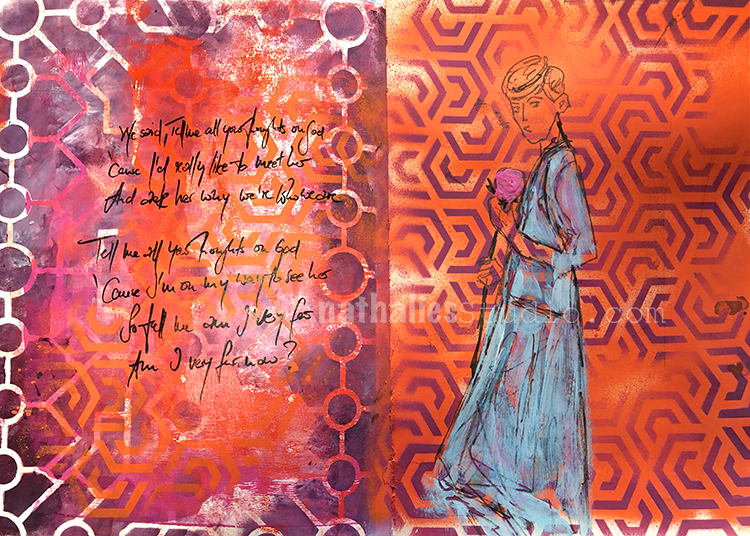
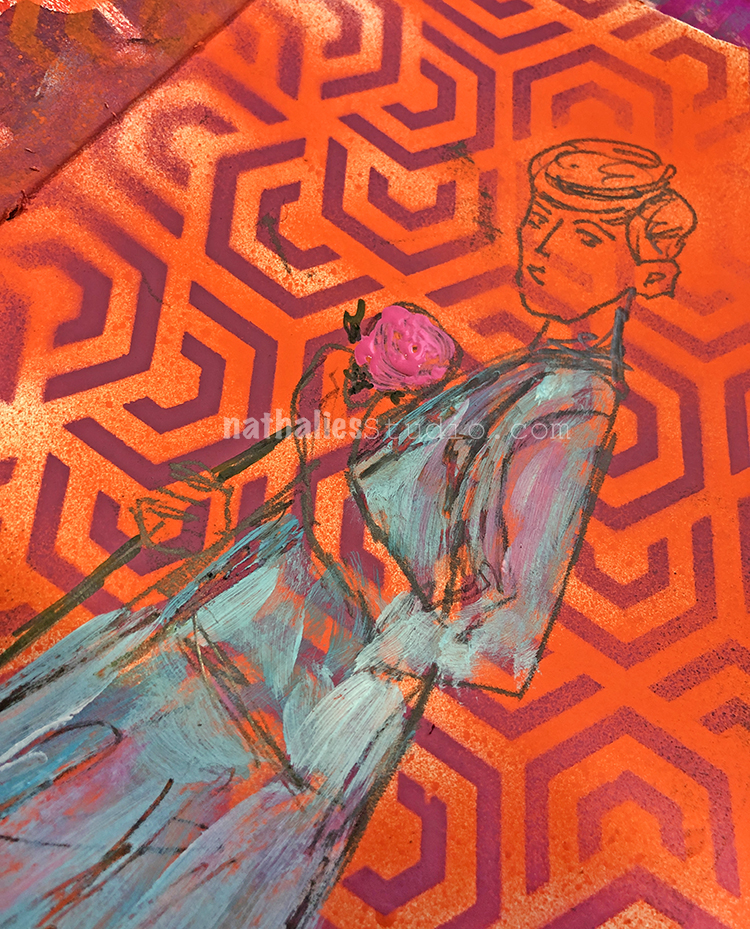
My wonderful friend Tina Walker is at it again – she invited several people to join her Stencilfied Prompts. The prompts are music related and each week she is posting a song. You can be inspired by the lyrics, the video, the album cover or anything related and the only restriction is that you have to use StencilGirl Product Stencils. Here is my take on Prompt 7:
A song I never heard before but I found the lyrics interesting yet again. I was in a very bold color mood and used my Exchange Place Stencil on the left with Acrylic paint and the Flower Maze Stencil on the right page with acrylic spray paint.
A little sketch and very limited painting on top – I actually like this- I want to explore this a bit more.

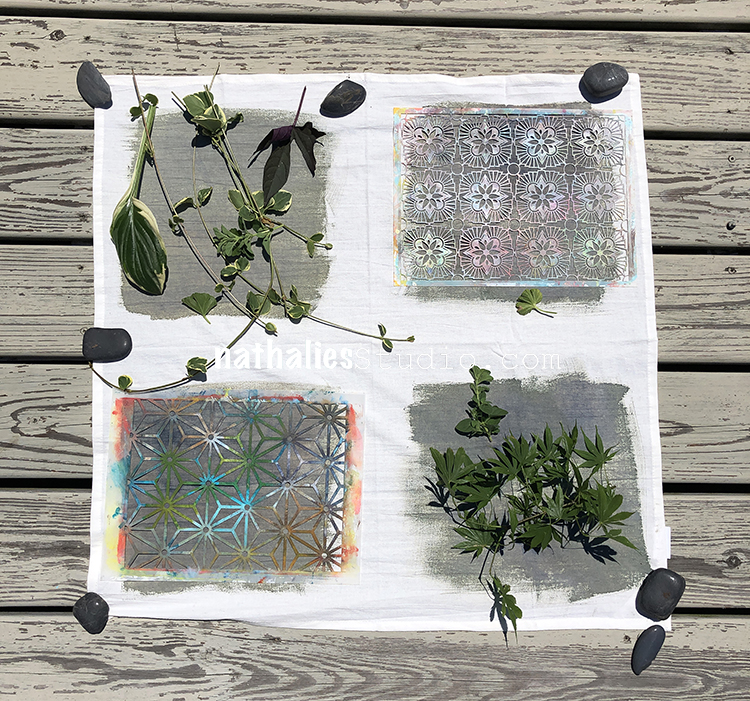


Love these! One tip is to place picture frame glass on top of the leaves/stencils/transparency/etc to hold everything down and in place.
Reply