nathalie-kalbach

NEW Rubber Stamps – FAN-tastic Designs & More!

I have some NEW rubber stamps coming out today! These have been in the making for a while and ever since I have been playing with them I cannot stop – I keep building new patterns. Are you a pattern lover too? Well check these out: First is the FAN-tastic stamps:

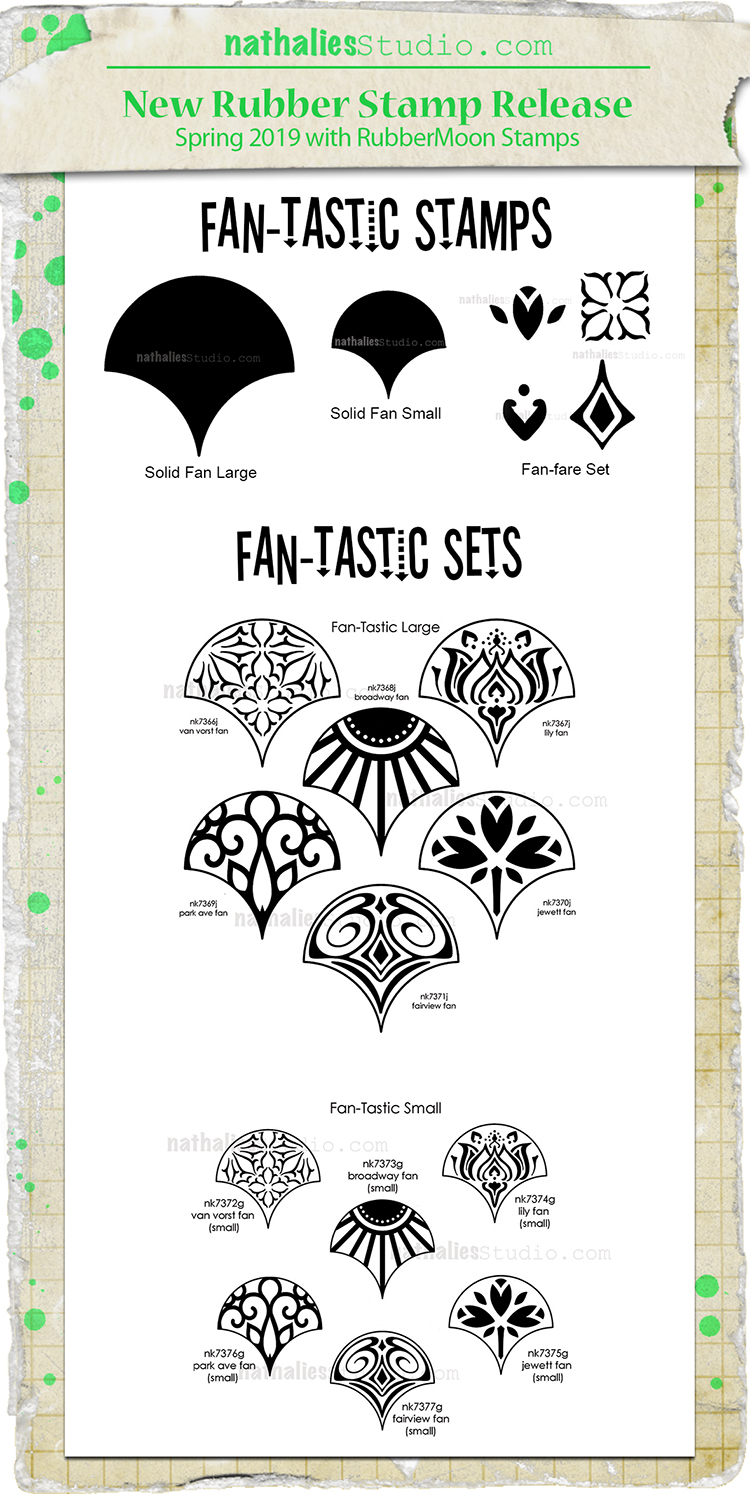
There are the two sets: FAN-tastic Large and FAN-tastic Small. The large ones measure 2.75″ across while the small ones measure 1.18″ across. These have six patterns each and can be arranged in all sorts of ways.

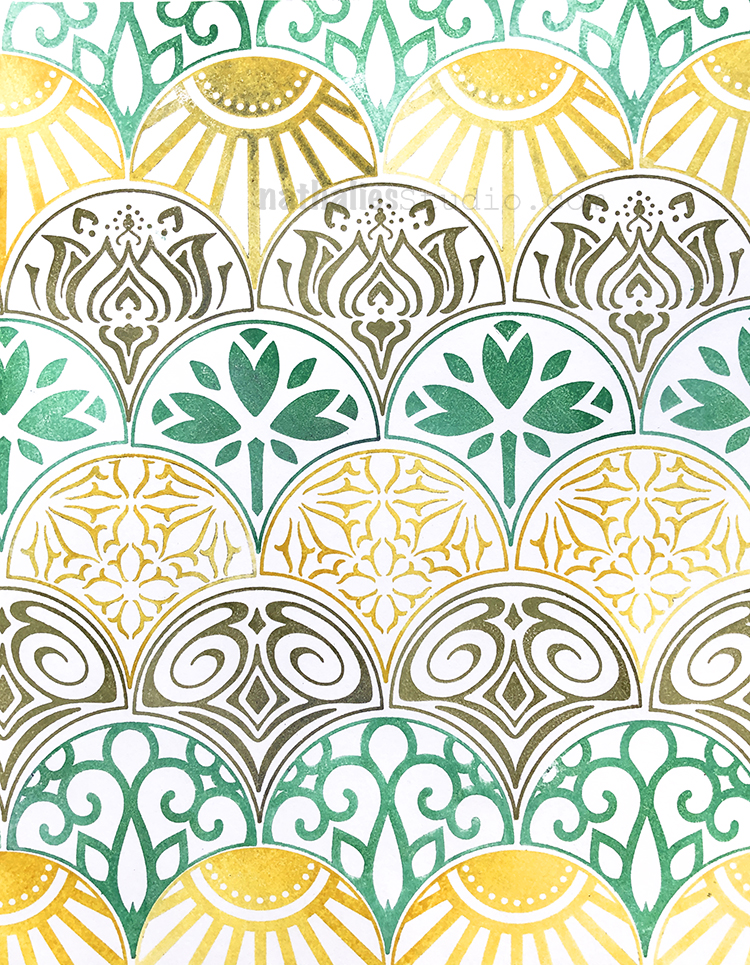
It makes me all giddy to see the Large Fan’s arranged in this colorful way. 

This is the Jewett Fan from the small set – tiled up in a classic art deco way.

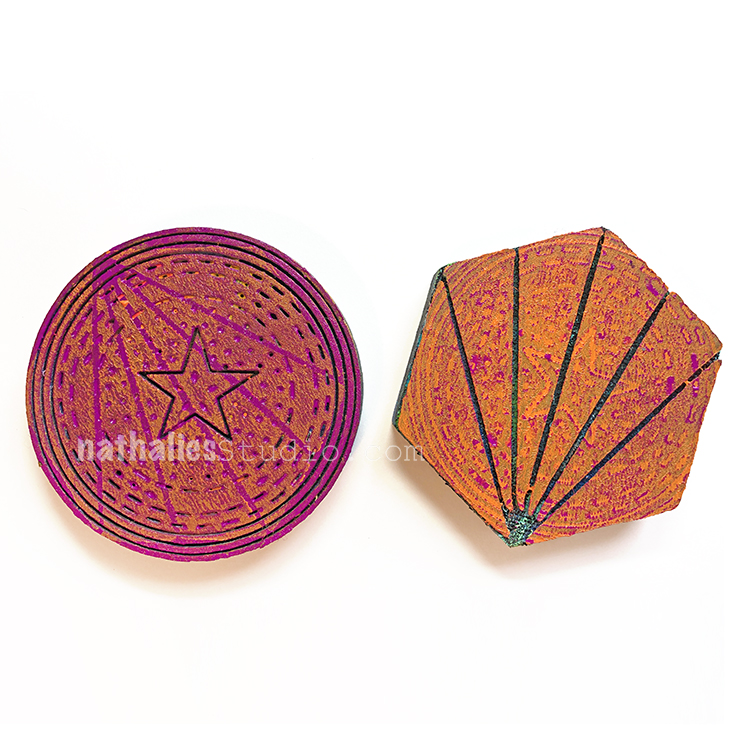
But ooooo, they can also be arranged this way! This is the Broadway Fan.

And then there are the single stamps: Solid Fan and Solid Fan small – because maybe you want to put a color under your pattern fan…

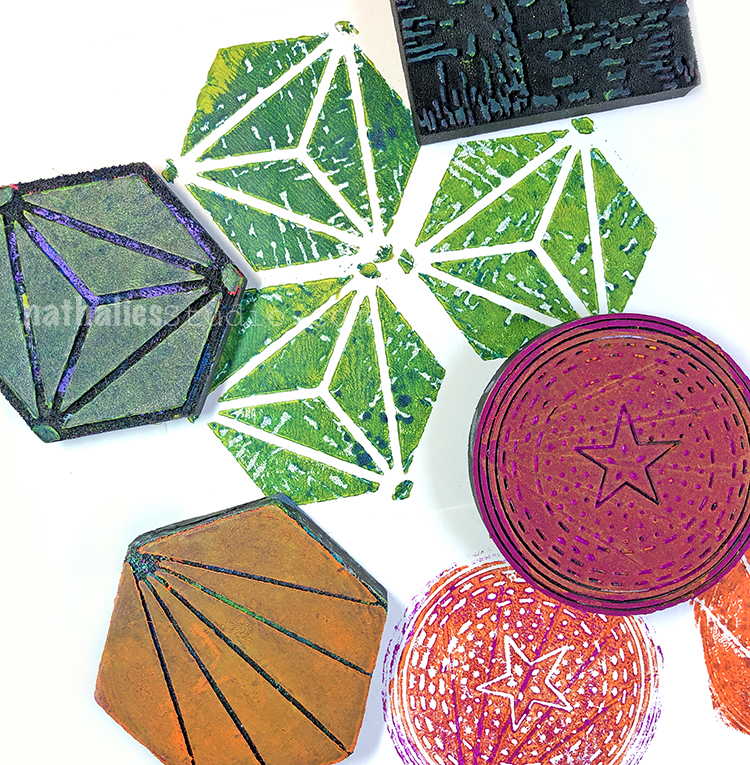
And then there is also the Fan-fare set of four mini stamps…

These can make patterns on their own and wow are there so many ways to play…

Use them all together and make some awesome patterns! I am totally smitten with these :)

Ok but there’s more:

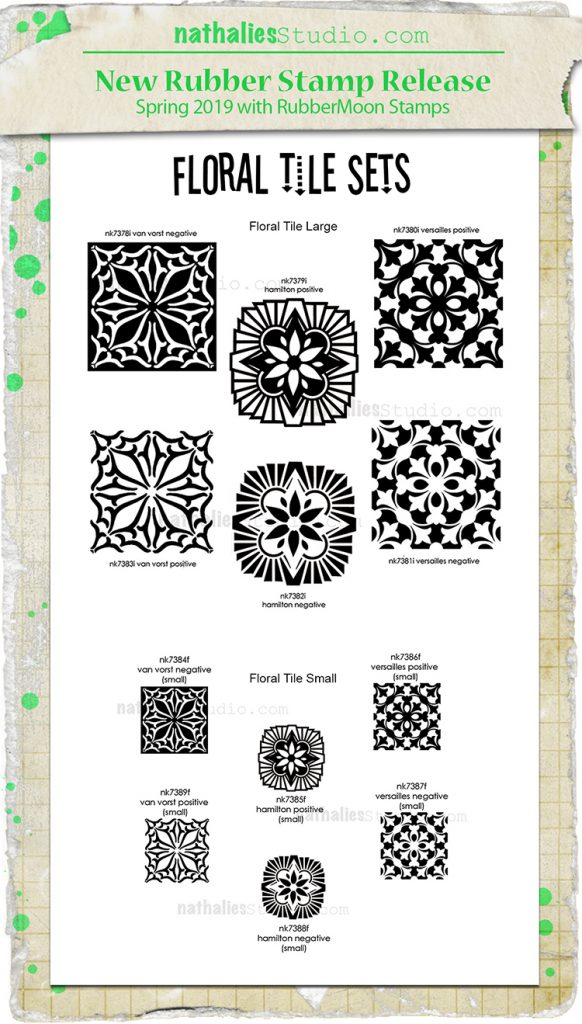
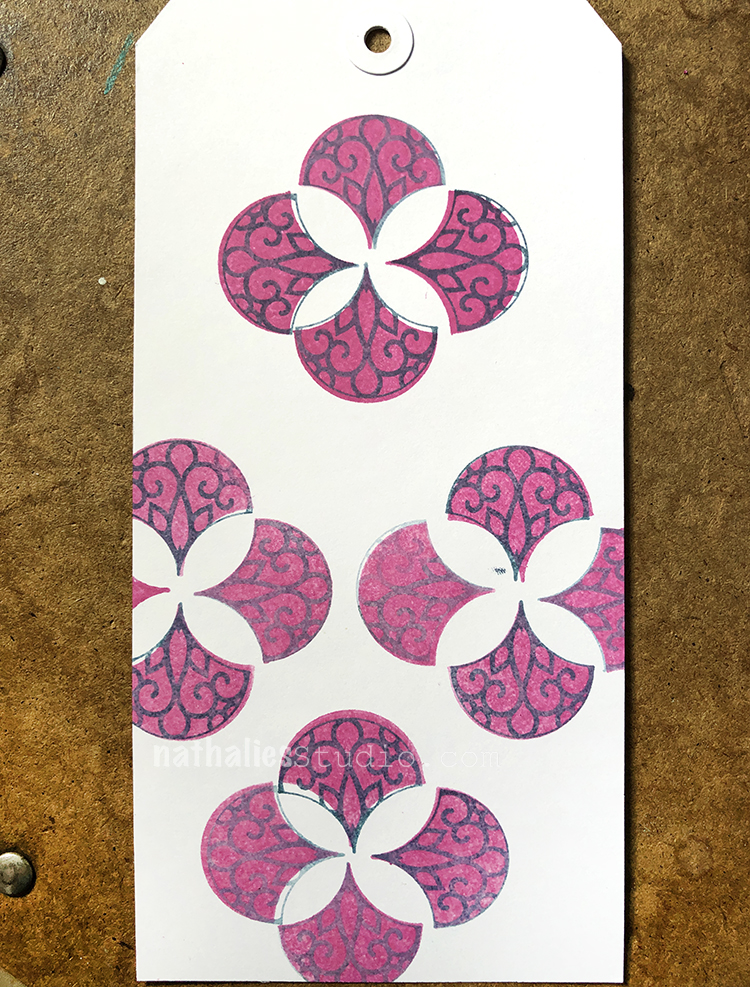
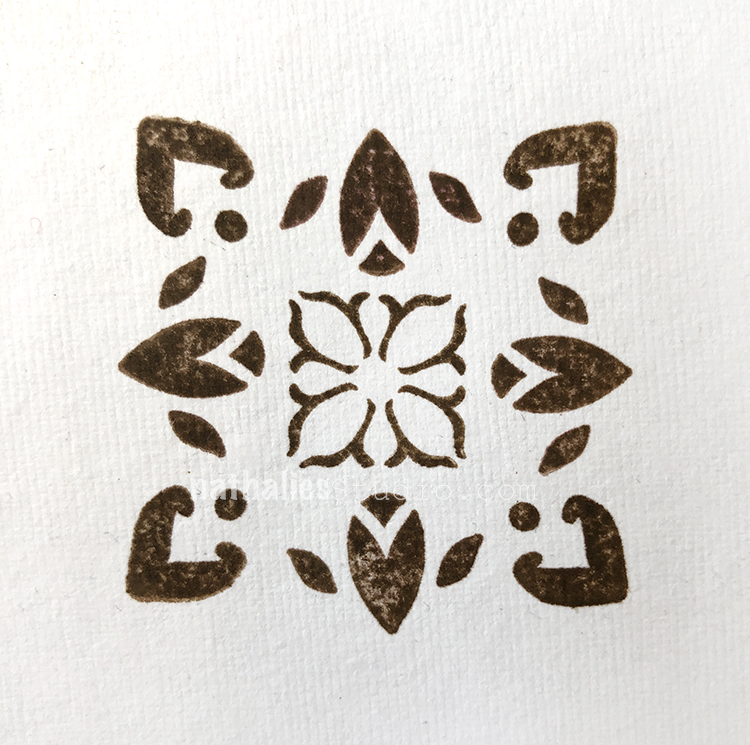
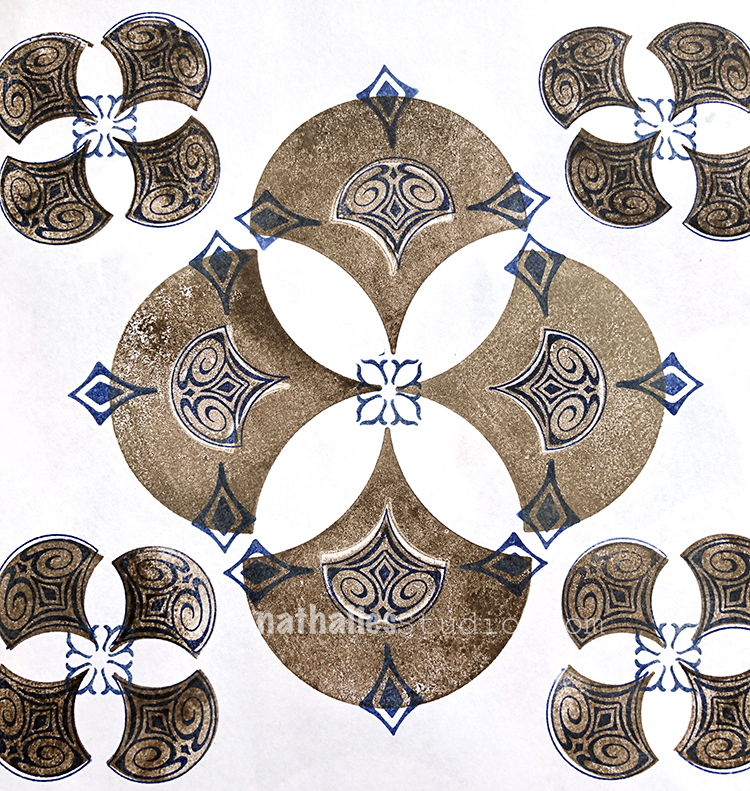
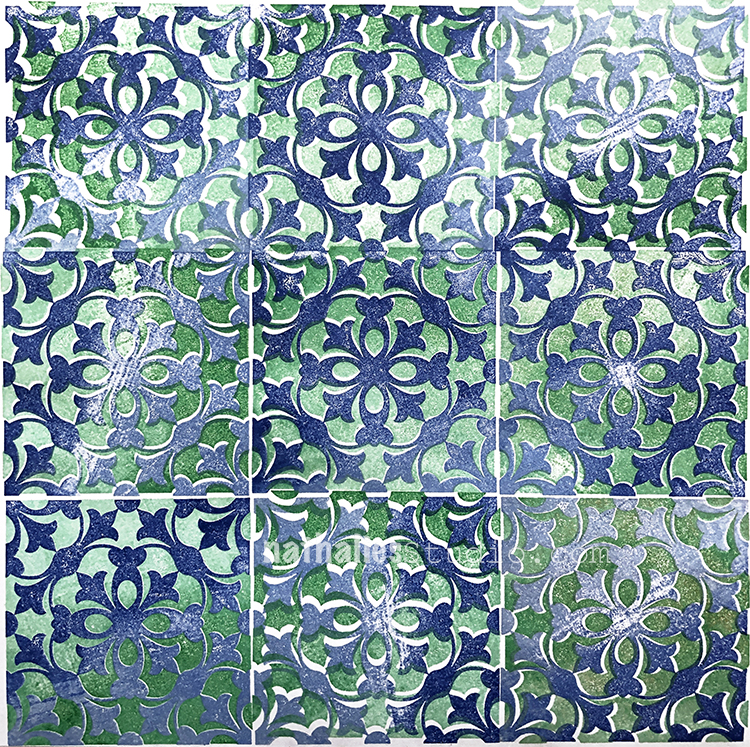
Those yummy Floral Tile Sets – one as a large one and one as a small one.

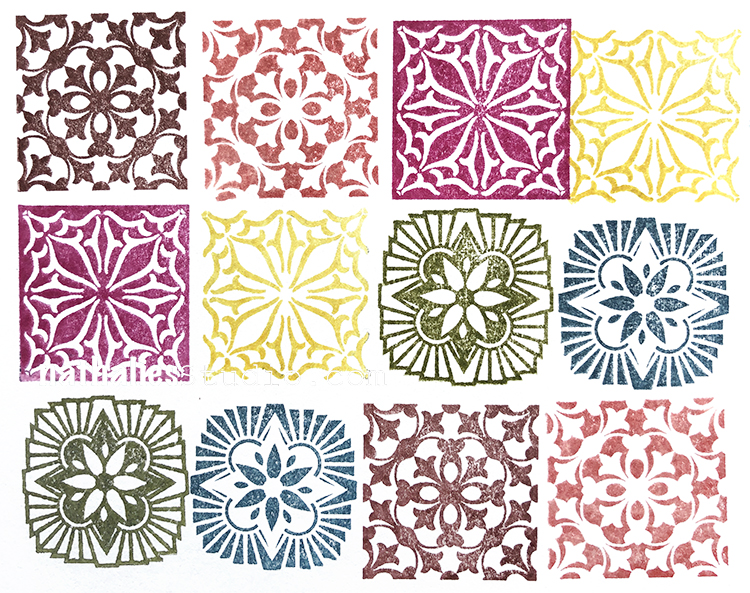
Here are the small floral tiles all next to each other

And the big positive and negative stamps used on top of each other.

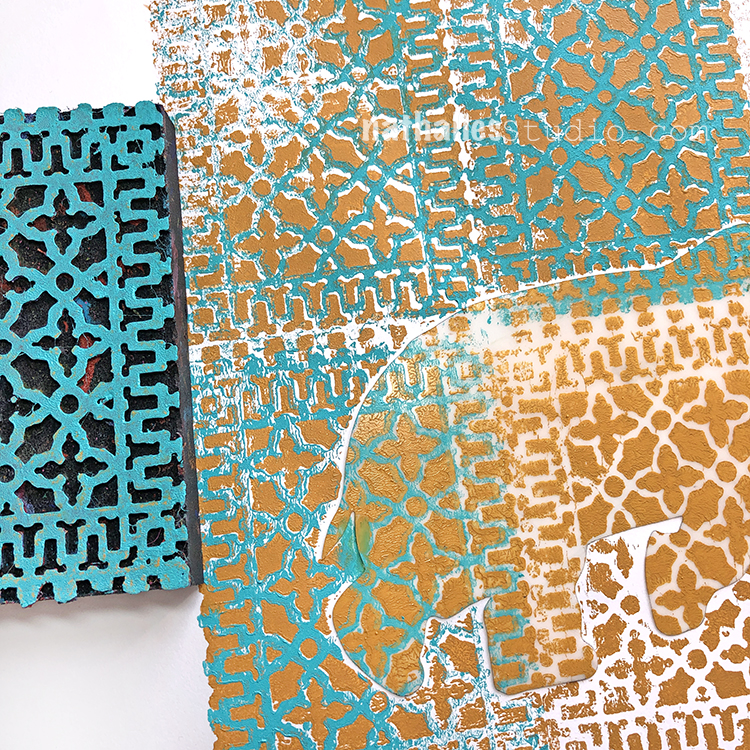
You can use them as is, with some of the Stencils I have and also with some of the foam stamps. ANNNDDD of course they can be used with the other new stamps as well :)

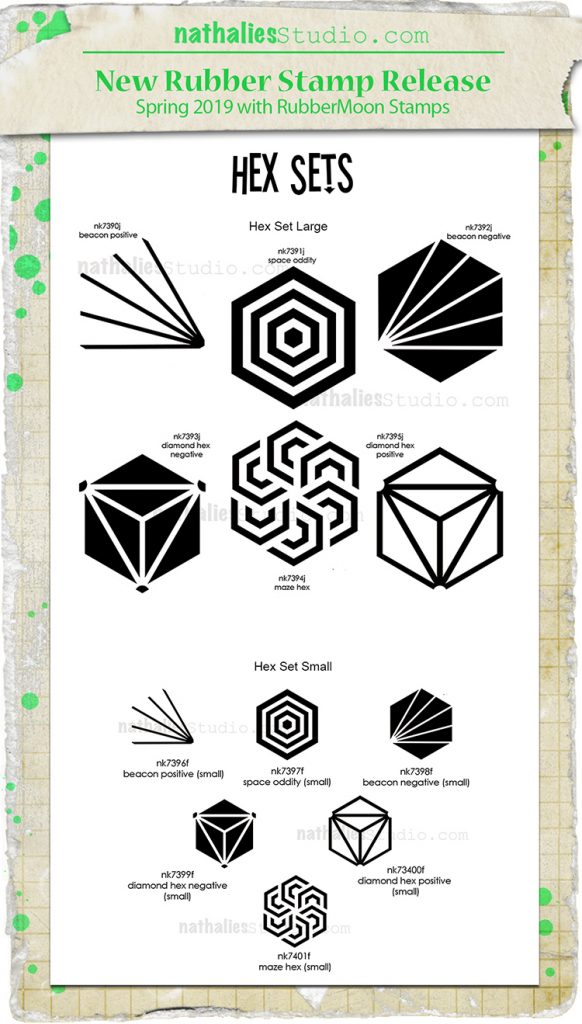
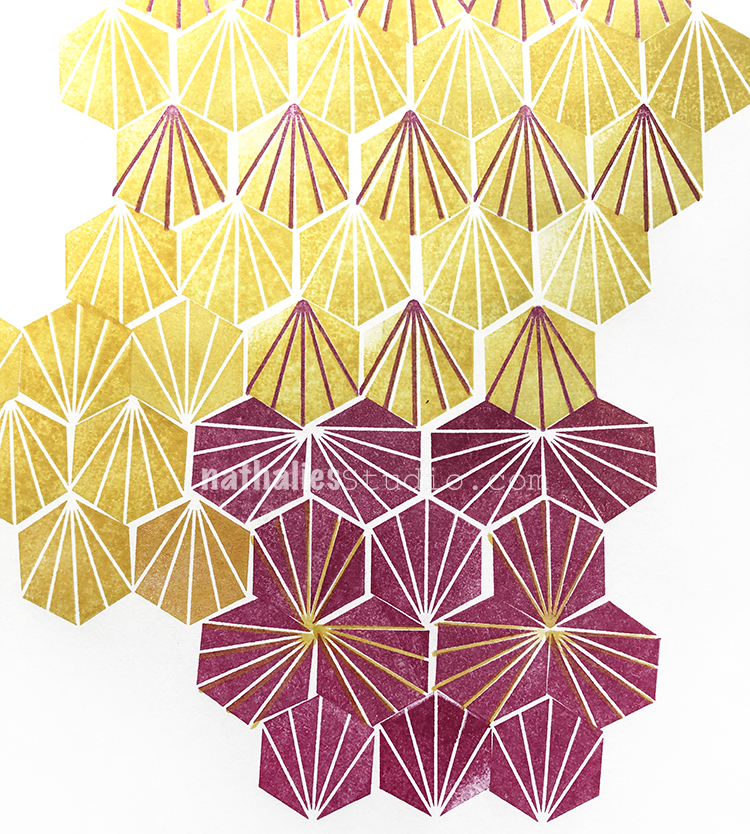
ANNNNDDD another one I am soooo excited about – the Hex Sets. Again they come as a Large Hex Set and a Small Hex Set.

This is the large Hex Set- which measures approximately 2.75″ across

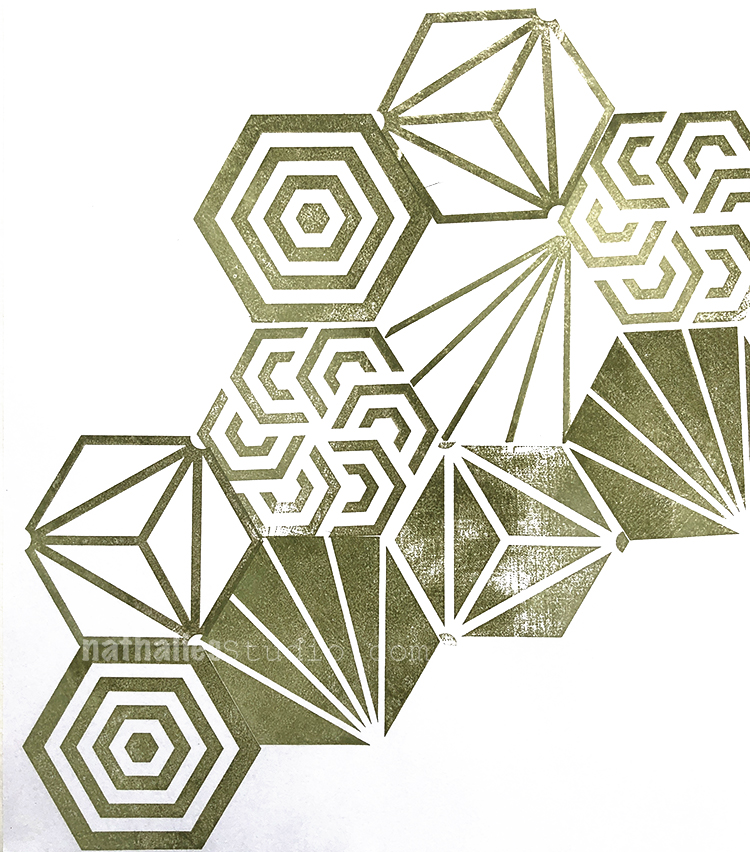
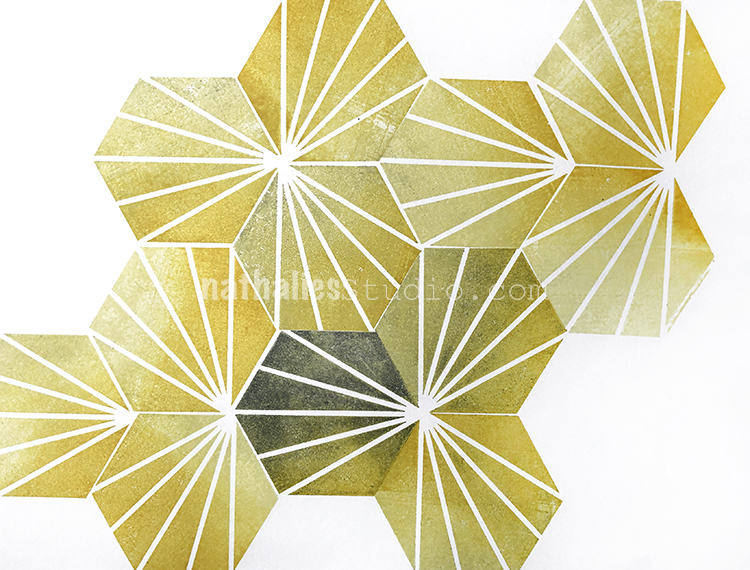
There are so many ways to use the Hexagons and arrange them to make patterns

but also to use the positive and negative patterns on top of each other

I cannot wait to show you even more of the patterns and designs you can create with those stamps! I can honestly say:

The possibilities of these stamps are limited only by your imagination

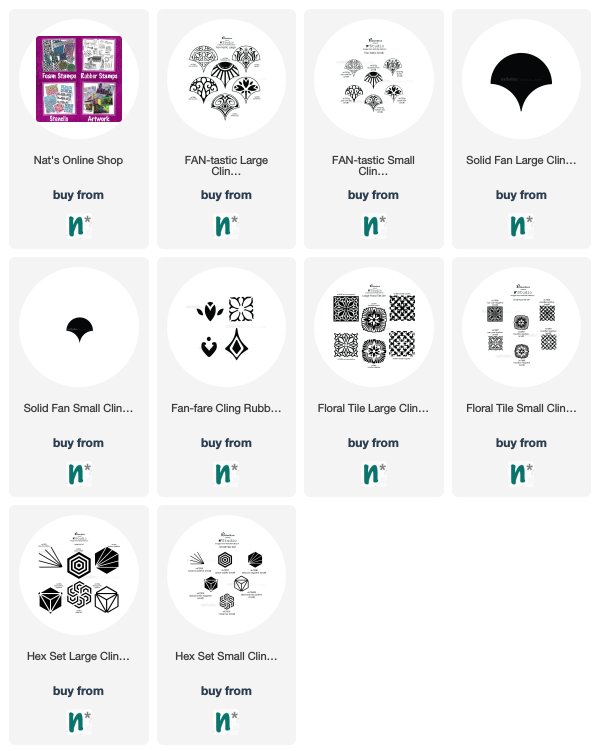
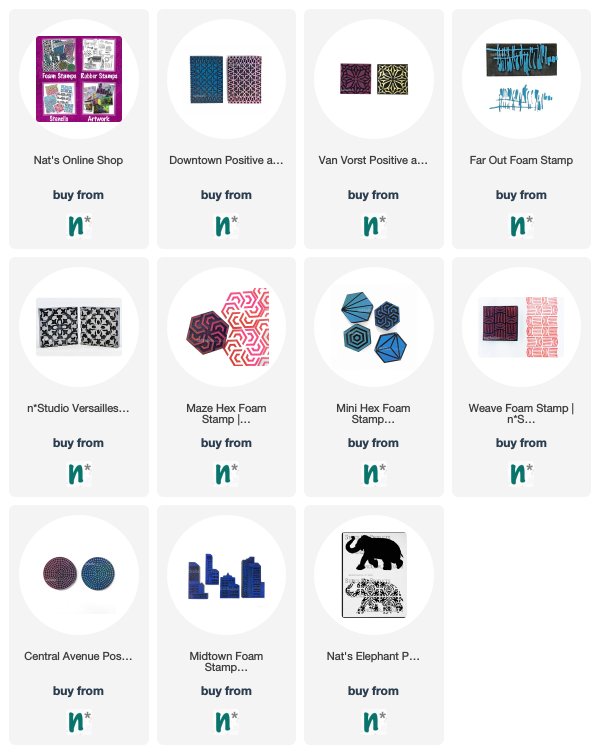
Here are all new sets now available in my store:

Comments (2)

  • Sue Clarke

    |

    Brilliant combos Nat…especially made with the fan set!

    Reply

Leave a comment

Foam Stamplifier Challenge Prompts 16-21

Day 16 – Ghost

No, no, don’t be scared- this is a friendly Ghost prompt. I love to apply paint on top of a dried paint layer and while the second layer is still wet, I take my slightly wet foam stamp and press it into the paint and lift it.

This will remove the second layer paint partly and create texture making for a subtle and nice imprint and revealing the color underneath. My favorite second color for this is white- it just gives a nice antique plaster effect.

Day 17 – Shape

Happy St. Patrick’s Day. I thought this would be a great day to amplifier your stamps using them to stamp out a shape…like a shamrock. Although …I guess I messed it up since a shamrock is a three-leaf clover ….oh well…you can tell I am not Irish- LOL – but hey, I tried.

Anyway you can use any shape of course and  you can cut it out of a piece of paper or like I do out of a piece of deli paper. Basically you are creating a stencil.

Then just fill in the opening with either one or more foam stamp patterns, and lift the stencil- the filled in area defining the actual shape.

Day 18 – Mask

Now of course you can also mask an area off and then define that area by stamping over the mask. Here I used one of my beloved Elephant Masks and my Downtown positive and negative Foam stamps.

You can easily cut out your own mask of course. And voila …there you have a it – love the background. So many options with this.

Day 19 – Spray

Another one of my super favorite foam stamplifier techniques is to use dye or ink sprays with my foam stamps.

Spray onto the stamps and print – I love the super vibrant watercolor effect this gives. So easy and yet so effective!

Day 20 – Texture

Another one of my old foam stamplify favorites. Use the spray paint we used yesterday as an embossing agent and create some nice grungy texture.

Spray your foam stamp with dye ink and stamp and while the ink is still wet sprinkle some UTEE or ultra thick embossing powder on top and then heat emboss it.

I love the raised water drop like texture this creates.

Day 21 – Brush

Using a brush to color in certain areas of a foam stamp is also a cool way to amplify the stamps.

When working with acrylic paint  you either have to work fairly quick in order to prevent the paints from drying to fast or you can use a little bit of retarder with your paints to extend the drying time a bit.

I hope you enjoyed this round of prompts. Here are the stamps I used for those:

Have you missed the prompt list? Here you go

See you tomorrow for a little Kaffeeklatsch! I’m showing off my new Rubber Stamps and chatting with you on Facebook. See you at 12noon EST :)

Leave a comment

Foam Stamplifier Challenge with the Creative Squad – Jennifer Gallagher


This month my Creative Squad is playing along with my new Foam Stamplifier Challenge: All month long you can follow my daily prompts on Instagram and on the blog to amplify your foam stamps!!! Today Jennifer Gallagher is following the prompt Spray! She’s using my Circle DriveSignals, Amsterdam, Gnarly, and Mid Century Squared foam stamps to demonstrate the art of making and using a masterboard!


All month long the Creative Squad is playing along with Nat’s Foam Stamplifier Challenge. Today’s prompt is “Spray!” So I pulled out my favorite spray inks, Dylusions ink spray by Ranger Ink, and all of my n*Studio foam stamps and got to work. This tutorial will walk you through using water-reactive spray inks and artfoamies to create a beautiful masterboard. Knowing how to create a masterboard will make quick work of backgrounds for Artist Trading Cards and Coins, greeting cards, and more.

Begin with a sheet of heavy watercolor paper. Spray a little of Ranger’s vanilla custard ink spray leaving white space here and there. Next, using Nat’s new Signals foam stamp, spray the stamp with rose quartz ink spray and press the stamp in a few places. Mist the foam stamp with a spritz of water and press it into a paper towel to remove the pink ink. Repeat the process again with laidback lilac ink spray.

Add some additional detail with Nat’s Gnarly or Mid Century Squared foam stamps by spraying it with laidback lilac and pressing it in various spots around the paper. Once dry, we can remove some of the ink to recover some white space and add additional interest by spraying the Signals foam stamp with water, gently pressing onto an area, and dabbing (don’t wipe) the water left behind with a paper towel.

Spray rose quartz ink onto Nat’s Amsterdam foam stamp and press onto the paper.

For a fun metallic flair, apply Ranger Ink Perfect Medium onto Nat’s Circle Drive stamp and Amsterdam stamp and emboss with perfect pearls in pewter and perfect bronze.

I’ve turned my masterboard into artist trading cards and coins. The possibilities are endless. I hope you’ve enjoyed this tutorial. Be sure to play along with Nat’s Foam Stamplifier Challenge and show us what you’ve created.


Thank you Jennifer – I love imagining all the possibilities for your gorgeous masterboard! You can find my Foam Stamps in my Online Shop. Here are some of the supplies that Jennifer used:


Feel inspired? I hope you join us for the Foam Stamplifier Challenge this month. As you play along, don’t forget to tag me when you share your creations – I would love to share your projects in my next  “n*Spiration From Around the Globe“.

Leave a comment

The Stencilfied Journal – Prompt 10

My wonderful friend Tina Walker is at it again – she invited several people to join her Stencilfied Prompts. The prompts are music related and each week she is posting a song. You can be inspired by the lyrics, the video, the album cover or anything related and the only restriction is that you have to use StencilGirl Product Stencils. Here is my take on Prompt 10:

This week’s prompt is Pink Floyd’s “Another Brick in the Wall” . Loved playing with my Kassel Stencil since I felt that would fit the best with the lyric part I picked.

For the first pink layer I used acrylic paint over the stencil and then for the second layer I used spray paint.

For the figure I used oil pastels – still love playing with them, it is so satisfying to play with this creamy intense colorful medium :)

Here are some of the supplies I used


Leave a comment

Currently Digging – Creative Squad Edition with Josefine Fouarge

It’s time for a special edition of Currently Digging – with my Creative Squad! Once in a while I like to share with you some nifty finds – like an Artist whose work caught my eye…, some Inspiration that got my creative juices flowing, and Tools & Techniques I am currently digging. Today we asked Josefine Fouarge from my Creative Squad what SHE is Currently Digging :) Hope you enjoy this.


Yayoi Kusama’s polka dot pumpkins are breathtaking and it gets even better when you look at them as part of her mirror room exhibition. Hundreds and hundreds of them, just mesmerizing. Some of her other pieces include huge murals that are full of texture and spikes in all sorts of shapes and sizes.

Religions based on nature: Paganism, Druidism, Voodoo, Wicca are some examples of nature-worshipping religion. I enjoy all the iconology of these religions, scanning through books that describe them, the style they are published in, etc. The images are usually eerie and full of meaning. You can look at them for a long time and always find something new. The way things are arranged on i.e. tarot cards inspire me to let my creativity flow and do what it wants to.

Torch Enamel: I just recently heard about torch enameling and was immediately hooked. I love trying new things – from blacksmithing to glass blowing – and always try to think about how to combine it with my art. Torch enameling seems to be a little bit of both worlds and it’s easy to play with the glass powder on smaller surfaces, even using existing supplies like stencils.


Thank you Josefine! I hope you all enjoyed hearing a bit more about what inspires Josefine as an artist. Stay tuned for the next Currently Digging Creative Squad edition for more from our other members :)

Leave a comment

Foam Stamplifier Challenge Prompts 11-15

Day 11 – Stencil

No surprise if you know me…I also love stencils and stencils are perfect amplifying tools for your foam stamps.

You can add paint to the solid back side of your foam stamps and then stamp through a stencil.

Lift the stencil and stamp right away again to receive a second but inverted print. You can also use foamstamps which have a more solid pattern – and stamp with the pattern side through the stencil. Another favorite of mine is to roll out a color onto the foam stamp with a more solid design and then put the stencil on top and add a different color with a cosmetic sponge on top of it.

It gives you so many more and unique possibilities with your foam stamps and for that matter also for your stencil.

Now that’s what I called amplified.


Day 12 – Pigment Ink

Love love love using my foam stamps also with pigment inks. I love how the foam creates some soft texture in combination with the inks and you can easily clean them after use with some water and a rag or a baby wipe.

Moonlight Duos by RubberMoon are a great hybrid ink and their colors are just sooo amazing. I also love using Distress Oxides and sprinkle the stamped image with water drops to lift off some of the ink with a paper towel and create even more visual texture.

So much fun and another medium you can easily use with your foam stamps.


Day 13 – Fabric

Can you say perfect relationship? Foam Stamps and Fabric love each other.

You can use acrylic paint but for fabric I want to wear or when I want to keep the fabric soft I use fabric paint. Besides using the foam stamps on a solid colored piece of fabric using it on a piece that already has a pattern is my total geek out fun.

You can use the fabric many many ways- but here…I give you my heart :)

Day 14 – Embroidery

Oomphing up your foam stamped image by adding some embroidery on top of the image is super fun! You can either just add some accents with certain embroidery stitches or fill in the actually design with satin stitches.

My Creative Squad Member Jennifer did a wonderful job creating some napkins with embroidered foam stamping and they are so beautiful. So many possibilities by combining foam stamping and embroidery.

Day 15 – Hugs & Kisses

I think the right term is stampkissing but I think Hugs & Kissing is perfectly adequate for this foam stamplifier technique. Use two different foam stamps- one that is more solid and one with a small pattern, apply different colors to each of them and then stamp them on top of each other – lift and stamp the more solid patterned foam stamp.

You can stamp off the other stamp on a different paper and get a nice color scheme. Make sure to use colors that mix well together.

I hope you enjoyed these prompts- here are the foam stamps I used for them:

In case you missed the prompt list and want to follow along – here you go:

Leave a comment

A Look Back – Cool Stuff You May Have Missed 03

A Look Back – a blog series to show you some projects and posts that you may have missed – sometimes going WAY back in the archive. I think it will be fun to revisit a few ideas that we haven’t seen for a while. I’m excited to see how a little look back might inspire something new in the future :)

This time I’m going to show posts and projects using one of my favorite tools – stencils! Here is A Look Back at some ideas. Enjoy!


First up is a classic – use your stencils with acrylic paint! But wait, there’s more: in this Art Journal spread I chose to use 2 different stencils that have the same pattern but in different scales: my Amsterdam 9×12 and my Amsterdam 6×6 stencils for an all over background. It is a subtle variation that gives more push and pull in the background.

How about taking your stencils and using them on fabric items? I did that here (in 2013 wow) with my Elephant March stencil, some acrylic markers, and acrylic spray paint on what we Germans call a “Heel Porsche.” Stencils are a great way to personalize everyday items.

Embossing paste is another fun medium to use with stencils. In this art journal spread again from way back, I used my Circuit stencil and some shimmery gold embossing paste to start the page and then added and subtracted inks overtop. You can gently wipe away the inks on top and reveal the embossing paste. And it has nice texture. Win win.

How about a little subtraction? Here I created a pan pastel background and then used my What’s the Point stencil and erased through it for some nice dots here and there. I love the softness of this technique.

And then I took the same What’s the Point stencil and embellished onto it with some acrylic markers for this art journal spread. Once you have the stencil pattern down you can jazz it up in all sorts of ways. So many options!!!


I hope you enjoyed A Look Back through my archive and maybe you are inspired to try some of the stenciling techniques I shared.

Here are some of the supplies that were used in these pieces:


Leave a comment

The Stencilfied Journal – Prompt 9

My wonderful friend Tina Walker is at it again – she invited several people to join her Stencilfied Prompts. The prompts are music related and each week she is posting a song. You can be inspired by the lyrics, the video, the album cover or anything related and the only restriction is that you have to use StencilGirl Product Stencils. Here is my take on Prompt 9:

This week’s prompt was Hotel California by The Eagles. I had fun playing with my Manhattan Stencil on a small gelli plate – using the plate to stamp into the art journal.

I sketched the figure over the background and then painted him partly in with Inktense Blocks- I love how the stenciled areas areas creating a pattern and texture for the clothes.

Here are the supplies I used for this prompt:


Leave a comment